12.2.0 - Release notes
Questionnaires in Automated Email Workflows
We're making it easier to collect valuable insights at the right moment with a new way to integrate questionnaires into your Automated Email Workflows. With this update, you can now add direct links to questionnaires inside automated emails, making it seamless for participants to provide feedback, submit requests, or share information - right from their inbox.
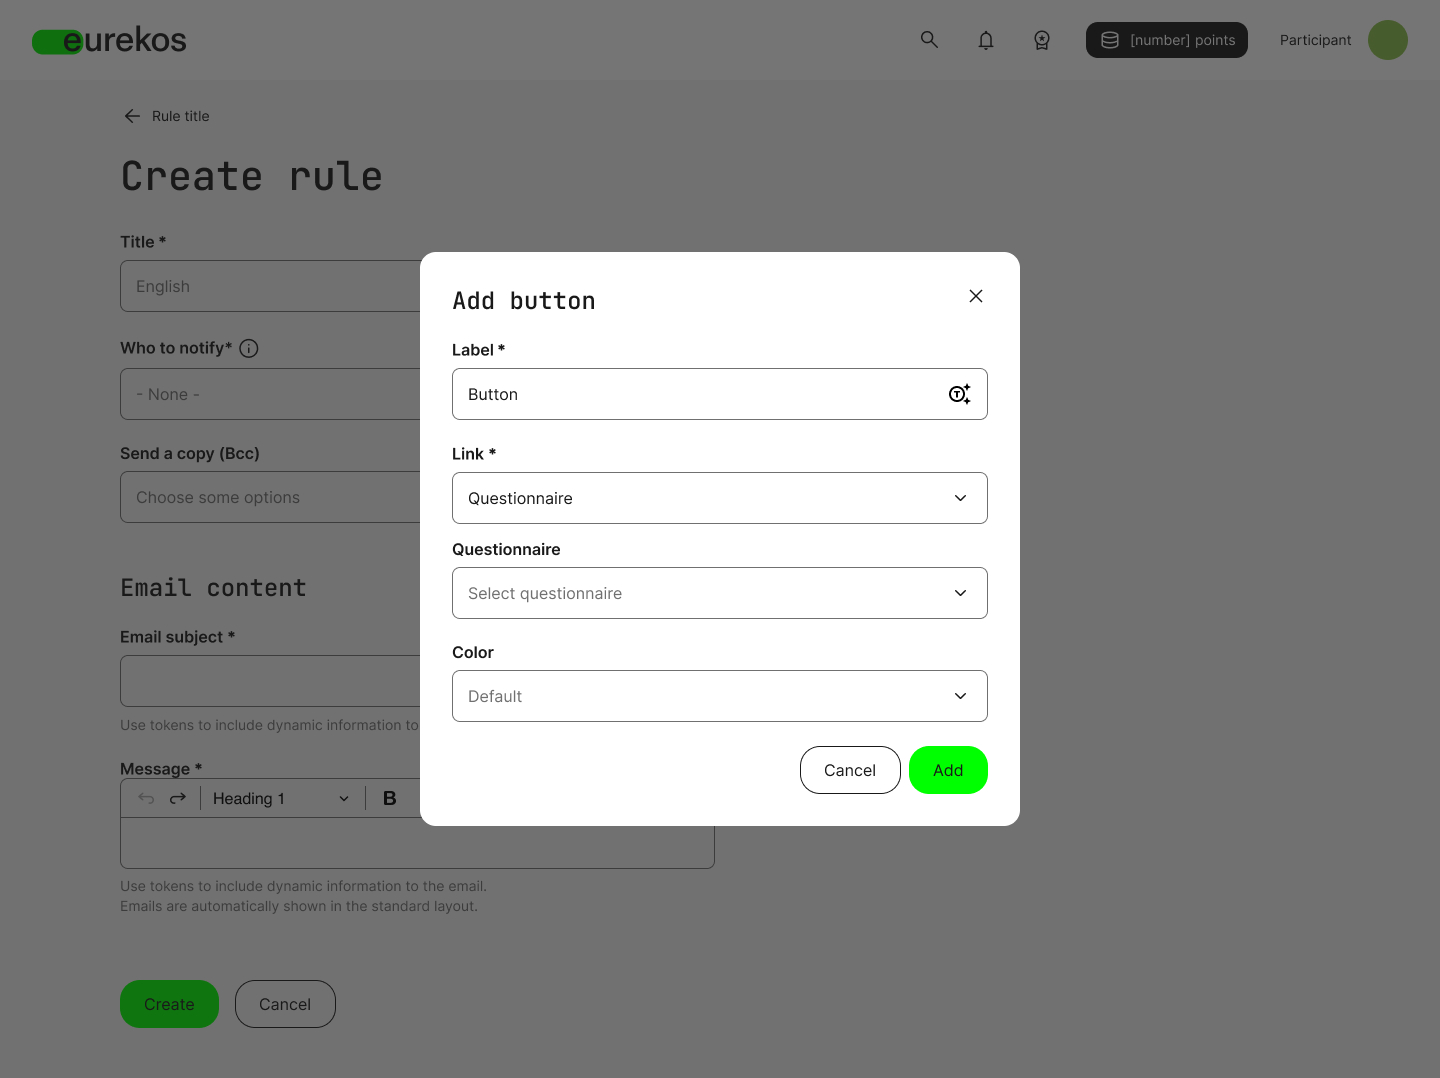
When creating an email rule within a workflow, you can:
- Insert a button into the email body
- Select "Questionnaire" as the button link type
- Choose the relevant questionnaire from a dropdown list of all questionnaires in Eurekos
- Customize the button's label and colors
Participants will be required to log in to complete the questionnaire. However, if you prefer to send an anonymous questionnaire without login requirements, you can do so by linking the button to a URL instead. Simply generate the anonymous link from the questionnaire overview using the "Copy link" option and insert it as the button URL.
Option to add buttons in Automated Email Workflows that link to a questionnaire.
Introducing Conditional Questions in Questionnaires
We’re introducing Conditional Questions in the questionnaire tool, allowing you to create dynamic, responsive questionnaires tailored to each participant’s input. This enables you to customize the flow of your questionnaires based on the responses to previous questions.
For example, if a user indicates that they work in healthcare, you can ask specific questions about their role and specialty. If they don't, those questions are skipped entirely. This can help participants only see what's relevant, making the questionnaire more engaging and enjoyable.
Here's how to set it up:
- Set up your questionnaire with all necessary questions.
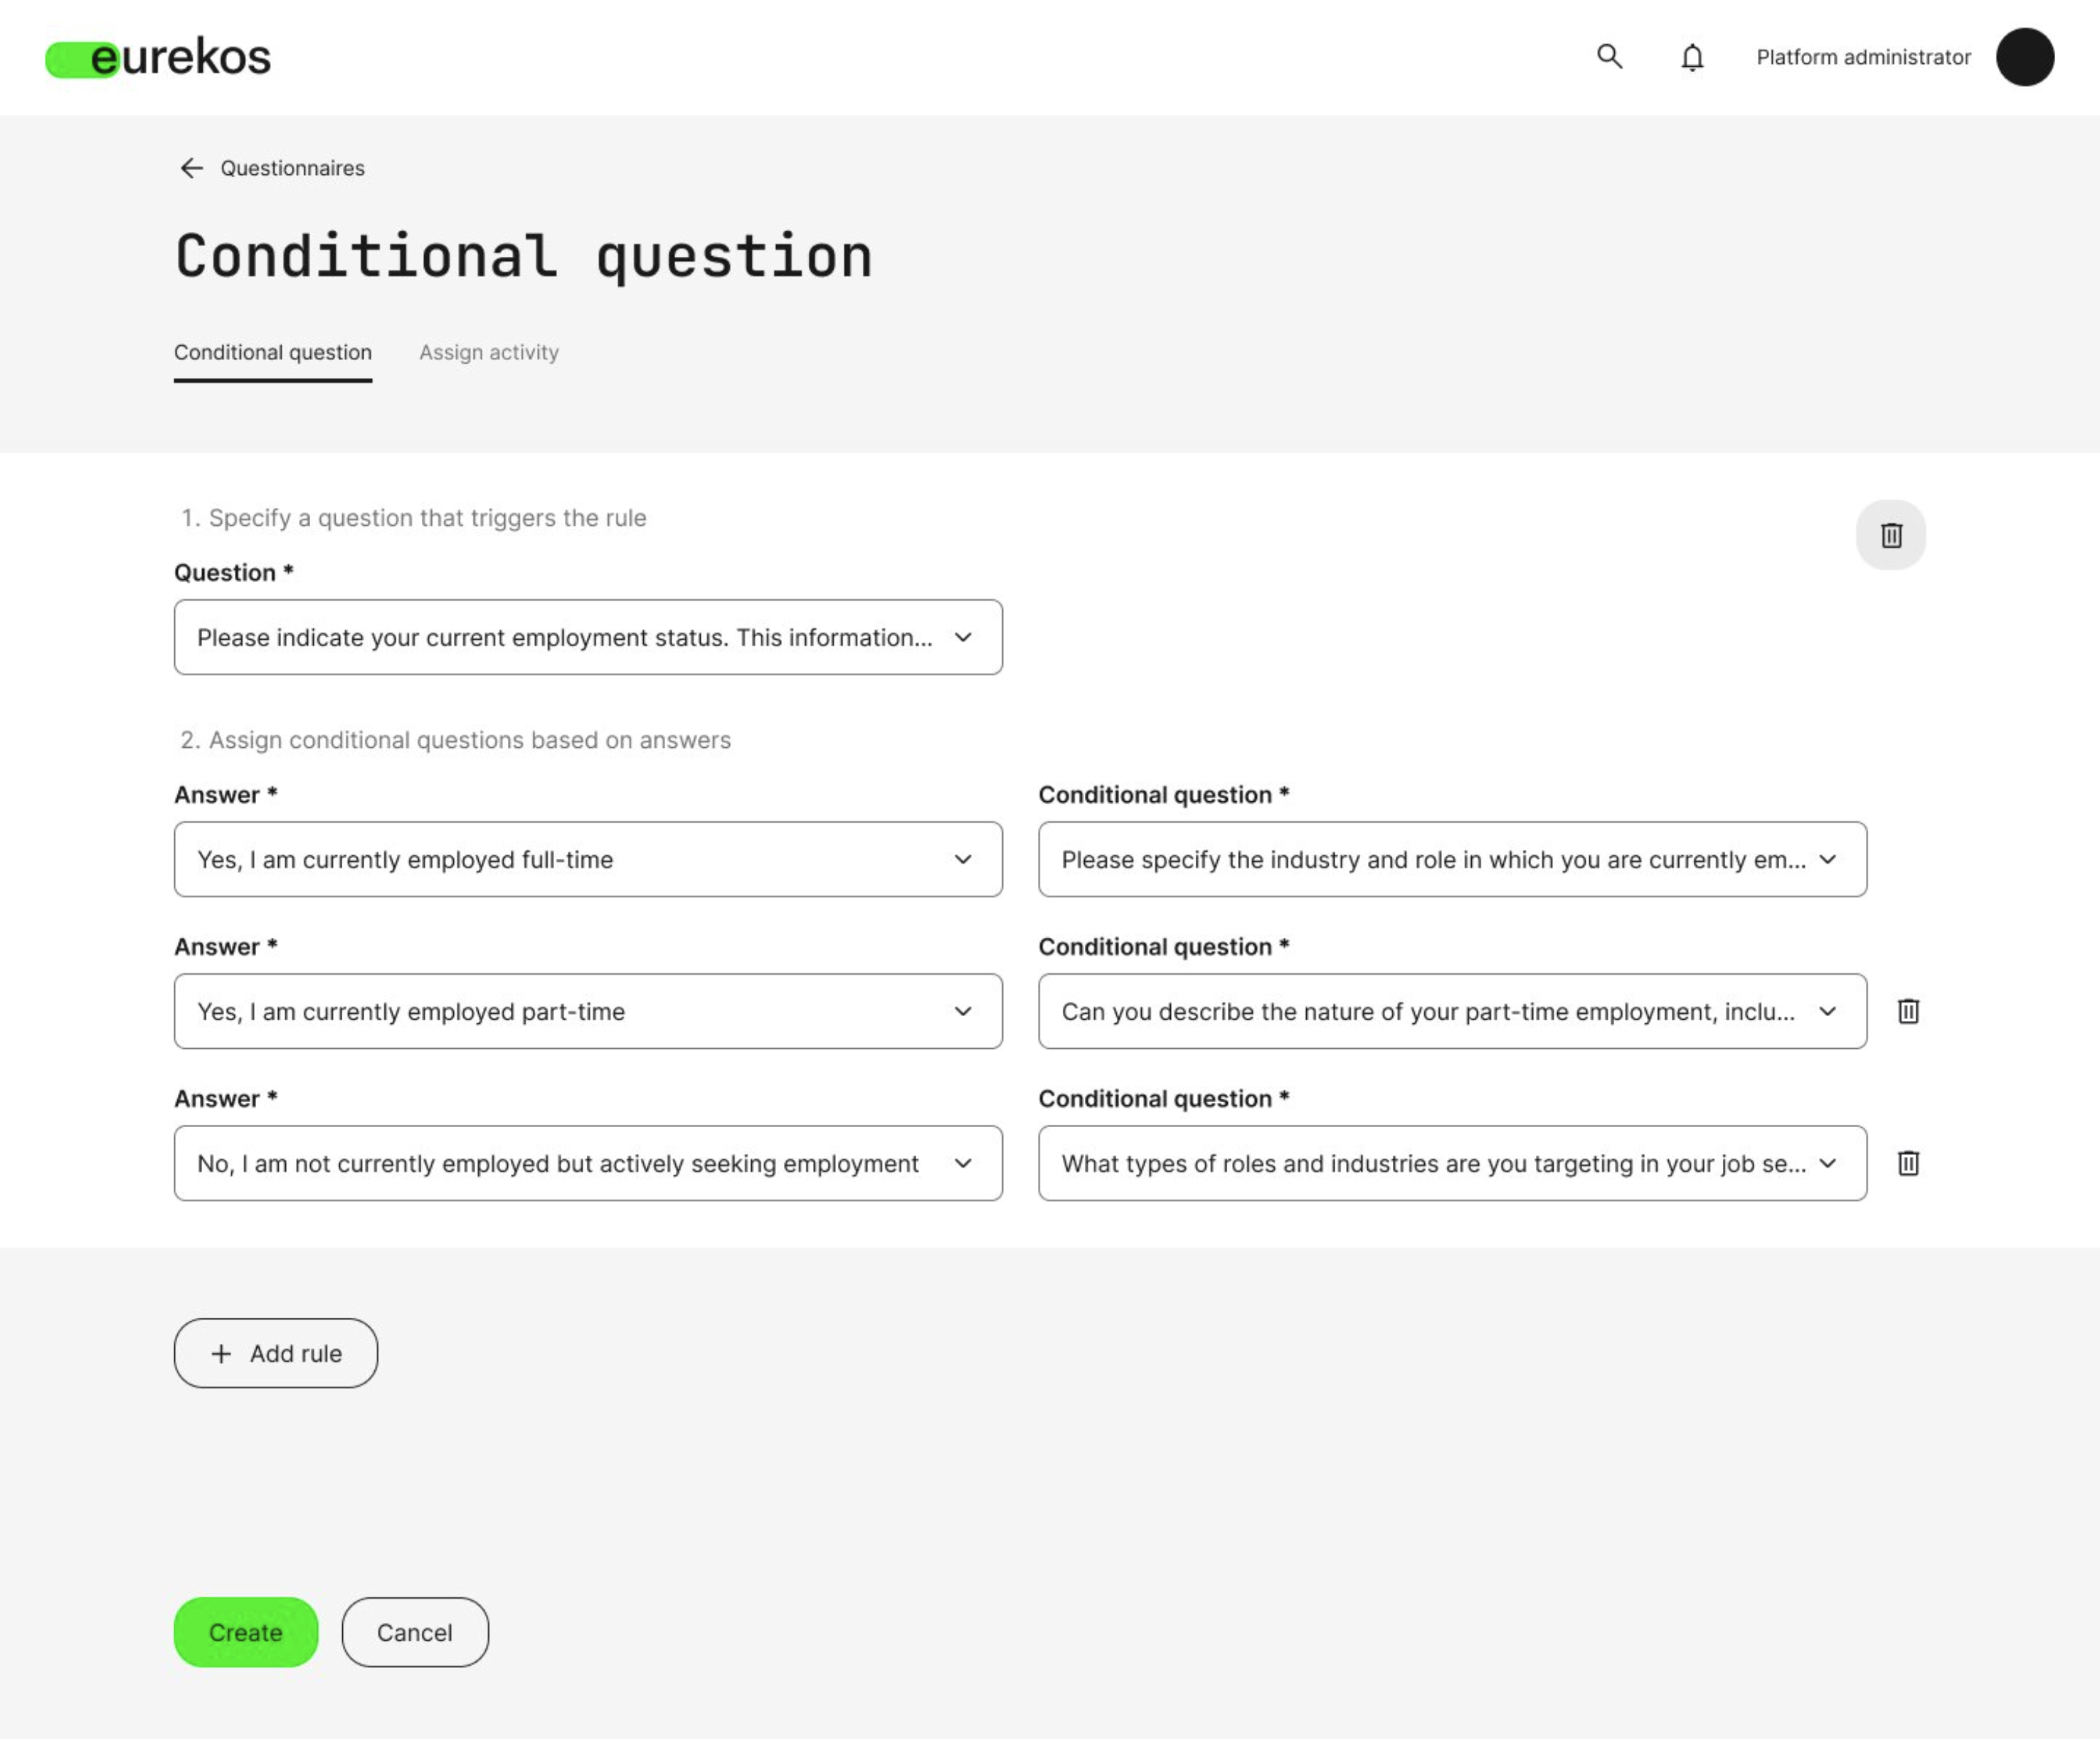
- From the questionnaire overview, select "Create rules" for the questionnaire you want to modify.
- Navigate to the "Conditional questions" tab.
- Click "Add rule".
From here, you first choose the trigger question - the question that determines whether a follow-up appears. Then you select the response option that will trigger a conditional question. Lastly, you pick the conditional question that should be displayed when that response is selected. The trigger question works with any question type that has answer options.
Set up conditional questions that only appear when a specific response in a trigger question has been selected.
Remember to test your questionnaire
Before going live with your questionnaire, it's a good idea to test the conditional logic and ensure all rules work correctly. You can do this directly from the questionnaire overview by clicking "Preview".
Participation Approval: Improved Request Management & Approver Flexibility
Managing participation approvals for your training activities just got easier. With this update, we’re enhancing the participation approval process to give you more control and flexibility when reviewing enrollment requests—whether for instructor-led training, certification programs, or any activity requiring approval before participation.
Participation Approval can be enabled for your self enrollment activities, allowing administrators and anyone assigned as approver access to a dedicated enrollment requests page to review and manage participant requests.
Bulk operations for faster request management
Now, you can manage large volumes of enrollment requests more efficiently with bulk operations. Approve, decline, or categorize multiple requests at once by selecting users with the multi-select checkbox, applying the desired status, and processing them in a single action.
Assign any user as an approver
We’ve also made it possible to assign any user as an approver for enrollment requests, regardless of their system role. Once assigned, approvers will see a new “Enrollment requests” menu in the platform, where they can access the enrollment request page for all activities they're assigned as approvers of - if the user already has access to Course Administration, they can navigate to it from there.
New column for "Other requests"
The enrollment requests page now includes an “Other requests” column, giving administrators immediate insight into whether a participant has previously requested enrollment in other training activities. If they have, a quick-access button opens a detailed view of their request history—including approved, declined, and canceled requests—along with direct links to the associated training activities.
To protect user privacy, participants assigned as approvers will not have access to request histories.
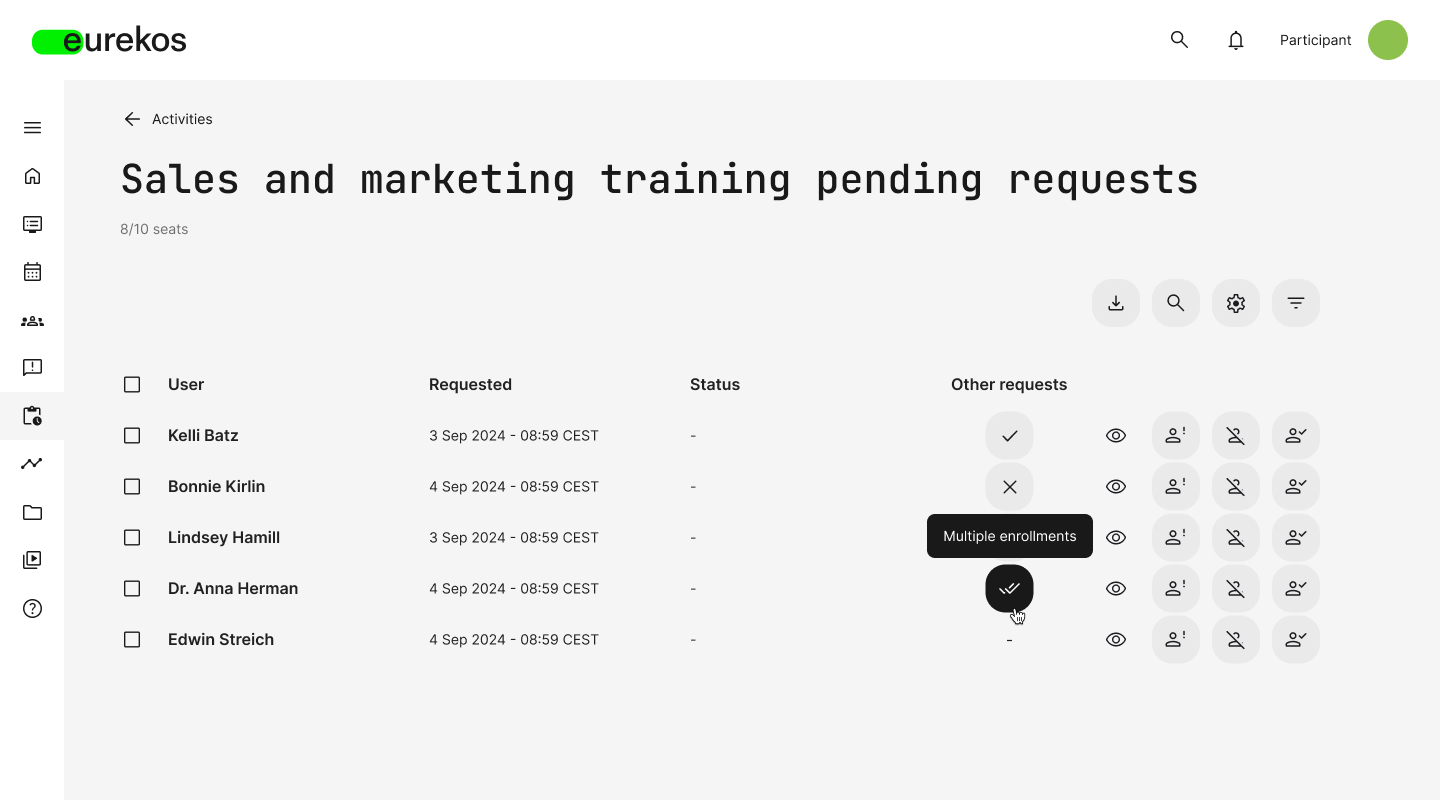
The enrollment requests page, where approvers can review and manage requests.
Incentives Without the Native Shop
We’re making Incentives more flexible by allowing you to run rewards programs without the logistical complexity of managing a shop. Previously, points earned through Incentives were tied to a native shop where users could redeem them for physical products. Now, you can enable Incentives without the shop, allowing users to accumulate points, track their progress on leaderboards, and engage in friendly competition—without the need to manage product inventory or shipping.
Incentives is a gamification feature allowing you to reward user engagement with points based on platform activities such as completing courses, passing assessments, or earning certificates. These points can be used to rank on leaderboards, and—if enabled—be redeemed for rewards in a native shop.
Configuring Incentives in General Settings
When enabling Incentives, you can configure the following settings:
- Enable at platform or organization level - Choose whether Incentives apply platformwide or for specific organizations only.
- Enable leaderboards - Display rankings based on accumulated points.
- Enable the native shop - Allow users to redeem points for products.
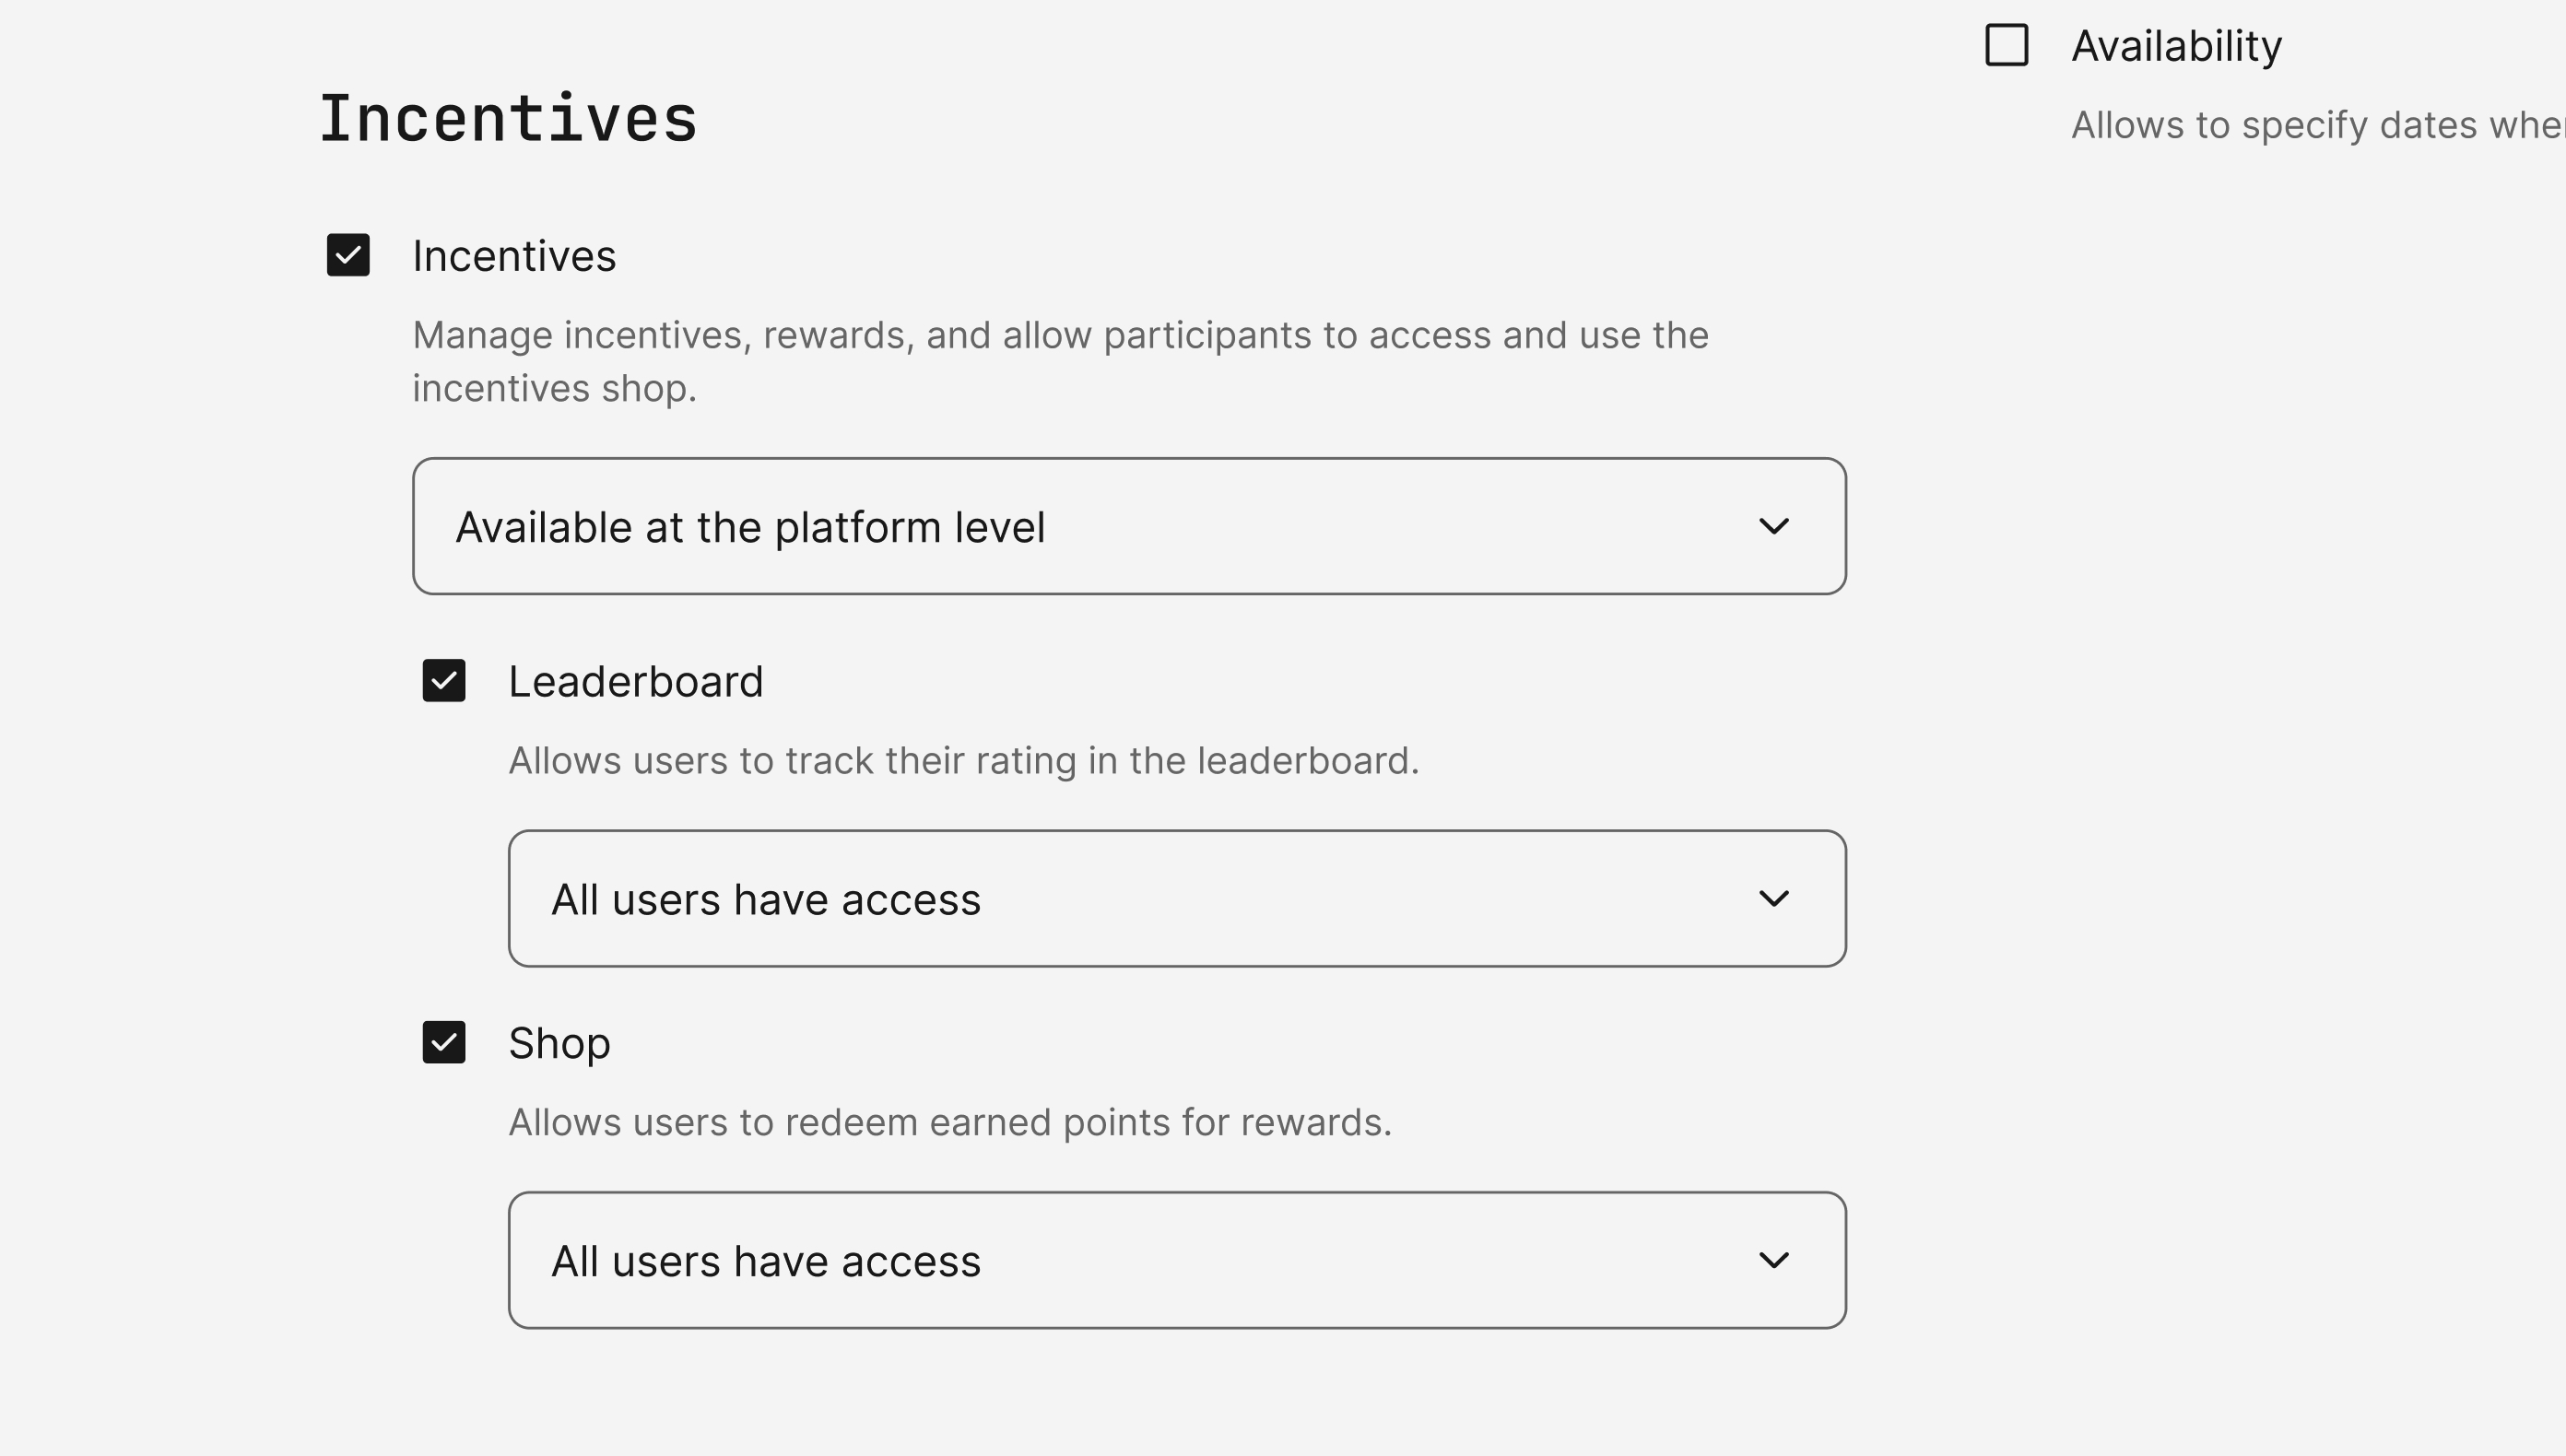
Incentives configurations available in the General Settings.
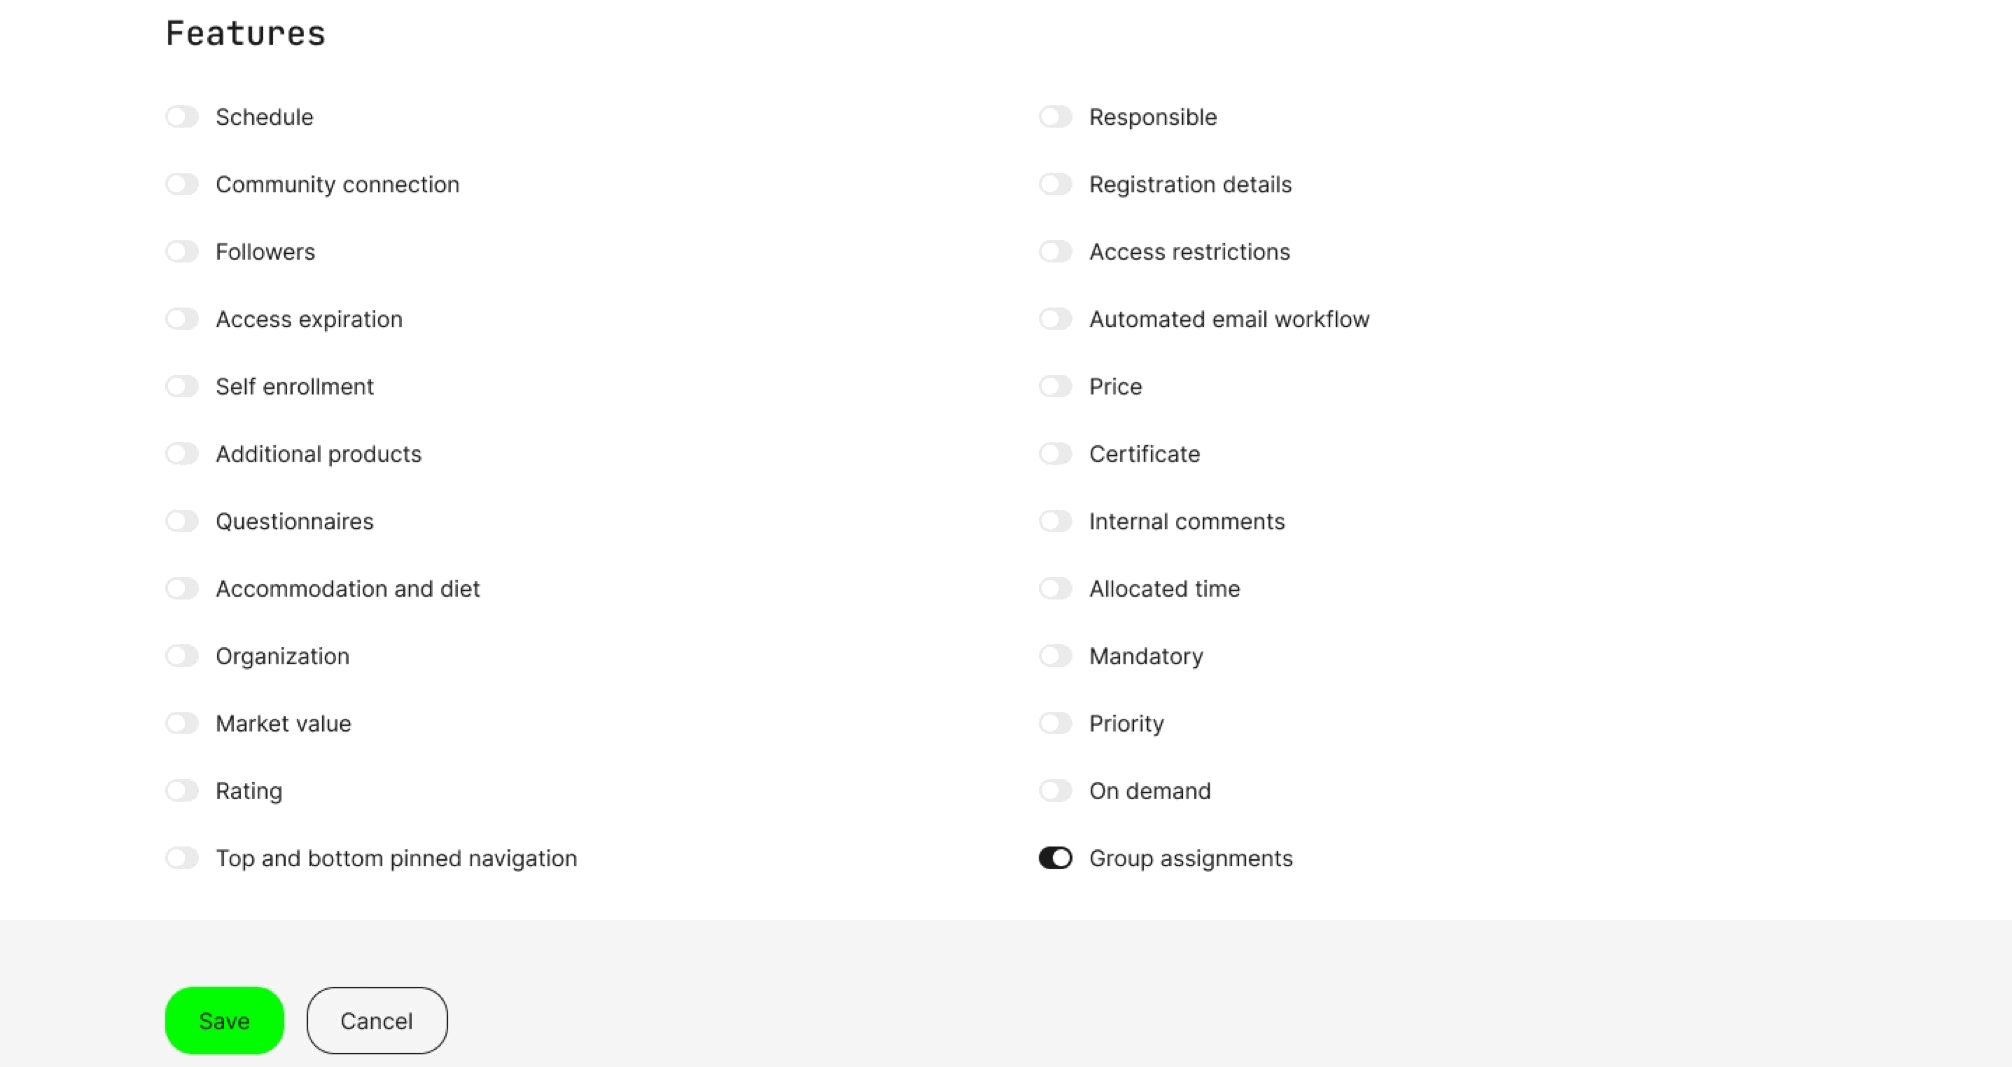
Group Assignments
We’re introducing Group Assignments, a new feature that allows participants to collaborate on assignment submissions within designated groups. This is especially useful for team-based projects, peer collaboration, or structured learning activities where multiple participants need to contribute to a shared submission.
Enabling Group Assignments & managing groups
Before participants can submit assignments as a group, Group Assignments must first be configured on the activity. Here is how to do it:
- Navigate to the activity page in edit mode and enable Group Assignments in the activity settings - then click save.
- Once enabled, a "Groups" button appears on the activity page. Clicking this opens the groups management page, where groups can be created and managed.
- From this page, you can create a group and give it a title, as well as an optional description and banner image.
- You can assign participants to groups, selecting from a list of all enrolled participants. Bulk operations and the option to filter participants from this list allows you to identify the right participants and assign them at once.
- Users can only belong to one group at a time. New participants must be manually assigned to a group upon enrollment.
If participation approval required users to submit a questionnaire, their responses can be viewed from the enrollment list. Filters can be applied to sort participants based on responses, and additional columns can be added to compare specific questionnaire answers.
Configuring assignments for groups
Once Group Assignments is enabled for an activity, assignment modules within that activity can be set as group assignments by selecting the “Group Assignment” checkbox in the module settings. This means that all group members are linked to the same assignment submission and submit collectively.
The flow of enabling Group Assignments, creating groups, and assigning enrolled participants.
Participant submission flow
Once assigned to a group, participants can access the Assignment module from their dashboard and start working on the submission.
- Any group member can draft, edit, and submit the assignment on behalf of the entire group.
- Drafts can be saved, with an option to notify group members of changes.
- Once submitted, all group members receive a notification with a link to the final submission.
If a participant is removed from a group, they will lose access to the submission. Conversely, if they are added to a group that has already submitted, they will inherit the group’s completion status and assessment. Participants who are not yet assigned to a group can view the assignment page but cannot submit. Instead, the "Create Submission" button is disabled with a tooltip explaining that they must be assigned to a group first.
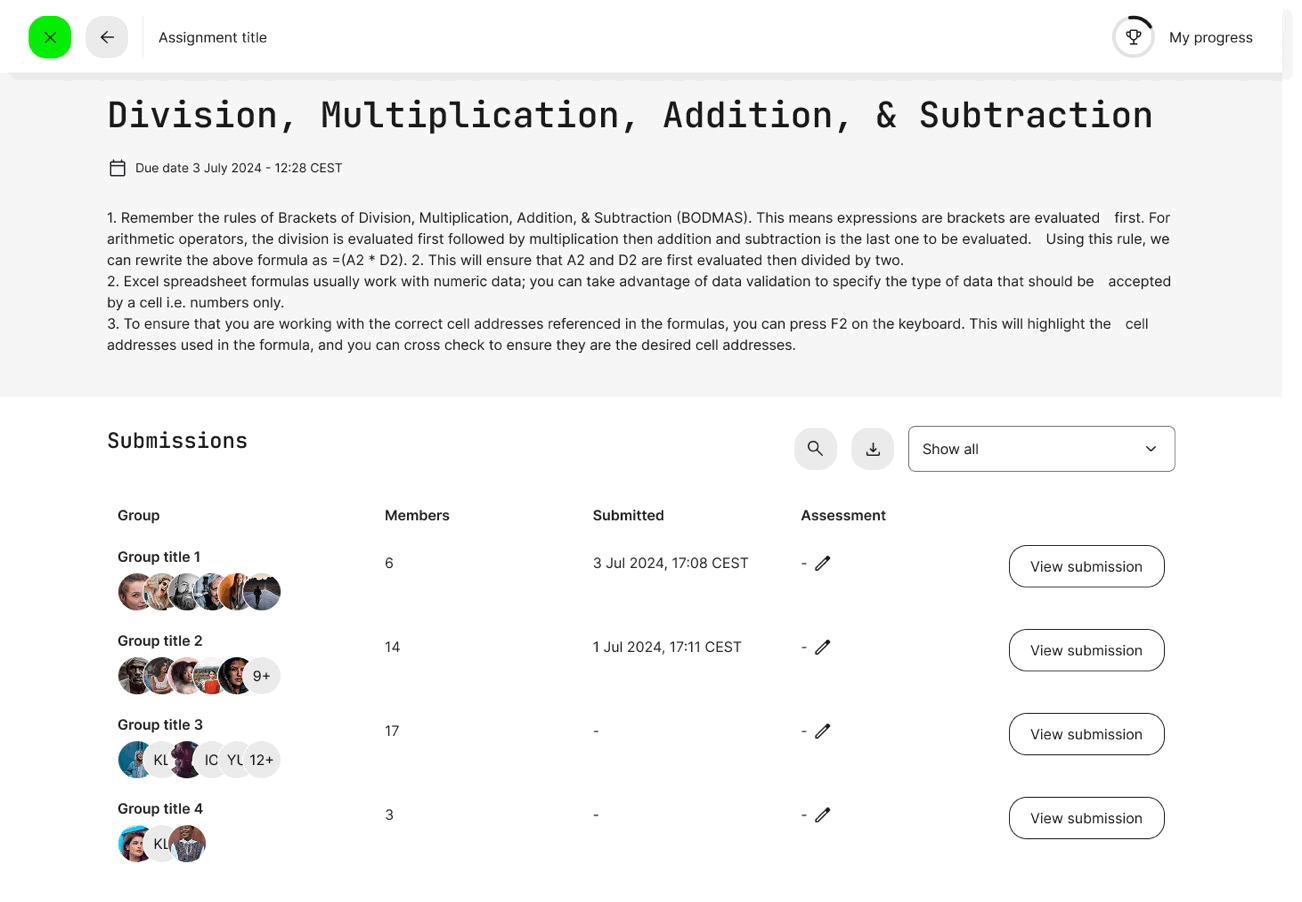
Instructor review & grading
Instructors can review and grade group assignments from the assignment page, where they can:
- Access and assess all group submissions in one place.
- Assign Pass/Fail with the option to grade the submission on a 1-10 scale.
- Notify all group members when the assessment is complete.
Please note that the 1-10 grading scale is now also available for individual, non-group assignments.
Instructor review and assessment flow of group assignments with option to grade submissions on a 1-10 scale.