13.0.0 - Release notes
We’re excited to unveil Release 13.0.0, a major platform update focused on AI-driven learning experiences, enterprise subscription capabilities, platform extensibility, and overall user experience.
These release notes in the article below provide a structured overview of all new features, improvements, and important changes included in this version. If you prefer to review the release notes offline, you can download the full PDF version here: Download Release 13.0.0 – PDF
Chapter
1
AI & Intelligent Services
In this chapter:
| Artificial intelligence is becoming a core enabler of modern learning experiences - not just as a productivity tool, but as a driver of engagement, discovery, and personalization. With this release, we introduce two powerful AI-powered add-on services designed to enhance how learners interact with content and how organizations unlock the full value of their learning assets. From conversational guidance across your entire platform to automated video transcription that improves accessibility and searchability, these services strengthen both learner experience and content performance. Together, they represent an important step toward a more intelligent Eurekos platform - where learning content is not only delivered, but actively surfaced, connected, and contextualized |
AI Learning Assistant
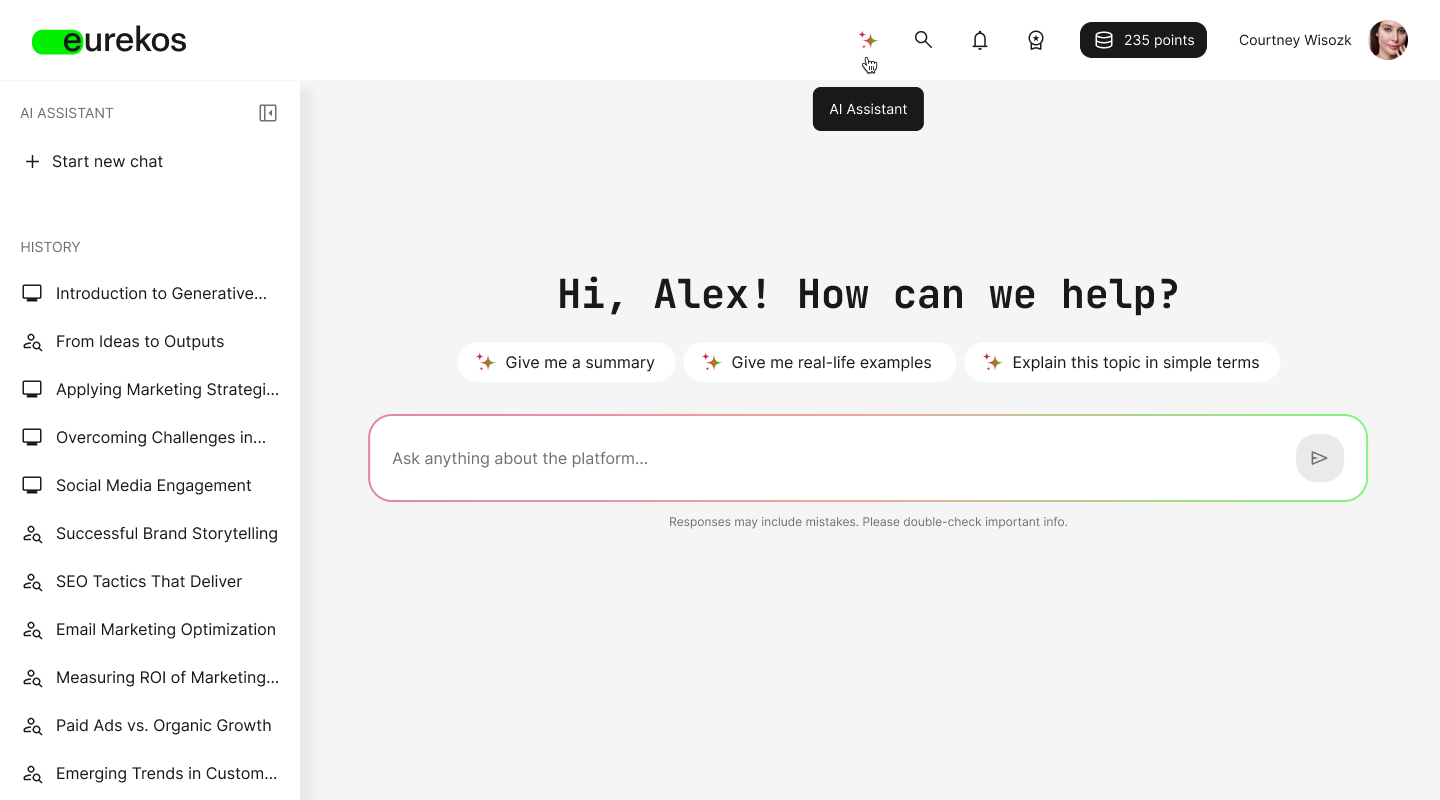
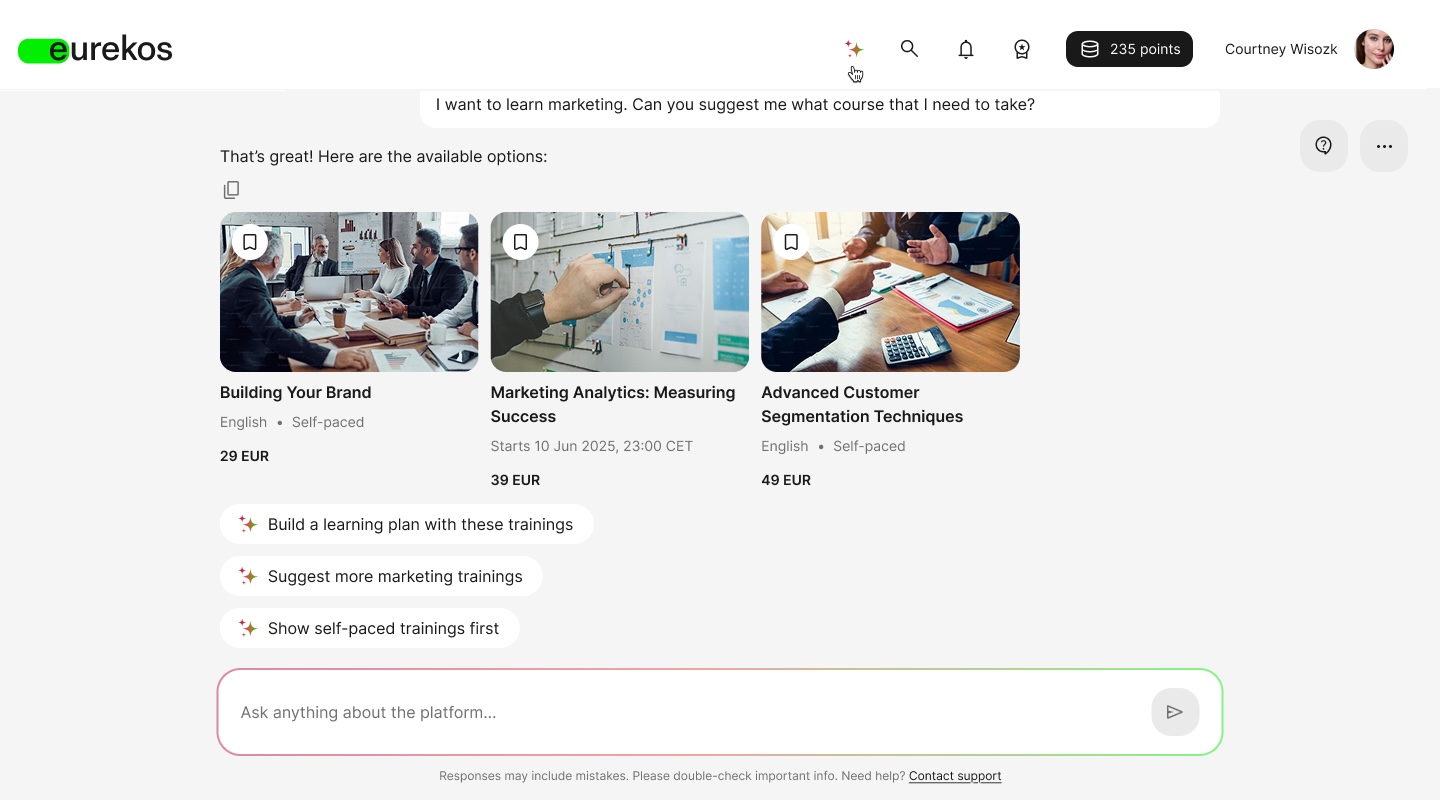
The new AI Assistant brings intelligent, contextual guidance directly into the Eurekos platform. Designed to help learners navigate complex learning environments, it delivers precise answers, surfaces relevant content, and recommends next steps - all within a conversational interface.
Rather than relying solely on traditional navigation and search, learners can now ask questions and receive structured, actionable responses based on the content they already have access to. The assistant can guide users to exact video moments, reference specific files, and recommend relevant courses available in the storefront - helping them move from question to learning in seconds.
For organizations running large academies, optional learning programs, or commercial training ecosystems, this strengthens content discovery, increases engagement, and supports contextual recommendations that can drive enrollment and upsell opportunities.
Features and Benefits
Context-aware content retrieval - The AI Learning Assistant retrieves and reasons over all indexed content the user has permission to access. This ensures answers are accurate, relevant, and security-compliant - while eliminating time spent searching manually.
Indexed content includes:
- Native course modules (course pages)
- Activity description pages in the storefront (including keywords)
- Files (TXT, PDF, DOCX, XLSX, PPT)
- Embedded links from all course widgets
- Video subtitles and transcripts for videos hosted in Eurekos
🗒️ Content type such as SCORM, H5P, events, and assignments are not included in this release but are planned for future iterations
Permission-aware intelligence - The assistant strictly respects Eurekos’ permission model. It only retrieves and reasons over content the user is authorized to access.
If relevant learning exists in the storefront that the user has not yet enrolled in, the assistant can recommend it based on activity description pages and keywords - without exposing restricted content. This enables contextual recommendations while maintaining strict access control.
Video-level guidance with timestamp precision - When videos are subtitled or transcribed, the assistant can:
- Reference specific quotes
- Provide clickable timestamps
- Direct learners to the exact moment relevant to their question
This significantly reduces the time spent navigating long video assets.
Contextual learning recommendations - Beyond answering questions, the assistant can recommend:
- Relevant courses
- Learning paths
- Storefront activities available for enrollment
💡 Recommendations are based on indexed content, activity description pages, and keywords. This makes high-quality activity description pages and keyword strategies increasingly important for maximizing discovery
Multilingual processing - The AI Learning Assistant processes requests in the user’s language and supports all languages. For optimal results, queries should be submitted in the same language as the underlying learning content, ensuring accurate retrieval and reasoning.
Secure architecture - The AI Learning Assistant runs on Microsoft infrastructure within a secure architecture. No personally identifiable information (PII) is shared with external services. Customer data is never shared across tenants or used to train external models. Chat history is securely stored within Eurekos.
Configuration
The AI Assistant is an add-on service and requires activation. To enable it, contact your Customer Success Manager. Once activated, it becomes available to all users on your platform.
User Instructions
Once the AI Learning Assistant is enabled, users can access it in two ways:
- Click the AI Assistant icon in the platform header
- Open Global Search and select the option to ask the AI Assistant
In both cases, the user is taken to a dedicated in-app conversation page.
On this page, users can:
- Start a new chat
- Continue existing conversations
- View their chat history
- Delete previous conversations
Each conversation is stored securely and remains accessible from the assistant interface, making it easy to revisit earlier questions or continue an ongoing discussion.
Chat history is stored and accessible in the assistant interface, allowing users to revisit previous conversations.
Considerations
- The assistant retrieves and reasons only over content that the user has permission to access.
- Storefront recommendations are based on activity description pages and keywords - well-structured descriptions improve recommendation quality.
- SCORM, H5P, events, and assignments are not indexed in this release.
- Responses may include inaccuracies, and users should verify critical information where required.
AI-Powered Video Transcription (Audio-to-Text)
Video is one of the most powerful learning formats - but without transcripts, it can be difficult to search, navigate, and fully leverage spoken content
With our new AI-powered audio-to-text transcription service, you can automatically generate high-quality transcripts for videos hosted in Eurekos. This significantly improves accessibility, searchability, and learner experience - while also strengthening the performance of both Global Search and the AI Assistant.
By turning spoken content into structured text, your videos become fully searchable knowledge assets. Learners can navigate to specific moments, search inside transcripts, and receive precise AI-assisted answers based on actual spoken content.
This add-on service transforms video from passive media into indexed, interactive, and intelligent learning content.

Features and Benefits
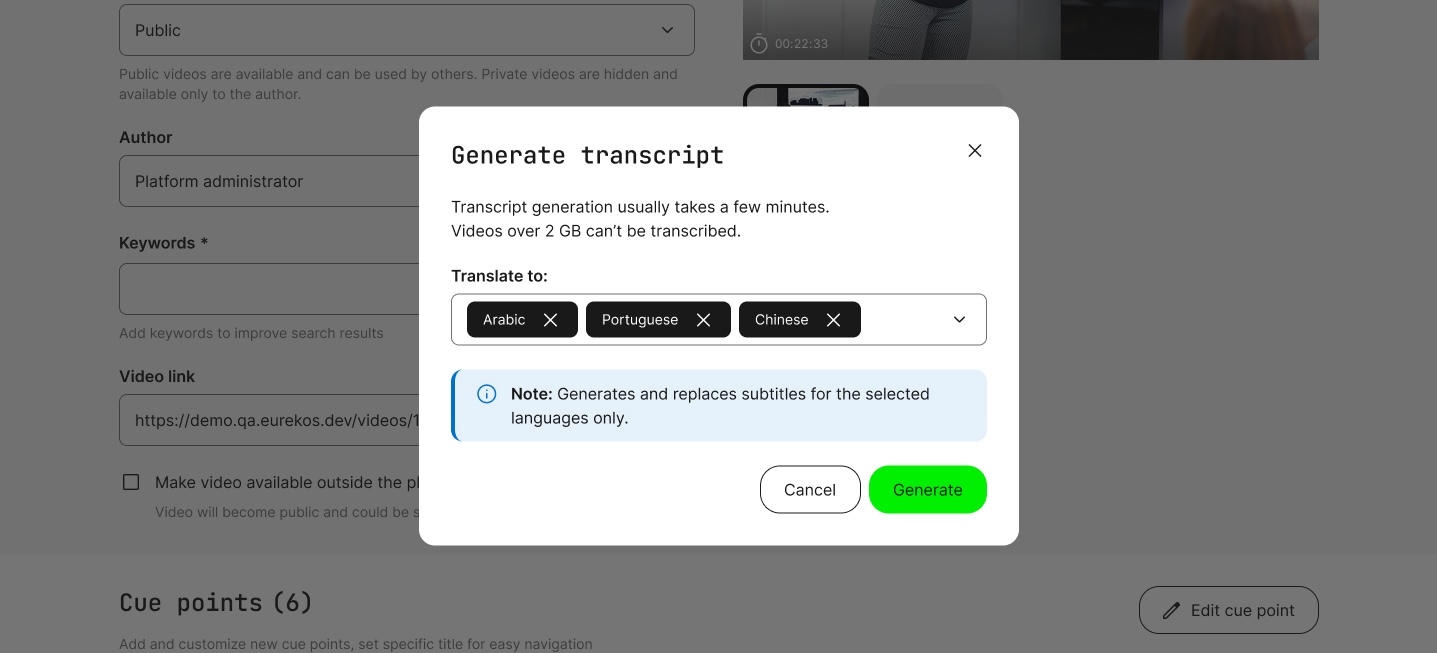
Automatic audio-to-text transcription - You can generate transcripts directly from videos hosted in Eurekos. The system converts spoken audio into structured subtitle files, which are automatically attached to the video and made available in the subtitle editor.
This removes the need for manual transcription workflows and significantly reduces the time required to make video content accessible and searchable.
Transcripts with editorial control - All AI-generated transcripts can be reviewed and edited within the platform using the enhanced subtitle editor described in Chapter 5 (Content Authoring).
This ensures that you retain full quality control and can correct terminology, branding, or domain-specific language before publishing.
Searchable and indexed spoken content - Generated transcripts are indexed by Global Search for increased discoverability and value of your video library. This means:
- Spoken words inside videos become searchable across the platform
- Users can discover video content based on what was actually said - not just the title or keywords
- If enabled, the AI Assistant can deliver answers based on spoken video content and provide clickable timestamps for contextual learning guidance.
Interactive transcript experience for learners - Once a transcript is available, learners can:
- View the transcript alongside the video
- Search within the transcript
- Click a line to jump directly to that timestamp
- Switch between available transcript languages
This improves navigation, comprehension, and accessibility - particularly for longer recordings, webinars, and expert sessions.
Multilingual translation support – You can continue generating as many transcripts as needed per video. Additionally, generated transcripts can be translated into 195+ languages using integrated translation services.
This enables global audiences to access video content in their preferred language, supporting international training initiatives without duplicating production efforts.
Configuration
This feature is available as an add-on service. To enable AI-powered video transcription, please contact your Customer Success Manager.
🗒️ Permissions: Once enabled, any user role with access to your platform's video archive will be able to generate transcripts for their own videos. Admin roles (Course Administrator, Support, Platform Administrator, Global Administrator) will be able to generate transcripts for the entire video library
User Instructions
Once enabled, transcripts can be generated per video:
- Edit video within the Video archive
- Under Subtitles and transcription, select Generate transcription
- Choose the language for transcription
Note that:
- Only videos under 2GB are supported
- Transcript generation typically takes a few minutes
- You will receive an email notification once processing is complete
When ready, the transcript appears under Subtitles and transcription, where it can be reviewed and edited before publishing.
Considerations
- Transcripts must currently be generated individually per video. Bulk generation options will be introduced in a future update.
- Transcript quality may vary depending on audio clarity and the terminology used. We recommend reviewing transcripts before publishing.
- This service applies only to videos hosted within Eurekos. Third-party embedded videos are not supported.
- The service uses AWS infrastructure for audio processing. All processing operates within a secure environment. Supported transcription languages follow Amazon Transcribe’s supported languages list.
Chapter
2
Platform Experience
In this chapter:
| This release delivers meaningful improvements to how users navigate, search, and access support across Eurekos. From a completely redesigned Help Center with built-in AI assistance to a fully modernized Global Search experience, these updates focus on reducing friction and increasing clarity. Whether you’re looking for guidance as an administrator or trying to locate the right course, file, or video as a learner, the platform now responds faster, surfaces more relevant results, and presents information in a clearer, more intuitive way. |
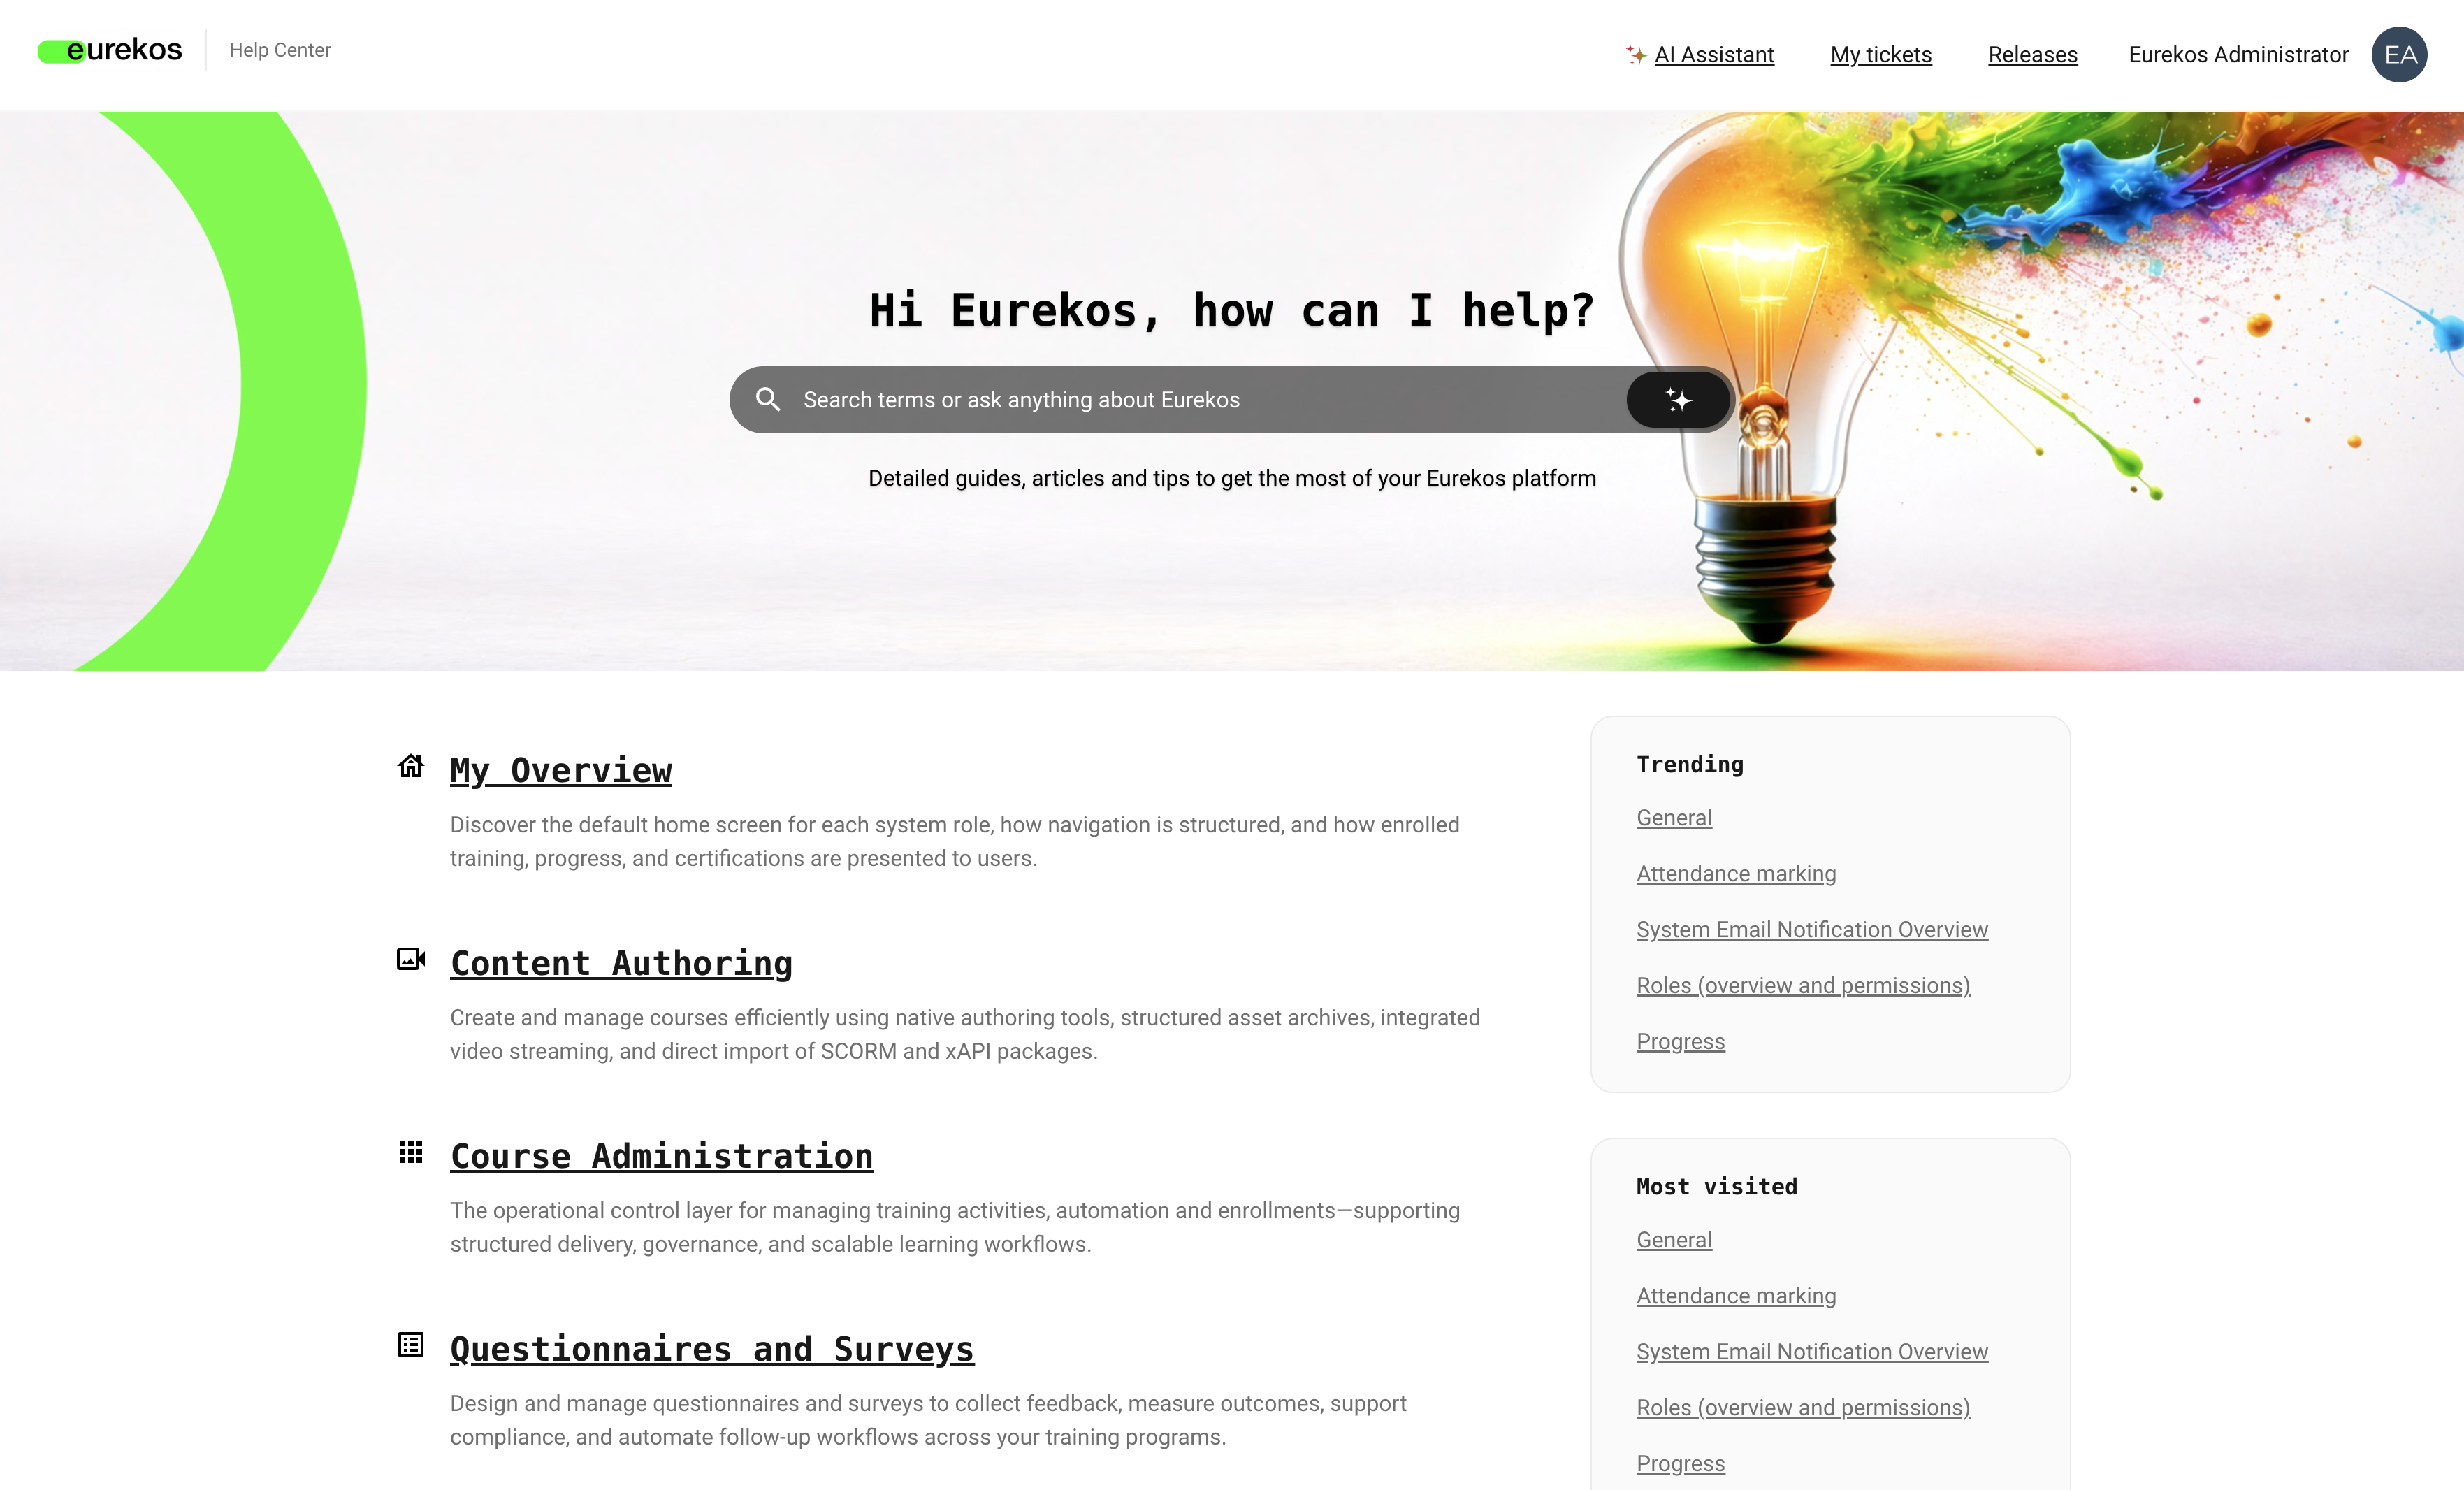
New Help Center (formerly Knowledge Base)
We’re excited to introduce our new Help Center - a major upgrade to the way administrators access support, documentation, and release updates.
The Help Center has been completely redesigned to make it faster and easier to find answers, explore features, and stay up to date with the platform. Whether you’re configuring advanced functionality, onboarding new colleagues, or troubleshooting a specific workflow, the new experience helps you get to the right information with less friction and greater clarity.
Beyond visual improvements, this release fundamentally enhances how help content is structured, discovered, and consumed. With smarter navigation, personalized recommendations, and built-in AI assistance, the Help Center becomes a more proactive and intelligent support companion - not just a documentation library.
Features and Benefits
Redesigned interface and smarter navigation - The Help Center now offers a modern, structured overview of topics with dedicated sub-pages and improved categorization, including:
- Clearer topic hierarchy and improved article organization
- Personalized sections such as Last visited, Trending, and Most visited
- A significantly improved search experience
Built-in AI Assistant for instant guidance - The Help Center now includes an AI assistant. You can ask questions conversationally and receive curated responses based on Eurekos documentation. The assistant suggests relevant articles, supports follow-up questions, and stores your conversation history in a dedicated view - creating a more guided and interactive experience. The AI assistant automatically detects the user’s language and provides responses in that same language.
Integrated access to support tickets - The Help Center now includes direct access to My tickets, allowing administrators to view open and historical support tickets from within the same environment, creating a unified support experience across documentation, AI assistance, release notes, and ticket tracking.
Expanded and continuously evolving documentation - As part of this release, we have reviewed and enhanced all existing articles and introduced many new guides and explanations across key areas of the platform. The Help Center now provides more detailed documentation and improved navigation to help administrators find relevant information faster.
The expansion of the Help Center is an ongoing initiative. Throughout 2026, we will continue adding new articles, tutorials, and structured documentation as the platform evolves. The full expansion of the Help Center content is expected to be completed after the summer of 2026.
💡 Offer the Help Center to your own users: In addition to providing our Help Center to all Eurekos administrators, the platform is available as an add-on product for anyone wishing to offer their own branded Knowledge Base. If you're interested, please reach to your Customer Success Manager
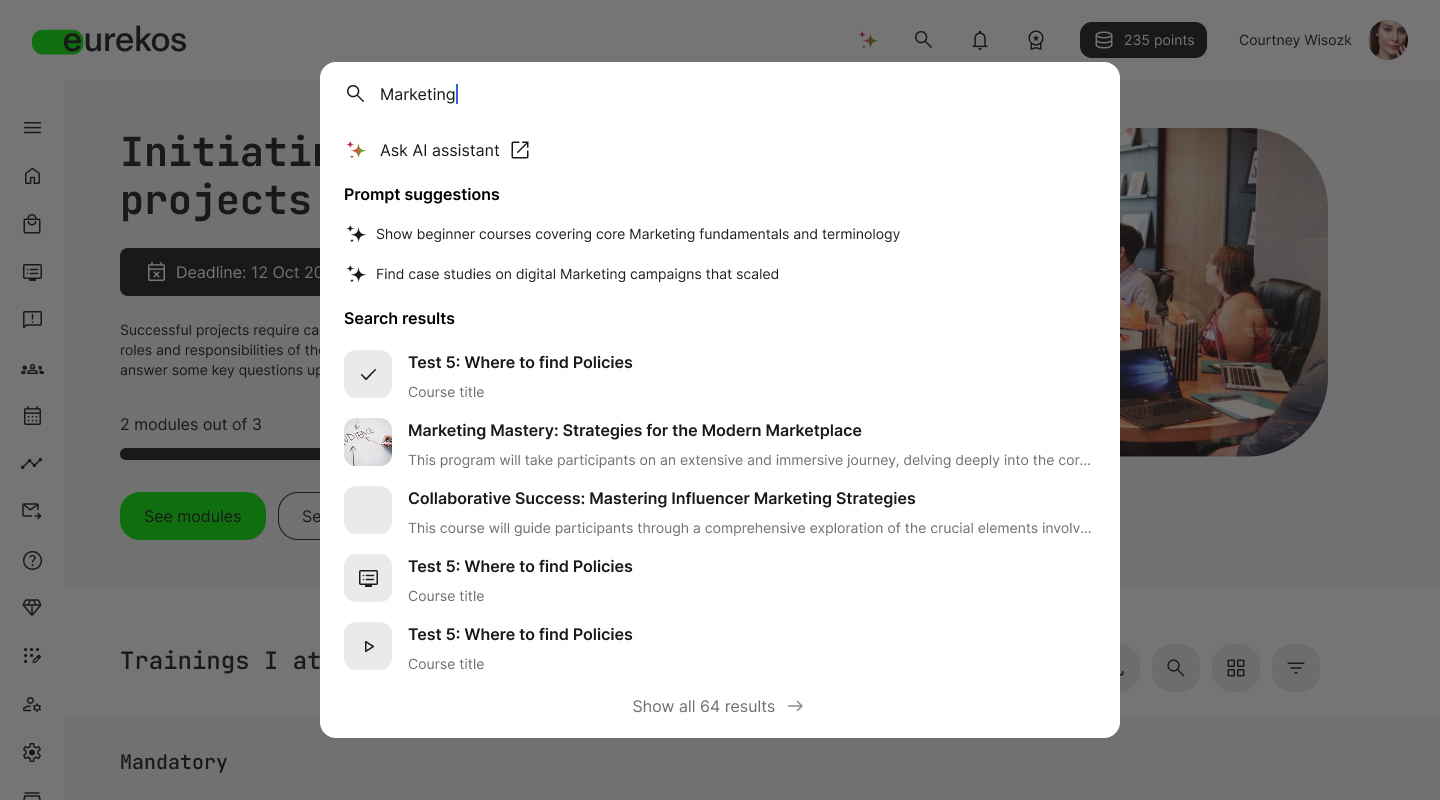
Modernized Global Search
The Global Search has been fully redesigned to deliver faster results, stronger relevance, and a significantly improved user experience.
Finding the right content - quickly and confidently - is critical in any learning platform. With this update, Global Search has been redesigned from the ground up to deliver faster results, improved relevance, and a significantly more intuitive user experience.
Search now begins the moment you start typing. Results appear instantly in a dynamic popup, content is indexed more broadly than ever before, and the results page presents information in a clearer, richer, and more actionable format.
Together, these improvements make it easier for learners to discover exactly what they need - whether that’s a course, activity, file, community post, or even a specific moment inside a video.
Features and Benefits
Search is now dynamic and responsive - When you click the search icon in the platform header, a popup opens immediately, and results begin appearing as you type. You no longer need to press enter to trigger a search, making discovery faster and more fluid.
The popup also includes helpful suggestions:
- Previous searches
- Matching content in real time
- (When enabled) AI prompt suggestions and quick access to the AI assistant
AI prompt suggestions are generated from indexed platform content, guiding users to relevant conversational queries about available learning assets. This reduces friction and helps users find relevant content in fewer steps.
Improved indexing and smarter relevance - Global Search now indexes significantly more content across the platform. This includes:
- Courses (native course modules/pages)
- Activity description pages in the storefront
- Community content
- Files (txt, pdf, docx, xlsx, pptx)
- Embedded links from all course widgets
- Video subtitles and transcripts hosted in Eurekos
By indexing transcripts and subtitles, search results can now reference specific video content more precisely - including surfacing relevant timestamps where applicable. This enables much more accurate, contextually relevant search results.
In addition, several major search engine improvements have been implemented to increase result quality:
- Word normalization (stemming) - Inflected or derived words are reduced to their root form, improving matching accuracy.
- Stop-word filtering - Common words such as “the,” “a,” and “and” are ignored to improve relevance.
- Fuzzy search support - The search engine now tolerates spelling mistakes, typos, and minor character variations.
Together, these improvements significantly increase the likelihood that users find the right content - even when queries are imperfect.
Richer and clearer search results page - The search results page has been redesigned to improve clarity and usability. Results now feature:
- Clearer content categorization (course, activity, file, video, community, etc.)
- Improved thumbnails and visual structure
- Better context previews for each result
- Highlighted matches within content where relevant
This makes it easier for users to understand what each result represents before clicking, leading to more confident navigation.
AI-assisted discovery (when enabled) - If the AI assistant add-on is enabled, Global Search integrates directly with it. In the search popup, users will see:
- Suggested AI prompts based on indexed platform content
- An “Ask AI assistant” option
- Direct entry into an AI-powered conversation
This creates a seamless bridge between traditional search and conversational discovery.
🗒️ The AI assistant feature is described in detail in chapter 1 of this release notes article.
Chapter
3
Subscriptions
In this chapter:
| Version 13.0.0 significantly expands and matures the subscription framework in Eurekos, introducing scalable seat management, enterprise-aligned billing flexibility, and targeted commercial control. With centralized subscription management, Team Subscriptions, Managed Subscriptions, and Personal Invitations, organizations can now package, sell, and govern recurring access models with far greater flexibility, while maintaining structured oversight. These enhancements enable training providers to support everything from individual learners to large enterprise agreements, aligning subscription-based learning with modern SaaS licensing models and real-world processes. |
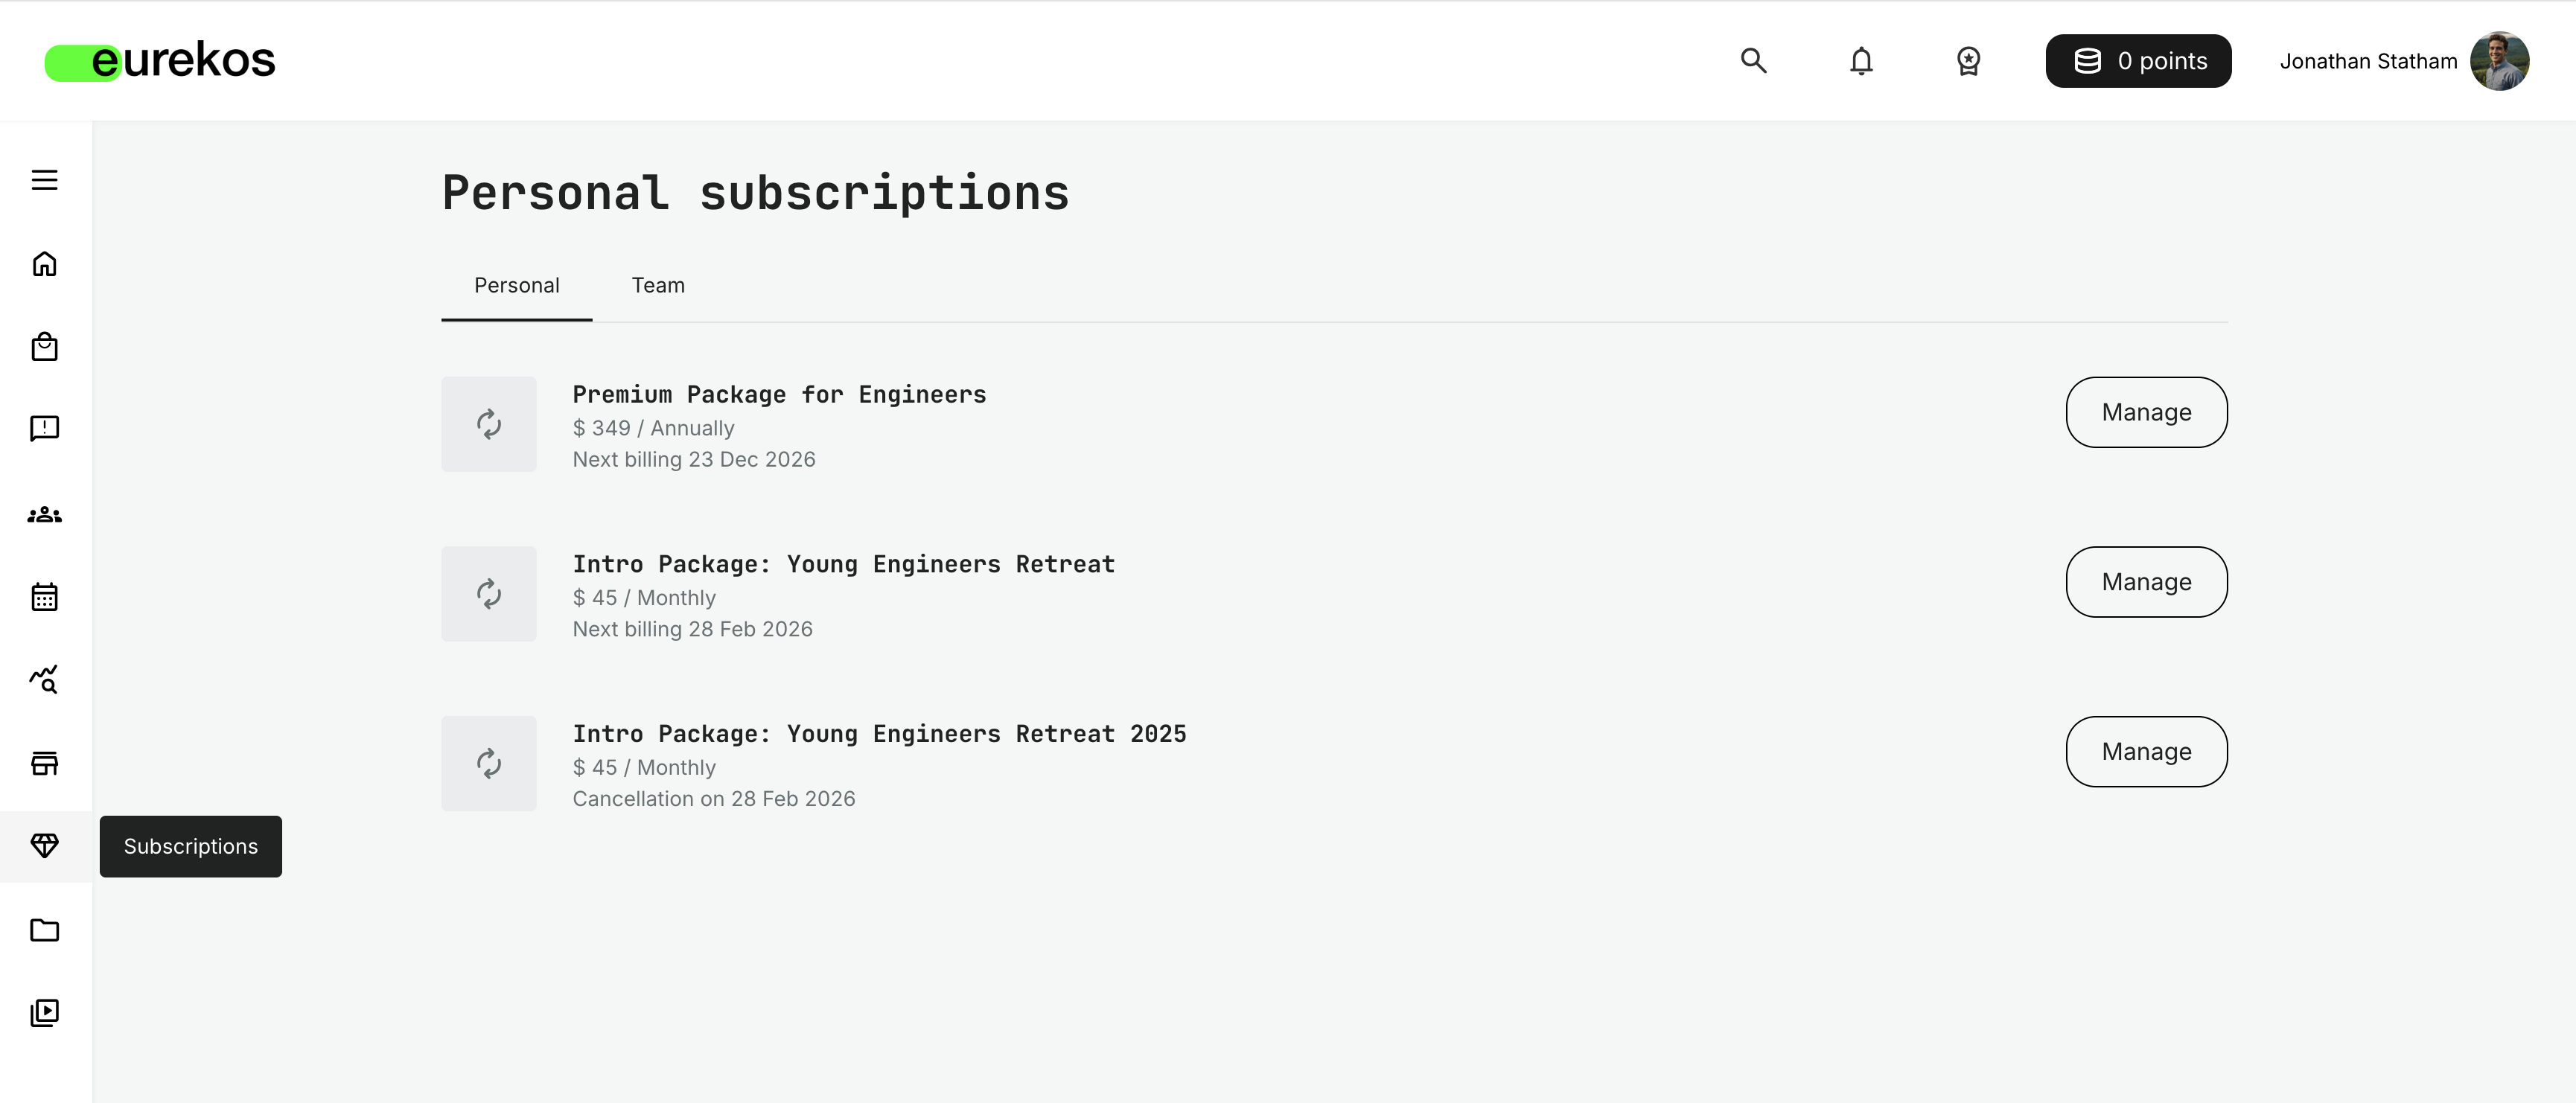
Centralized Subscription Management
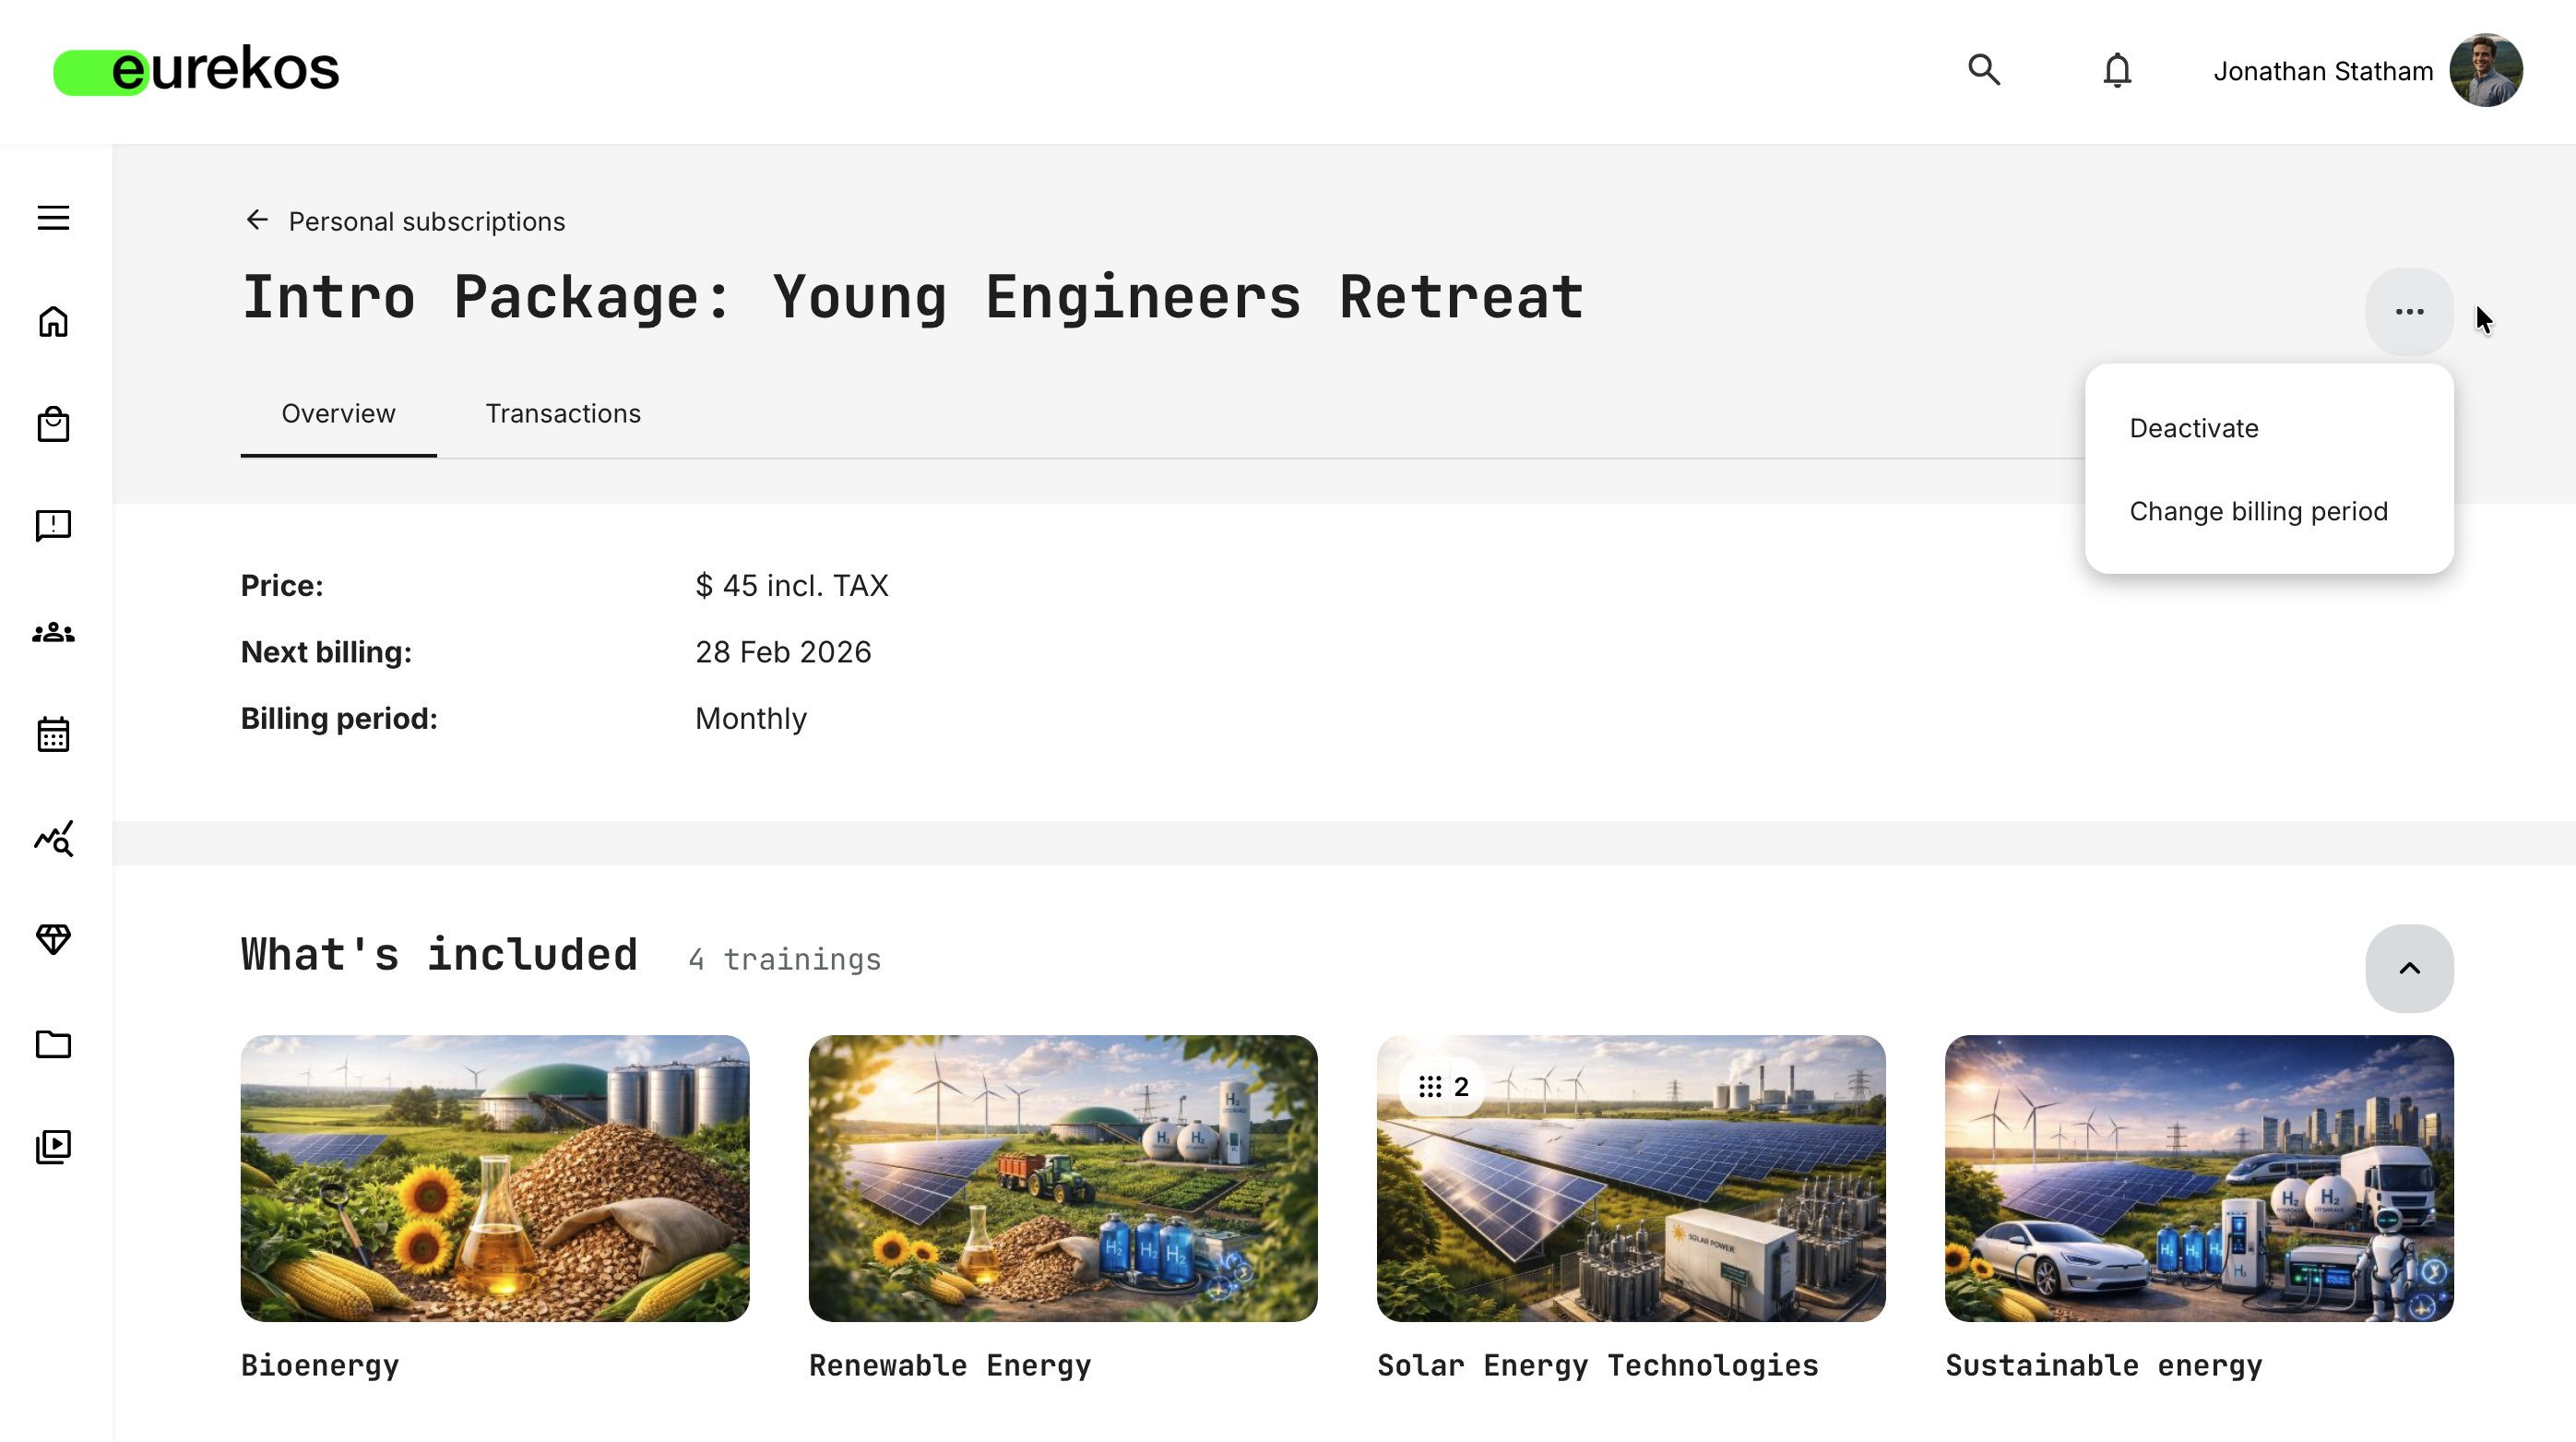
Subscriptions are now accessed via a dedicated entry in the Main menu (diamond icon) rather than the user profile.
This structural change reflects the evolution of subscriptions from a primarily personal billing feature to a scalable subscription framework supporting personal, team-based, and managed subscription models. All subscription-related actions are now consolidated in one centralized management hub, designed to support both individual subscribers and organizational team owners.
This update establishes subscriptions as a first-class commercial capability within the platform.
Features and Benefits
Dedicated subscription hub in the main navigation - Subscriptions are now clearly separated from profile settings and accessible directly from the main menu.
This clearly separates subscription management from personal profile settings, making subscription-related actions easier to locate and manage.
Unified management of personal and team subscriptions - Users who hold multiple subscription types - such as personal and team subscriptions - can manage them from a single interface.
Subscriptions are organized clearly, with tabs separating personal and team contexts where applicable. This reduces confusion and improves navigation.
Full lifecycle management in one place - The centralized hub provides visibility into the entire subscription lifecycle.
Users can:
- Review billing details
- See upcoming billing dates
- Access transaction history
- Deactivate or reactivate subscriptions (within applicable rules)
Improved governance for organizations - Team subscription owners gain a dedicated operational view of seat allocation, members, and billing status.
User Instructions
Subscriptions are accessed via Main menu → Subscriptions. From here, depending on their role and subscription type, users can:
- View active and cancelled subscriptions
- Review included training activities
- Check billing period and next billing date
- Access the Transactions tab for payment history
- Deactivate or reactivate subscriptions (within applicable billing rules)
- Manage seats (for Team Subscription Owners)
If a user has both personal and team subscriptions, these are clearly separated in tabs for easy navigation.
Considerations
- As the navigation entry point for subscriptions has changed, consider whether any internal documentation or onboarding material referencing subscription access via the user profile should be updated.
Team Subscriptions
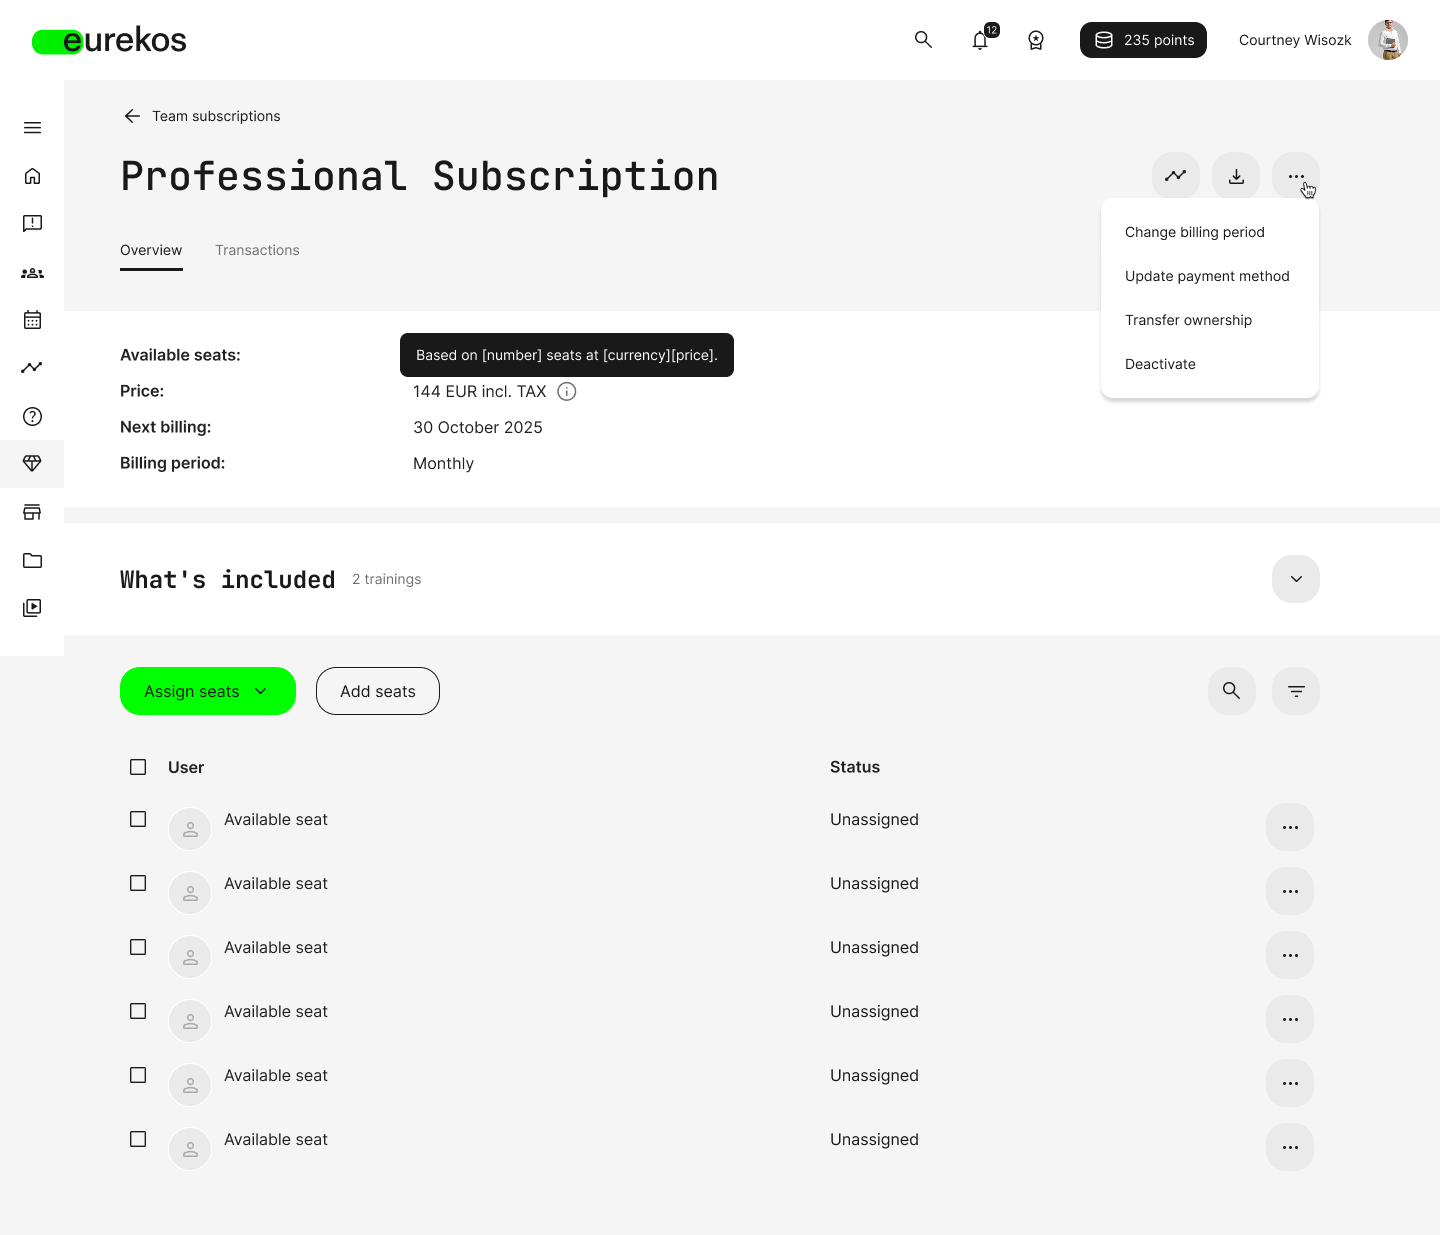
With this update, we're introducing Team Subscriptions, enabling organizations to purchase and manage multiple subscription seats under a single subscription owner.
This model is similar to managing licenses for other modern software services (such as productivity or office platforms). A designated Team Subscription Owner controls seat allocation, billing, and lifecycle actions, while team members gain access to subscription content without managing payments themselves.
Team Subscriptions extend the subscription model from individual access to scalable, organization-level training enablement, supporting structured governance, seat reallocation, and centralized oversight.
This enables training providers to package and scale recurring access models for customers, partners, and distributed teams without manual seat administration.
Features and Benefits
Team Subscriptions combine storefront-based self-service purchasing with centralized seat governance. Once a subscription is configured and exposed in the Storefront, organizations can independently purchase multiple seats and fully manage access, allocation, and billing, reducing administrative workload while enabling scalable subscription revenue.
Multi-seat subscription model - Organizations can purchase multiple seats within a single subscription and manage them centrally. This enables scalable access without requiring separate subscriptions per user.
Dedicated team member management interface - The subscription overview includes a structured member list with full operational visibility. The interface includes:
- Assigned seats
- Available (unassigned) seats
- Seat status (Active, Pending, Expiring soon, Unassigned)
- Individual and bulk seat operations
- Search and filtering capabilities
Flexible seat assignment and lifecycle handling - Seat management supports both registered and unregistered users.
- Registered users receive access immediately upon assignment
- Unregistered users receive an invitation email and remain in Pending status until account creation is completed
- Seats can be unassigned without being deleted
- Seats can be permanently deactivated, reducing future billing
Training history preservation - When a seat is removed, access to subscription content is revoked, but completed training, progress data, and earned certificates remain visible to the user and in reports.
Built-in financial transparency - Subscription updates, seat purchases, and billing changes trigger automatic email confirmations. The Transactions tab provides access to billing history and payment details.
💡 Owner does not require a seat: A Team Subscription Owner can manage the subscription without occupying a seat. They can manage the team, distribute or assign training, and allow subscription members to enroll in training independently as needed
Configuration
Any existing subscription automatically supports purchase as a Team Subscription. No separate subscription type needs to be created.
To enable Team Subscriptions, you simply need:
- A subscription (created under Course Administration → Subscriptions)
- The subscription is exposed either in the Storefront (via Settings → Storefront), or shared via direct link
- Allow seat transfers between users - If enabled, seats can be transferred between users at any time. If disabled, seats can still be assigned and unassigned, but not directly transferred.
- A global grace period (default: 5 days) applies for failed recurring payments before subscription cancellation. This setting can be adjusted via Eurekos Support.
- Email confirmations are sent for subscription changes, such as updates to the billing plan. These notifications—along with other subscription-related emails—can be customized to match your organization’s communication strategy and tone of voice under “Settings → Email sending → Subscriptions”.
🗒️ A configured Stripe account is required to support recurring subscription billing. Stripe must be connected under Settings → Third-party integrations → Stripe
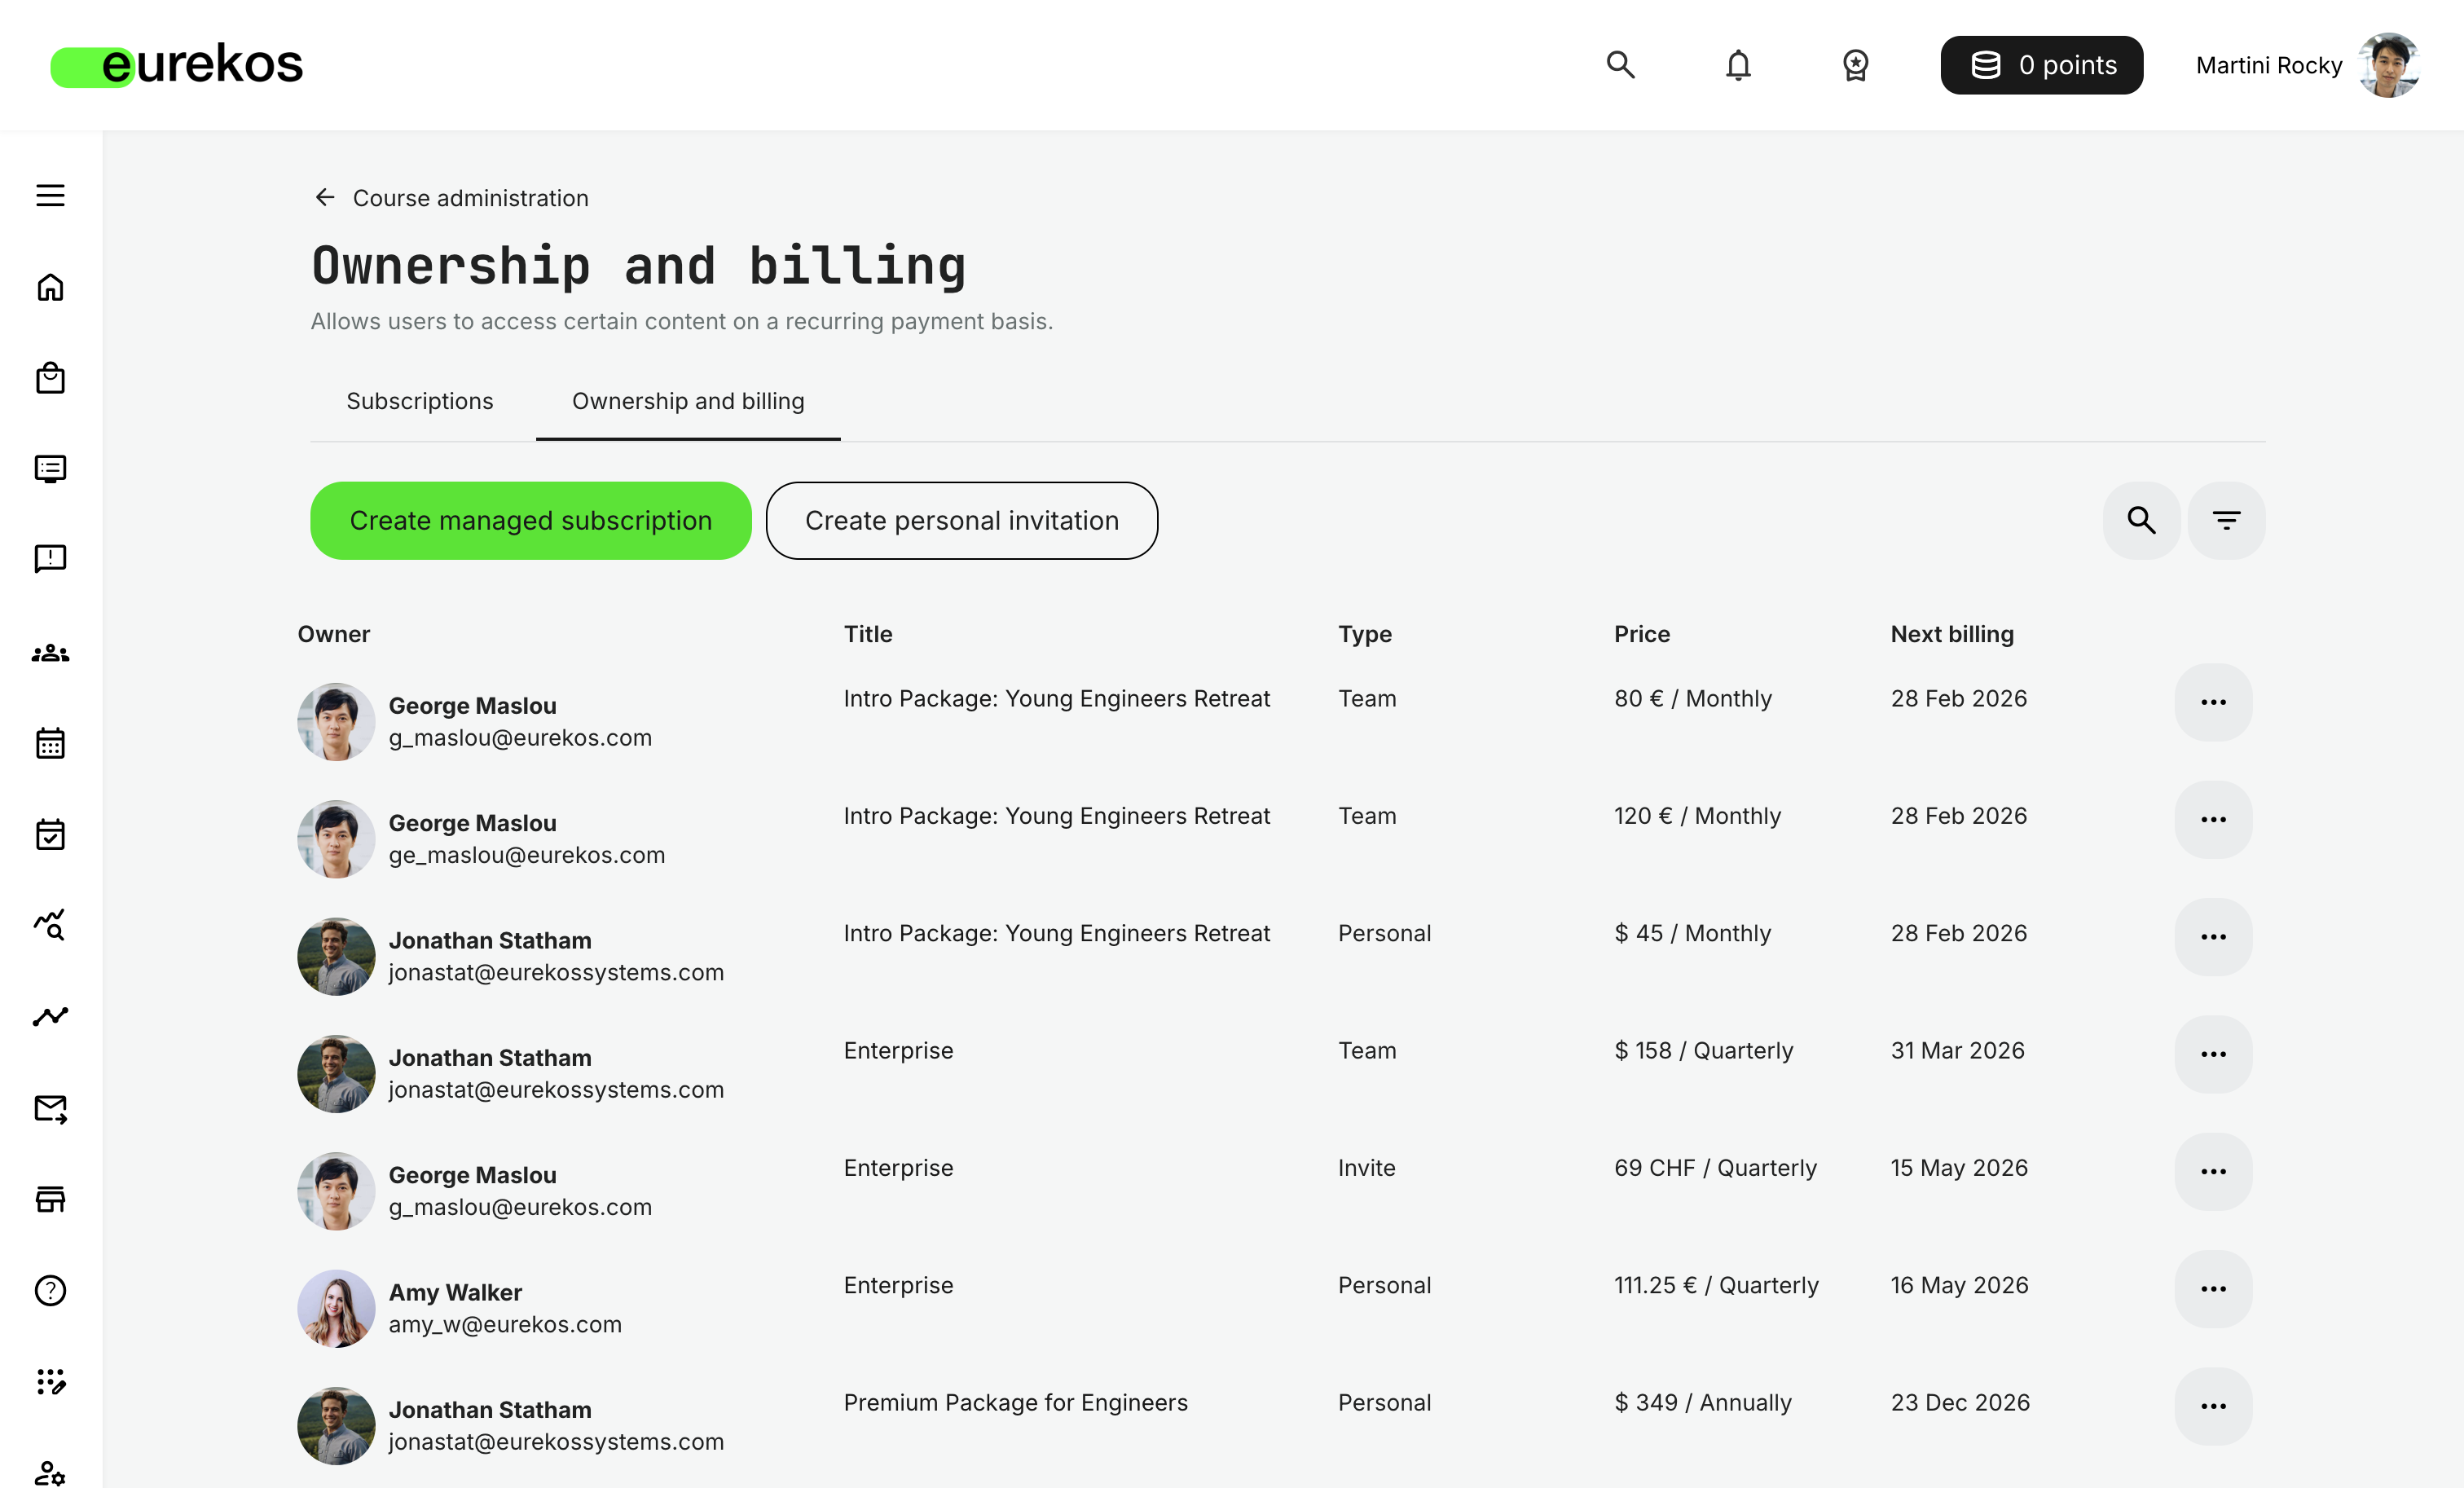
Managing Subscriptions – System Administrator
System administrators with access to Course Administration can oversee and supervise all subscriptions via: Course Administration → Subscriptions → Ownership and Billing
Here, administrators search and filter by subscription and type, as well as access the following operations needed to supervise subscriptions:
- View subscription details - leads directly to the subscription details page, including transaction details.
- Cancel subscriptions (administrative override) - is an administrative override and is more definitive than a subscriber-initiated deactivation. Once cancelled, the action cannot be reversed by administrators or the subscriber, and a confirmation is required. Existing subscribers retain access to included activities and their progress until the end of the current billing period, as payment has already been made. An additional option to impact the cancellation date is available for cancelled subscriptions
- Change next billing date - provides an option to set the next billing date in the future.
Managed Subscriptions
Version 13.0.0 introduces Managed Subscriptions, extending the Team Subscription model to support invoice-based and externally managed payment agreements.
Managed Subscriptions extend the Team Subscription model to support enterprise purchasing scenarios where subscriptions are negotiated outside the platform. Rather than requiring standard online checkout, Managed Subscriptions allow organizations to access subscription-based learning through alternative payment arrangements such as invoicing or purchase orders (POs). This is especially useful for team- and enterprise-level training where standard online payments are not practical.
With managed subscriptions, organizations can support special pricing, negotiated deals, bundled content, and ongoing adjustments to what’s included, making it easier to tailor learning access for large groups while aligning with internal procurement and billing processes. This approach helps organizations manage the complexity of extended enterprise training, which requires accommodating global learners, varied payment expectations, and evolving training needs.
💡 Managed Subscriptions are ideal for enterprise customers who require invoice-based billing, negotiated pricing, or PO-based purchasing instead of standard online payments.
Features and Benefits
Managed Subscriptions combine enterprise billing flexibility with the operational scalability of Team Subscriptions:
Invoice-based subscription model - Managed Subscriptions support alternative billing arrangements, such as invoicing, purchase orders, or custom agreements, instead of the standard online checkout. This enables enterprise customers to align subscription-based learning access with internal processes.
Administrator-created subscriptions - System administrators can create Managed Subscriptions directly under Course Administration → Subscriptions → Ownership and Billing. This allows commercial agreements to be configured centrally rather than relying on storefront-based self-service purchasing.
Custom billing arrangements - Support custom-negotiated pricing, bundled content, and customer-specific terms. When creating a managed subscription, system administrators can define:
- Billing model
- Billing period
- Price
- Number of seats
- Renewal reminders
- Customer information and payment details
Ownership transfer to the customer organization - When a Managed Subscription is created, administrators designate a contact person from the customer organization as the subscription owner. This person receives an invitation to take ownership of the subscription and can then manage seats, invite members, and administer learner access for their organization. Commercial terms such as pricing, billing period, and seat limits remain under administrator control.
Full operational parity with Team Subscriptions - After setup, the Managed Subscription functions like a Team Subscription:
- Seat assignment and transfers
- Member management
- Progress tracking
- Lifecycle handling
The key difference is that billing and payment are handled outside the platform, while seat management and learning administration function the same as in Team Subscriptions.
Configuration
Managed Subscriptions are created by system administrators under: Course Administration → Subscriptions → Ownership and Billing
From here, administrators select Create managed subscription, which opens a structured setup form.
During creation, the administrator:
- Selects an existing subscription template
- Defines the subscription owner
- Configures billing model, billing period, pricing, and number of seats
- Enters payment and customer details
- Defines renewal reminders
- Adds optional administrative comments
Once created, the designated subscription owner receives an invitation to take ownership.
After acceptance, the subscription becomes visible in the owner’s Main menu → Subscriptions area and can be managed like any Team Subscription.
Considerations
- Managed Subscriptions bypass online payment checkout. Financial settlements must be handled externally in accordance with the agreed billing terms.
- Administrators are responsible for ensuring billing accuracy when defining pricing and renewal conditions.
- Once created, a Managed Subscription follows the same seat and lifecycle logic as Team Subscriptions.
- Cancellation and billing date adjustments remain available under Ownership and Billing, subject to applicable administrative permissions.
Personal Invitations for Subscriptions
Version 13.0.0 introduces Personal Invitations for Subscriptions, enabling system administrators to offer a specific individual a custom price for an existing subscription.
Rather than modifying the standard subscription price or creating duplicate subscription configurations, administrators can now negotiate and extend targeted pricing to a single recipient. The invited user can complete checkout using the special price and choose whether to purchase the subscription as a personal or team subscription.
This feature provides controlled commercial flexibility, allowing negotiated pricing without impacting public subscription pricing or other customers.
💡 Personal Invitations are ideal when negotiating special pricing wihtout altering standard subscription pricing or creating duplicate subscription configurations

Features and Benefits
Personal Invitations combine pricing flexibility with structured subscription governance.
Custom price per seat - Administrators can override the standard subscription price for a specific individual while keeping the base subscription configuration unchanged.
Uses existing subscription setup - Invitations are linked to an already configured subscription. Billing periods available at checkout follow those defined on the subscription itself.
Supports both personal and team subscriptions -The invitee can choose during checkout whether to purchase the subscription for themselves or as a team subscription using the negotiated price.
Optional expiration deadline - Administrators can define a deadline for the offer. Once expired, the invitation becomes invalid automatically.
Preserves pricing integrity - Standard subscription pricing remains unaffected. The special price applies only to the invited recipient.
Simplifies negotiated agreements - Ideal for discounts, special partner agreements, promotional pricing, and one-off negotiated contracts.
Configuration
Personal Invitations are created by system administrators under: Course Administration → Subscriptions → Ownership and Billing
From here, administrators select Create personal invitation and:
- Select an existing subscription
- Enter the invitee’s information
- Define billing period (from the subscription’s configured options)
- Set currency and custom price per seat
- Optionally define a deadline for the offer
Once created, the invitee receives an email invitation directing them to the subscription checkout page with the negotiated price applied.
After purchase, the subscription behaves like a standard Personal or Team Subscription and is managed via: Main menu → Subscriptions.
Chapter
4
Storefront
In this chapter:
| This release includes a series of targeted improvements to the Storefront experience, focused on increasing flexibility, visibility, and commercial control. The updates strengthen how subscriptions are presented and accessed, improve how activities are surfaced and shared, and give administrators greater control over layout, visibility rules, and the enrollment journey. Together, these enhancements make it easier to promote the right content to the right audiences — while delivering a clearer, more intuitive experience for learners and managers. In the sections below, we outline the key updates and how they can be configured and applied in practice. |
New Subscription Row Type and Subscription-Based Visibility Controls
We're introducing a new Subscription row type in the Storefront, together with subscription-based visibility controls.
You can now build structured, row-based storefront layouts that clearly communicate what is included in a subscription - both before and after purchase - instead of relying solely on the Carousel widget to expose subscriptions.
For learners, this means greater transparency and easier access. For you, it means more control over how subscription value is presented, segmented, and scaled.

Features and Benefits
New row type: subscription - You can now create a Storefront row that displays all activities included in a selected subscription.
This allows you to:
- Present subscription content directly in the grid layout of the Storefront
- Show included activities with full visual cards and metadata
- Display a “Subscribe” call to action (CTA) directly on the row
- Use the Subscription row as an alternative or complement to the Carousel widget
Unlike previous versions, where subscriptions were primarily exposed via the Carousel widget, you can now design subscription-driven storefront journeys using standard row layouts.
Optional activity filtering within subscription rows - When configuring a Subscription Row, you can optionally filter the displayed activities using a selected vocabulary and specific tags.
This enables you to:
- Split large subscriptions into multiple thematic rows
- Highlight curated subsets of a broader subscription
- Create more structured and guided discovery experiences
Example: a single Enterprise subscription can be displayed across multiple rows such as “Core Courses,” “Advanced Modules,” or “Compliance Training,” all drawing from the same subscription but filtered differently
New target audience criterion: subscribed - You can now control row visibility based on a learner’s subscription status. By using the new Subscribed target audience criterion, you can:
- Show a Subscription row only to users subscribed to a specific subscription
- Create post-purchase views that surface included content clearly
- Deliver differentiated storefront experiences for subscribed vs. non-subscribed users
This directly solves a common subscription UX challenge:
When enrollment behavior is configured so learners are not automatically enrolled in all included activities after purchase, learners can now easily find the content they have access to - via a row that becomes visible once they subscribe.
Improved subscription transparency on activity pages - The storefront now better communicates how activities relate to subscriptions:
- Activities included in a subscription row display subscription checkout options
- If an activity is also available as a one-time purchase, both options can be clearly presented
- When viewing an activity available via subscription, learners are informed and guided toward the relevant subscription
This improves conversion clarity and reduces friction between one-time purchases and recurring subscription models.
Configuration
To use this functionality:
- Go to Settings → Storefront
- Create a new row
- Select Type: Subscription
- Choose the subscription to display
- (Optional) Select a vocabulary and specific tags to filter included activities
- Configure appearance and sorting options
- Save the row

To control visibility based on subscription status:
- Hover over the row
- Select Target audience
- Add the criterion Subscribed
- Choose the relevant subscription
- Save
You can combine the “Subscribed” rule with other audience criteria, such as organization, job function, or country, to create highly targeted storefront experiences.
Considerations
- The Subscription row complements, but does not replace, the Carousel storefront widget - both can be used together depending on your design strategy.
- Enrollment behavior (automatic vs. manual enrollment after purchase) is still defined at the subscription level.
- Test audience configurations before going live. Because Storefront sections adapt dynamically based on subscription status, organization, language, and other criteria, small changes can significantly impact what learners see. We recommend creating representative test users for key audience segments (e.g., different roles, organizations, regions, subscription states, and languages) and using Masquerade together with Target Audience preview mode to validate the full end-to-end experience
Display Keywords on Activities in the Storefront
We have extended the Storefront configuration to allow you to display activity keywords directly in the Storefront’s standard grid view.
Keywords have always supported search and internal classification. With this update, you can now surface them visually in the Storefront, helping learners better understand what an activity covers at a glance - and improving browsing, discovery, and contextual relevance.
This provides stronger alignment between search behavior and storefront browsing, while giving you more control over how activities are presented commercially.

Features and Benefits
Platform-wide keyword visibility in the Storefront - You can now choose to display activity keywords directly in the Storefront, alongside other activity metadata.
This allows you to:
- Improve discoverability beyond search
- Reinforce thematic positioning (e.g., compliance, sustainability, leadership)
- Make large catalogs easier to scan and navigate
- Provide a clearer context before users click into the activity description page
Because keywords are defined per activity, you retain full flexibility in how content is classified and presented.
Configuration
To enable keyword display in the Storefront:
- Go to Settings → Commerce
- Locate the Activity information section
- Enable the new Keywords checkbox
Keywords are configured individually for each activity on the Activity settings page. Once enabled in Commerce settings, any keywords assigned to an activity will automatically appear in the Storefront grid view.
Ignore Storefront Filters for Custom Rows and Carousel
You can now ensure that manually curated Storefront sections are always visible - regardless of storefront filtering logic.
With a new platform-wide configuration, Custom rows and Carousel sections can ignore all storefront-related filters, including language-based filtering, interest/type tags, and organization-based storefront restrictions. This ensures that activities you deliberately select for these sections are displayed to users, even if other storefront configurations would normally hide them.
This can give you better control over strategic, promotional, or mandatory content placements in the Storefront, without being constrained by dynamic filtering rules.
Features and Benefits
Guaranteed visibility for curated content - When you manually add activities to a Custom row or Carousel, you can ensure they are shown - even if storefront filters would otherwise exclude them.
Bypasses storefront filtering logic - The configuration ignores:
- Language-based storefront filtering
- Interest and type tag filtering
- Activity-level organization storefront filtering
- Global organization filtering
Enables direct enrollment from the Storefront - Users can see and enroll in activities displayed in these sections, even if storefront rules would normally prevent them from appearing.
Ideal for campaigns and strategic placements - This is especially valuable for:
- Compliance or mandatory training promotions
- Featured programs
- Cross-organization visibility initiatives
- Executive or time-sensitive announcements
- Marketing-driven campaign rows
Preserves deeper access controls - While storefront visibility rules are ignored, this configuration does not override module-level permissions or other non-storefront access restrictions.
Configuration
This is a platform-wide backend configuration. To enable it, you must open a support ticket with Support.
Once enabled:
- It applies to Storefront Row type: Custom
- It applies to the Storefront Carousel
- No per-row configuration is required after activation.
Considerations
- This configuration applies globally and impacts the subsequent behavior of all Custom rows and Carousel sections on the platform.
- Because storefront filtering logic is bypassed, you should carefully test visibility and enrollment behavior before publishing changes live.
Enhanced Customization of the Enroll Widget on the Activity Description Page
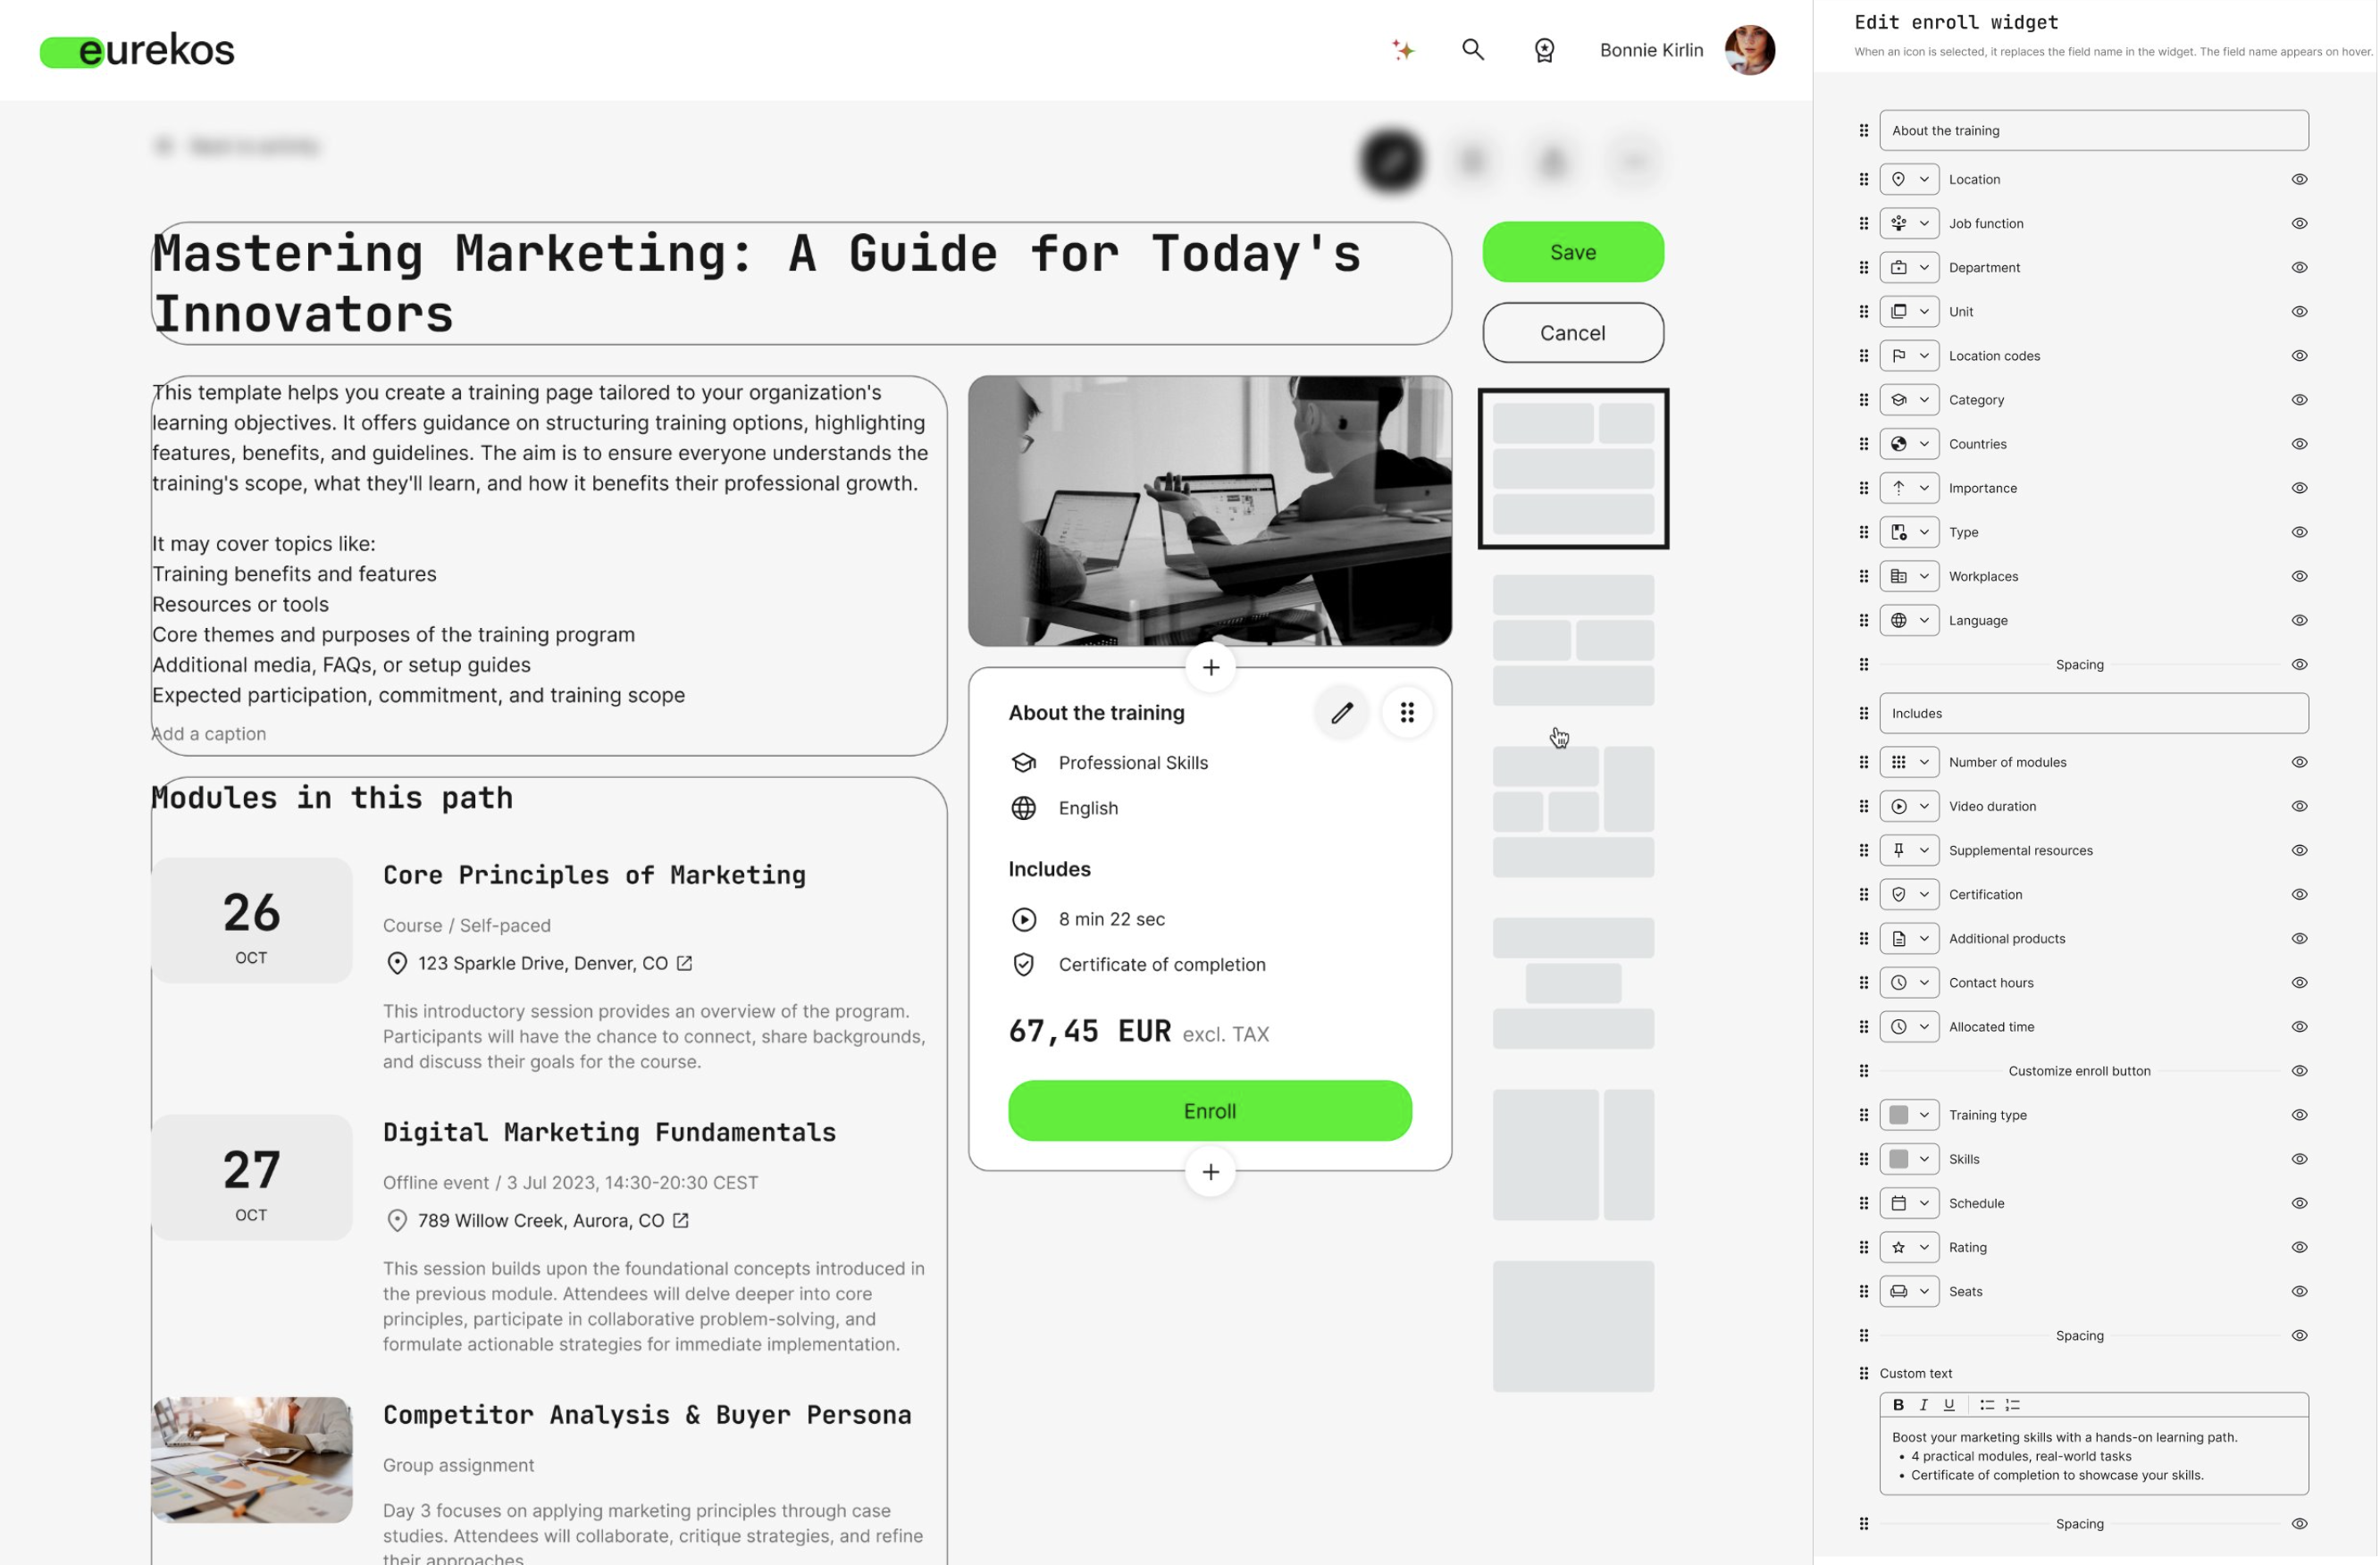
We have significantly enhanced the flexibility of the activity description page by migrating the enroll widget and banner into the layout editing interface.
Previously, the enroll widget was a fixed, system-generated component. While it automatically reflected activity metadata (such as schedule, certification, language, type, etc.), you had limited control over what was displayed and how it appeared.
With this update, the enroll widget and banner are now fully integrated into the page layout editor. This gives you complete control over structure, visibility, positioning, and presentation - allowing you to design activity pages that better reflect your brand, audience, and commercial strategy.
Features and Benefits
Full layout control of the enroll widget - The enroll widget is now part of the editable layout structure. You can move it between containers, reposition it within the page, and structure it according to your preferred layout.
Configurable activity metadata display – The enroll widget can now be edited. You can show or hide individual metadata elements (e.g., schedule, certification, language, seats, price, etc.), reorder them, and adjust their presentation. This allows you to tailor the information hierarchy to your audience and commercial priorities.
Customizable icons and visual styling - Icons can be adjusted, and the enroll widget can now be individually colored per activity description page, giving you stronger brand alignment and visual differentiation where needed.
Custom content within the widget - You can include custom text blocks inside the enroll widget to support contextual messaging, compliance notes, campaign messaging, or upsell positioning.
Flexible banner placement - The activity banner is no longer fixed at the top of the enroll widget. It can now be placed in any available container within the selected layout, enabling more dynamic, visually optimized page designs.
Stronger commercial optimization - By controlling what information appears and how it is prioritized, you can optimize your activity pages for clarity, conversions, and audience relevance - especially in paid or campaign-driven storefront setups.
Migration of enroll widget
- As part of this release, the activity description enroll widget will be migrated to the new layout structure. See layout migration scheme below. Significant research and testing have gone into defining a migration scheme that minimizes visual disruption. However, because the enroll widget and banner are now modular layout components, you may notice slight structural adjustments to existing pages.
- We recommend reviewing key activity pages after the update to ensure layout, ordering, and metadata visibility align with your intended design and commercial priorities. That said, the overall structure and appearance of the activity description page should remain largely identical to how it appeared prior to the migration.
Share Activity from the Activity Description Page
We have added a Share button to all activity description pages, making it easier for users to distribute activities across teams, partners, and external audiences.
With one click, users can copy a direct link to the activity description page. If your platform uses organization-specific custom URLs, administrators can generate links on behalf of an organization, ensuring the correct branded and organizational context is preserved when sharing, and making the user a member of the organization during signup/login.

Features and Benefits
One-click sharing for all users - every activity description page now includes a Share button. Clicking it copies the activity link directly to the clipboard for quick distribution via email, chat, or campaigns.
Organization-specific sharing (custom URLs) - If organizations on your platform use custom URLs (organization aliases), administrators can generate links on behalf of a specific organization. This ensures:
- The correct branded context is shown to the recipient
- Organization-specific appearance and configuration are applied
- Anonymous users can be associated with the correct organization during signup or login
Supports external promotion and partner distribution - This enables structured sharing across partner networks, campaigns, and distributed sales or training organizations - without requiring manual URL handling.
Configuration
No additional setup is required to enable the Share button. However, organization-based sharing depends on:
- Organizations having custom URLs configured in the organization settings
- If no custom URLs are configured, the Share button will simply copy the standard activity description URL.
Considerations
- Be mindful when editing activity titles. The activity description page URL includes the activity title. If you change the title after links have been distributed, previously generated links may no longer work.
- We recommend finalizing titles before launching large campaigns or distributing links externally.
Better Checkout UX for Managers
We’ve improved the checkout experience for users with Manager permissions so it’s clearer whether you’re enrolling your team or yourself.
Previously, Managers were taken directly into the team enrollment flow, which could feel unintuitive when the intention was simply to enroll themselves. With this update, the checkout page now presents a clear and immediate choice between Team and Myself, making the flow more intuitive and aligned with real-world usage patterns.
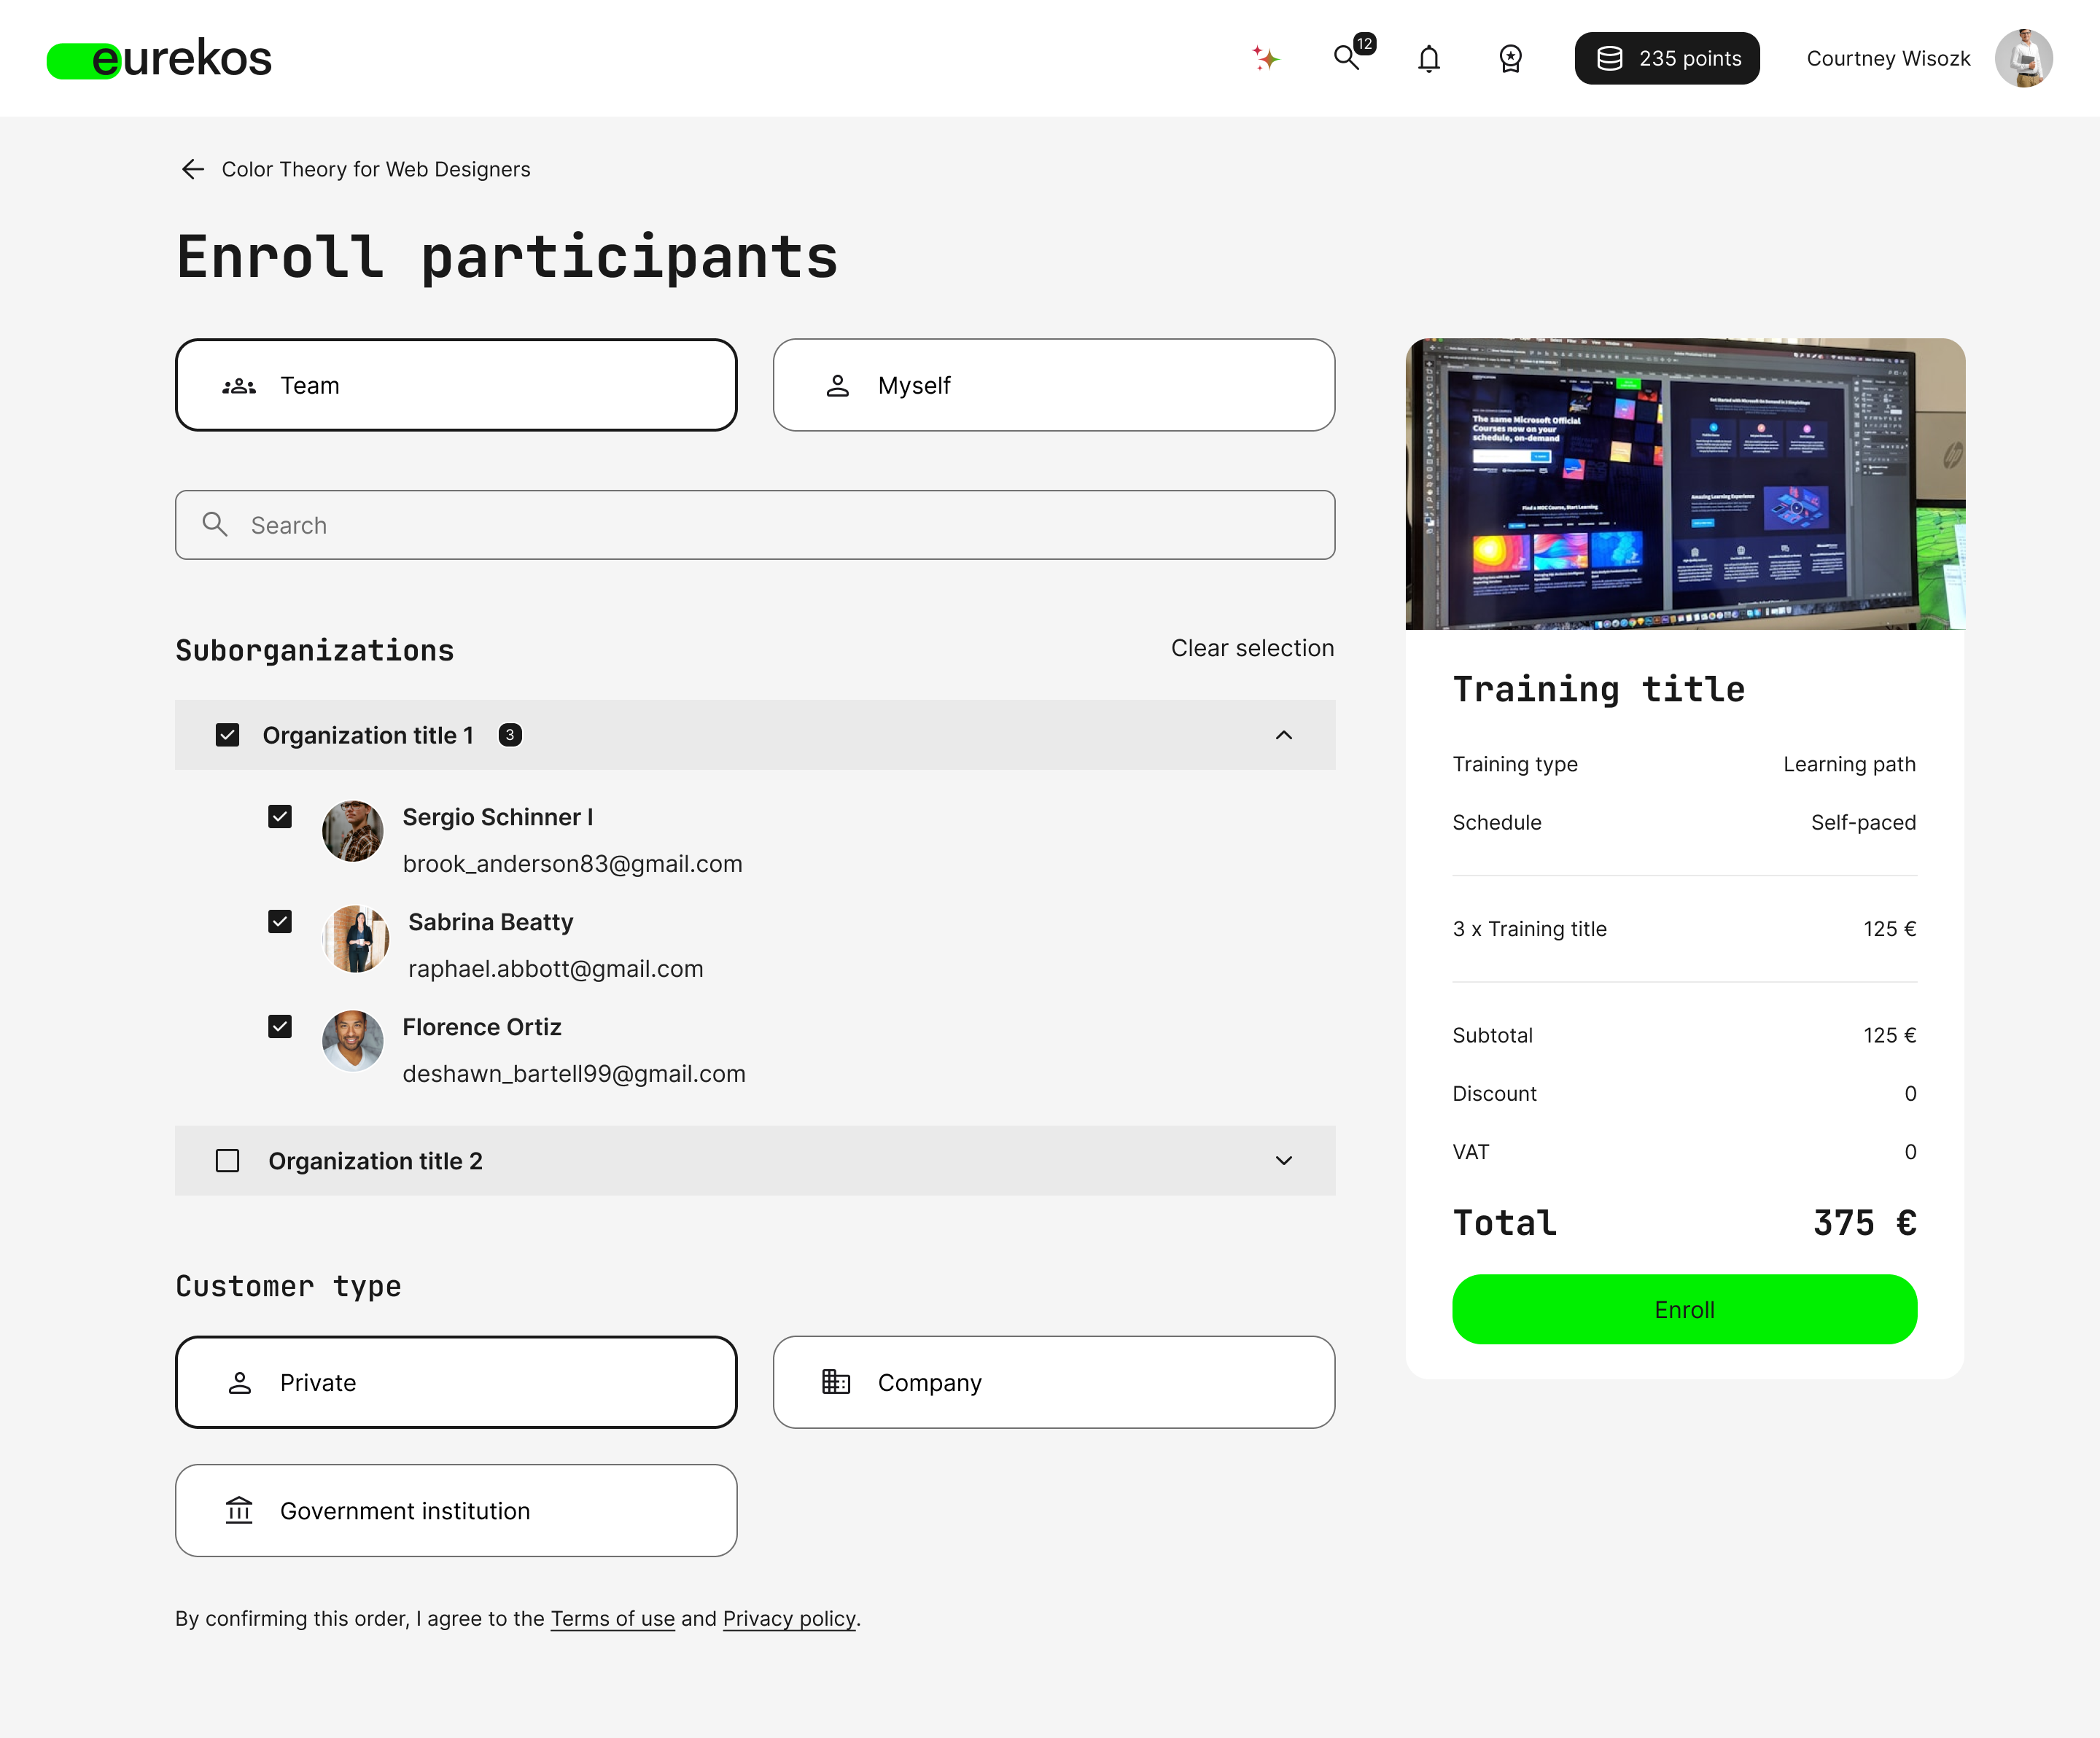
Features and Benefits
- Clear “Team” vs. “Myself” selection at the start of checkout, reducing friction and confusion for Managers.
- Faster self-enrollment when the Manager is also the learner — fewer clicks, less uncertainty.
- More consistent buying experience by aligning the checkout flow with the Team Subscriptions UX pattern.
Chapter
5
Content Authoring
In this chapter:
| This release introduces significant improvements to how you create, manage, and scale learning content in Eurekos. From interactive video transcripts and page-level adaptivity to a more powerful text editor and stronger brand governance controls, these updates give content creators more flexibility and administrators more control. Together, they make it easier to build richer, more personalized, and more professional learning experiences - while ensuring consistency and scalability across your platform. |
Video Transcripts & Enhanced Video Management
Video management in Eurekos has been significantly enhanced to improve accessibility, searchability, and editorial control.
With this update, transcripts and subtitles become first-class elements in the video experience. Administrators can now create, upload, edit, and manage subtitles and transcripts directly within the platform, while learners can view and interact with transcripts directly inside the video player.
Beyond improved usability, this update strengthens the platform’s global search capabilities by indexing video transcripts and subtitles, enabling video content to be discovered in new ways. These enhancements also lay the foundation for AI-powered video transcription and translation services (described in chapter 1 of this release).
Features and Benefits
Enhanced video administration interface - The video administration experience has been redesigned to improve clarity and efficiency when managing:
- Cue points
- Slides
- Subtitles and transcripts
The updated interface makes it easier to add, edit, and structure interactive video elements, reducing friction for content editors and improving the maintainability of large video libraries.
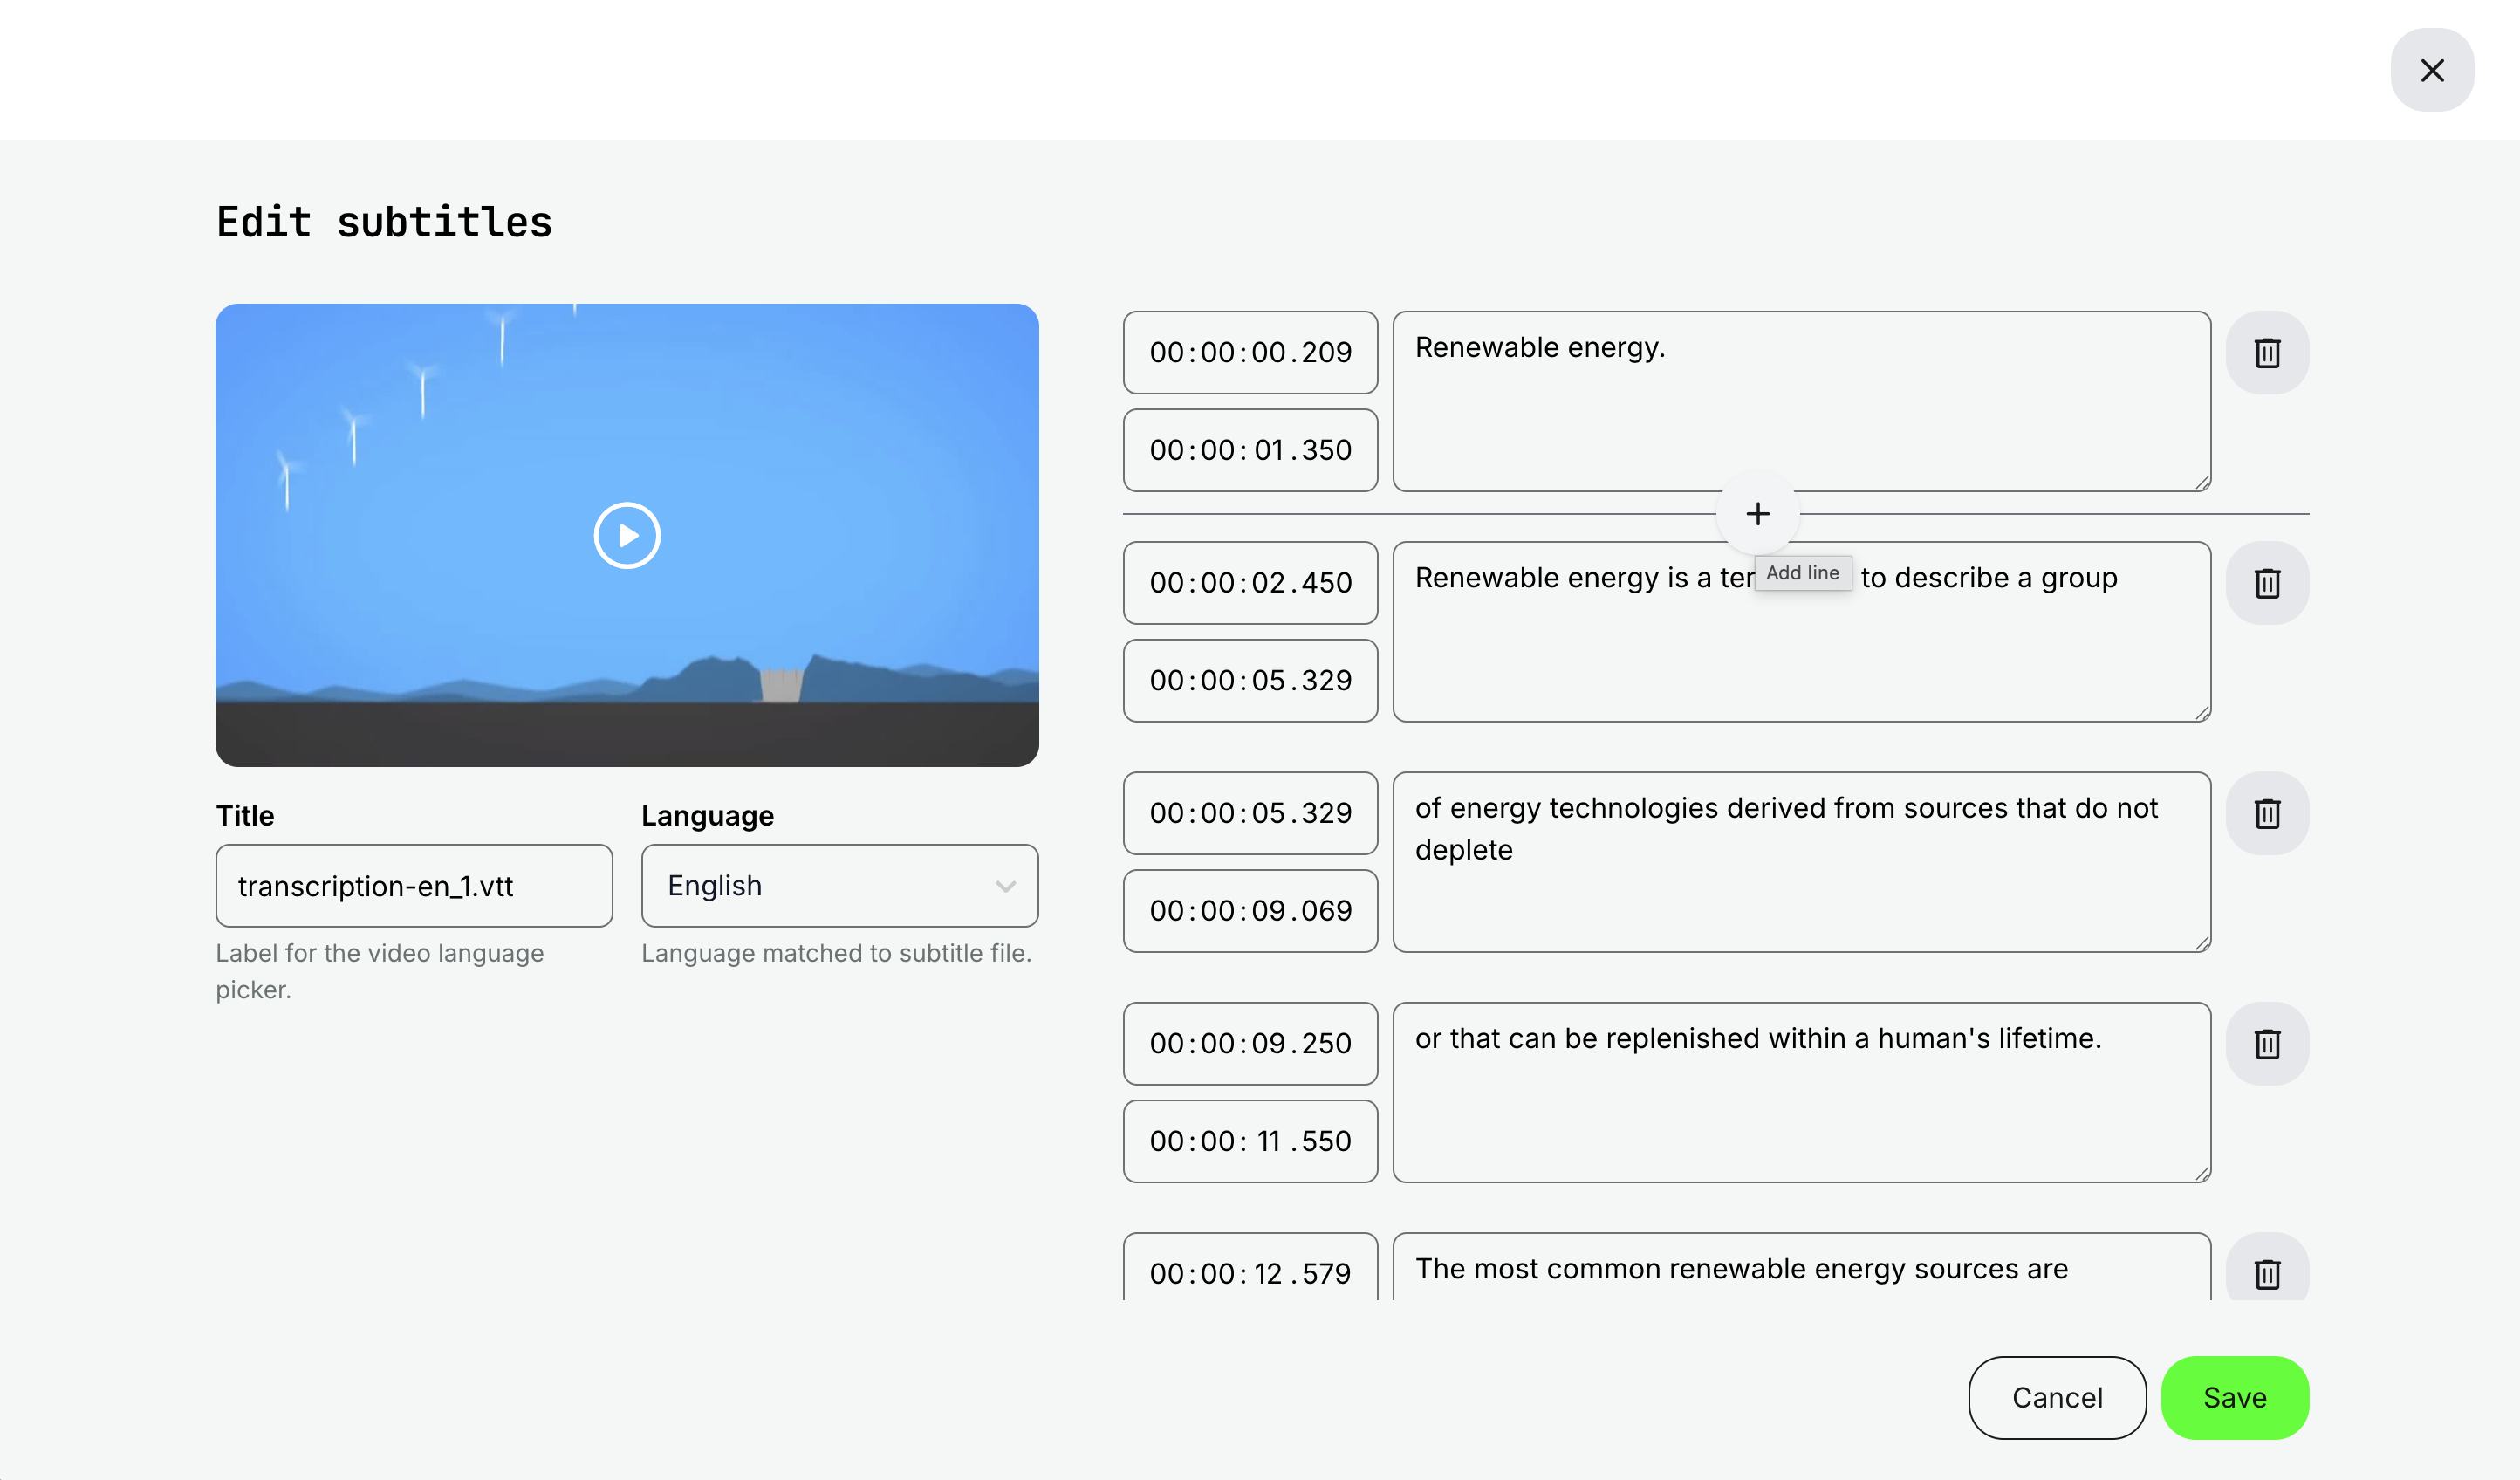
Create and edit subtitles directly in the platform - Subtitles and transcripts can now be created manually within the video edit interface, in addition to uploading existing subtitle files. Key new capabilities include:
- Manual subtitle creation with timestamp control
- Editing uploaded subtitle files directly in the platform
- Support for VTT (generation & download) and continued support for SRT uploads
This gives administrators full editorial control without relying on external tools, simplifying content workflows and ongoing updates. Transcripts and subtitles can also be downloaded when needed.
Interactive transcript experience in the video player - The video player has been enhanced to support an interactive transcript panel. Learners can now:
- Open and read the transcript while watching the video
- Search within the transcript
- Click any transcript line to jump directly to that timestamp
- Switch between available transcript languages
This transforms videos into an active learning experience - improving comprehension, navigation, and accessibility.
Video content becomes searchable - Video transcripts and subtitles are now indexed by the platform’s global search.
- This means that spoken words in videos become searchable across the platform, increasing the discoverability of knowledge embedded in recorded content.
- For organizations with large webinar archives, product training libraries, or expert recordings, this unlocks significant additional value from existing assets.
AI-ready video infrastructure - This update also enables optional AI-powered services (described in Chapter 1), including AI-driven audio-to-text transcription and AI-translation of transcripts and subtitles.
- All AI-generated transcripts remain fully editable within the platform, ensuring editorial control and quality assurance.
⚠️ All roles with video management permissions have access to the enhanced video administration features.
Considerations
- Transcript and subtitle quality directly impact search accuracy and learner experience. We recommend reviewing and validating transcripts before publishing, particularly when using AI-generated versions.
- VTT is now the primary format for transcript generation and download, while SRT remains supported for upload and use.
- Transcript management, interactive transcripts, and transcript-based search currently apply only to videos hosted within Eurekos. Third-party embedded videos (e.g., Vimeo, YouTube, or other external providers) are not supported by these features.
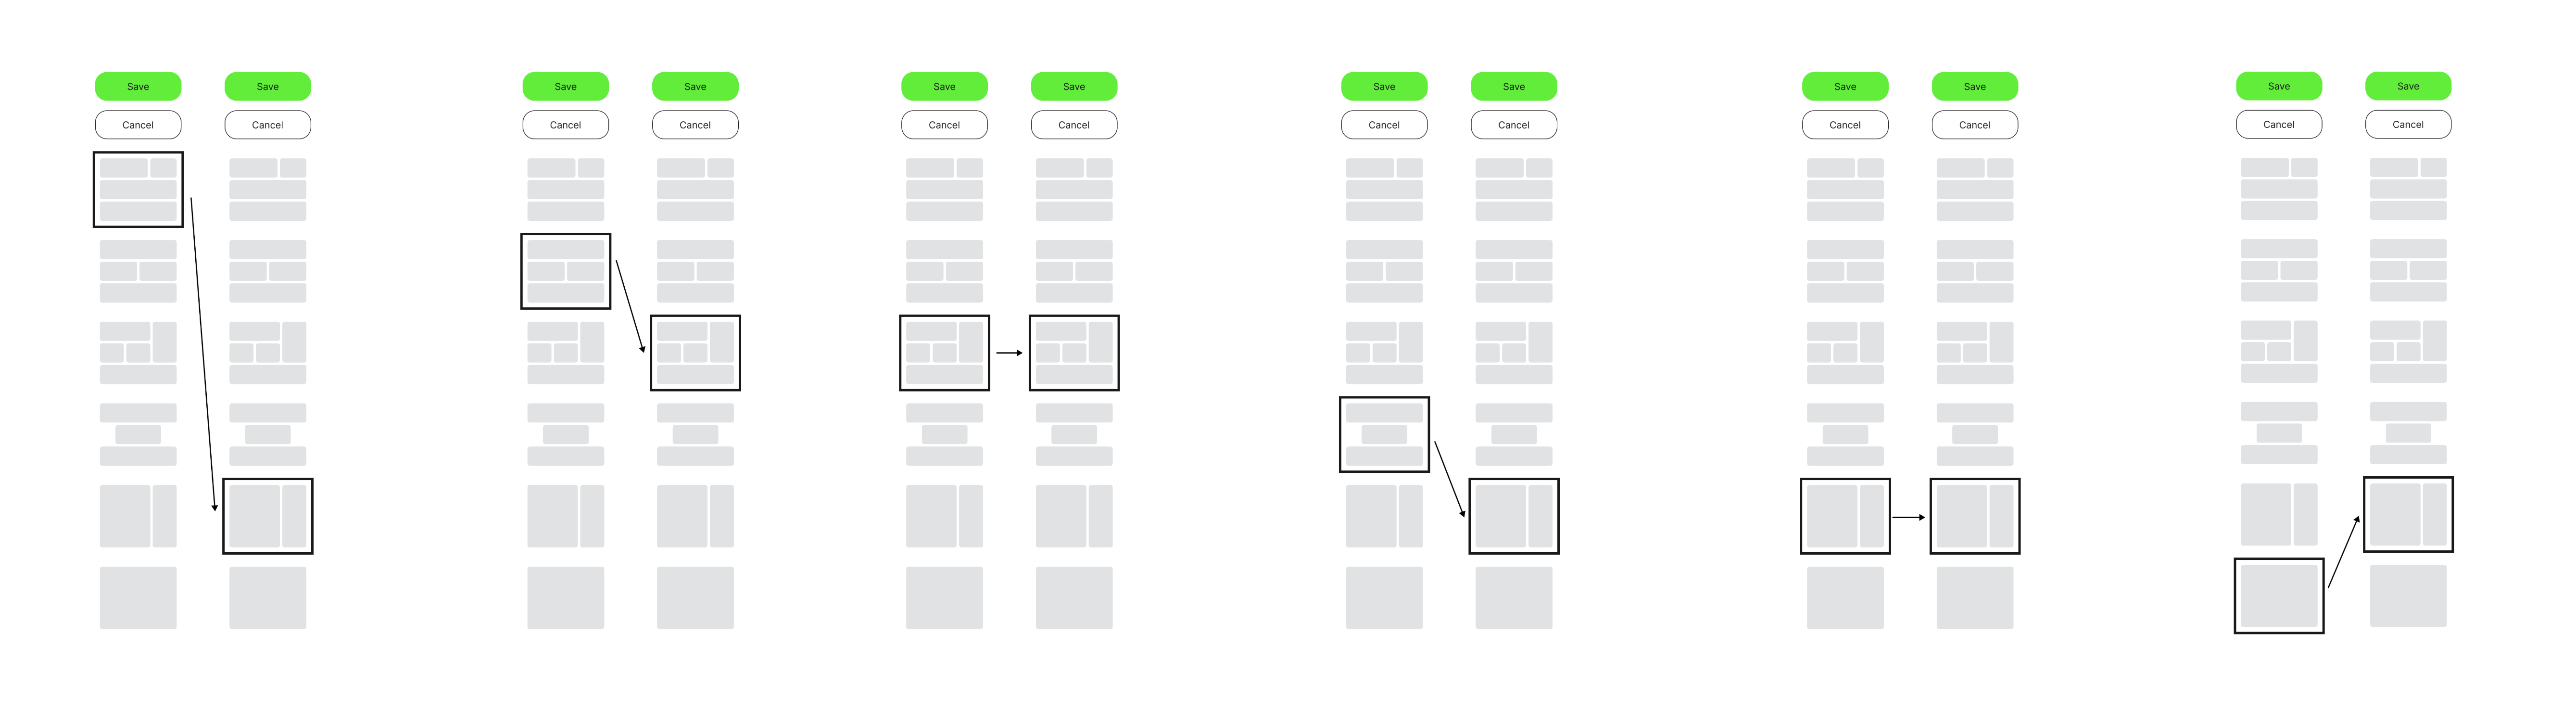
Adaptive Course Pages
With this update, we extend adaptive learning deeper into the course experience by enabling page-level adaptivity within course modules created in the Eurekos authoring tool.
Until now, adaptivity in Eurekos has been available in onboarding flows and learning paths, where modules can dynamically become recommended or optional based on profile attributes or assessment performance. With this release, that same adaptive intelligence can now be applied inside individual course modules—at the page level.
Content creators can define rules that make pages recommended, optional, or supplemental based on a learner’s job function tags or performance in H5P assessments.
This enables a far more granular level of personalization—allowing courses to adjust in real time to learner needs, performance, and roles, without requiring multiple versions of the same course.
Features and Benefits
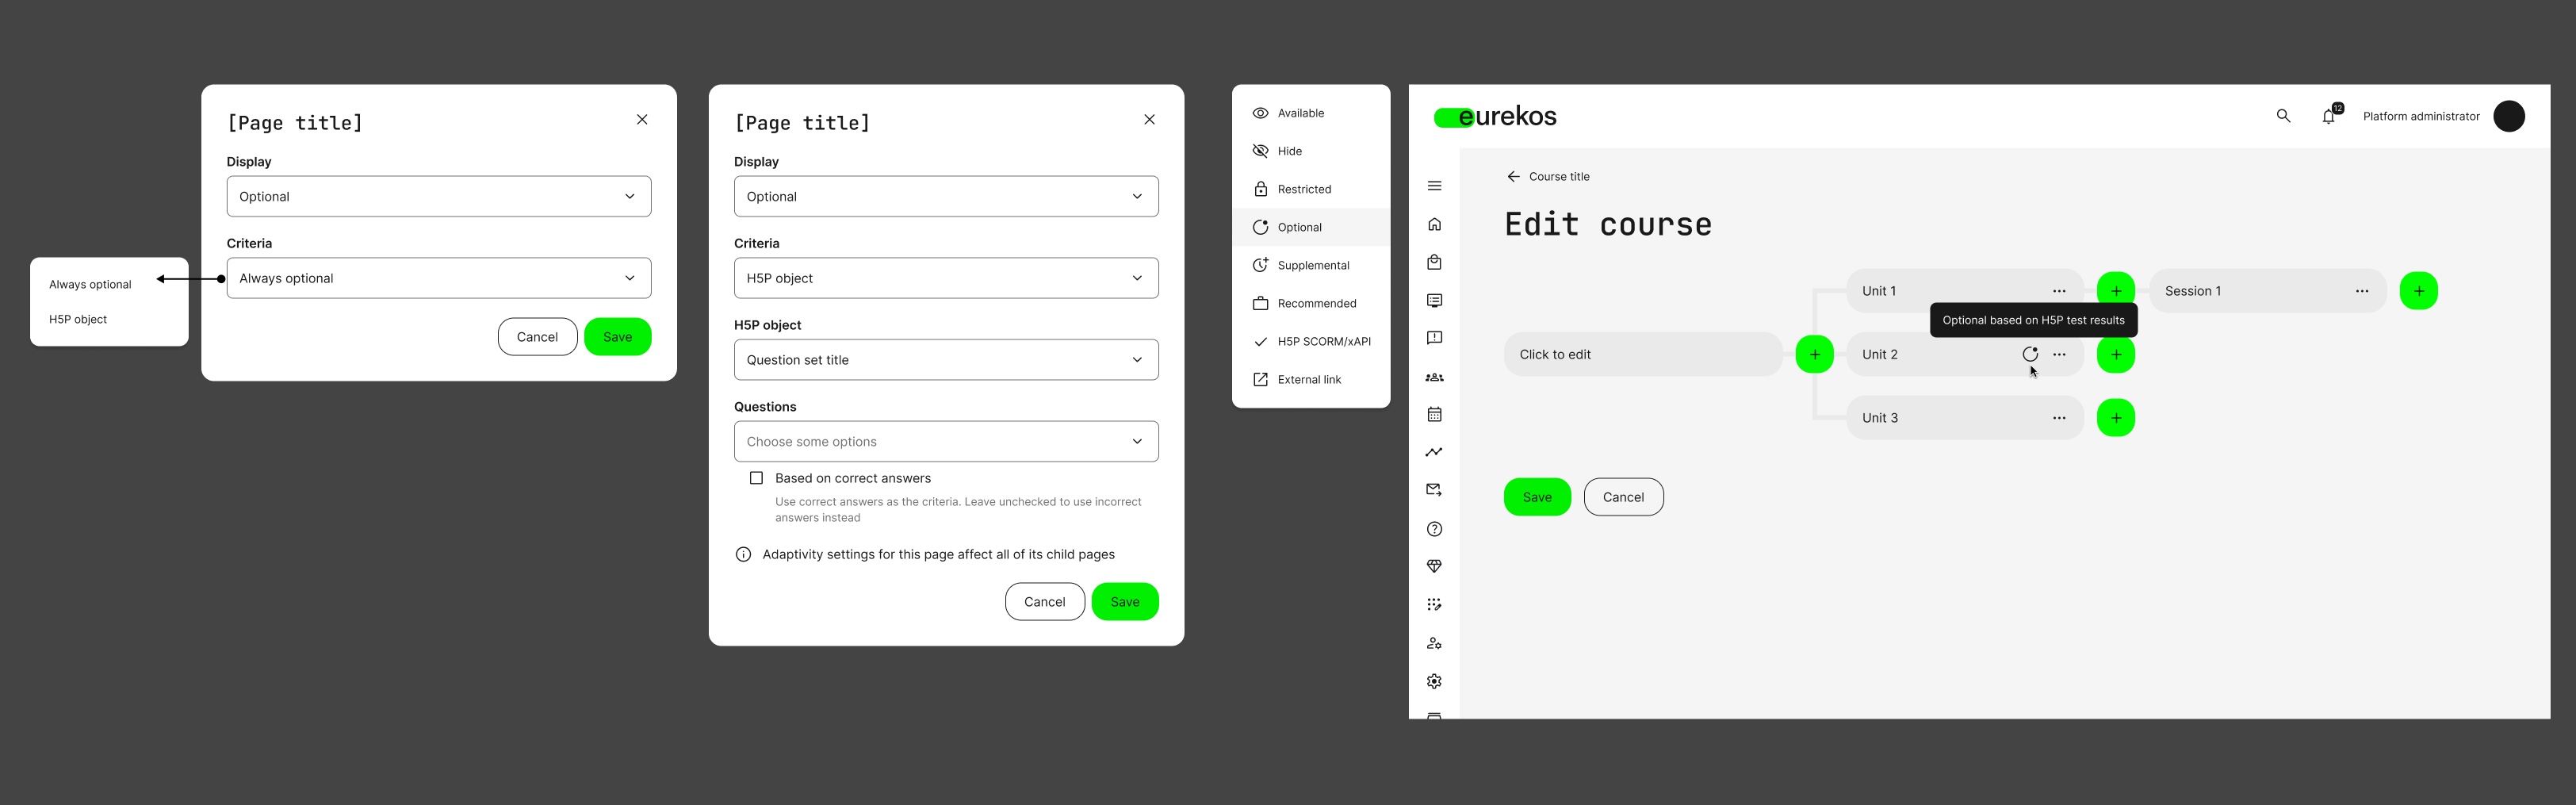
Page-level display rules - Content creators can now configure adaptive display rules directly in the page settings. In addition to existing options (Hide, Restrict, H5P SCORM/xAPI, External link), the following adaptive states are available:
Recommended - A page can become recommended based on job function tag(s) in the learner’s profile, supporting role-based personalization within a single course structure.
Optional - A page can be:
- Always optional, or
- Optional based on a learner’s response (correct/incorrect) to selected H5P Question Set questions.
Optional pages are excluded from progress tracking and do not count toward course completion
Supplemental - A supplemental page remains hidden in course navigation until specified criteria are met (e.g., answering specific H5P questions correctly or incorrectly). Supplemental pages can be configured to:
- Be included in progress tracking, or
- Not counted toward completion.
This enables structured, enrichment, or deep-dive content that only appears when relevant.
Clear learner communication - When a course adapts during progression, learners receive an on-screen notification explaining that their course has been updated and what has changed.
- In the course navigation, learners can clearly see whether pages are recommended, optional, or supplemental—ensuring transparency and reducing confusion.
Progress tracking and analytics alignment - Adaptive outcomes are fully reflected in:
- Learner progress tracking, Course completion logic, Administrative reporting, and analytics
- Administrators can see when pages have become optional or supplemental for individual learners, providing insight into adaptive pathways and performance patterns.
Stronger instructional design flexibility - This enhancement allows organizations to:
- Deliver differentiated learning within a single course
- Surface advanced or deep-dive content for high-performing learners
- Align content visibility with role-based requirements - All without duplicating modules or fragmenting the course structure.
User Instructions
To configure adaptive pages:
- Open the course module in the Eurekos authoring tool.
- Select the page and open Page settings.
- Under Display, choose the desired rule (Available, Recommended, Optional, Supplemental, etc.).
- For Optional or Supplemental pages:
- Select the relevant H5P object.
- Choose specific question(s) that determine the rule.
- Define whether the rule is based on correct or incorrect answers.
- Specify whether the page should count toward progress (where applicable).
- Save changes.
As learners progress through the course and meet the defined criteria, page visibility and status will update dynamically.
Considerations
- Adaptive rules rely on properly configured H5P Question Set objects. Clear assessment design is critical to achieving the intended learning flow.
- Designers should ensure this aligns with certification or compliance requirements.
- Supplemental pages remain hidden until triggered. If the criteria are never met, learners will not see the page.
- Adaptive updates occur dynamically as learners progress, and learners are notified of changes.
Enhanced Text Editor in the Authoring Tool
We have significantly upgraded the text editor in the Eurekos authoring tool to provide content creators with greater flexibility, precision, and control over their content.
This update responds directly to long-standing requests for more advanced formatting capabilities - including tables, image handling, and richer styling options - while maintaining the simplicity and reliability creators expect.
The result is a more powerful, professional content-creation experience, enabling you to design richer learning materials directly in Eurekos without relying on external tools or workarounds.

Features and Benefits
The upgraded editor introduces a wide range of new formatting and content options, along with an improved, more intuitive ribbon interface. Key enhancements include:
- Table support - Create structured tables directly within course pages, including row and column management, cell merging and splitting, and table and cell property configuration. This makes it easier to present structured information such as comparisons, pricing, specifications, or data-heavy content in a clean and professional format.
- Image insertion and management - Insert images directly from your local computer or from the platform’s archive. This simplifies content workflows and reduces the need for external hosting or embedding solutions.
- Code blocks and technical formatting - Insert formatted code blocks where needed - particularly valuable for technical, IT, or developer-focused training.
- Expanded text styling options - Improved list formatting, indentation controls, font size adjustments, font color and background color options, and strikethrough formatting provide significantly greater editorial control and visual clarity.
- Improved ribbon behavior and usability - The editor interface has been refined for better responsiveness and clearer tool grouping, making it easier to create and edit content efficiently.
Importantly, no previous functionality has been removed. All existing formatting capabilities remain available, ensuring a seamless transition while unlocking more advanced authoring possibilities.
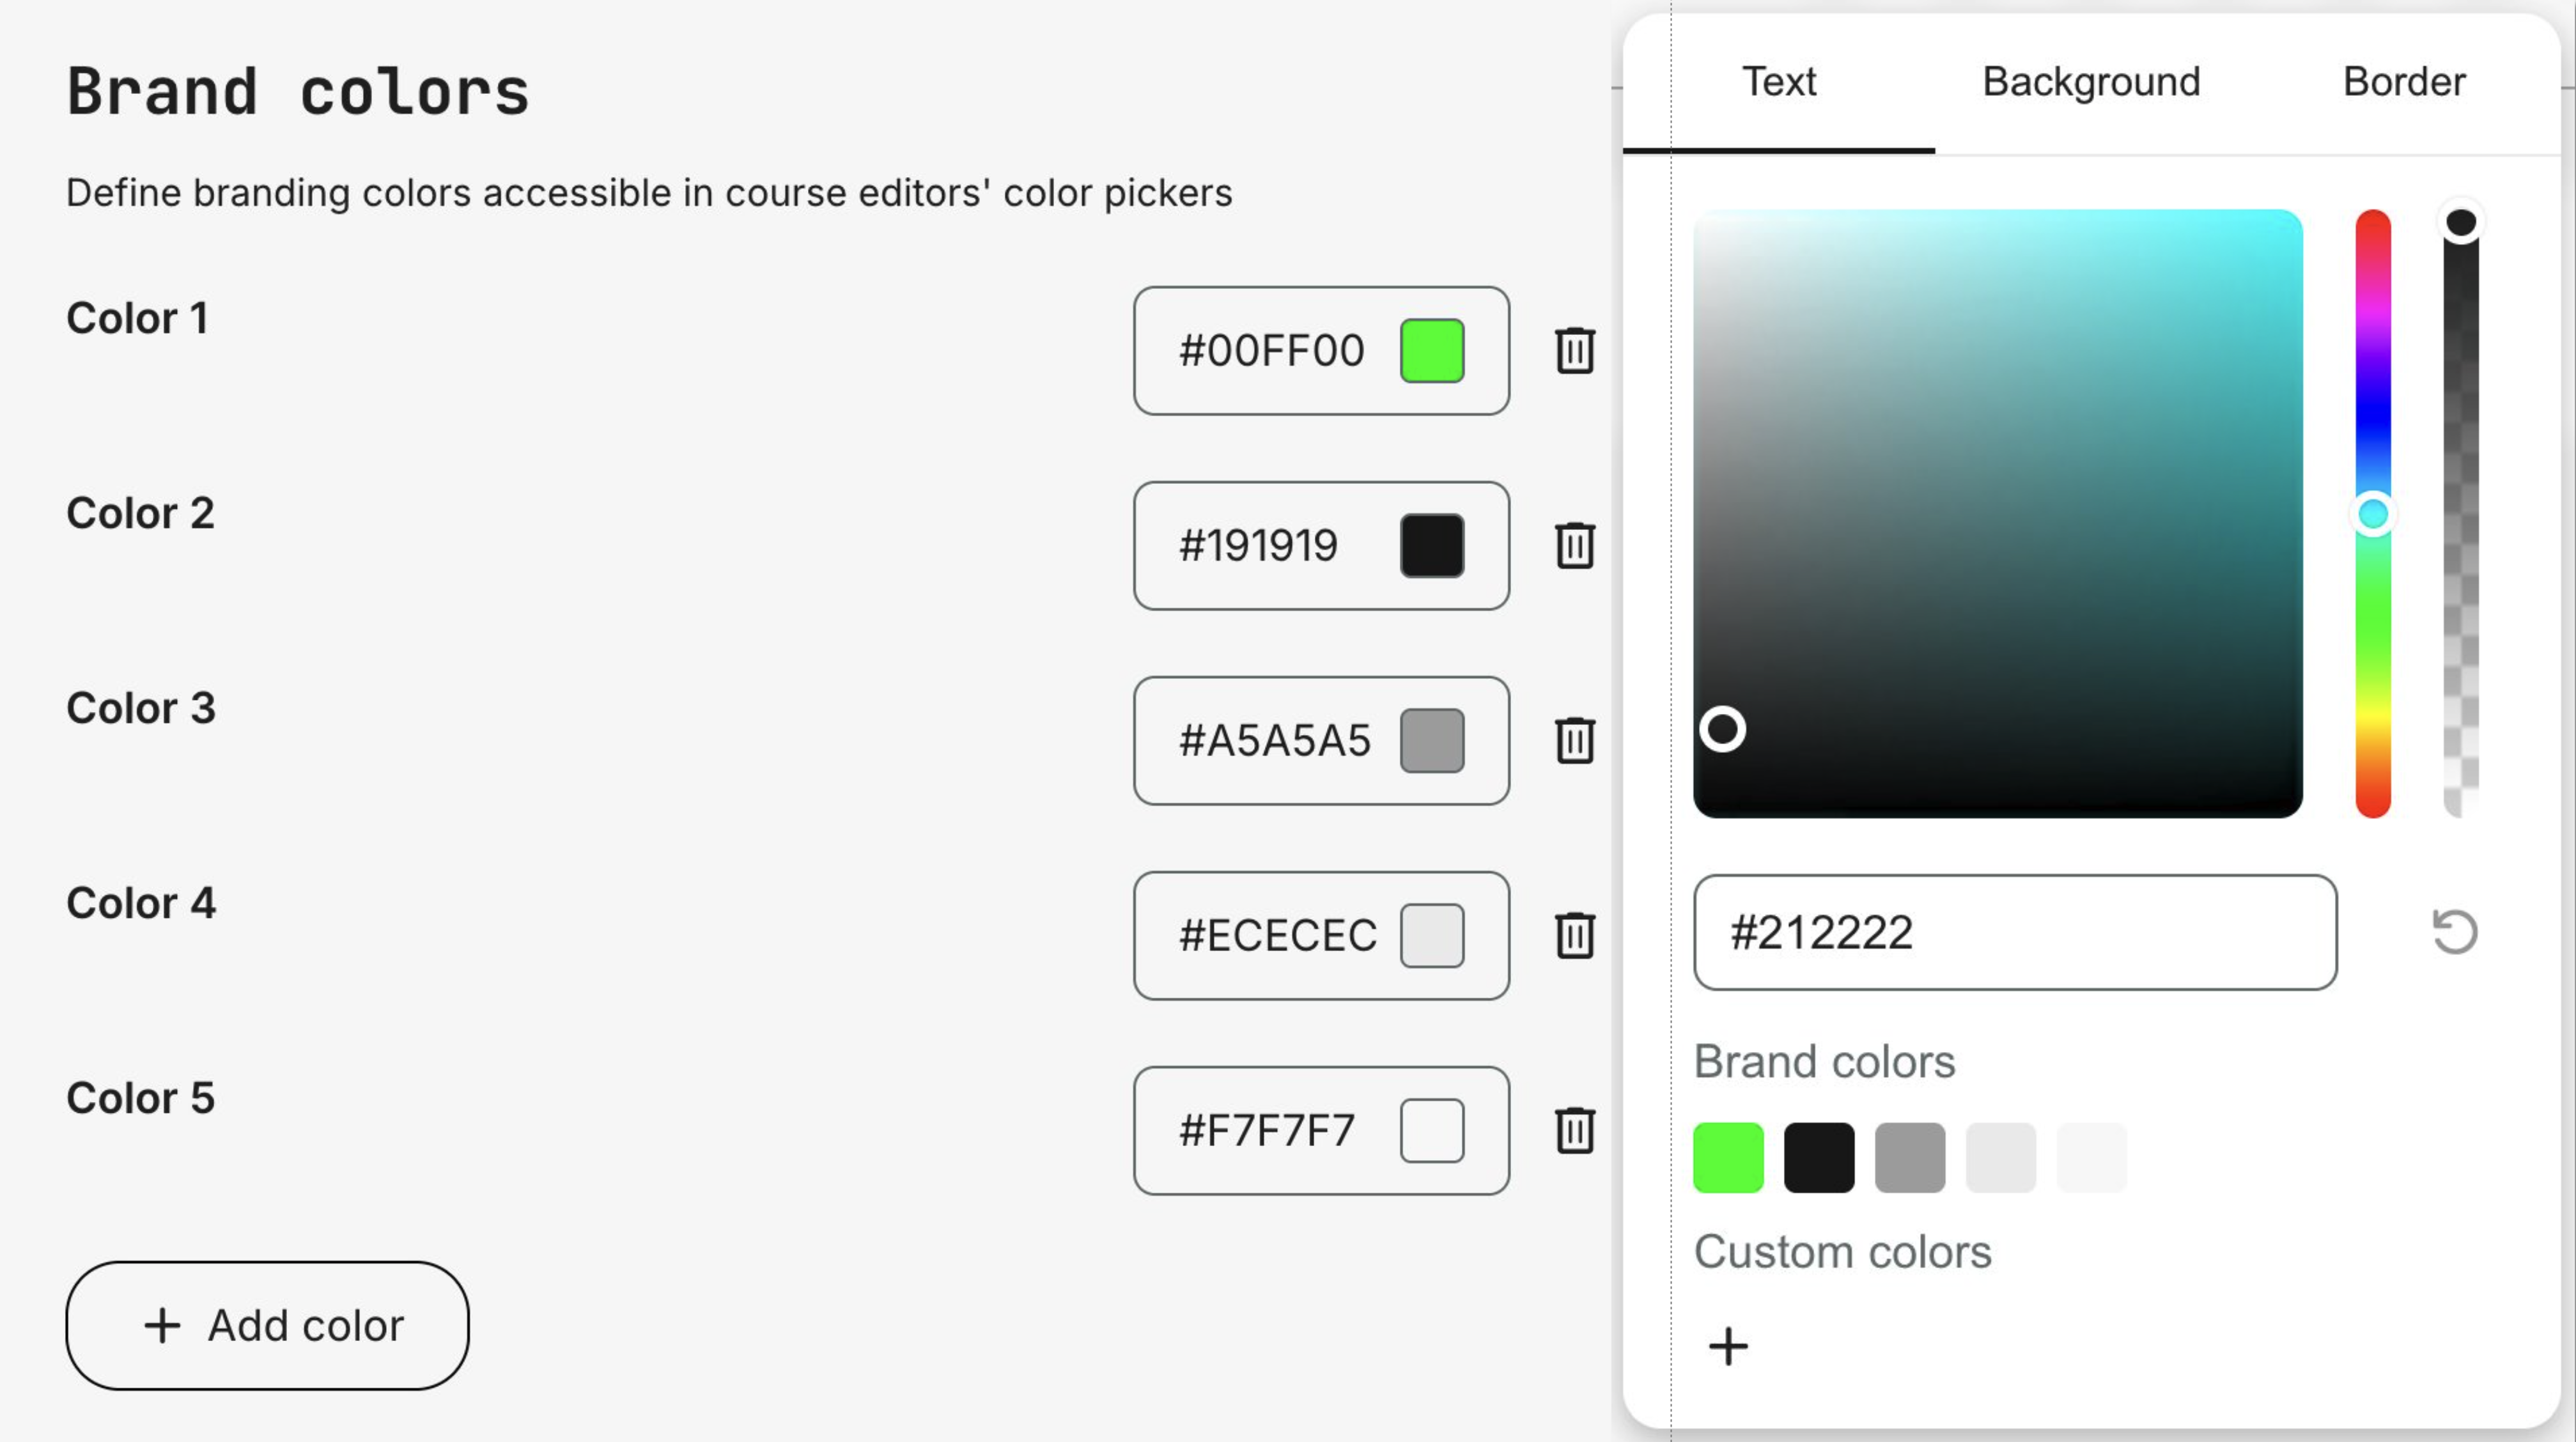
Brand Color Presets
We have introduced brand color presets to help content creators stay visually aligned with your organization’s identity.
With this update, approved brand colors are now directly available in the authoring tool’s color picker. This helps ensure consistent visual styling across courses and pages—while making everyday content editing faster and more intuitive.
Features and Benefits
- Centralized brand control - Define official brand colors once at platform-level and make them available everywhere in the authoring experience.
- Consistent visual identity - Reduce the risk of off-brand colors across courses, pages, and learning materials - especially in environments with many content creators.
- Faster content production - Content creators can quickly select approved colors directly from the color picker rather than manually enter HEX codes.
- Seamless integration into the authoring workflow - Brand colors appear alongside custom and recently used colors in the editor’s color picker, making them intuitive and easy to use.
Configuration
Brand colors are configured under: Settings → Appearance → Colors → Brand colors
- Administrators can define and manage a list of brand colors.
- These colors are immediately available in all supported color pickers in the Eurekos authoring tool.
- This is a platform-wide configuration and applies across all content creators.
Considerations
- Brand color presets are available only at platform-level and cannot be configured at the organization level.
- Content creators can still freely choose other colors and maintain their own custom color presets in the editor.
Configurable Unique ID for Videos
By default, video titles in Eurekos must be unique across the platform. This means that two videos cannot share the same title - even if they belong to different courses or serve different purposes.
With this update, we introduce a new platform-level configuration that allows the Video Code field to be used as the unique identifier instead of the Title.
Features and Benefits
- Use the Video Code field as the unique identifier - You can now configure the platform so that the Video Code, rather than the Title, serves as the unique identifier for videos.
- Greater editorial flexibility - When Code is set as the unique identifier, content creators can reuse learner-friendly, consistent titles across courses without causing system conflicts.
- Improved scalability for structured content libraries - Organizations managing many courses, modules, or recurring formats can maintain clean naming conventions without being forced to artificially modify titles for technical reasons.
- Clear validation on save - When Code is configured as the unique identifier, it is validated accordingly during video upload and update.
Configuration
- This is a platform-wide backend configuration.
- It must be enabled by raising a support ticket.
- By default, the system continues to use Title as the unique identifier.
Chapter
6
Course Administration
In this chapter:
| This release introduces meaningful enhancements to how you manage pricing, enrollment workflows, and communication in Eurekos. From advanced Discount Campaigns and extended Participation Approval workflows to improved email automation, streamlined participant management, and stronger reporting controls, these updates give course administrators greater flexibility and operational control. Together, they make it easier to run structured, scalable training operations - while ensuring consistent pricing logic, transparent communication, and predictable enrollment outcomes across your platform. |
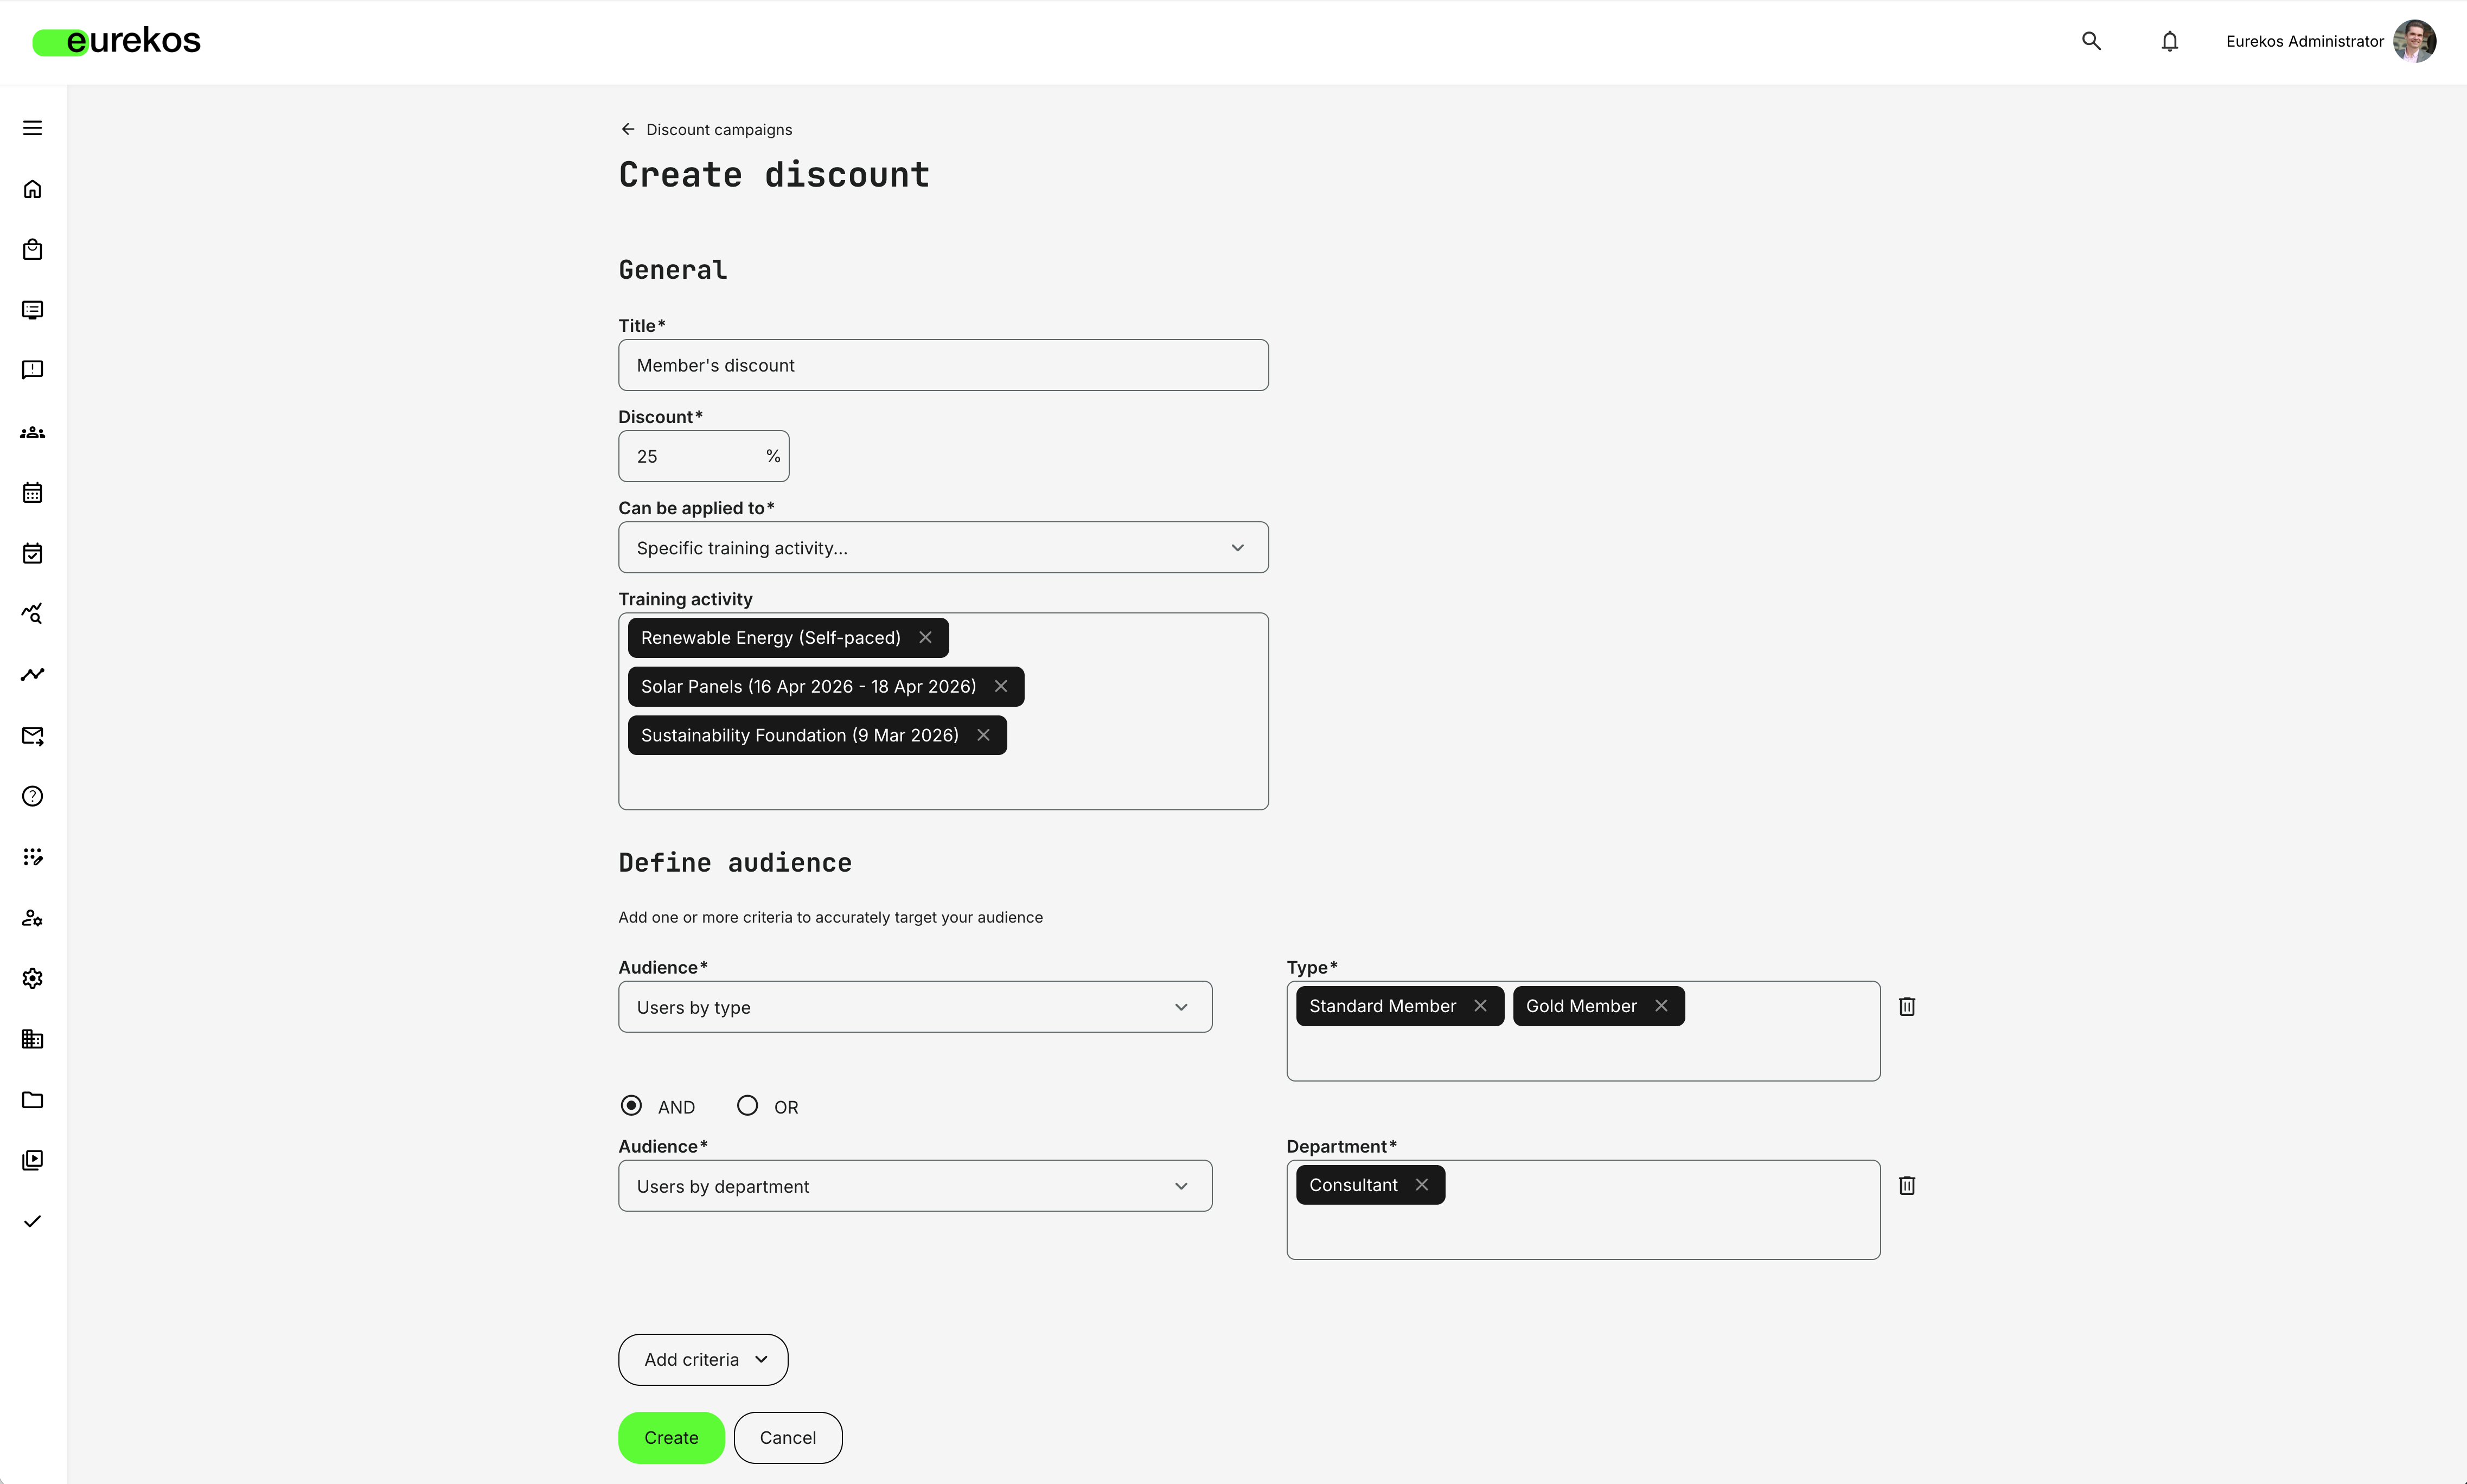
Discount Campaigns (formerly Coupons)
We have reworked the former Coupons section in Course Administration and expanded it into Discount Campaigns, introducing a new and powerful way to manage discounts.
In addition to traditional coupon codes and organization-level discounts, you can now create profile-based discounts that automatically apply to defined target audiences - without requiring a code at checkout.
This enables more scalable, flexible, and commercially strategic pricing models. Whether you are offering member pricing, partner discounts, campaign-based promotions, or structured tiered access, pricing can now adapt automatically based on who the user is.
When configured, eligible users will see their discounted price reflected throughout the purchasing journey.
Features and Benefits
Profile-based automatic discounts - You can now create discounts that apply automatically to users who match defined profile criteria. Instead of distributing coupon codes or relying solely on organization-level pricing, discounts are triggered dynamically based on user attributes. This enables scalable member pricing, partner programs, campaign targeting, and structured commercial models - all handled automatically by the platform.
Discount Campaigns allow you to:
- Define discount percentages (with decimal support)
- Select specific activities or apply discounts broadly
- Build audience rules using profile attributes with AND/OR logic
Transparent pricing across the purchasing journey - When a user qualifies for a discount, the adjusted price is reflected consistently across the entire purchasing flow.
The discounted pricing is visible in:
- Storefront listings
- The activity description page (showing both original and discounted price)
- The checkout flow, where the correct final amount is calculated
Controlled interaction with other discount types - Discount Campaigns integrate with organization-level discounts and coupons, following a defined application order. This ensures predictable pricing behavior and prevents unintended stacking of discounts.
Discounts are applied in the following order:
- Discount Campaign
- Organization-level discount
- Coupon
In addition:
- If multiple Discount Campaigns apply to the same user, the highest discount is used
- Discounts do not accumulate
Accurate pricing for manager-led enrollments - When managers enroll participants on behalf of their team, discount eligibility is evaluated individually per participant. Pricing is based on each team member’s profile.
Configuration
To create a Discount Campaign discount:
- Navigate to Course Administration → Discount Campaigns
- Open the Discounts tab
- Click Create
- Define:
- Title
- Discount percentage
- Applicable activities
- Target audience criteria (profile-based rules)
Discount Campaigns are managed at platform-level and respect the platform’s organization filter if enabled.
Considerations
- In the API, this discount type is referred to as a “global discount” (to differentiate it from organization-level discounts).
- Discounts do not stack. If multiple eligible discounts apply, the highest one is used.
- Subscriptions are not affected by Discount Campaign discounts.
- Tax rules are calculated on the discounted price.
- When managers enroll team members, eligibility is determined per participant.
- Discount Campaigns respect the organization filter if enabled on your platform.
Fixed Amount Coupons & Decimal Support
Coupons have been enhanced to support both fixed-amount discounts and percentage-based discounts with decimal values.
Previously, coupons could only be configured as whole-number percentages, limiting pricing flexibility and marketing options. With this update, administrators can now create more precise and commercially compelling discount strategies - whether that means offering “Save $100” or applying fractional percentage discounts such as 25.5%.
Features and Benefits
Support for fixed-amount coupon discounts - Coupons can now be configured as a fixed monetary value instead of only a percentage. This allows marketing teams to create clearer, more persuasive offers and enables pricing strategies better aligned with campaign goals.
When configuring a fixed-amount coupon:
- The discount must be defined in at least one currency
- If multiple currencies are enabled on the platform, a fixed value must be configured per supported currency
- Coupons can only be applied in currencies where a fixed discount value has been defined
End users can only apply a coupon when the activity price currency matches a configured coupon currency.
Decimal support for percentage-based coupons - Percentage-based coupons now support decimal values. This enables more granular pricing strategies and improves precision when working with complex pricing models.
Administrators can now define discounts such as:
- 12.5%
- 25.75%
Clear and predictable pricing behavior - Coupon logic has been updated to ensure consistent, controlled pricing outcomes.
Please note:
- Negative pricing is not supported
- If a fixed discount exceeds the activity price, the user receives a 100% discount
- The coupon is still consumed even if the full activity price is covered
Configuration
Coupons are configured from: Course Administration → Discount Campaigns → Coupons. You can select whether the coupon is percentage-based or fixed-amount during setup.
Considerations
- Fixed-amount coupons must be configured per currency when multiple currencies are enabled
- Coupon discounts are applied according to the defined discount order (after Discount Campaigns and organization-level discounts)
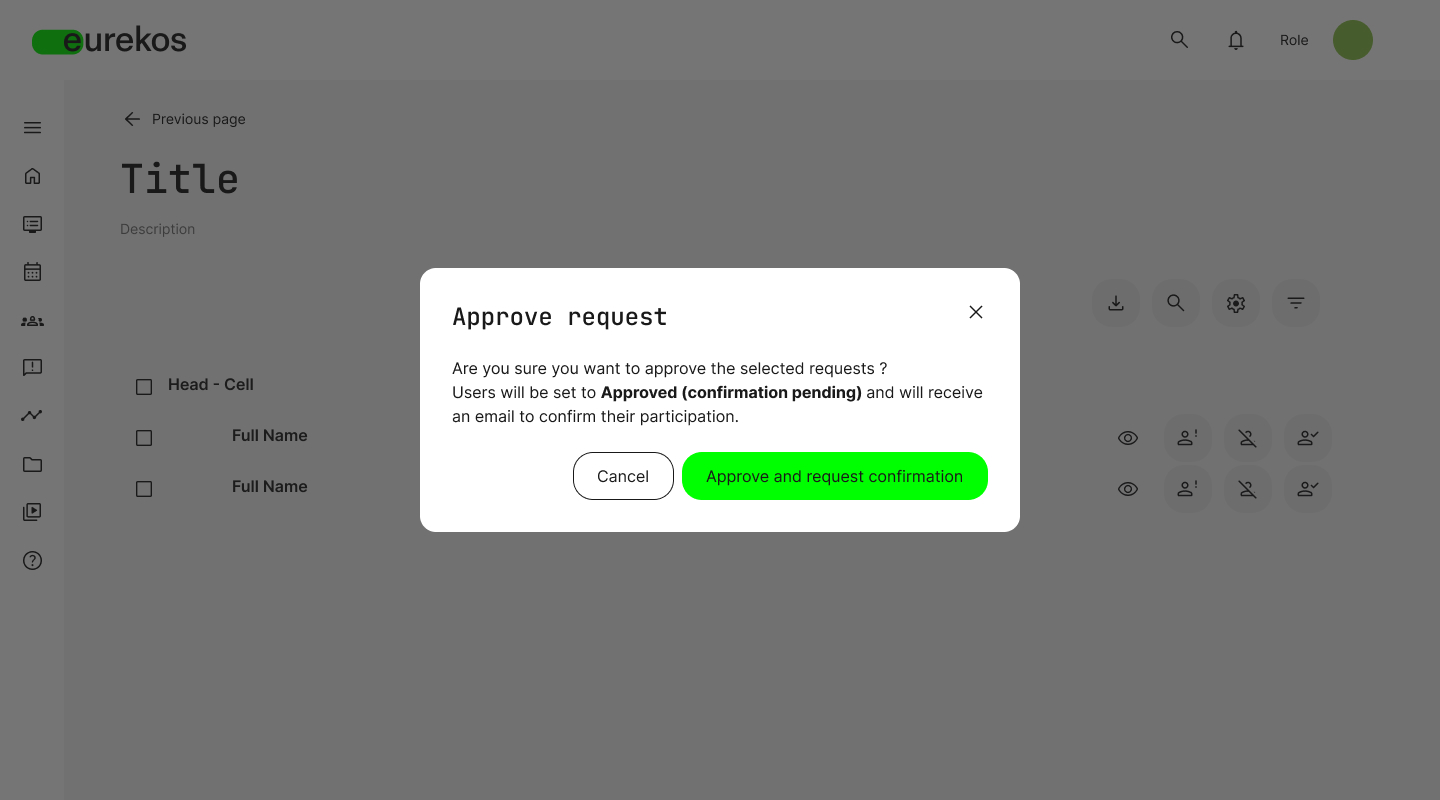
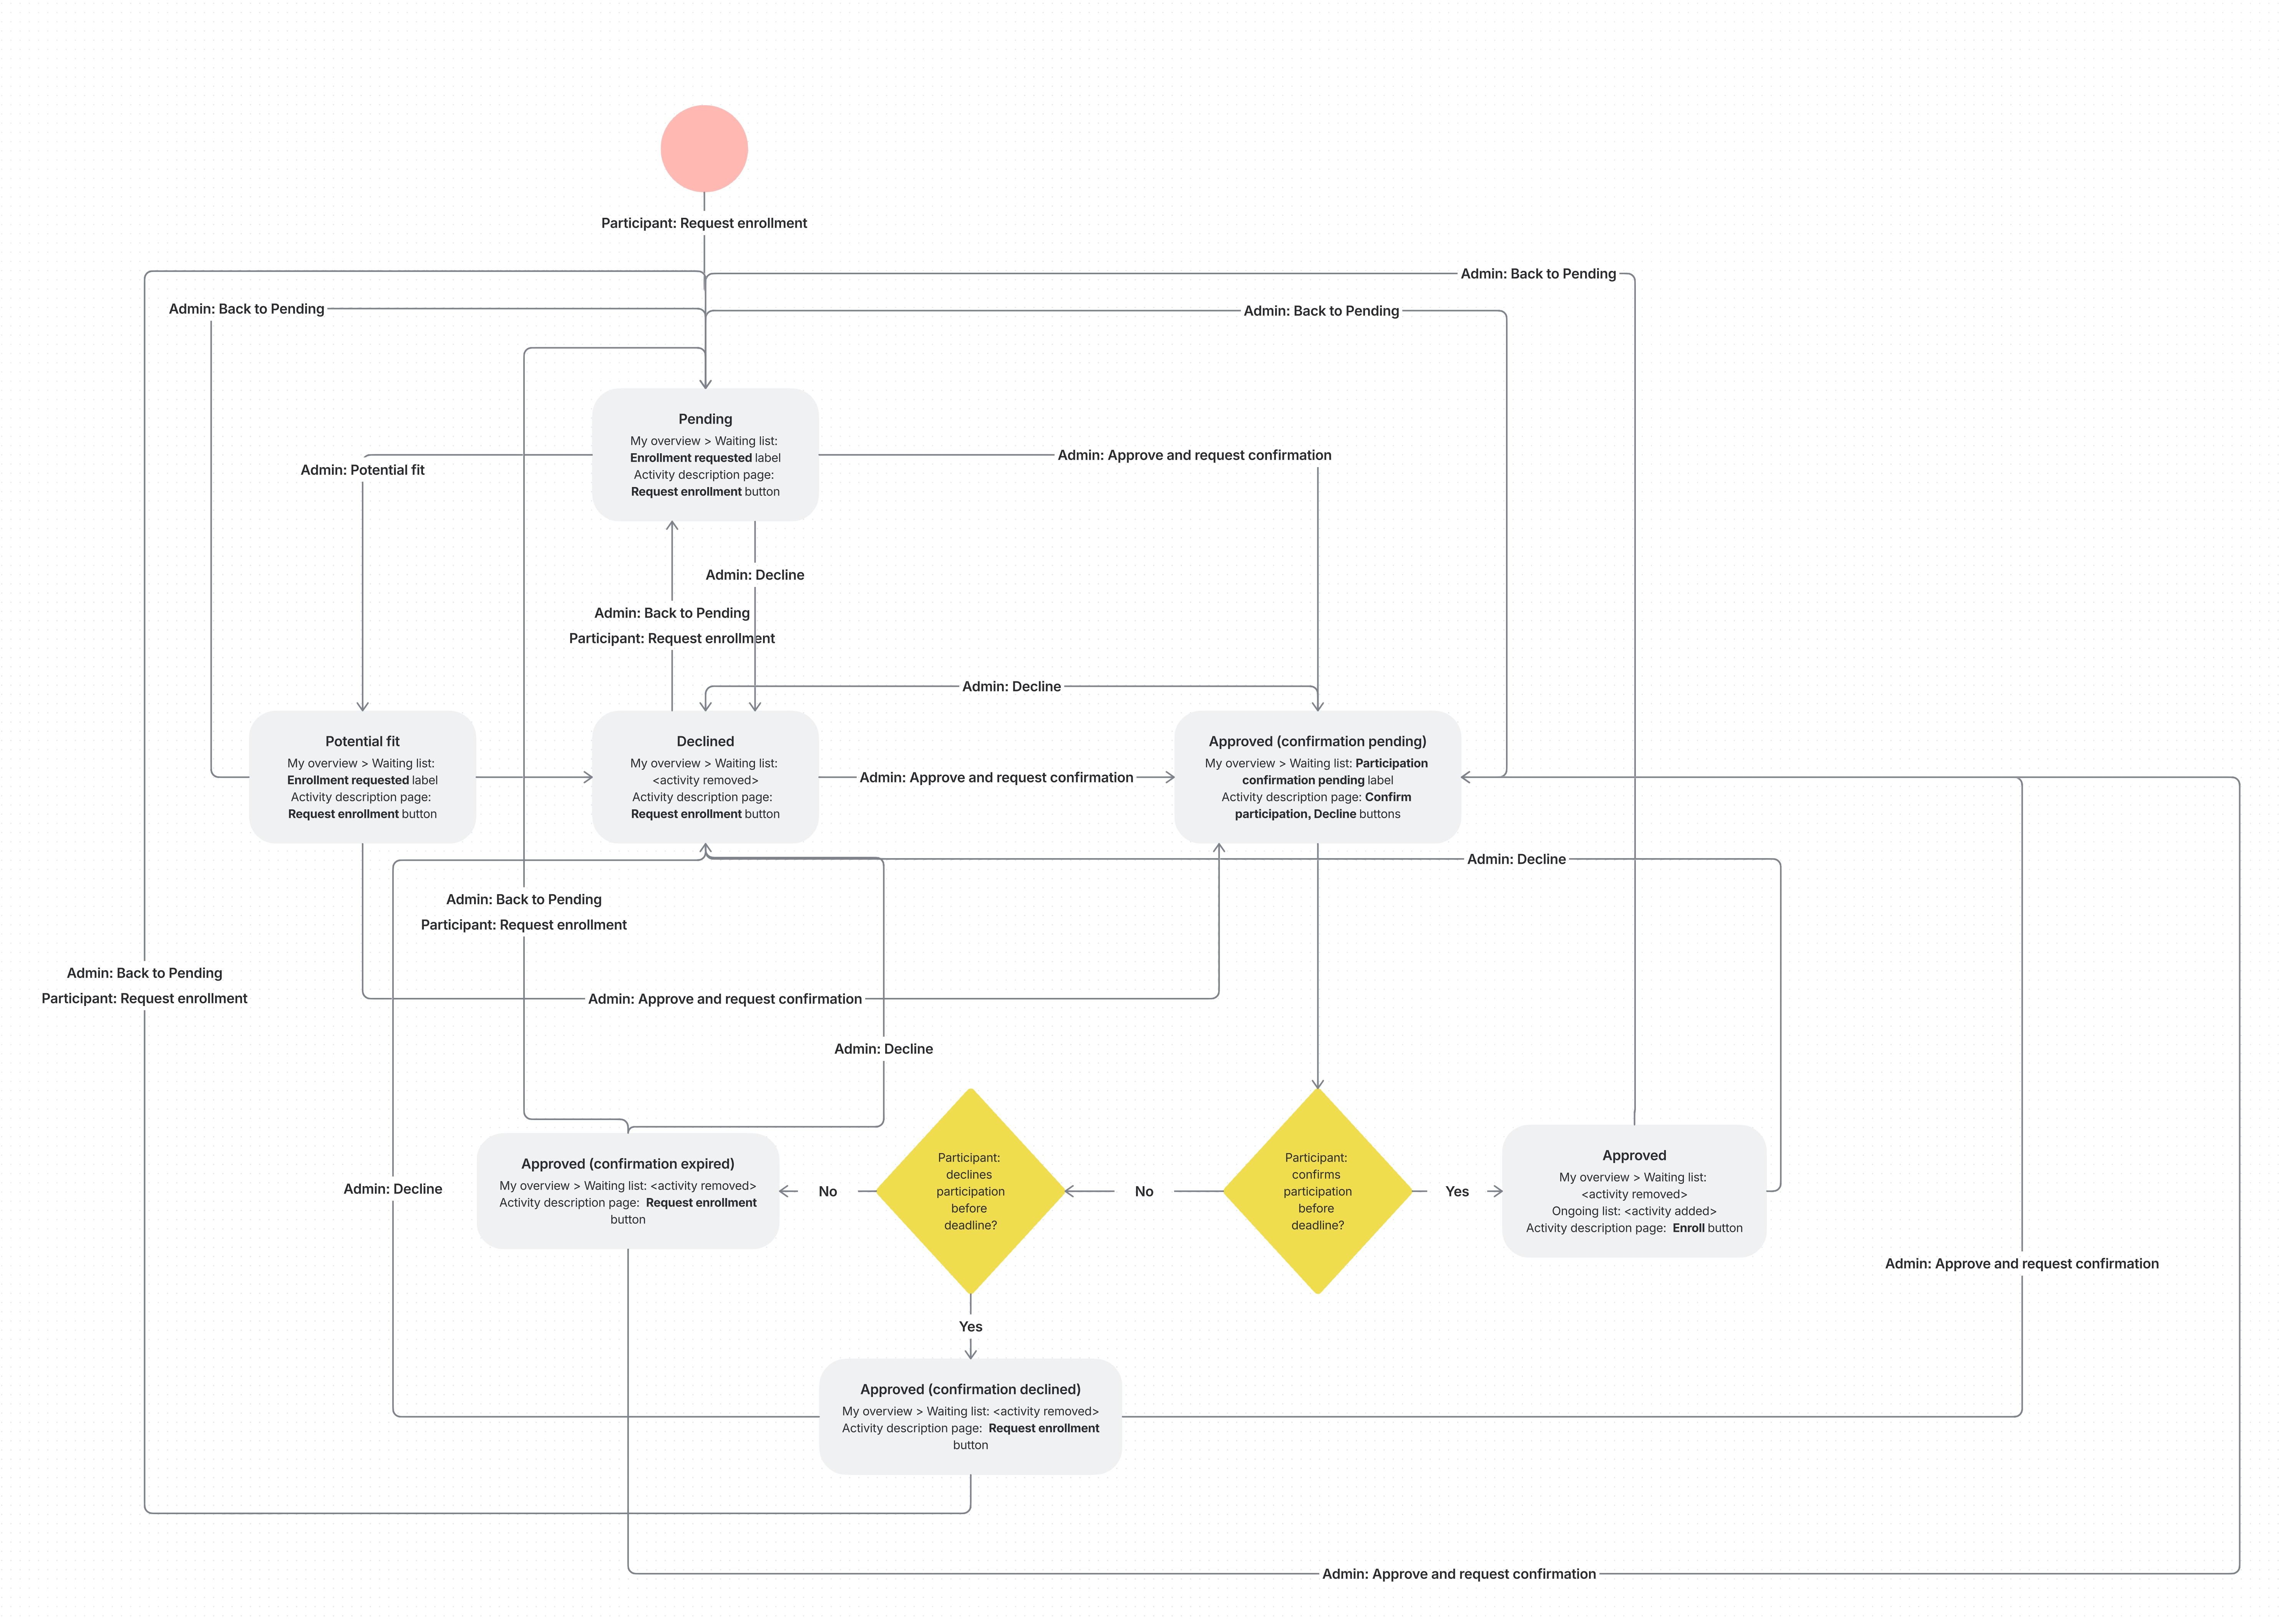
Participation Approval Workflow Extensions
With this update, Participation Approval workflows have been extended to support post-approval confirmation and staged data collection.
Activities that require approval can now be configured so that approved applicants must actively confirm their participation before they are granted final access to the activity. This enables more effective management of long approval cycles, ensures participant commitment, and collects relevant information only when needed.
The enhancement adds greater process control, flexibility, and governance to approval-based enrollment flows.
Features and Benefits
Post-approval confirmation with a mandatory questionnaire - You can now require approved applicants to confirm their participation before granting them access to the activity. When enabled, confirmation is only completed once the participant submits the required questionnaire:
- The confirmation step allows you to collect additional information only from approved users, while ensuring that final access is granted only after the participant actively reconfirms.
- This is particularly valuable in scenarios with long approval cycles, where circumstances may change between initial application and final approval. If the participant declines or fails to confirm before the defined deadline, access is not granted.
Staged data collection and privacy-by-design support – The extended workflow enables separating initial application data from information relevant only to approved participants. Instead of collecting all required data upfront from every applicant, you can request additional information only after approval.
This approach reduces unnecessary administrative burden, limits data collection to what is relevant at each stage, and supports privacy-by-design principles. It enables you to structure data handling more precisely by:
- Defining different data requirements for the application and confirmed participation
- Handling large applicant volumes more efficiently
- Applying differentiated anonymization or retention strategies across workflow stages
Clear enrollment status progression and participant communication - When post-approval confirmation is enabled, approved applicants receive an email prompting them to confirm participation. The enrollment status reflects whether confirmation is pending, completed, declined, or expired, ensuring transparent handling of each request.
Participants are only granted final access once confirmation requirements have been fulfilled.
Configuration
Post-approval confirmation is configured in the activity features under Self enrollment → Participation approval.
To enable the feature:
- Activate Self enrollment
- Enable Participation approval
- Select Require users to complete a participation questionnaire after approval
- Choose the questionnaire to be completed
- Define the confirmation deadline (e.g., number of days after approval)
Enrollment requests can be reviewed and managed via the Enrollment requests section of the activity’s participation list, where administrators can approve or decline requests, monitor confirmation status, and download reports.
Participation Approval Triggers in Automated Email Workflows
Automated email workflows have been extended to better support Participation Approval processes.
You can now create email automations specifically targeting participants with approved or declined enrollment requests. In addition, when Participation Approval is enabled on an activity, a dedicated automated email workflow can be connected directly as part of that setup. This provides greater flexibility, precision, and control in managing communication across approval-based enrollment flows.
Features and Benefits
New approval-based email triggers – You can now target participants based on the outcome of their enrollment request. This allows you to tailor communication to approved or declined applicants, rather than relying on generic enrollment triggers.
With these new “Who to notify” options, you can configure automations for:
- Participants with approved enrollment request
- Participants with declined enrollment request
These triggers can be combined with existing timing rules (days before/after, hours before/after, or at the time of specific events), enabling structured communication around approval decisions.
Dedicated workflow connection for Participation Approval – When Participation Approval is enabled on an activity, you can directly assign a specific Automated Email Workflow to that approval process.
This allows you to:
- Separate approval-related communication from general enrollment workflows
- Maintain cleaner automation logic
- Ensure that approval notifications follow a clearly defined communication flow
By connecting a dedicated workflow, approval-specific notifications are handled consistently throughout the enrollment request lifecycle.
Configuration
To use the new approval-based triggers:
- Go to Course Administration → Automated Email Workflows and create or edit an Automated Email Workflow.
- In the Who to notify field, select either:
- Participants with approved enrollment request, or
- Participants with declined enrollment request
To connect a dedicated workflow to Participation Approval:
- Go to the relevant Activity
- Enable Self enrollment → Participation approval
- Select the desired Automated email workflow in the Participation Approval settings
Once connected, approval-related notifications follow the configured workflow logic, and can be monitored from the notification timeline column in the participant list.
Considerations
When configuring approval-based email workflows, consider the following:
- Approval triggers are distinct from general enrollment triggers - ensure you select the correct “Who to notify” option for your intended logic.
- If you assign a dedicated workflow to Participation Approval, approval-related notifications should be managed within that workflow to avoid overlapping or duplicated communication.
- Carefully align timing rules (e.g., at the time of approval or days after approval) with your internal review processes to ensure accurate, relevant messaging.
New Email Tokens for Activity Communication
To provide more flexibility in automated communication, we’ve added new dynamic tokens to Automated Email Workflows.
These tokens make it easier to reference activity-specific roles and the actual signup user directly in email subject lines and message bodies — strengthening contextual communication across enrollment, completion, and approval flows.
Features and Benefits
- [Activity Course Administrator] token – You can now dynamically reference the course administrator assigned to a specific activity within your email workflows.
- The token automatically pulls the course administrator defined on the activity to which the workflow is connected.
- [Signup user email] token – You can now dynamically reference the user's email address who triggered the action (e.g., enrollment, completion, request submission).
- For example, when notifying an instructor that a participant has completed a training, the email can explicitly include the participant’s email address without manual lookup.
User Instructions
The new tokens are available when creating or editing rules inside Course Administration → Automated Email Workflows. To use them:
- Open or create an email rule.
- In the email Subject or Message field, click the Insert token plugin.
The selected token will then dynamically populate when the workflow is triggered.
Considerations
- Tokens pull data from the activity; ensure these fields are correctly configured (e.g., the activity has a course administrator assigned).
- When notifying third parties (e.g., managers or instructors), ensure your workflow aligns with your organization’s data-sharing and privacy policies.
Import Users to Activity via Sheet Upload
We have introduced a new enrollment option directly on the Activity page: Import users.
This allows administrators to enroll multiple participants in a specific activity in a single step using an XLSX file. The feature supports both existing users and the creation of new users during the import process.
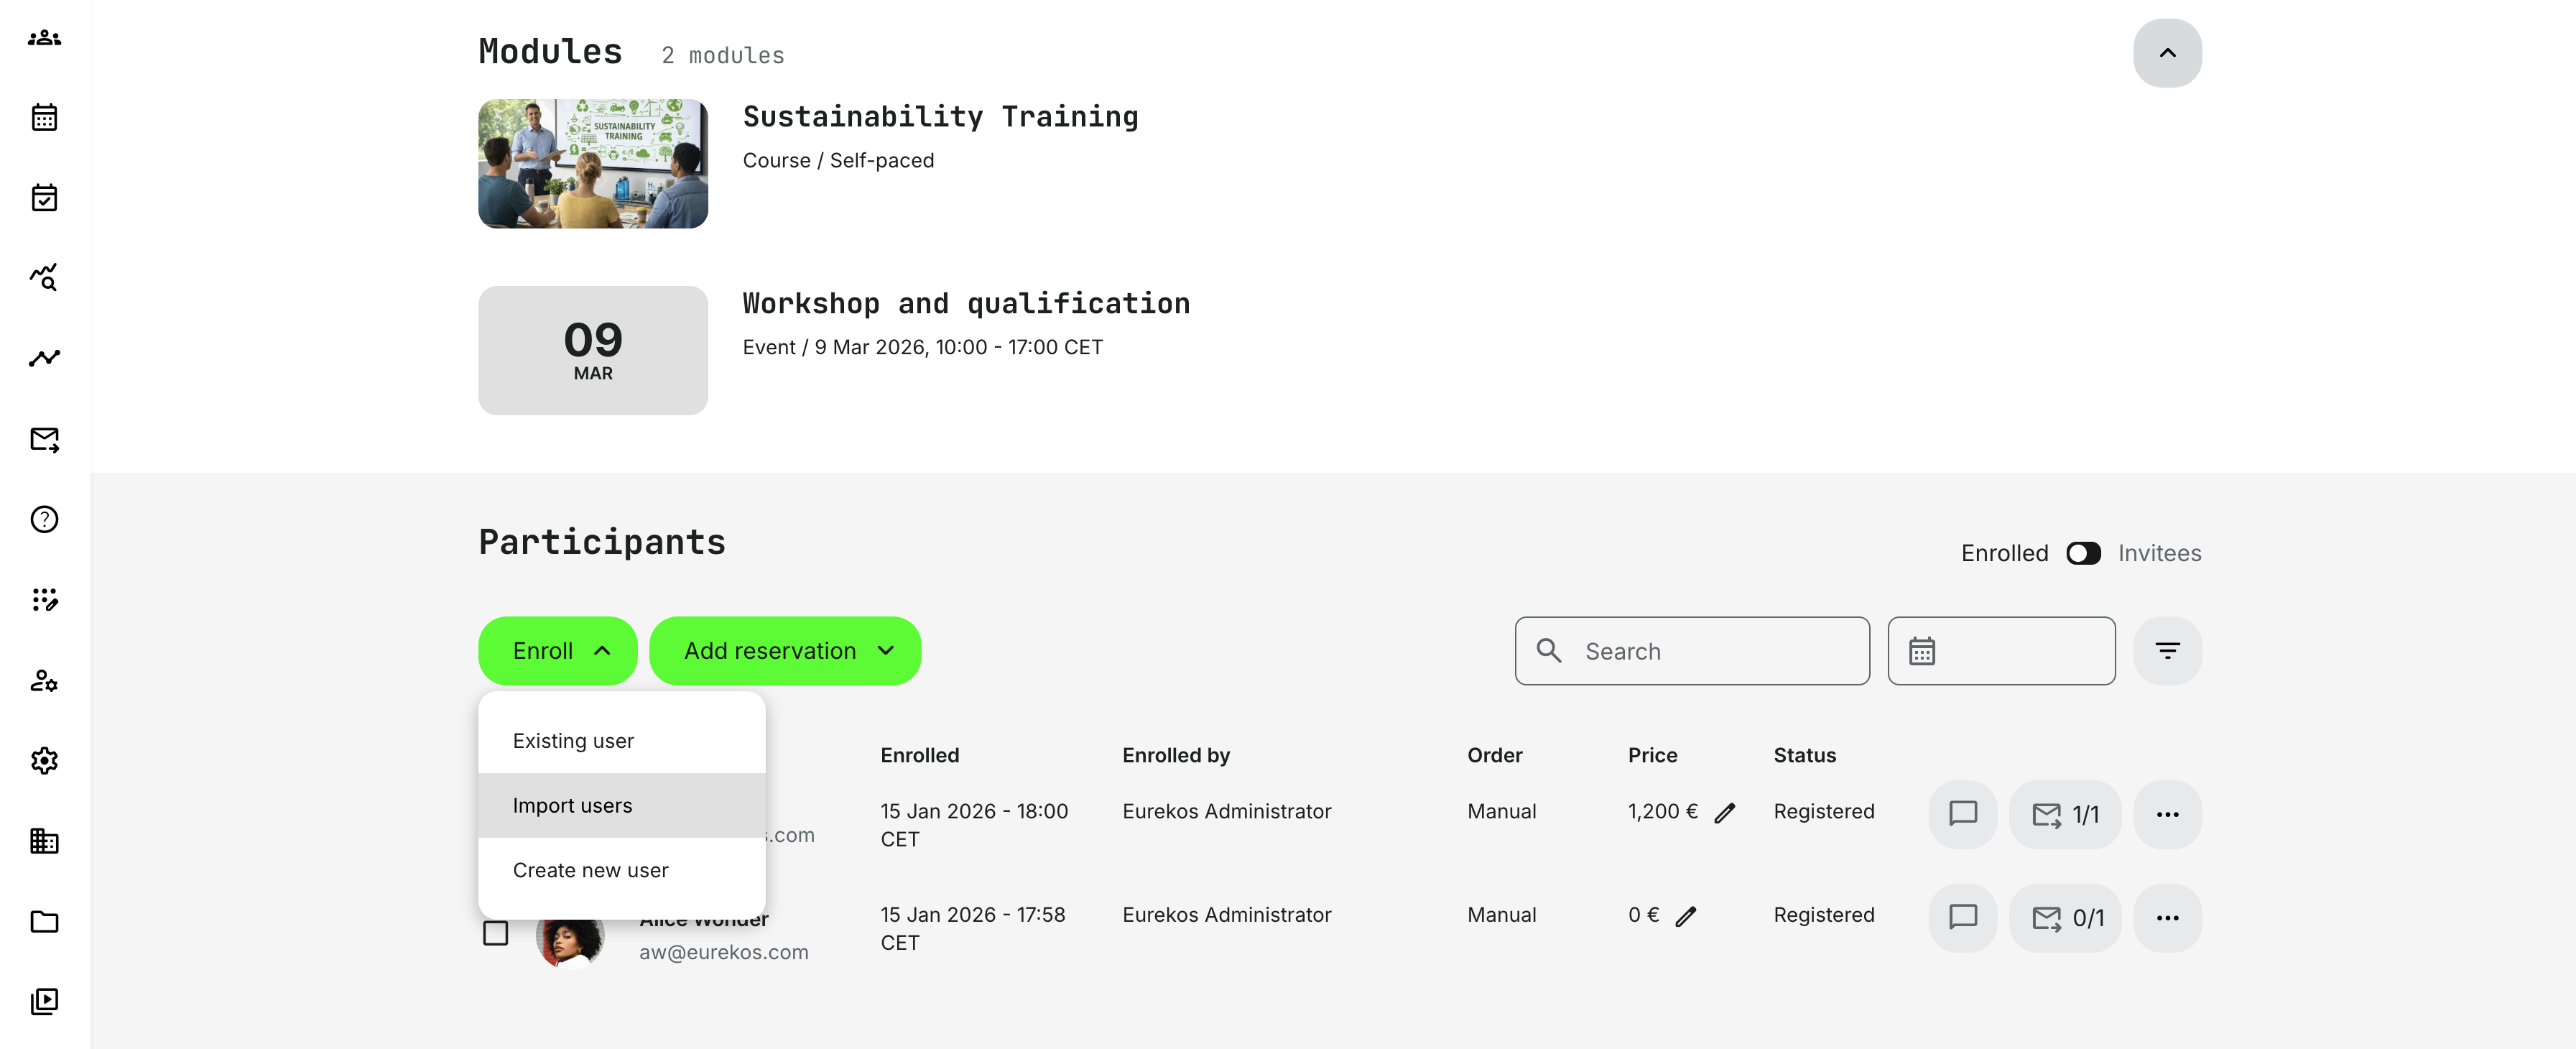
Features and Benefits
Bulk enrollment directly from the Activity page – As an extra enrollment option, you can now choose to upload an XLSX file and assign users to a specific activity. This can simplify operational workflows and reduce manual enrollment work.
The import flow allows you to:
- Enroll existing users into the activity
- Create new users and enroll them in the same process
Flexible pricing and notification control – During import, you can configure how participants are handled commercially and communicatively. Depending on your needs, you can:
- Specify a custom price for the enrollment (if the activity has pricing enabled)
- Choose whether users should be notified
- Allow new users to create their own password via email
- Schedule when notifications are sent
This gives you full control over how participants are onboarded - whether immediately, silently, or as part of a coordinated campaign.
Automatic onboarding for new users – When new users are created during an import, they receive an email prompting them to complete their account setup (if enabled).
Role-based permissions – The import experience adapts based on user permissions:
- Users with permission to create new users can both create and enroll users
- Instructors with permissions to manage their own participants can only assign existing users
Configuration
The Import users option is available on the Activity page to roles that have permission to manage participants in that activity.
Permissions are governed by:
- General role permissions
- The setting under Settings → General → Features for instructors (which determines whether instructors can manage participants in their activities)
If the Organization Filter is enabled on your platform:
- Platform Admin, Course Admin, and Support roles can only import users into organizations they are members of
- Global Administrators retain full cross-organization access
The import requires an XLSX file, and it is recommended to download the example template to ensure correct formatting before upload.
Considerations
When using sheet-based enrollment, administrators should consider the following:
- The file structure must match the provided example template; incorrectly formatted files will fail import
- Instructors cannot create new users during import
- If the Organization Filter is enabled, users can only be imported into permitted organizations
- Profile updates are not applied during activity import — the import strictly handles enrollment
Quick Access to Progress Analytics from the Activity Page
We have improved navigation for course administrators by adding direct access to Progress Analytics from the Activity page.
With a single click, administrators can now open the Progress Analytics dashboard already filtered to the selected activity, eliminating unnecessary navigation steps.
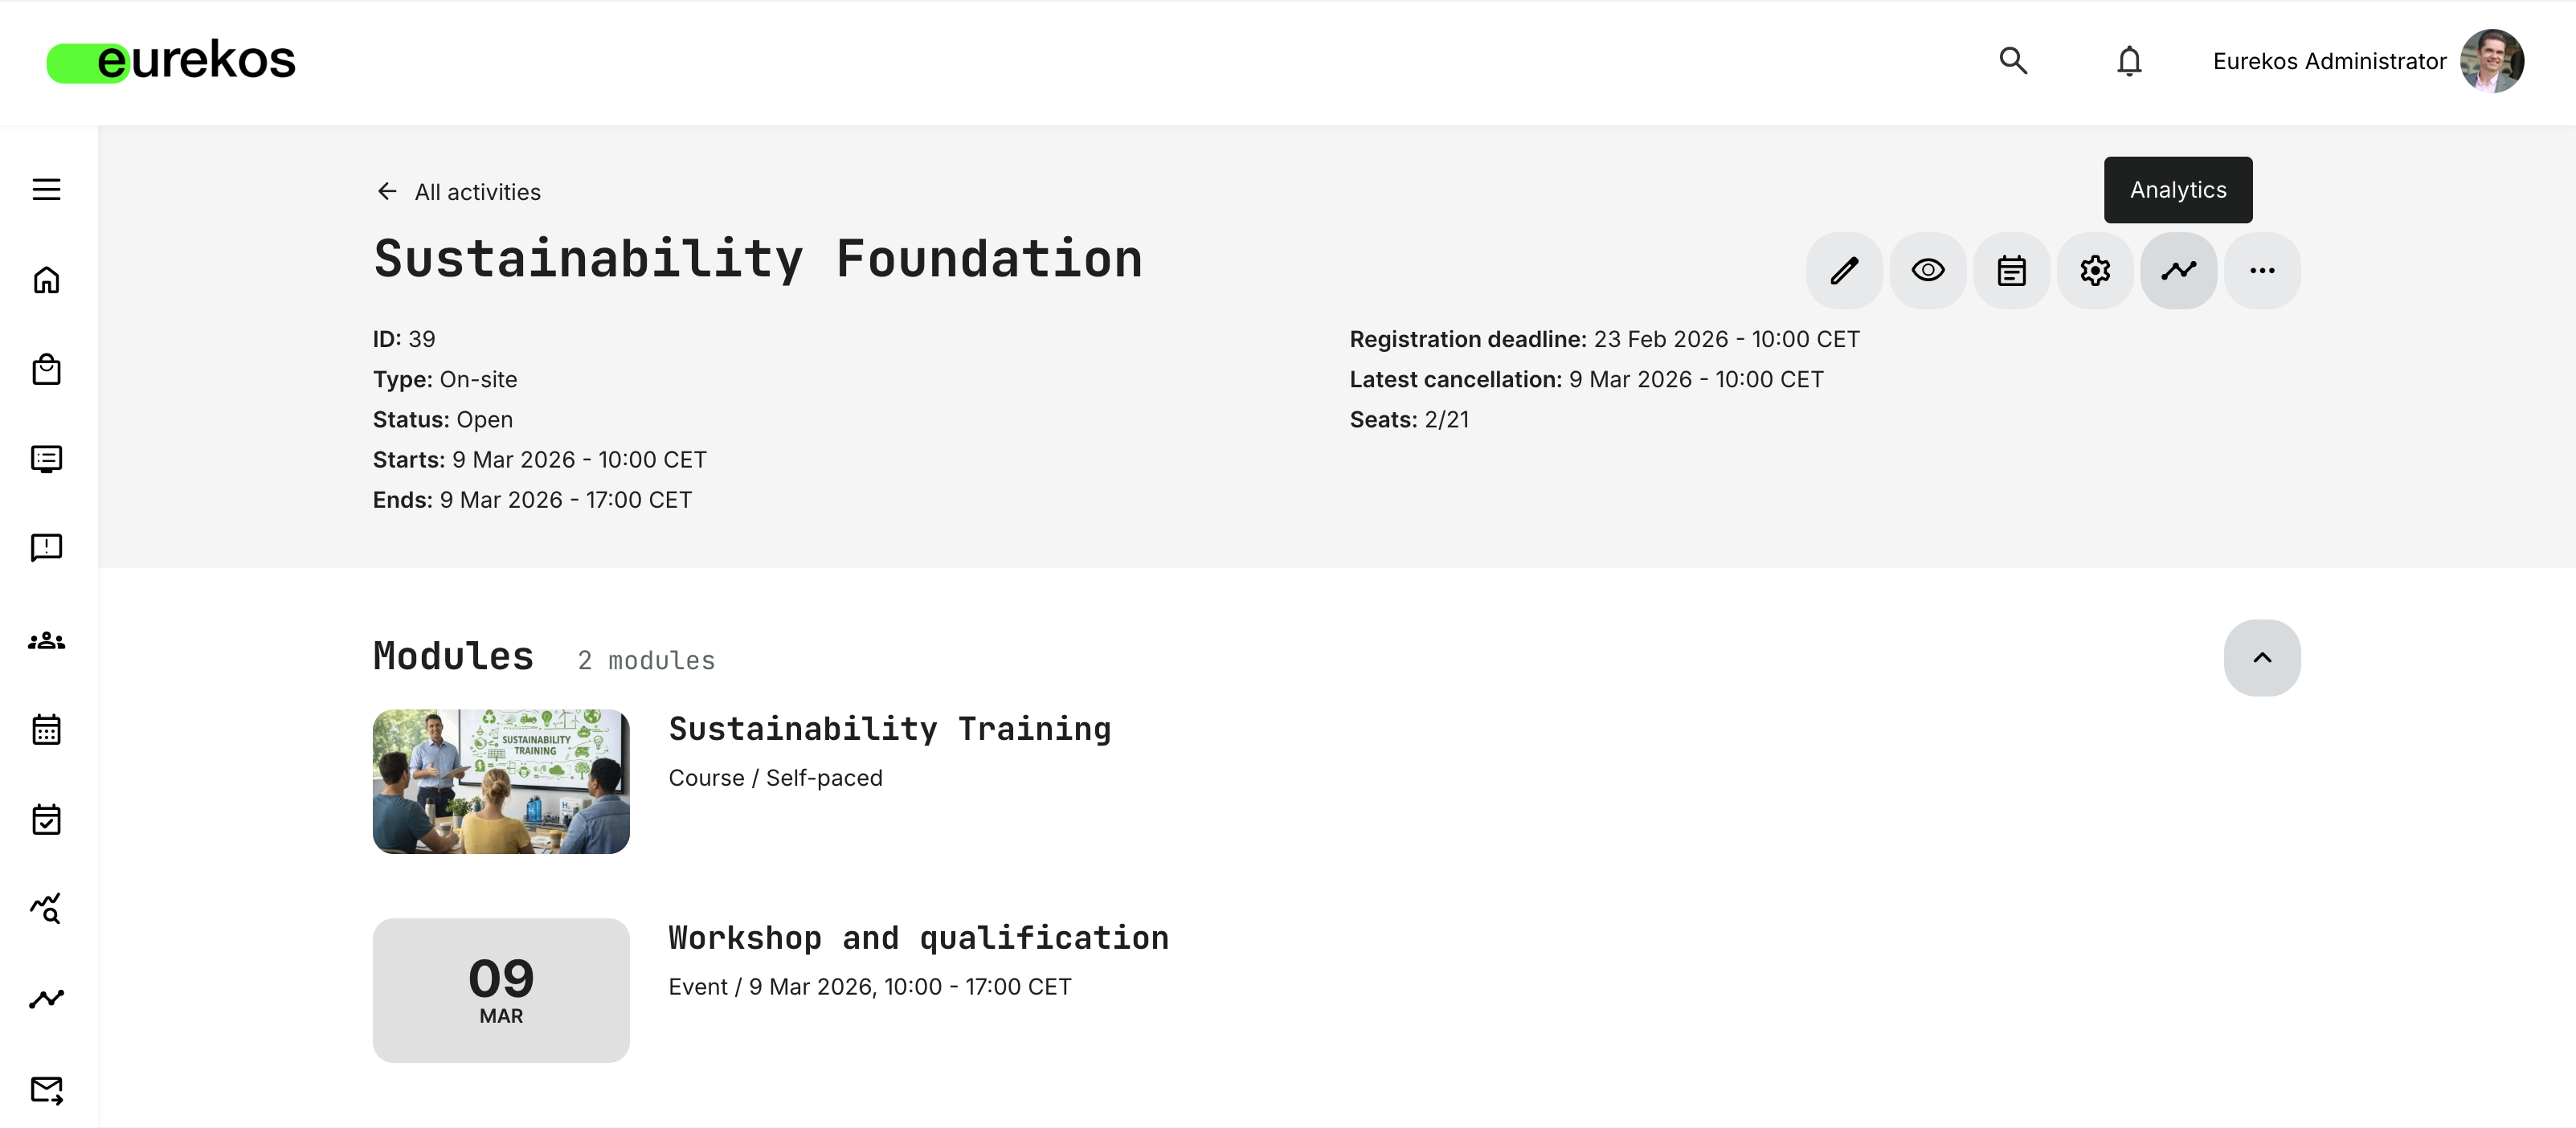
Features and Benefits
- Direct shortcut to activity-specific analytics – A new Analytics button is now available on the Activity page. When clicked, it takes you directly to the Progress Analytics dashboard with the relevant activity pre-selected.
- Context-aware filtering – The dashboard automatically loads with the activity filter applied, ensuring you immediately see the correct data without additional setup for enhanced day-to-day efficiency. This improves day-to-day efficiency when needing to review:
- Participant progress
- Completion rates
- Engagement metrics
- Performance data for the specific activity
Exclude Activity from User’s Training Transcript
We have introduced a new activity setting that allows course administrators to exclude specific activities from appearing in a learner’s training transcript.
By default, all completed and registered activities are included in a user’s downloadable transcript. With this update, administrators can now exclude selected activities when relevant.
Features and Benefits
Activity-level control over transcript visibility – When enabled, the activity will no longer appear in the user’s downloadable training transcript, giving administrators more flexibility in how learning history is presented. This is particularly useful when:
- Running internal, preparatory, or administrative activities that should not appear on official records
- Managing learning histories where only accredited or qualifying activities should be documented
More intentional transcript governance – The transcript becomes a more controlled and purposeful document rather than an automatic list of all activity participation. This allows you to:
- Align transcripts with formal training frameworks
- Separate administrative or non-certifying activities from official learning records
User Instructions
To exclude an activity from transcripts:
- Navigate to the Activity
- Open Activity Settings
- Locate the Reporting section
- Enable “Exclude activity from user’s transcript”
Chapter
7
Questionnaires and Surveys
In this chapter:
| We’ve expanded questionnaires from data collection tools into structured profiles and automation engines. With new question types, profile update rules, and Supplemental Questionnaires, you can now capture validated data, synchronize it with user profiles, and use it to power segmentation, onboarding, and personalization workflows across the platform. |
New Question Types: Number and Date
We have added two new question types for questionnaires: Number and Date.
These structured input types allow administrators to collect numeric and date-based responses rather than relying on free-text responses. By introducing stronger input validation, questionnaires now support more consistent data capture, improved analytics, and better alignment with automation and profile update use cases.
Features and Benefits
Number question type - The Number question type enables the collection of validated numeric input within a defined range, improving data consistency and reducing the need for manual validation in reporting and profile updates. This question type:
- Accepts whole numbers only (no decimals)
- Requires administrators to define minimum and maximum allowed values
Date question type - The Date question type introduces a calendar-based input field to ensure standardized date collection across questionnaires. It can optionally include time selection for more precise data capture:
- Provides a calendar-based date picker
- The optional date and time toggle enables time selection
- Both question types are fully supported in questionnaire analytics and reporting dashboards.
User Instructions
To add a Number or Date question to a questionnaire:
- Navigate to Course administration → Questionnaires
- Create or edit a questionnaire
- Select Add question
- Choose Number or Date
For Number questions, you must define minimum and maximum values. For Date questions, you can optionally enable the Date and time setting.
Questionnaire Rules – Update User Profiles
We have introduced the ability to automatically update user profile fields based on questionnaire responses.
With questionnaire rules, you can map specific questions and answers to profile fields, enabling structured data synchronization between questionnaires and user profiles. This transforms questionnaires into operational data engines, supporting onboarding, segmentation, organizational mapping, and personalized learning experiences.
By linking questionnaire responses directly to profile attributes, you can automatically maintain accurate and actionable user data.
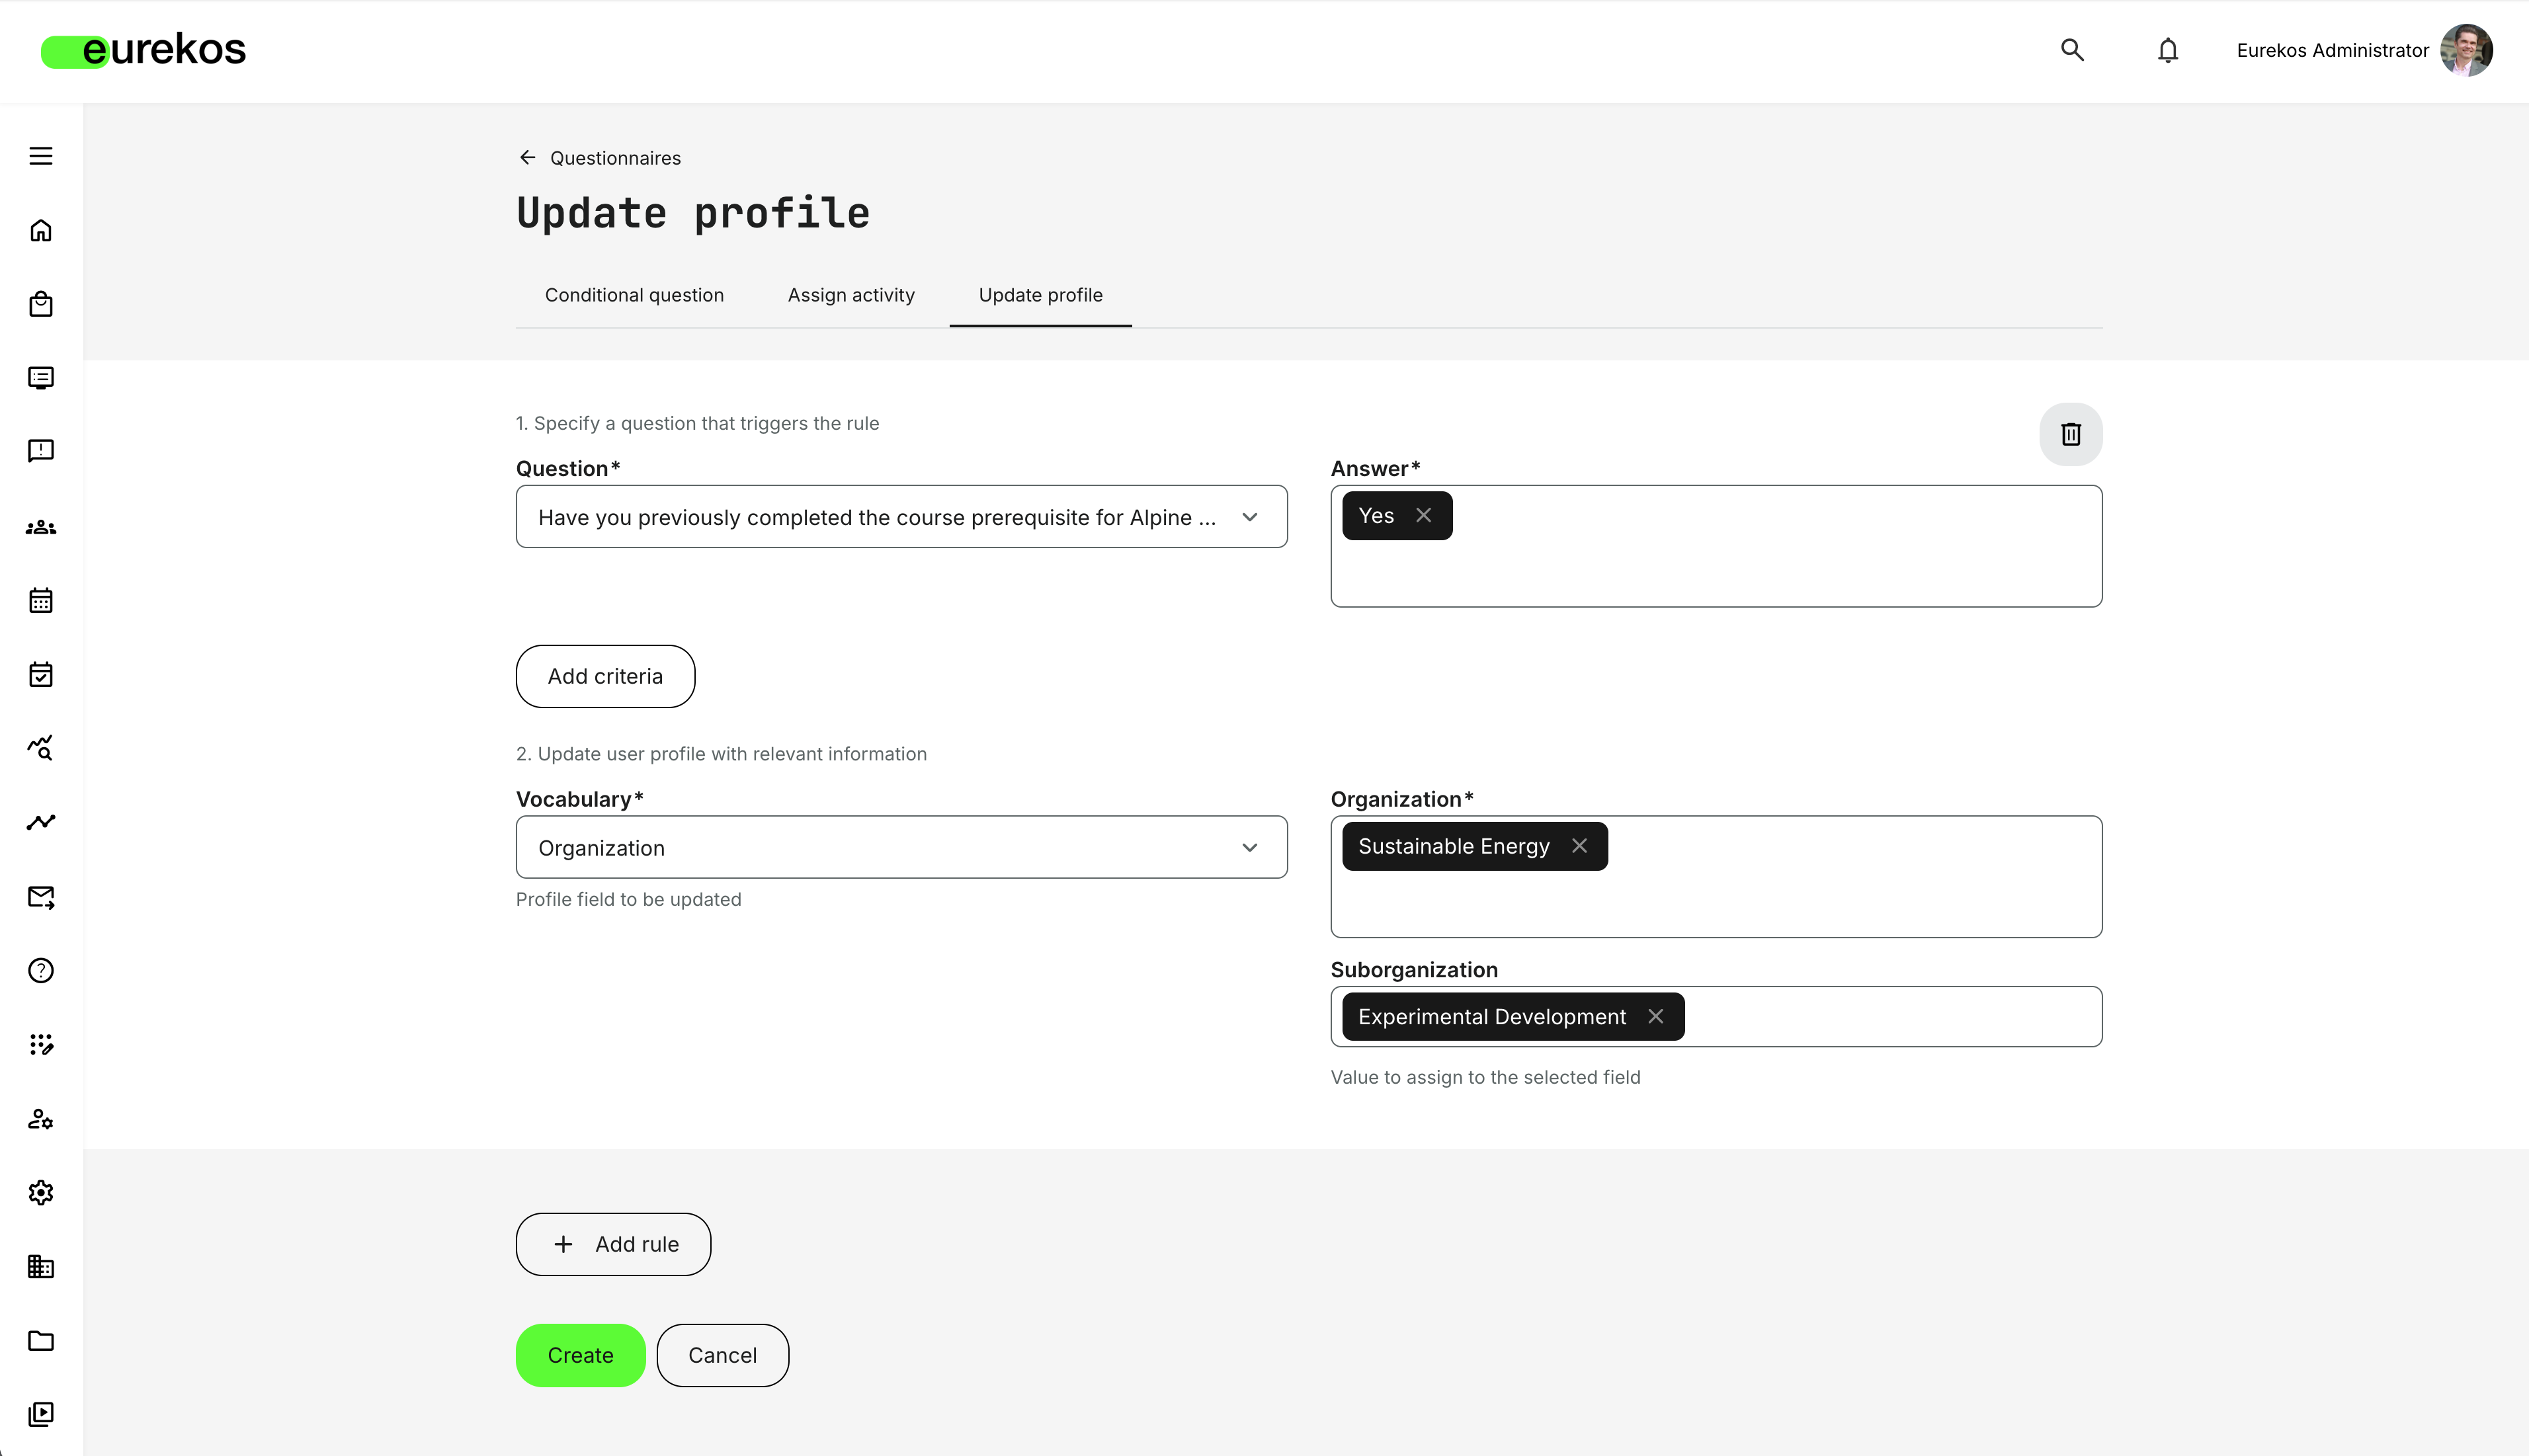
Features and Benefits
Question-to-profile mapping - Define rules that map specific question responses to profile fields (vocabularies). When a user submits a questionnaire, matching rules automatically update the user’s profile. This enables:
- Structured onboarding workflows
- Automated profile enrichment
- Segmentation based on responses
- Dynamic organization mapping
- Improved personalization and recommendations
Flexible rule logic - Rules are configured per questionnaire and support:
- Mapping one or multiple questions to one or multiple profile fields
- AND / OR conditional logic
- Multiple rules within the same questionnaire
Support for tag vocabularies, organization, and date-value fields - Profile fields such as Job function, Department, Title, and other vocabularies can be updated automatically:
- Tag-based vocabularies and organization accumulate values when multiple conditions are met.
- Structured fields (e.g., single-value fields) are updated based on defined rule logic.
Integrated across all questionnaire use cases - Profile update rules apply regardless of how the questionnaire is used:
- Onboarding questionnaires
- Application forms
- In-course questionnaires
- Email-triggered questionnaires
- Recurring or automated questionnaire flows
Powerful personalization trigger - Profile updates can directly influence content visibility and recommendations in the storefront, enabling targeting based on profile attributes. By automatically updating job functions, departments, and other profile fields, questionnaires can dynamically shape what users see, providing a tailored storefront experience.
User Instructions
Any user with access to Questionnaires in the Course Administration can create profile update rules. This is how it is done:
- Navigate to Course Administration → Questionnaires
- Select a questionnaire and choose Create rules
- Go to the Update profile tab
- Click Add rule
- Define:
- The triggering question and answer(s)
- The profile field (vocabulary) to update
- The value(s) to assign
Multiple criteria and multiple rules can be configured within the same questionnaire.
Considerations
- Profile update rules apply regardless of whether the profile field is configured as editable or read-only for the user.
- If a questionnaire is edited after rules are created, associated rules become inactive and must be reviewed and re-saved.
- Administrators should carefully design rule logic to ensure consistent and intended profile updates.
💡 By combining onboarding questionnaires with profile update rules, organizations can automatically segment users, assign them to the correct organizations, and personalize their learning experience from the moment they log in.
Supplemental Questionnaire – Extending the User Profile with Business Context
With this update, we introduce Supplemental Questionnaires, allowing you to extend the standard user profile with structured, business-specific data.
While standard profile fields cover identity, contact information, and organizational structure, organizations often need to capture contextual and evolving information about their users that goes beyond fixed profile attributes. This is where the Supplemental Questionnaire comes in.
With Supplemental Questionnaires, we allow you to extend the user profile with structured, business-specific data without modifying the core user model. Instead of adding static profile fields, you can designate a questionnaire as a profile-level extension, making its responses part of the user’s ongoing profile context.
This enables you to capture evolving, domain-specific information about users - such as experience level, compliance declarations, or prerequisites data - in a structured and reusable way.
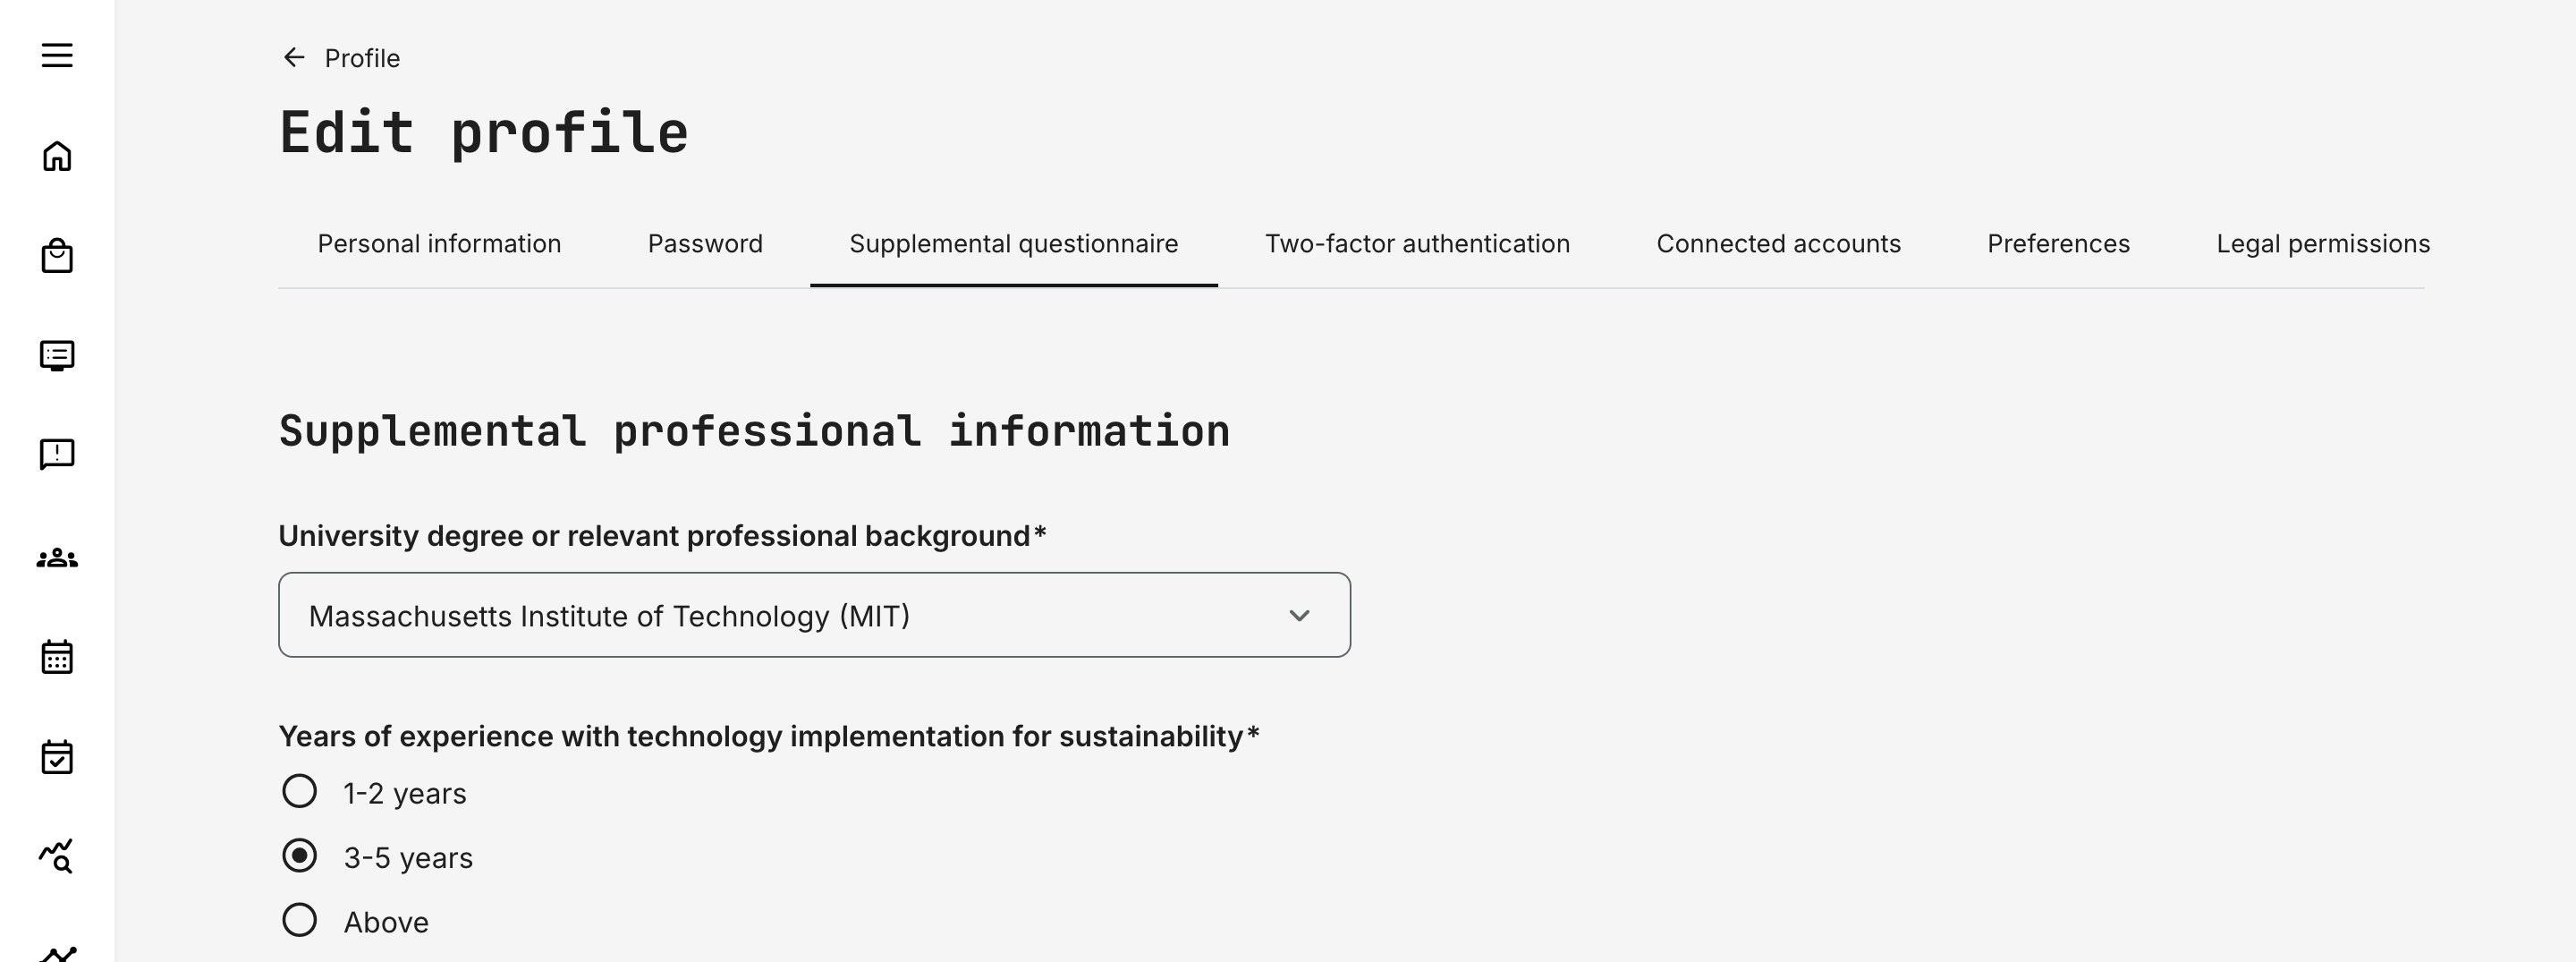
Features and Benefits
Profile-level extension of user data: You can designate one questionnaire as the platform’s Supplemental Questionnaire. Once enabled, its responses become part of the user profile rather than being tied to a specific activity.
Flexible and evolving user model: Instead of customizing core profile fields, you can use a questionnaire-driven structure that evolves with your programs. Common use cases include:
- Capturing education or professional background at onboarding
- Collecting experience level or product familiarity for partner programs
- Asking for compliance declarations or prerequisites before granting access
- Gathering application data for programs or accreditations
- Periodically revalidating information that changes over time
Structured data for filtering and segmentation: Supplemental responses become structured profile attributes that you can use to:
- Filter users in the Users list
- Segment and report on audiences
- Because this data is intentionally collected and validated, it is more reliable for operational decision-making.
Cross-questionnaire synchronization: Questions from other questionnaires can be mapped to update Supplemental Questionnaire fields automatically. This means you can collect data in onboarding flows, surveys, or in-course questionnaires and ensure the user’s profile remains consistent and up to date across the platform.
Configuration
Supplemental Questionnaires must be enabled at platform level.
To configure:
- Navigate to Settings → General
- Enable Supplemental questionnaire
- Select the questionnaire to use
Only one Supplemental Questionnaire can be active at a time, and the configuration applies platform-wide.
Once enabled:
- A Supplemental tab appears on all user profiles
- The selected questionnaire becomes the profile-level extension for all users
Mapping other questionnaires to the Supplemental Questionnaire
To map questions from another questionnaire to the Supplemental Questionnaire:
- Navigate to Course Administration → Questionnaires
- Create or edit a questionnaire
- Edit a question
- Enable Link to supplemental question
- Select the corresponding Supplemental question
When a user submits the questionnaire, the mapped answer will update the defined Supplemental field on the user’s profile.
Users can view and update their Supplemental responses directly from their profile page.
Considerations
- Only one Supplemental Questionnaire can be active per platform.
- Because the setting is platform-wide, changes affect all users.
- Administrators should carefully design Supplemental questions, as they become part of the user’s persistent profile context.
Chapter
8
Organizations
In this chapter:
| This release introduces greater flexibility and governance for managing organizational structures and metadata. You can now move organizations freely within your hierarchy—making it easier to adapt to structural changes without rebuilding or migrating users. In addition, new organization-level keyword controls allow you to standardize and manage how content is categorized, supporting stronger taxonomy governance where needed. |
Move Organizations Within the Hierarchy
Managing complex organizational structures is now more flexible. You can move one or multiple organizations - including their sub-organizations - to a new position within the hierarchy without recreating them or manually migrating users.
This update lets you freely restructure your organization tree, whether you need to change reporting lines, consolidate structures, or reorganize business units.
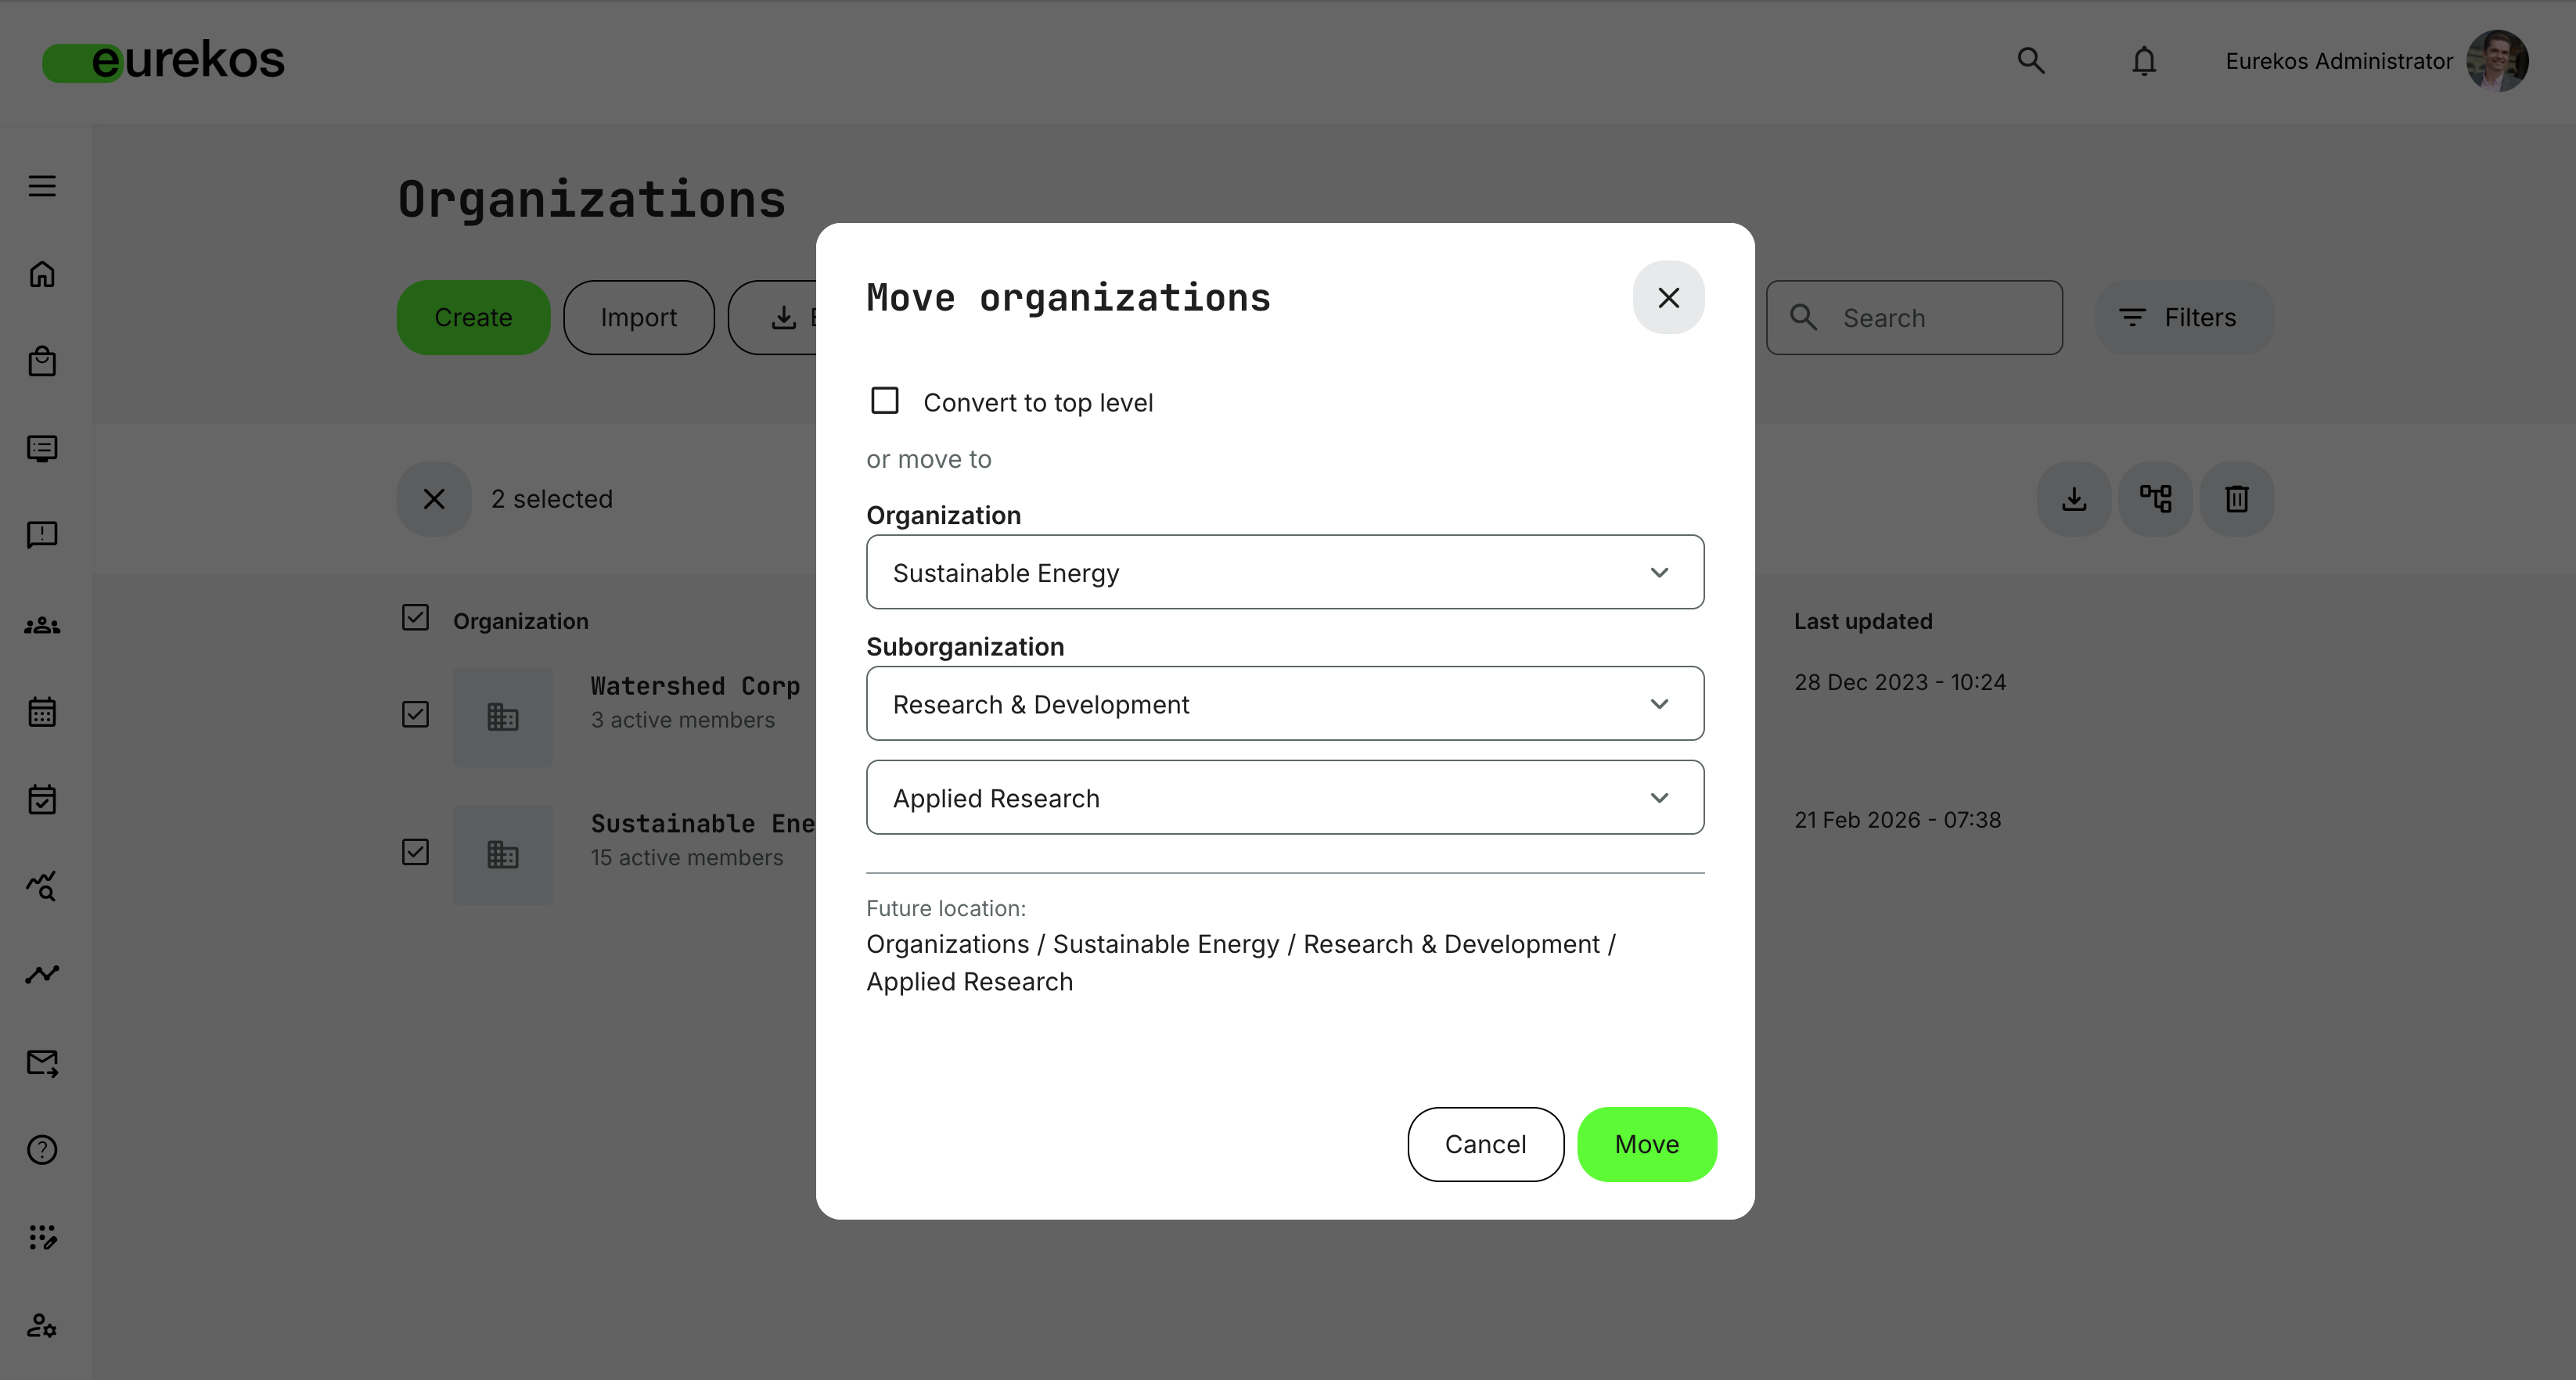
Features and Benefits
Move organizations freely within the hierarchy - You can reposition any organization, top-level or sub-organization, to a new location in the structure. An organization can be moved under a new parent or converted into a top-level organization. This gives you full flexibility to evolve your structure as your business changes.
Bulk move support for faster restructuring - You can select multiple organizations and move them in a single action. This makes large structural updates significantly more efficient.
Entire organization branches move together - When you move an organization, all of its sub-organizations automatically move with it. Structural relationships are preserved without requiring manual adjustments.
No recreation or user migration required - Previously, relocating an organization required creating a new organization and transferring users. With this update, you can restructure directly - saving time and reducing administrative risk.
Content and access remain intact - all linked entities, including activities, courses, announcements, and subscriptions, retain their references after the move. User access and visibility continue to function according to the updated hierarchy.
Permission-aware restructuring - The move functionality respects existing governance rules:
- Available to roles with organization management permissions (Global Administrator, Platform Administrator, Support, and Course Administrator)
- If the organization filter is enabled, administrators can only see and manage organizations within their accessible scope
- Administrators at higher levels can move organizations to lower levels
- Administrators at lower levels cannot move organizations to higher levels
User Instructions
To move an organization:
- Navigate to Organizations.
- Open the More (⋯) menu for a single organization and select Move, or select multiple organizations and use the bulk Move action.
- Choose one of the following options:
- Select a destination organization to move it under a new parent.
- Convert a sub-organization into a top-level organization.
- Confirm the action.
The selected organization - along with any child organizations - will immediately appear in its new position within the hierarchy.
Organization-Level Managed Keyword Lists
You can now define a controlled keyword list at the organization level.
By default, keywords are free-form, allowing content creators to create and apply any keyword to activities and courses. With this update, you can enable a managed keyword list on an organization and define exactly which keywords are available for use.
This allows you to align content with an approved taxonomy, industry thesaurus, or internal governance model - while still keeping flexibility where needed.
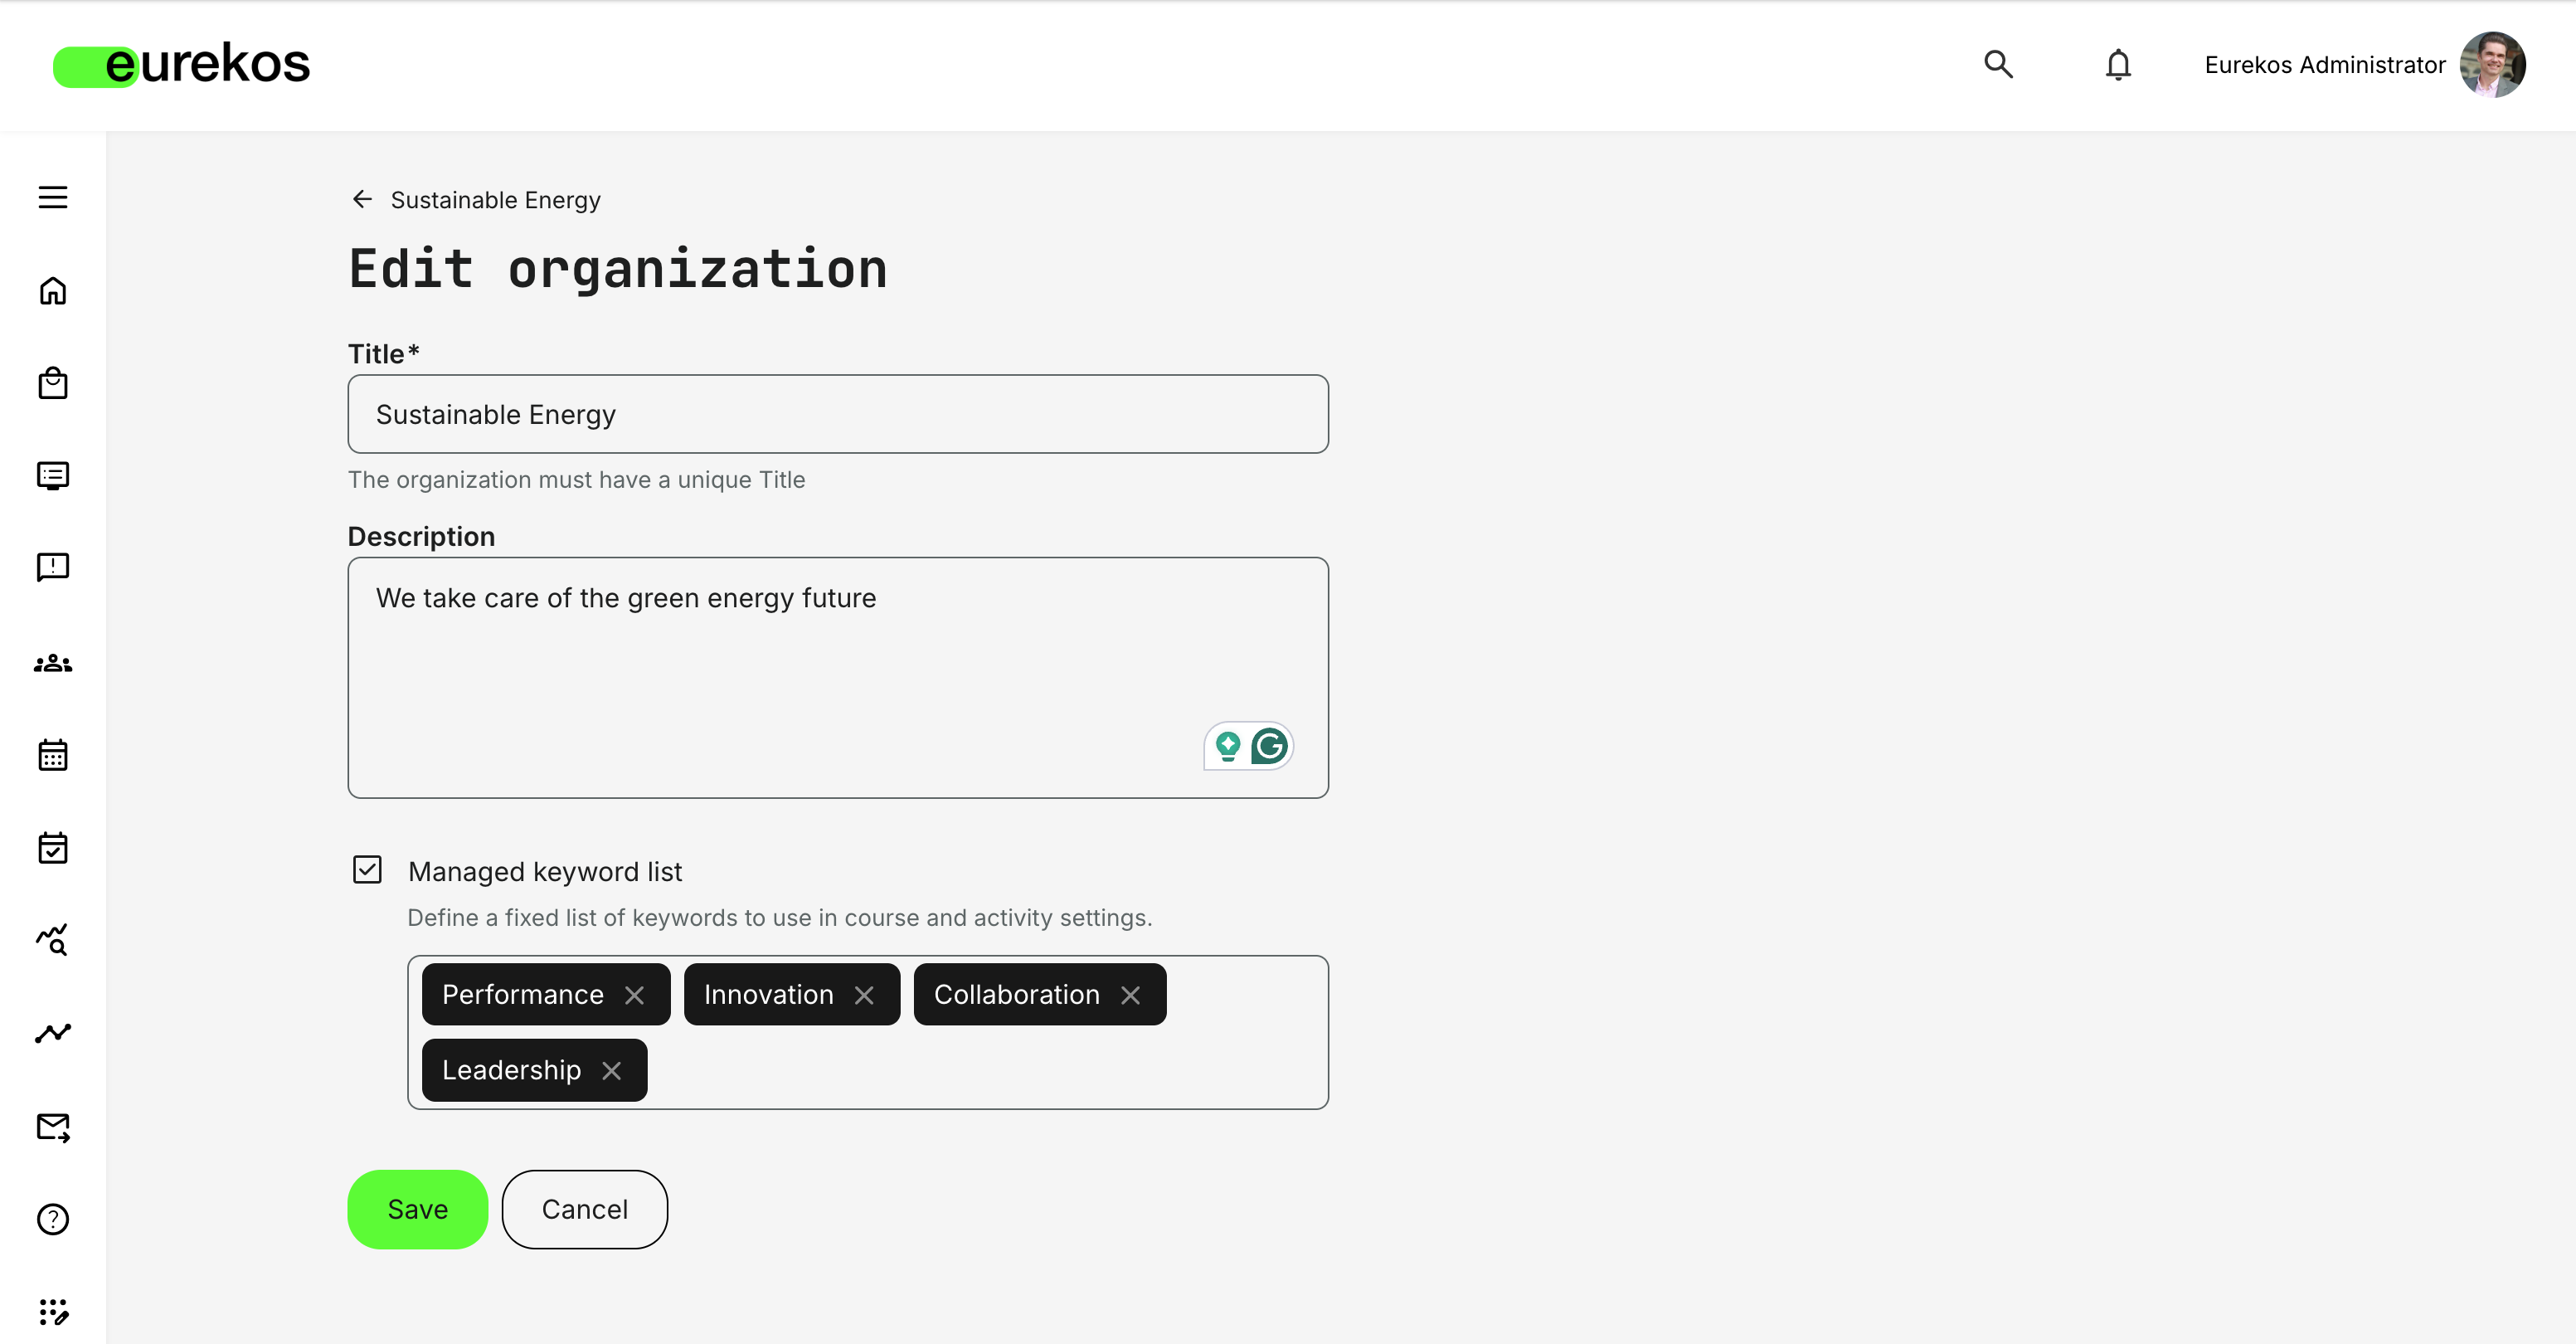
Features and Benefits
Controlled keyword governance per organization – You can define a fixed list of approved keywords that content creators must use when tagging activities and courses. Instead of free-text keyword entry, users select from a predefined dropdown list, ensuring consistency and alignment with your organization’s terminology.
This is particularly valuable for organizations that:
- Work with standardized taxonomies or regulated vocabularies
- Require review or approval of searchable metadata
- Want to improve filtering and search accuracy
- Need to prevent inconsistent keyword usage
Flexible dual-mode logic (Free or Managed) – You decide how keywords behave per organization. If managed keyword list is disabled (default), content creators can freely create and apply keywords. If enabled, only the predefined keywords are available.
This gives you the ability to apply governance where required - without affecting other organizations on the platform.
Independent control across organizational layers – Keyword lists are configured per organization and are not inherited automatically between parent and sub-organizations.
This means:
- A parent organization can enforce a managed list without impacting sub-organizations
- A sub-organization can enable its own managed list independently
- Different parts of your hierarchy can operate with different governance models
Configuration
The Managed keyword list option is available on the Create organization and Edit organization pages.
To enable it:
- Open the relevant organization.
- Enable Managed keyword list.
- Define the approved keywords.
- Save your changes.
Once enabled, users editing activities and courses within that organization will see a dropdown list containing only the defined keywords.
The keyword list can be edited at any time by users with organization management permissions (Global Administrator, Platform Administrator, Course Administrator, Support).
Keyword visibility on the Storefront is not affected by this setting. All keywords applied to activities and courses are displayed as usual.
Considerations
Before enabling managed keyword list, consider the following:
- Keyword lists are not inherited between parent and sub-organizations. Each organization must configure its own list if a restriction is required.
- Users who belong to multiple organizations may be affected by the most restrictive configuration.
- Keyword restrictions do not apply to videos
Chapter
9
Analytics
In this chapter:
| This release introduces several targeted improvements to reporting and data transparency across the Eurekos platform. From deeper insight into user activity and clearer financial reporting to new visibility into external resources and module-level progress, these updates strengthen the foundation for data-driven decision-making. |
Active Users Report – Extended Activity Visibility
The Active Users report has been extended with deeper insight into what users actually engage with during a selected reporting period.
In addition to identifying which users were active, the report now shows which activities each user entered - providing a clearer picture of real platform usage and engagement patterns.
Features and Benefits
Activity-level insight per active user – The report now includes a new column, “Activities entered,” listing the activities a user engaged with during the selected time period. This allows you to move beyond tracking logins with this report and see where actual learning activity took place.
An activity is included in the report when the user has interacted with it in meaningful ways, including:
- Viewing a course module
- Entering a page in an “Existing Training” module
- Being marked as attended in an event
- Creating or editing an assignment submission
Improved internal reporting and cost allocation – By clearly showing which activities users engaged with, you gain stronger data for internal reporting and financial reconciliation. For example, organizations can more accurately allocate training costs or income to the correct internal budgets based on actual activity participation.
🗒️ Activities listed in the report are not filtered out by organization filter logic. If you have access to the user included in the report, all activities they entered during the selected period will appear in the “Activities entered” column.
External Resources Report
We have introduced a new External Resources report in Analytics, providing administrators with a complete overview of all third-party resources referenced across the platform.
The report lists every external URL embedded in your course modules and shows exactly where it is used. This gives organizations greater transparency and control over externally hosted content included in their courses and activities.
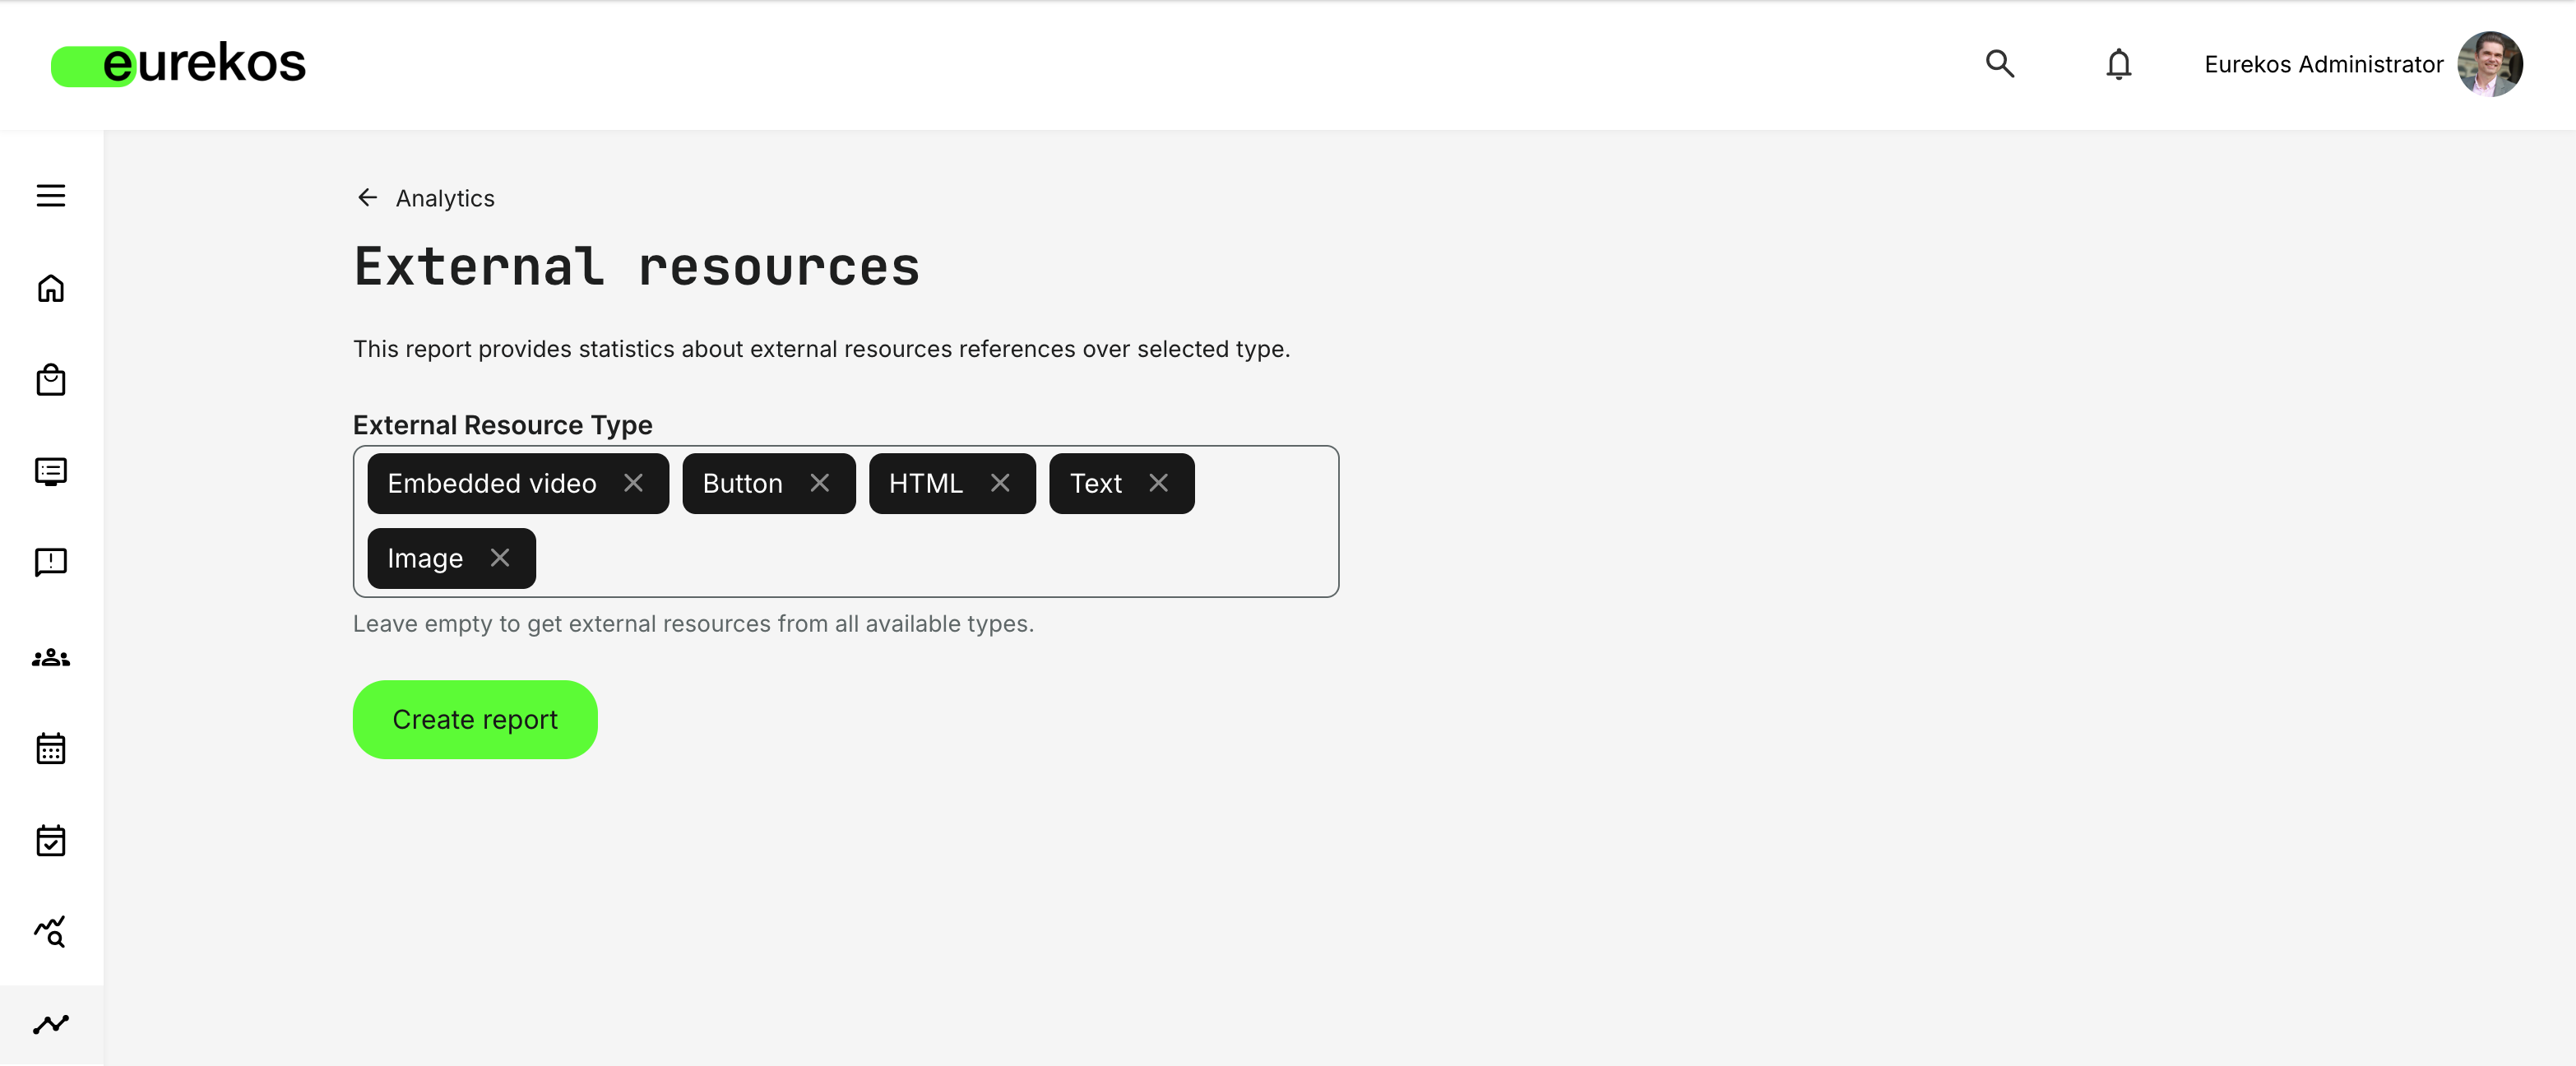
Features and Benefits
Overview of all external references – The report compiles all third-party resources used across course, course description, and activity description pages into a single, exportable file.
This makes it significantly easier to audit and manage externally hosted content across your platform.
The report includes:
- External resource type (e.g., Embedded video, Button, HTML, Text, Image, Quickchannel)
- External resource URL
- Page URL in Eurekos where the resource is used
Improved governance and compliance control – By clearly mapping every external reference to the page where it appears, you gain full visibility into third-party dependencies within your learning environment. This supports:
- Vendor and content audits
- Security and risk assessments
- Cleanup of outdated or broken external links
User Instructions
You can generate the report from: Analytics → External Resources
To create a report:
- Select one or more External Resource Types (optional)
- Leave the field empty to include all types
- Click Create report
Permissions and data visibility follow the platform’s Analytics permission settings and organization filter logic.
Considerations
When using the External Resources report, administrators should be aware that:
- Organization filter logic applies to the generated report.
- Users only see data they have permission to access, based on their role and the organization's scope.
- If a course or activity is deleted, its external resources are automatically removed from the report.
- The report lists references to external content but does not verify whether the external URLs are still accessible.
Transactions Report Enhancements
The Transactions report has been extended and refined to improve financial clarity, reporting consistency, and subscription visibility. These updates introduce new data columns, clearer financial terminology, and improved numeric formatting - making the report easier to use for reconciliation, accounting, and downstream processing.
Features and Benefits
New subscription and expiration date column - Two additional date fields are now available in the Transactions report to improve lifecycle visibility for enrollments and subscriptions. These fields help administrators better understand access timelines and recurring billing structures.
The report now includes:
- Signup expiration date – Displays the activity expiration date when this feature is enabled
- Next billing date – Displays the upcoming billing date for subscription-based transactions
These columns make it easier to track access validity and subscription cycles directly from the report export.
Clearer financial terminology - Several column titles have been updated to better reflect the financial meaning of the data. The new terminology improves consistency and reduces ambiguity when sharing reports with finance teams or importing data into accounting systems.
The following column names have been updated:
- Original price → List price
- Total minus discount → List price minus discount
- Total → Total paid
These changes clarify the distinction between listed pricing, applied discounts, and the final paid amount.
Improved numeric formatting for financial columns - Key financial columns now use proper numeric formatting in exported reports, making them more suitable for calculations, pivot tables, and financial reconciliation.
The following columns are now exported using numeric formatting:
- List price
- Discount
- List price minus discount
- Tax
- Total paid
This ensures that values behave correctly in Excel and BI tools without requiring manual reformatting.
Progress Report – Inclusion of Existing Training Module
The Progress report has been extended to include the Existing Training module type. Previously, the report only returned progress rows for Course and Event modules. With this update, activities that include an Existing Training module are now represented in the report structure.
Features and Benefits
Existing Training modules are now included in the Progress report - Activities that contain an Existing Training module will now display a dedicated row for that module in the Progress report export. This provides administrators with a better overview of module types included in an activity.
In addition to the standard progress data, the report now includes an additional column:
- Selected training – Displays the name of the training selected by the user within the Existing Training module. If the user has not selected or is not enrolled in the referenced training, the cell remains empty.
This improves reporting transparency in scenarios where activities are composed of nested or linked trainings, ensuring the module structure is better reflected in the report.
🗒️ While the Existing Training module is now visible in the Progress report, detailed progress statistics for the referenced training itself are still accessed through that Activity’s own Progress report.
Chapter
10
Incentives
In this chapter:
| This release introduces Achievement Badges as a powerful extension to the existing Incentives feature set. Badges add a new visual layer to your engagement strategy, helping you recognize milestones, highlight progress, and motivate continued participation across your learning programs. |
Badges
With this release, we are extending the Incentives feature set with the introduction of Badges - visual achievements that recognize milestones in a learner’s journey.
While Incentives already allow you to reward engagement with points and optional rewards, Badges add a new layer of motivation and progression. They help learners understand where they are in their journey, what they have accomplished, and what they can aim to achieve next.
Features and Benefits
Visual recognition of learning milestones – Badges provide learners with clear, visible achievements tied to meaningful engagement actions. Instead of only accumulating points, learners now receive milestone-based recognition that supports progression and long-term motivation. This strengthens engagement in scenarios where learning is optional, competitive, or tied to loyalty programs.
Flexible earning logic: point-based or rule-based – You can configure how badges are earned using two different models:
- Point-based badges, earned when a learner reaches a defined number of incentive points
- Rule-based badges, earned when a learner completes a defined action. Rule-based triggers include actions such as:
- Complete activity
- Complete module
- Earn certificate
- Pass test
- Submit questionnaire
- Attend event
🗒️ These rules apply generically across the platform and are not tied to specific activities or objects
Optional repeatable achievements – Badges can be configured to be earned multiple times. This allows you to create recurring achievements, such as:
- Earning the same badge every time a learner reaches 100 points
- Awarding a badge each time a learner attends an event
Repeatable badges accumulate over time, reinforcing continuous engagement.
Clear visibility in profile and leaderboard – Earned badges are displayed directly in the learner’s profile and on the leaderboard.
Un-earned badges are also visible in the profile, helping learners understand what actions are required to unlock them and creating transparent progression goals.
Seamless integration with existing Incentives programs – Badges integrate directly with your existing Incentives configuration.
They can:
- Operate independently of the rewards shop
- Be used as a pure recognition mechanism
- Complement point-based incentive programs
Configuration
Before creating badges, Incentives must be enabled in: Settings → General. Once enabled, badges can be configured via: Settings → Incentives → Badges
To create a badge, you must:
- Define a badge title
- Upload a square SVG or PNG file with a transparent background
- Configure the earning rule (point-based or rule-based)
- Optionally enable repeatable earning
🗒️ Only roles with access to the platform settings can configure badges (Global Administrator and Platform Administrator)
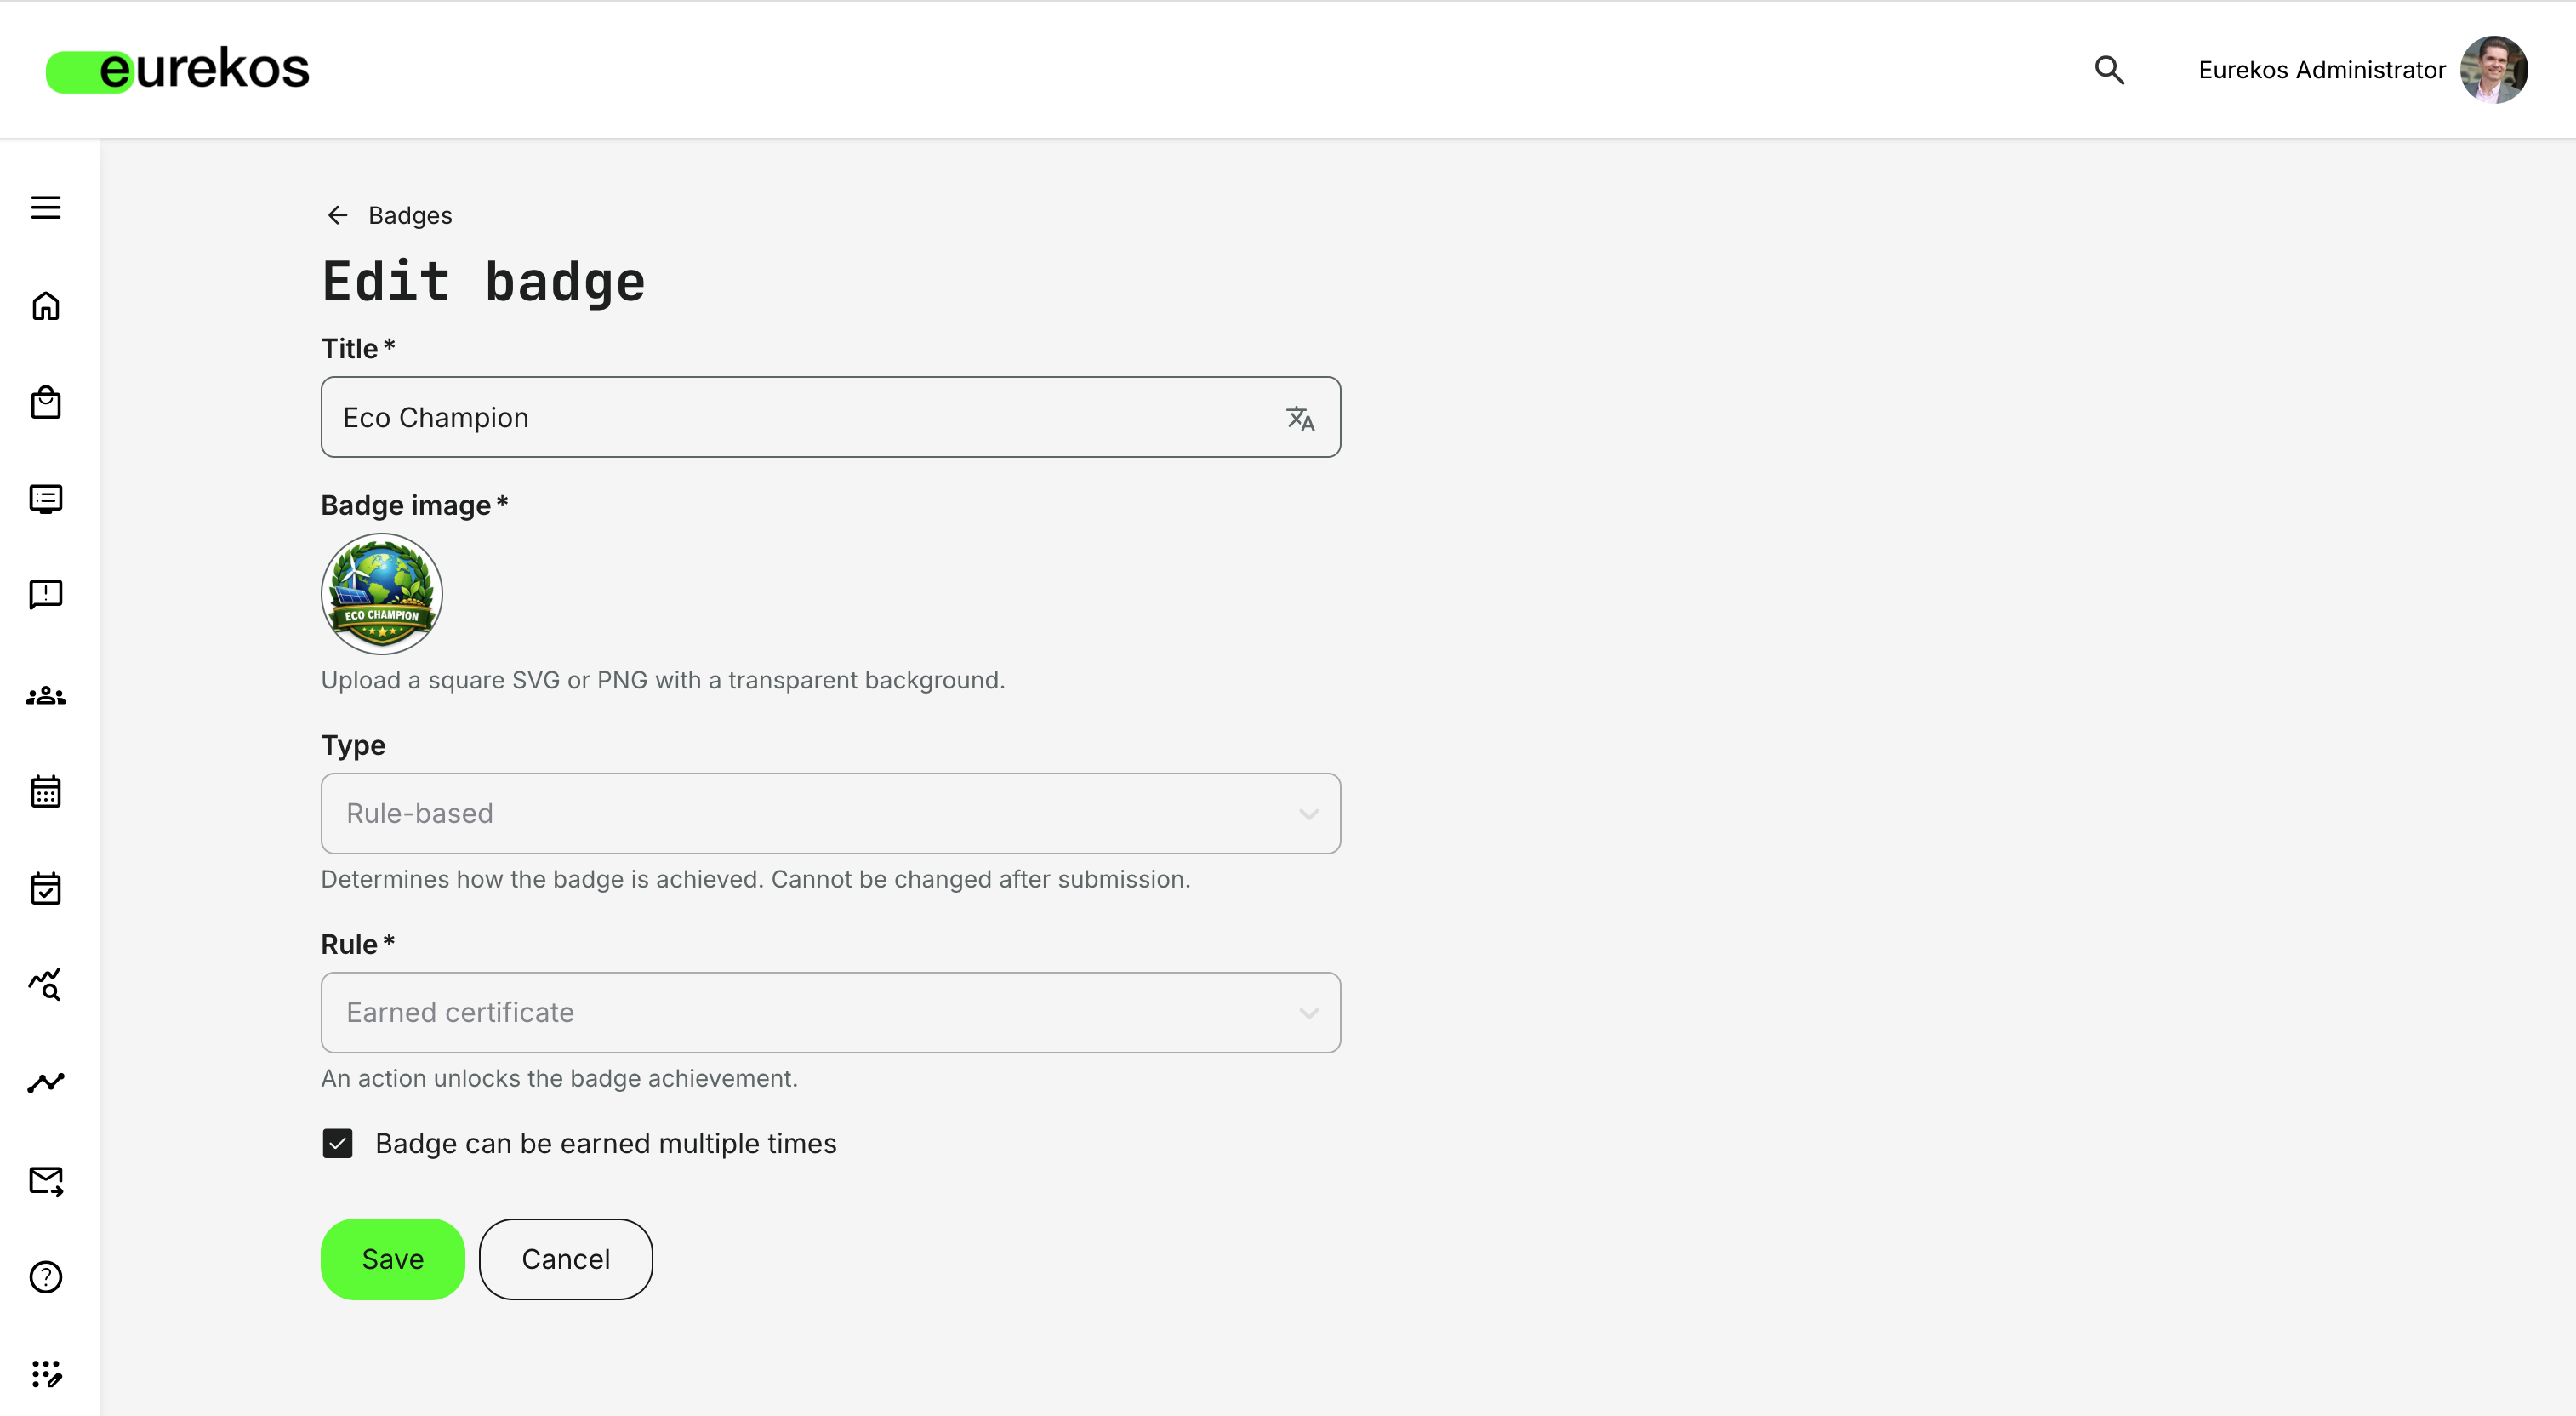
User Experience
When a learner earns a badge:
- An on-screen notification is displayed immediately
- A record of the achievement appears in the notification center
No email notification is sent.
Badges are visible in:
- The learner’s profile
- The leaderboard (if enabled)
Un-earned badges are also displayed in the profile, allowing learners to see available achievements and progression paths.
Considerations
- Rules are generic - Badge triggers cannot be tied to specific activities, questionnaires, or individual objects.
- Editing behavior - Changes to a badge only affect badges issued after the update is saved. Previously issued badges remain unchanged.
- Deletion behavior - Deleting a badge removes it from all relevant user profiles and leaderboards. Badges cannot be deleted individually for specific users.
- Organization-level activation - Incentives (and therefore badges) can be enabled per organization, meaning you do not need to run badge programs platform-wide.
Chapter
11
Integrations & Extensibility
In this chapter:
| With this release, we continue expanding how Eurekos connects to - and extends into - your existing technology stack. Whether you want to embed custom scripts, synchronize marketing consent with Brevo, integrate your Quickchannel video library, or enable Vipps MobilePay as a Nordic payment option, these updates give you greater flexibility and control. |
External Scripts
With External Scripts, you can extend the Eurekos platform by injecting custom JavaScript into your environment - without backend customization or support tickets.
This capability gives you greater control over how your platform behaves and integrates with your broader technology ecosystem. Whether you need to embed your own chatbot, connect analytics tools, implement marketing trackers, or integrate consent management solutions, External Scripts allow you to do so in a controlled and configurable way.
By bringing script management into the platform interface, you can now manage, scope, test, and maintain custom scripts directly - improving flexibility while maintaining administrative oversight.
Features and Benefits
Centralized script management - External scripts can now be added and managed directly from the platform settings. This eliminates the need for backend deployments for most script-related use cases and gives administrators visibility and control over active scripts. You can:
- Add multiple scripts
- Enable or disable them at any time
- Edit existing scripts directly in the interface
Flexible script configuration (Inline or External) - You can add scripts in two ways:
- External – Provide a URL pointing to a hosted JavaScript file
- Inline – Paste the JavaScript code directly into the platform
For external scripts, additional HTML attributes can be defined for the <script> tag. For inline scripts, you can optionally render the content as <noscript> for environments where JavaScript is disabled.
Controlled placement within the platform - Scripts can be injected into either:
- The <head> section (Header placement)
- The <body> section (Footer placement)
When using footer placement, you can choose to insert the script immediately after the opening <body> tag or at the bottom of the page.
Role- and organization-based targeting - Scripts can be restricted to specific system roles and/or organizations. This enables you to:
- Test scripts with limited audiences before full rollout
- Apply scripts only to specific customer groups
- Support organization-specific integrations
- Limit impact during validation
If no roles or organizations are specified, the script applies globally.
Support for common extensibility use cases - External Scripts enable a wide range of integrations, including:
- Custom chatbots
- Google Tag Manager and analytics tools
- Cookie consent managers
- Marketing pixels and tracking services
- Other custom JavaScript-based services
🗒️ If you previously had custom scripts configured by Eurekos at the backend level, these scripts have now been migrated into this new interface and are fully manageable from within the platform.
Configuration
External Scripts can be configured via: Settings → Third Party Integrations → External Scripts. Only top-level administrators (Platform administrator or Global Administrator) can manage scripts.
When creating a script, you can configure:
- Script type (Inline or External)
- Script URL (for external scripts)
- Script attributes (for external scripts)
- Script code (for inline scripts)
- Optional <noscript> rendering (for inline scripts)
- Placement (Header or Footer)
- Insert at top of <body> (for footer placement)
- Availability (Enabled or Disabled)
- Role restrictions
- Organization restrictions
We recommend using role or organization restrictions to test scripts before rolling them out to a broader audience.
Considerations
- Working with external scripts requires technical competence. Improperly implemented scripts can affect the user interface or platform behavior.
- While we implement safeguards to protect core platform integrity and database security, the responsibility for script security and correctness lies with you.
- Scripts should be thoroughly tested before enabling them for production users.
- External scripts are generally not executed for anonymous (unregistered) users. However, they may execute for anonymous users accessing the platform via custom organization URLs (e.g., invite links, QR invites, custom organization URLs, or organization-based activity sharing links).
- Our support team can assist where needed, but validation and testing of custom scripts should be performed by your technical team.
Brevo Integration
With the new Brevo integration, you can connect Eurekos with your Brevo marketing platform to automate newsletter subscriber management.
If you use are using Brevo today for customer newsletters, this integration eliminates the need for manual exports and imports. Users who consent to receive newsletters during signup in Eurekos are automatically synchronized to your connected Brevo account - ensuring your marketing lists remain accurate, compliant, and up to date.
Features and Benefits
Automatic synchronization of newsletter subscribers - Users who provide newsletter consent in Eurekos are automatically created as contacts in your connected Brevo account. This ensures that your marketing audience is always aligned with user consent status in Eurekos, reducing manual list management and minimizing compliance risk.
Flexible field mapping between Eurekos and Brevo - When setting up the integration, you can map Eurekos user profile fields to Brevo contact attributes. This allows you to:
- Transfer relevant profile data into Brevo
- Segment audiences based on user attributes
- Personalize campaigns using synchronized data
Only Email, First Name, and Last Name are mandatory. All other fields are optional and configurable.
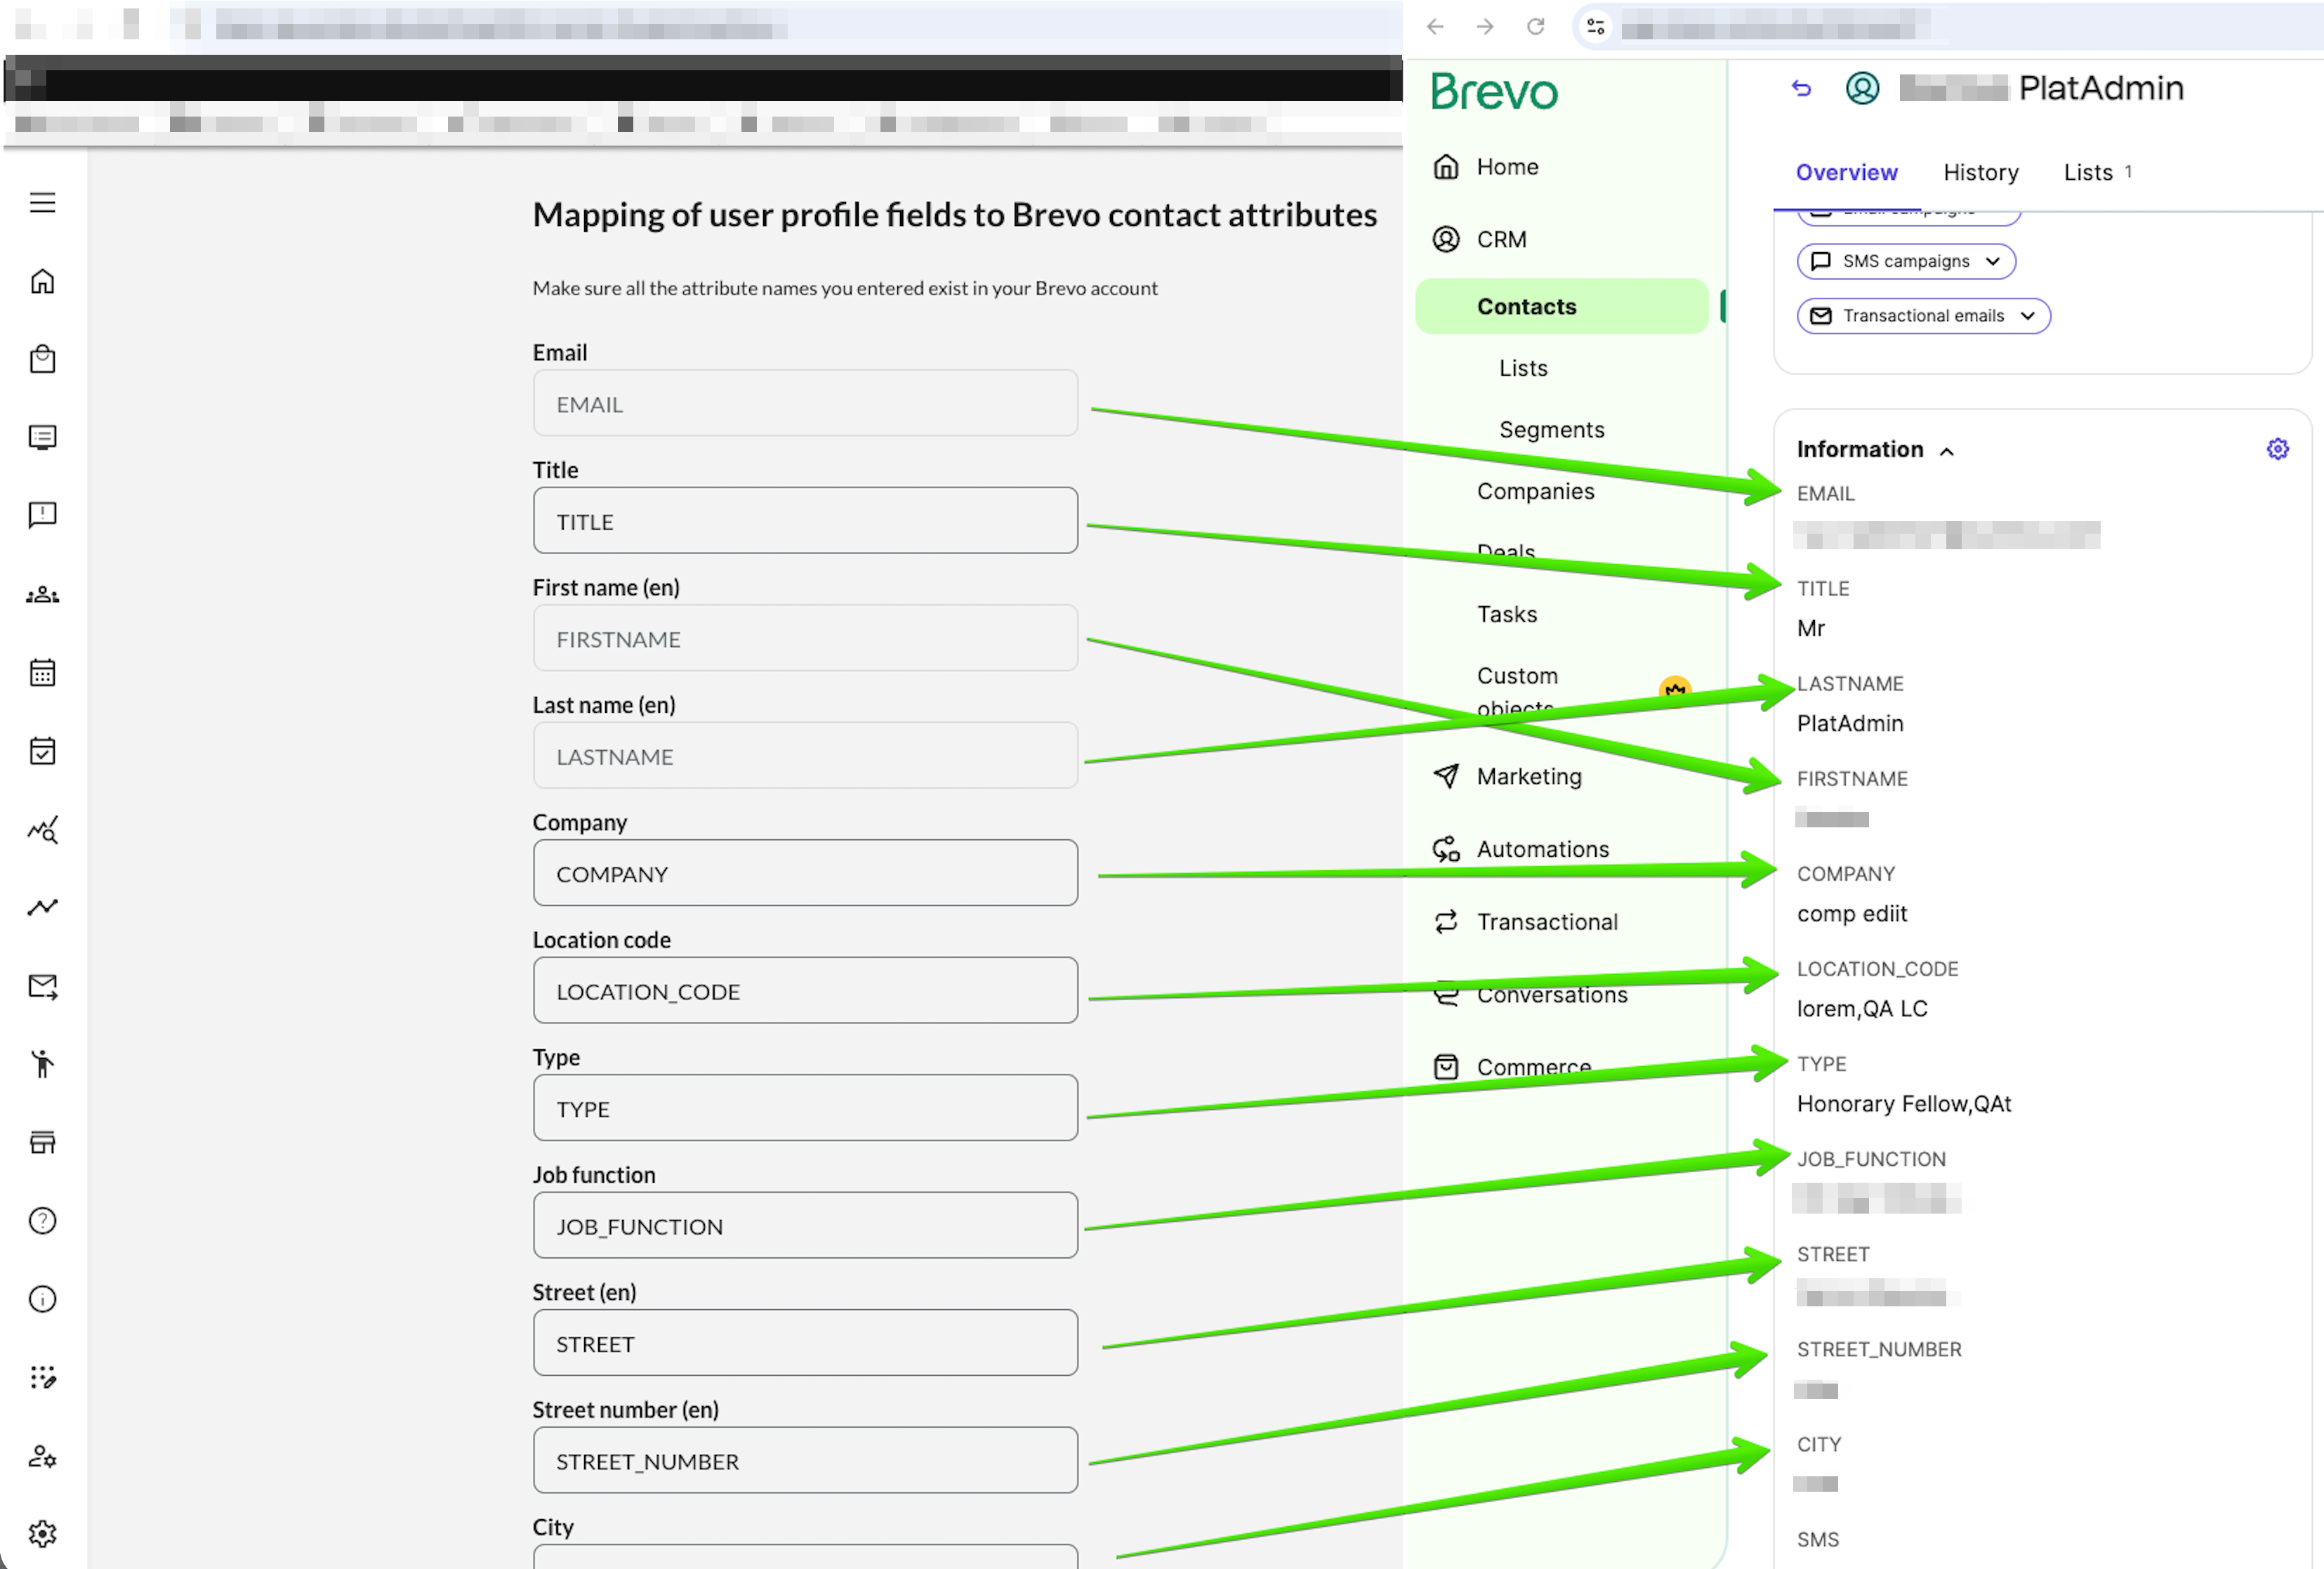
Integrated consent collection during onboarding - Newsletter consent can be collected directly within the Eurekos signup experience.
When enabled, users can:
- Provide consent during signup
- Accept via a popup on first login
- Update their consent at any time via Edit Profile → Preferences
This makes consent collection part of your standard onboarding flow — without requiring additional tools.
Dynamic consent-based updates - The integration ensures that your marketing database reflects current consent status changes. If a user:
- Withdraws newsletter consent
- Is deleted from Eurekos
Their corresponding contact is automatically removed from Brevo.
Configuration
To configure the Brevo integration:
- Navigate to Settings → Third Party Integrations → Brevo
- Insert your Brevo API key to connect your account
- Map Eurekos profile fields to Brevo contact attributes
To enable newsletter consent collection:
- Go to Settings → General
- Enable Newsletter consent
- Save your settings
Once enabled:
- The consent checkbox appears on the signup form
- A consent popup is shown on first login (for new users only)
- Consent status can be updated anytime under Edit Profile → Preferences
Please note that the popup is not shown to users created before newsletter consent was enabled.
Considerations
- Only users who have actively consented to receiving newsletters are synchronized to Brevo.
- Users created before newsletter consent was enabled will not automatically see the popup - consent must be collected through other means if needed.
- Attribute mapping in Brevo must align with configured contact attributes in your Brevo account.
- We recommend validating field mappings before activating the integration in production.
- For assistance with setup or best practices, please contact support@eurekos.com
Quickchannel Integration
If you use Quickchannel to host and manage your video content, you can now connect it directly with Eurekos.
The Quickchannel integration allows you to embed approved videos from your Quickchannel library directly into course pages using a dedicated widget in the Eurekos authoring tool. This creates a seamless workflow between video management and learning delivery - while ensuring moderation rules, governance, and analytics remain intact.
Features and Benefits
Direct access to your Quickchannel video library - Once connected, content creators can browse and search it directly from within the Eurekos course editor. The library is searchable by: Title, Description, Filename, Tags, Video ID.
Moderation-aware embedding - The integration respects Quickchannel’s moderation status. Videos can be filtered by: Approved, Not approved, Not moderated. Not approved videos will not be available for selection
Native Quickchannel playback experience - Embedded videos are played using Quickchannel’s native video player. This includes support for:
- Alternative audio tracks
- Captions
Integrated analytics tracking – Video engagement with Quickchannel videos is tracked and included in the Progress report & Content engagement analytics dashboard.
The platform records:
- Whether the video was watched
- How much of the video was viewed
Metadata sync back to Quickchannel - When a Quickchannel video is embedded in Eurekos, metadata is updated on the Quickchannel side. An attribute-value pair is added to the video in Quickchannel, showing:
- The course code of the Eurekos course
- A link to the corresponding course page
This gives your video administrators visibility into where each video is used across your learning ecosystem.
Configuration
To configure the integration:
- Navigate to Settings → Third Party Integrations → Quickchannel
- Enter your Quickchannel Account ID
- Enter your API token
Once connected, the Quickchannel widget becomes available in the course authoring tool.
Considerations
- Videos marked as Not moderated in Quickchannel cannot be embedded. If a video’s moderation status changes to “Not moderated” after it's embedded, it will appear unavailable in Eurekos.
Vipps MobilePay Integration
We have added support for Vipps MobilePay as a new payment gateway in Eurekos.
With this integration, customers operating in the Nordic region can offer Vipps and MobilePay as payment options for activity purchases. Supporting both card-based payments and wallet-based mobile app payments, the integration provides flexibility while maintaining a seamless flow between Eurekos and Vipps MobilePay’s secure external checkout.
Features and Benefits
Nordic-optimized payment experience - Vipps and MobilePay are widely used across Denmark, Finland, Norway, and Sweden. By enabling this gateway, you offer learners a payment method they already know and trust, improving checkout confidence and completion rates.
Two supported payment methods - Once enabled, two separate payment methods become available:
- Vipps card
- Vipps wallet
This allows you to support both traditional card entry and mobile app-based wallet payments, depending on user preference.
Secure external checkout flow - Payments are processed via Vipps MobilePay’s secure external checkout environment.
For Vipps card:
- The user is redirected to the external checkout page
- Card details are entered securely
- Upon completion, the user is redirected back to Eurekos
For Vipps wallet:
- The user enters their phone number in checkout
- A payment request is sent to the Vipps or MobilePay app
- The user confirms payment in the app
- The user is redirected back to Eurekos
Configuration
To configure the integration:
- Navigate to Settings → Third Party Integrations → Vipps MobilePay
- Enter the required credentials from your Vipps merchant account:
- Merchant Serial Number (MSN)
- Client ID
- Client Secret
- Ocp-Apim-Subscription-Key (primary)
- Select the environment (Test or Production)
- Save the configuration
- Navigate to Settings → Commerce → Payment methods
- Enable:
- Vipps card
- Vipps wallet
A Vipps merchant agreement and valid API credentials are required before enabling the integration.
We recommend contacting support@eurekos.com if you need assistance with setup.
Considerations
- Vipps MobilePay is available to Nordic customers (Denmark, Finland, Norway, Sweden).
- Vipps card is not available in the Test environment.
- The Test environment requires use of Vipps test credentials and, for wallet payments, the dedicated test mobile app.
- Payment processing, compliance, and settlement are handled by Vipps MobilePay.
Shortlist of Additional Noticeable Changes
- WCAG compliance Improvements: In this release, we have introduced a broad set of WCAG compliance improvements across the platform, focusing on accessibility, keyboard operability, and screen reader support. Enhancements include improved keyboard and voice navigation for storefront search, listings, LP pages and overview, page header search, sidebars, filters, chosen fields, dropdowns, date pickers, and specific popups (including fullscreen popups). We refined focus management (including clear focus indication and proper focus restoration after closing popups), strengthened screen reader support for listings and skip links, and ensured strikethrough text is properly announced. Additional updates include improved sidebar structure and navigation, better header semantics for the “Upcoming events” and “Last visited” blocks, corrections to video player keyboard navigation, and improved contrast for interactive elements to ensure better visibility and accessibility compliance.
- Improved PDF handling for enhanced security: To mitigate potential scripting vulnerabilities in PDFs, PDFs are now downloaded directly to the user’s device rather than opened in a new browser tab (when supported by the browser). This reduces the risk of embedded JavaScript in uploaded PDF files being executed in the browser.
- Custom sender selection for Automated Email Workflows: Each email rule in Automated Email Workflows can now specify the sender from the list configured under Settings → Email Sending → Senders. Previously, all automated workflows used the same sender. The default sender is still defined under Settings → Email Sending → System emails → Automation.
- Assignment module comments can now be disabled: The comment section can be disabled in the Assignment module via a platform-wide configuration (requires a support ticket). Previously, commenting was always enabled.
- Multiple equipment selection for activities and modules: Administrators can now select multiple equipment resources at both the activity and module levels. Previously, only one equipment item could be assigned. This provides greater flexibility when managing and booking training resources.
- Grades included in downloadable training transcript: When users download their PDF training transcript from their profile page, grades received through the Assignment module are now included.
- Invoice tracking column in Transactions: A new column, “Invoice sent”, has been added to the Transactions listing (Course Administration → Transactions) for payments using the invoice option. This allows administrators to mark invoices as sent or not sent. The column is also available in the Transactions report. Configuration requires a support ticket.
- Custom storefront row size option: A new “Custom” row size option is now available in the storefront, allowing administrators to define the exact number of activities displayed per row. Previously, only predefined increments (4–32) were available.
- New date-picker profile fields: Four new date-picker fields have been added under Settings → Forms → Profile (disabled by default): “Audit date,” “Graduation date,” “Last working day,” and “Probation end date.” These fields can be renamed as needed.
- BankID-based enrollment restriction: For platforms using the BankID integration, activities can now require a valid BankID verification to complete enrollment. This adds an additional identity validation layer for regulated or high-trust scenarios.
- New Certopus instructor token: For clients using Certopus as their certification engine, a new token is now available, allowing instructor names to be dynamically referenced on certificates.