14.0.0 - Release notes
In this release
14.0.0 is a major release, with new features and improvements across AI, the learner dashboard, the storefront, learning paths, questionnaires and ecommerce. Download the full release notes as a PDF
- Saga, our learner AI assistant: opens right inside the training, uses SCORM, H5P and Resource Library content, gives answers based on the learner’s profile, suggests follow-up questions, and can now run on ChatGPT, Claude or Gemini.
- Dashboard Recommendations: the top of My overview becomes a carousel of admin-picked and AI-driven recommendations, so no learner starts on an empty dashboard.
- Storefront filter sidebar: filter on every storefront page, with multi-level tags, counters and search within the filters.
- Storefront Agenda view: browse upcoming scheduled training as a detailed, day-by-day list.
- Learning paths with nested activities: see the modules inside nested activities, with progress that reflects the real workload.
- Questionnaires: insert questions anywhere, show answers as tiles, and add help text to each answer option.
- Stripe Checkout: offer TWINT, Klarna and dozens of other payment methods through Stripe’s hosted checkout page.
- Discount campaigns: manage organization discounts together with all other discounts, with optional expiration dates.
The release also includes security improvements and eleven smaller changes, listed at the end of this article.
Saga - The Next Generation of Our Learner AI Assistant
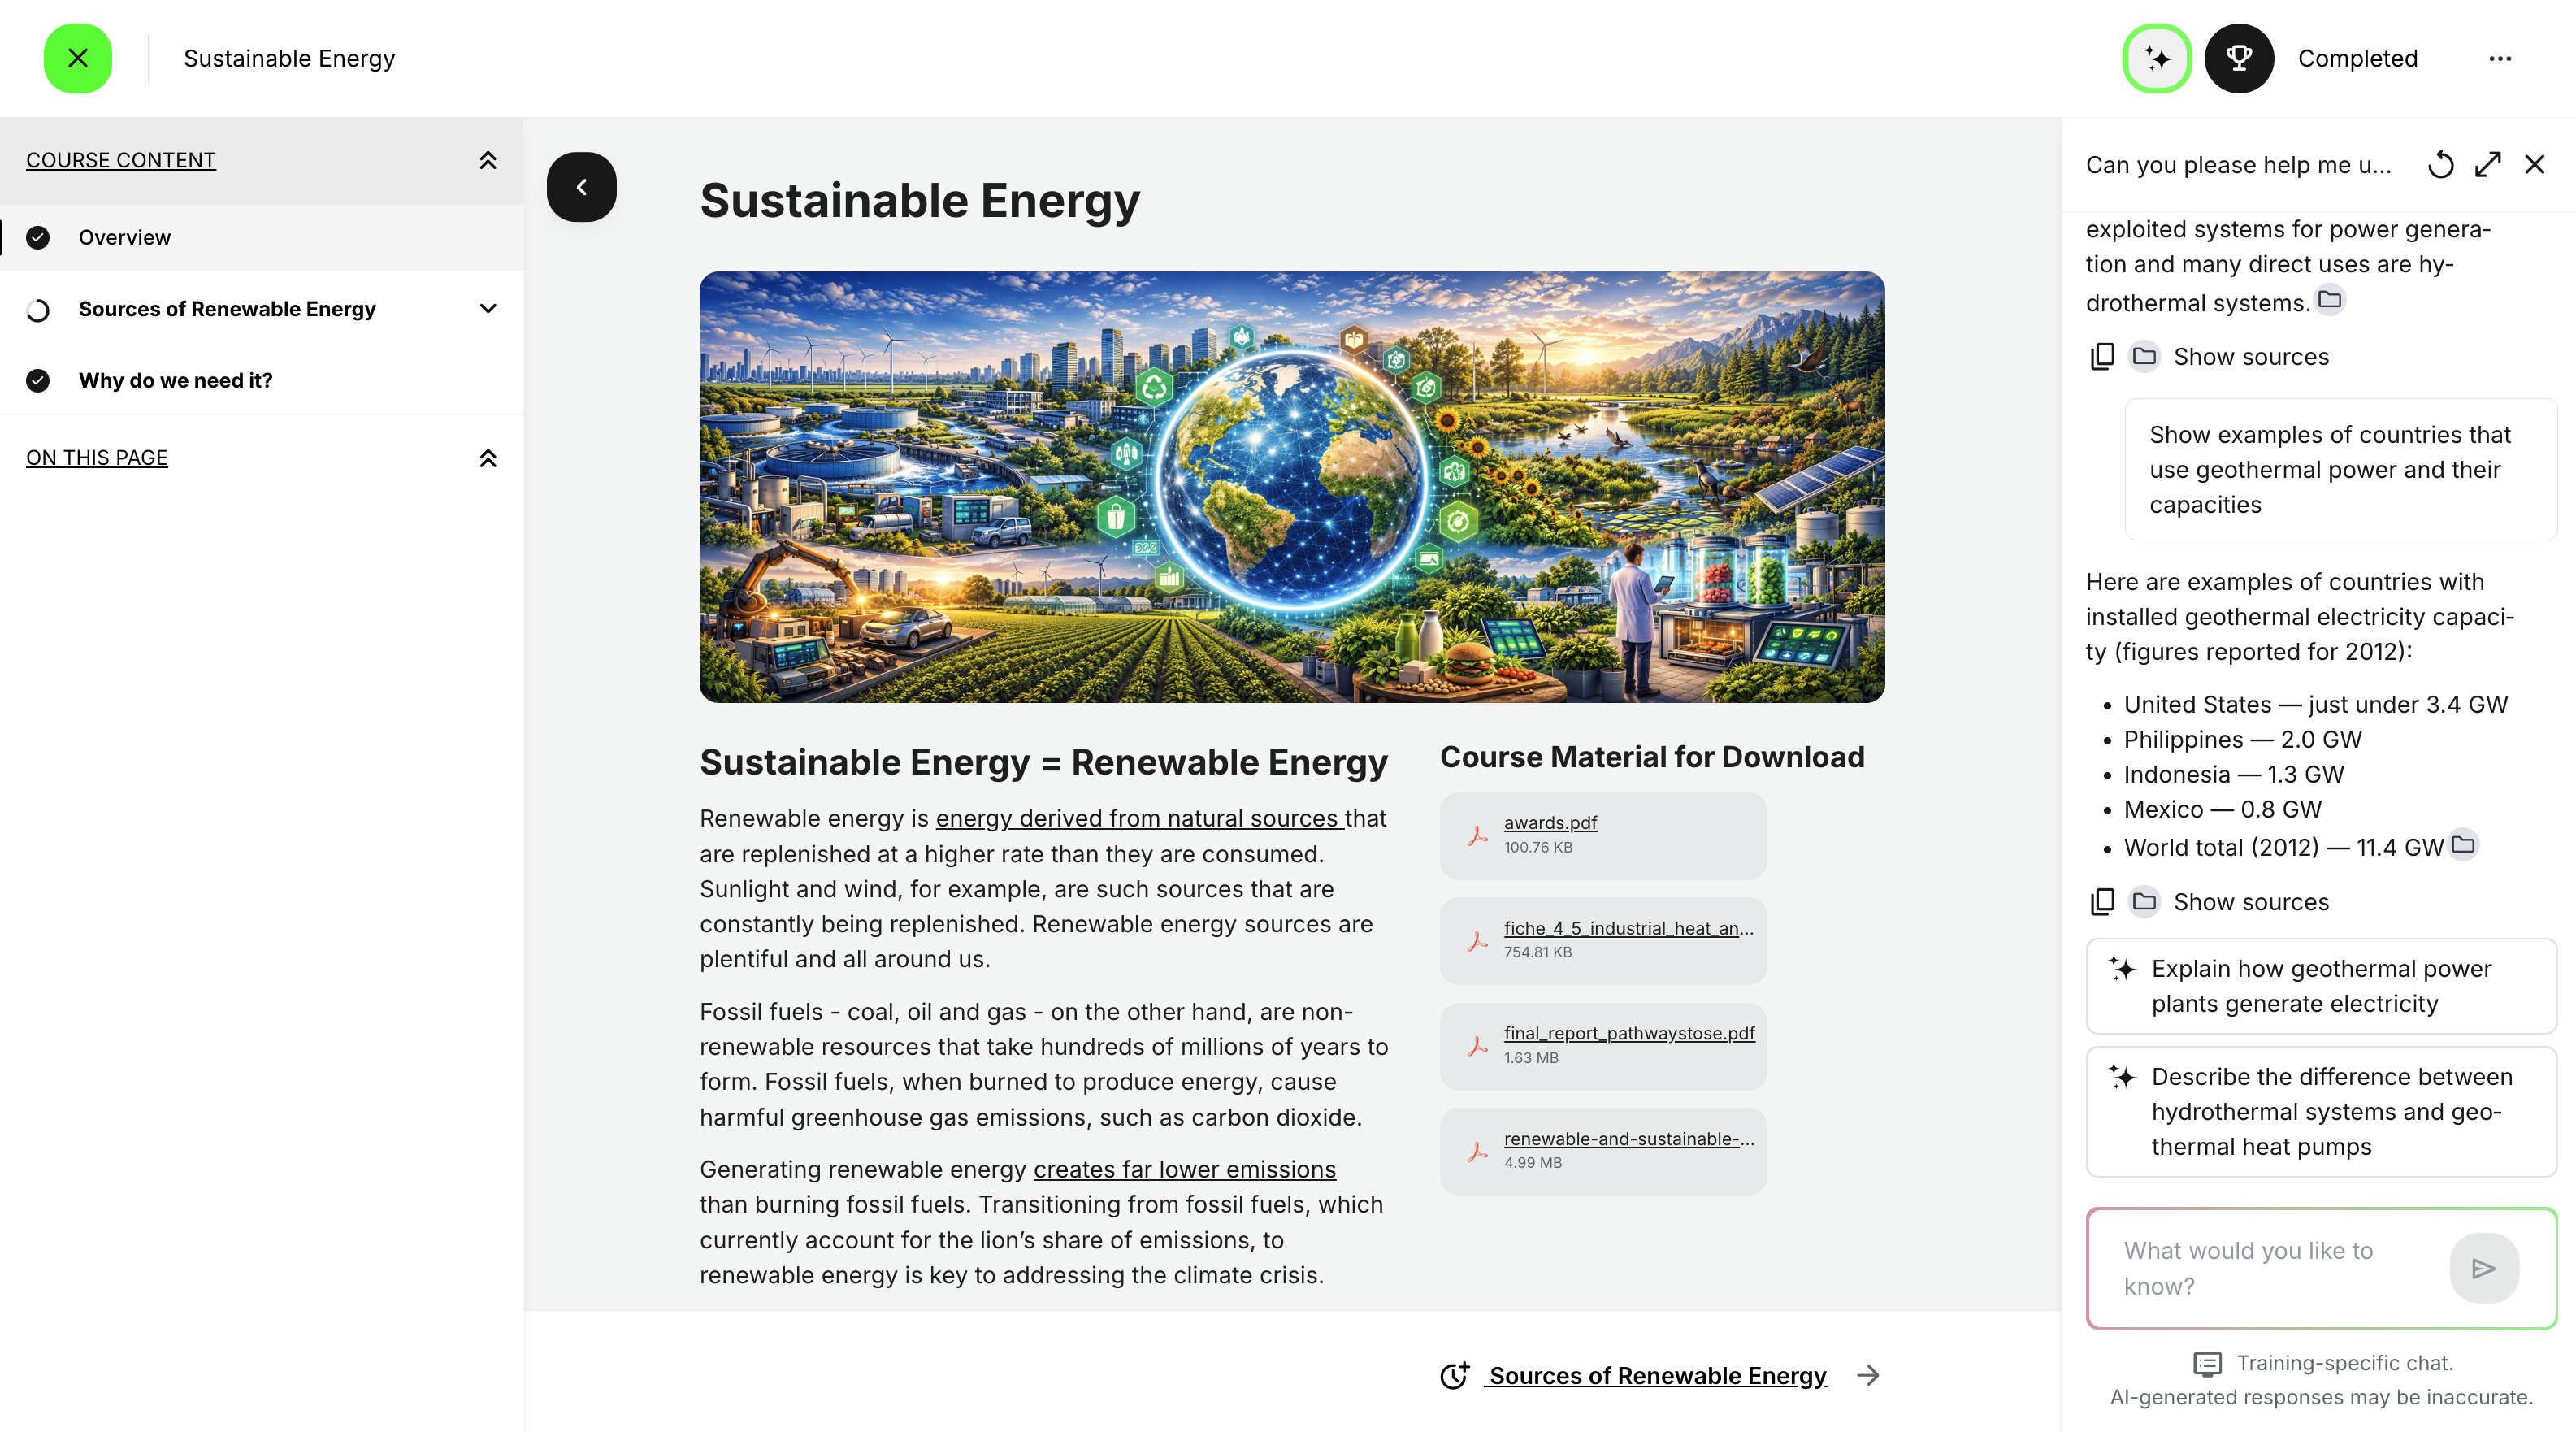
The AI Learning Assistant we introduced in 13.0.0 has reached its next generation. Now called Saga by default, it opens as a sidebar on the page the learner is on, including inside the training they're working on, and it reasons over far more of your content, including SCORM, H5P and the Resource Library. Saga also uses each learner's profile and training history to give more relevant, personal answers, and it suggests follow-up questions to keep the conversation going.
For admins, this release adds more control over how Saga is set up: enable it for selected organizations only, choose between ChatGPT, Claude and Gemini as the underlying AI model, and rename the assistant to whatever fits your brand. Saga is the default name, but you can call it anything you like. As before, Saga only works within your platform's permission, organization and content access rules, so learners only get answers from material they already have access to. That is what sets it apart from a generic AI chatbot.
Features and Benefits
Saga as a sidebar, wherever learners are: Selecting Saga in the site header now opens it as a sidebar on the current page by default, instead of taking learners to the full-page conversation. Learners can ask a question, switch between their most recent chats or start a new one, and carry on with what they were doing. When they want more room or their complete chat history, Open full chat takes them to the full-page view.
Saga inside the training (learn mode): Learners can now open Saga directly in learn mode, both inside a course module and on a learning path's overview page. The chat opens as a sidebar next to the content rather than covering it, so learners keep their place in the lesson. Each training has its own dedicated chat. Saga answers from that training's own content first, covering every module in a learning path, and links its sources to the specific module where the answer comes from. If the training doesn't cover a question, Saga can draw on the Resource Library (where enabled) or point the learner to related trainings in the storefront instead. Learners can clear the chat for a training at any time and start over.
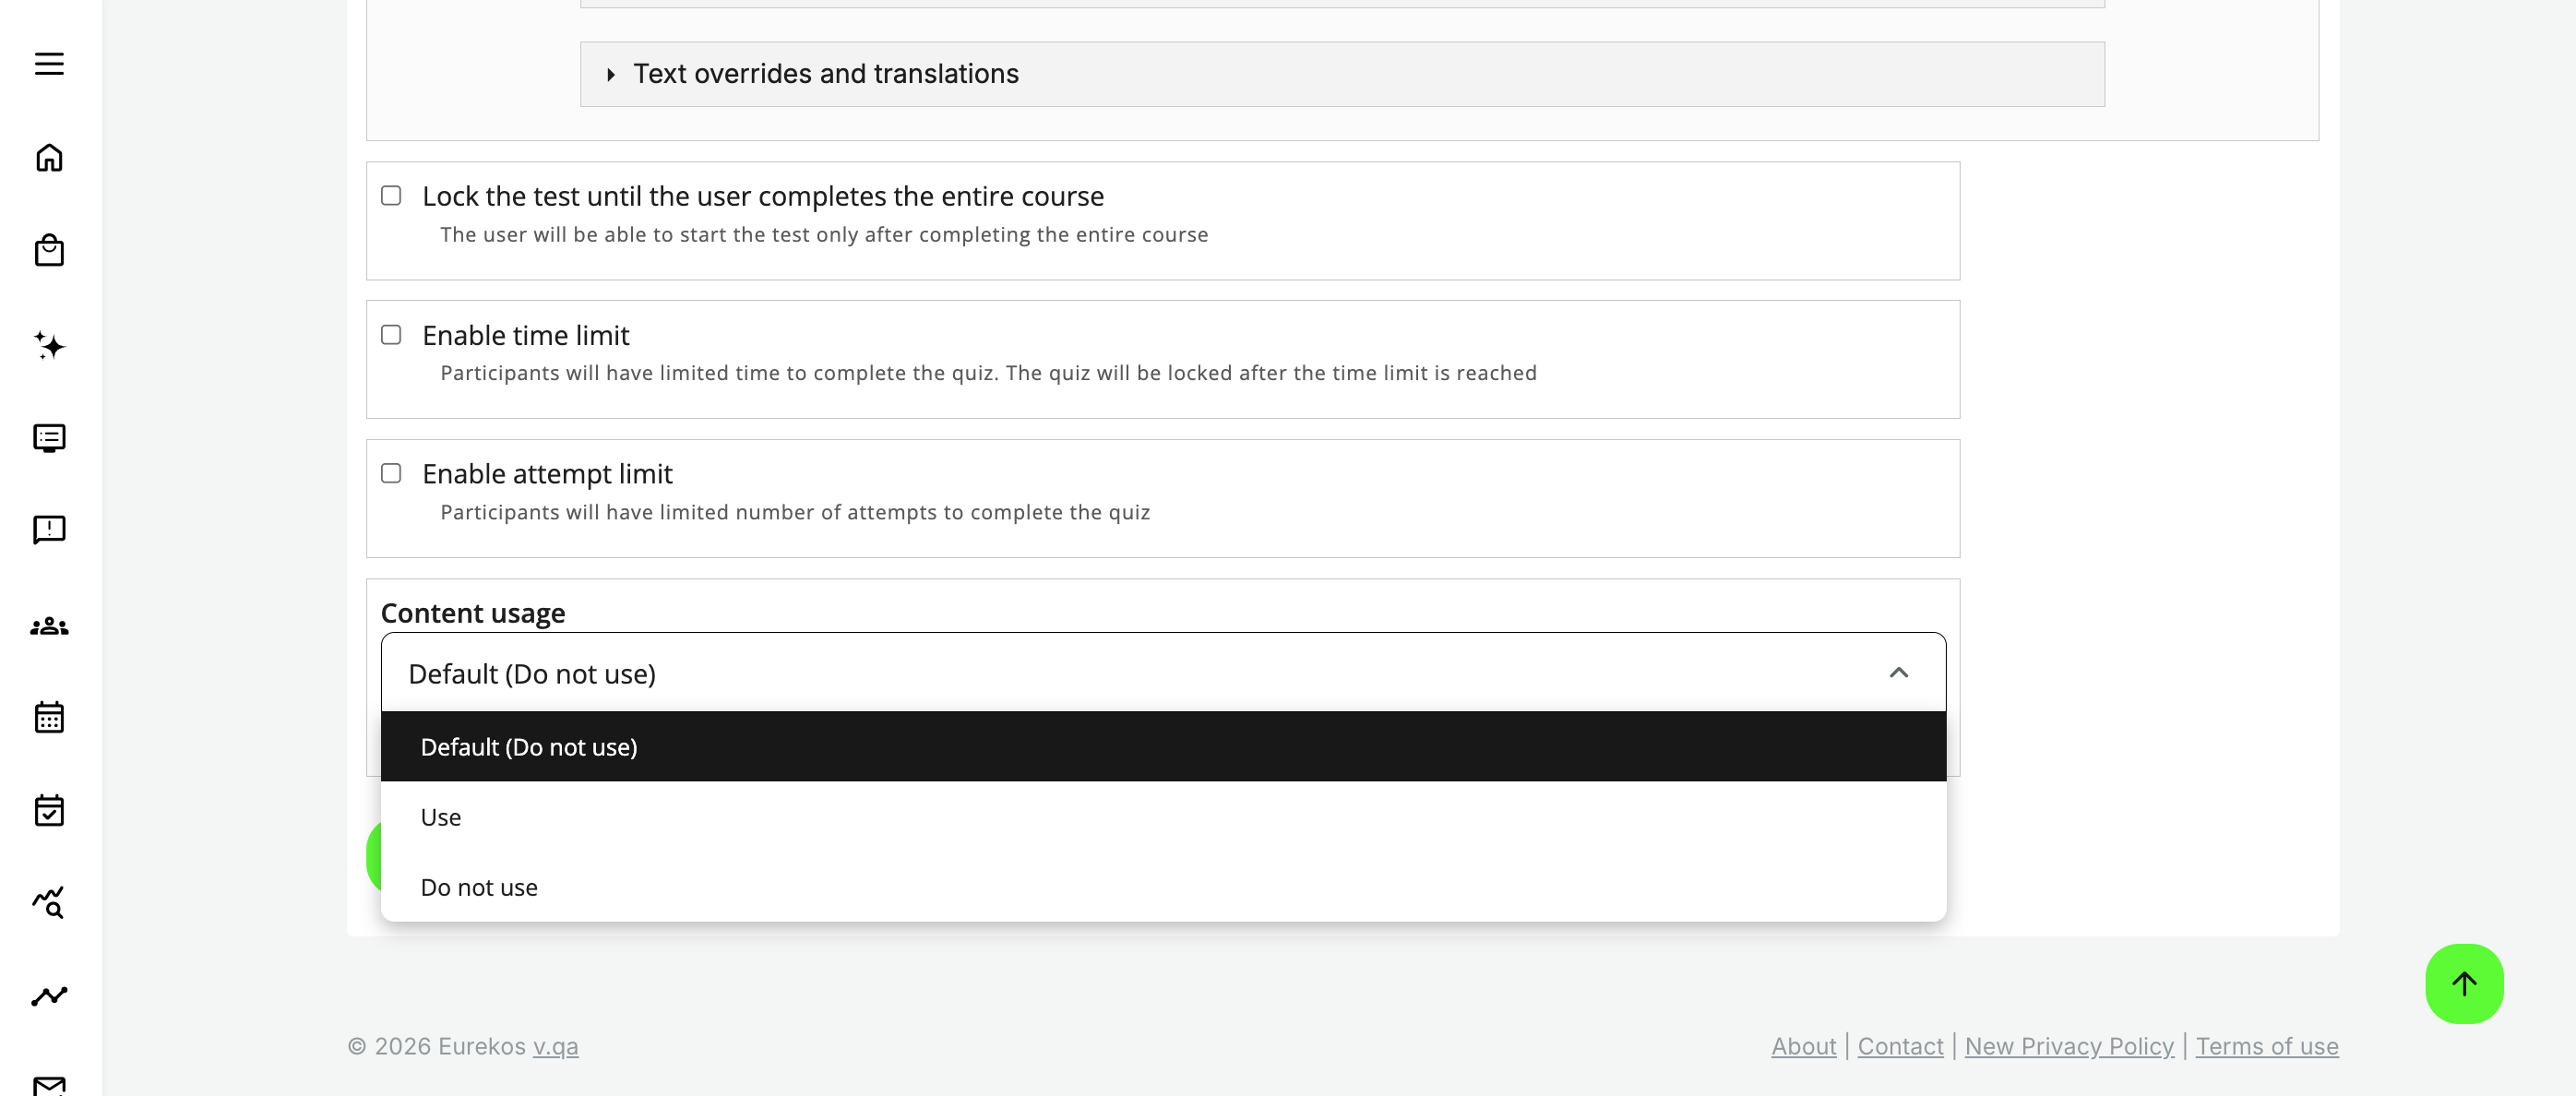
SCORM and H5P content indexing: Saga can now reason over the content inside SCORM packages and H5P objects, including text, quizzes, links and audio. Previously, it was limited to native Eurekos course material. With this update, Saga gives the same level of support however the training was built. You stay in control of what Saga can use: each H5P object and SCORM course can be included or excluded individually. This matters most for graded assessments and exams: excluding them keeps learners from asking Saga for the answers.
Resource Library indexing: If the Resource Library module is enabled on your platform, Saga now indexes its files too. Learners can find relevant reference material by asking Saga, and the Resource Library's existing access model stays the same.
About the Resource Library: The Resource Library is an optional module that works as a tag-based document management system. When a learner registers for a training, they automatically get access to a related folder of supporting files, which is useful for sharing reference materials, guidelines or supplementary documents alongside formal training content. The Resource Library is off by default. To enable it on your platform, please contact your Customer Success Manager or Eurekos support.
Personalized answers based on the learner's profile: Saga now knows who it's talking to. It uses the learner's profile information and training history, including the trainings they're enrolled in and their progress in each, as context for the conversation. Before this update, Saga knew nothing about the learner. Now it can tailor its answers, for example by recommending a sensible next training or skipping what the learner has already completed. We've also improved how Saga finds and ranks the most relevant sources, so answers are more accurate overall.
Suggested follow-up questions: After each response, Saga suggests up to three follow-up questions, such as asking about a specific recommended course. Learners can select a suggestion to continue the conversation with one click. This helps them explore a topic further, especially when they aren't sure what to ask next.
Choice of AI model: Saga can now run on Claude or Gemini as well as ChatGPT, which was previously the only option. This gives you more freedom to choose the AI provider that best fits your organization's preferences, policies or existing agreements.
Per-organization enablement: Saga can now be enabled for selected organizations instead of only for the whole platform. You can turn it on for specific organizations or sub-organizations, or make it available everywhere except selected ones. Only members of organizations with access see Saga. This is especially useful for piloting Saga with one department or region, offering it to a subset of customer organizations, or providing it as a premium capability to specific partners.
Rename the assistant: Saga is the default name, but admins can rename the assistant to anything they like, such as a name that matches your brand or your academy. The new name is shown everywhere the assistant appears on the platform.
Configuration
Saga is an optional add-on. To enable it on your platform, please contact your Customer Success Manager. The choice of AI model (ChatGPT, Claude or Gemini) and the platform-wide H5P and SCORM indexing setup are handled by Eurekos, so please reach out to your Customer Success Manager or support@eurekos.com to discuss what's right for you.
Once Saga is activated, configure it under Settings → Third Party Integrations → Artificial intelligence (AI):
Set availability: Use the Behavior dropdown to choose where Saga is available:
- Disabled: Saga is not available
- Available at the platform level: Saga is available to all users
- Available at the organization level: Saga is enabled or excluded for specific organizations and sub-organizations
Selecting Available at the organization level shows organization and sub-organization pickers, plus an Exclude organization / suborganization option that inverts the selection, making Saga available everywhere except the chosen organizations.
- Rename the assistant: Under AI assistant, enter a new name in the Assistant name field. The default is Saga.
- Add Saga to the sidebar menu (optional): Select Show in sidebar to add Saga as a menu item in the platform's main sidebar menu. When the checkbox is cleared, users reach Saga from the site header only.
To include or exclude an individual H5P object or SCORM course, open its edit page and set the Context usage field to Use or Do not use. For H5P objects, open the object from the H5P archive. For SCORM courses, go to Course Settings. The field can also be set when importing a SCORM course.
Considerations
- Assessment integrity: If H5P and SCORM content is indexed, quiz content is indexed too. Review the H5P objects and SCORM courses used for graded exams and knowledge checks, and set their Context usage field to Do not use so learners can't get answers through Saga.
- Phased rollouts: The per-organization controls make it easy to pilot Saga with a single department, region or customer organization before opening it up more widely. We recommend this approach before enabling Saga platform-wide.
- Where your data is processed: The infrastructure Saga runs on depends on the AI model you choose. ChatGPT and Claude run on Microsoft infrastructure, with Claude provided through Microsoft Foundry. Gemini runs on Google infrastructure. If your organization has requirements for where AI processing takes place, take this into account when choosing a model, and contact your Customer Success Manager for more details.
Dashboard Recommendations - Turn My Overview Into a Personalized Starting Point
The first section of My overview, previously Last visited, is now Recommendations. Until now, it only showed the last activity the learner had opened. Learners who weren't enrolled in anything yet saw an empty dashboard on their first visit, and the main workaround was to set up onboarding rules that enrolled new users automatically.
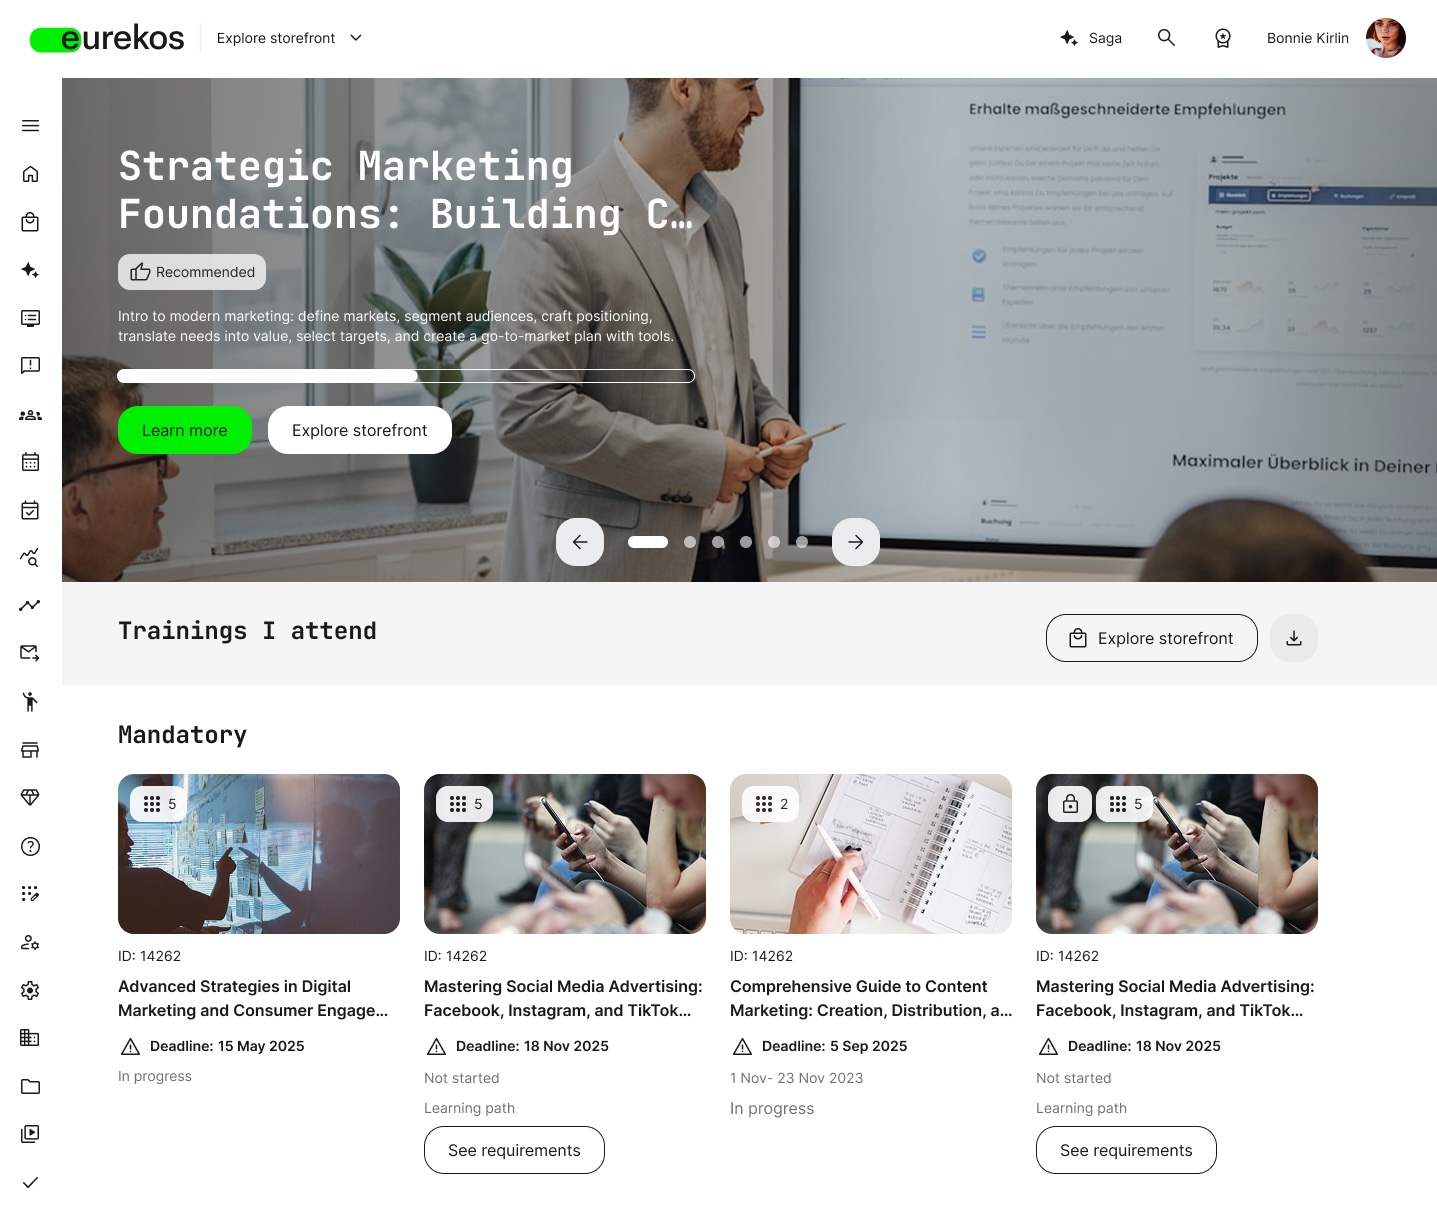
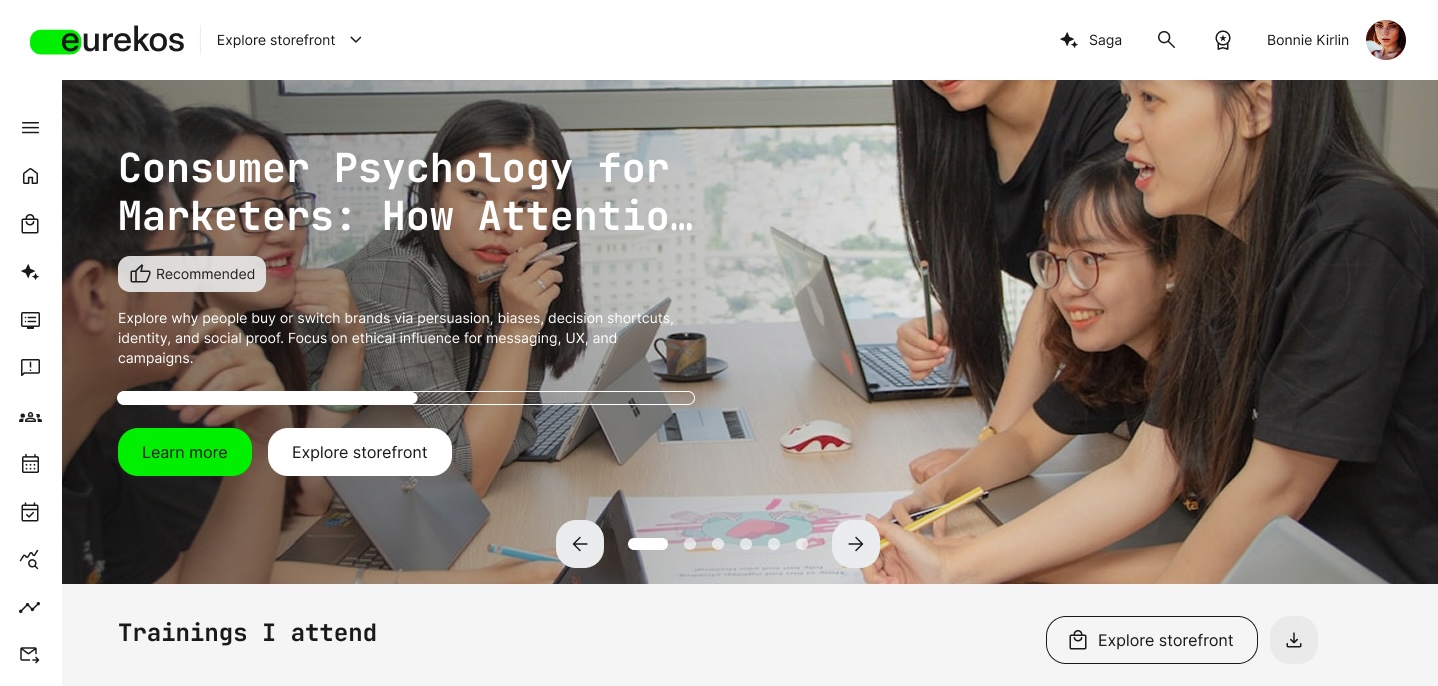
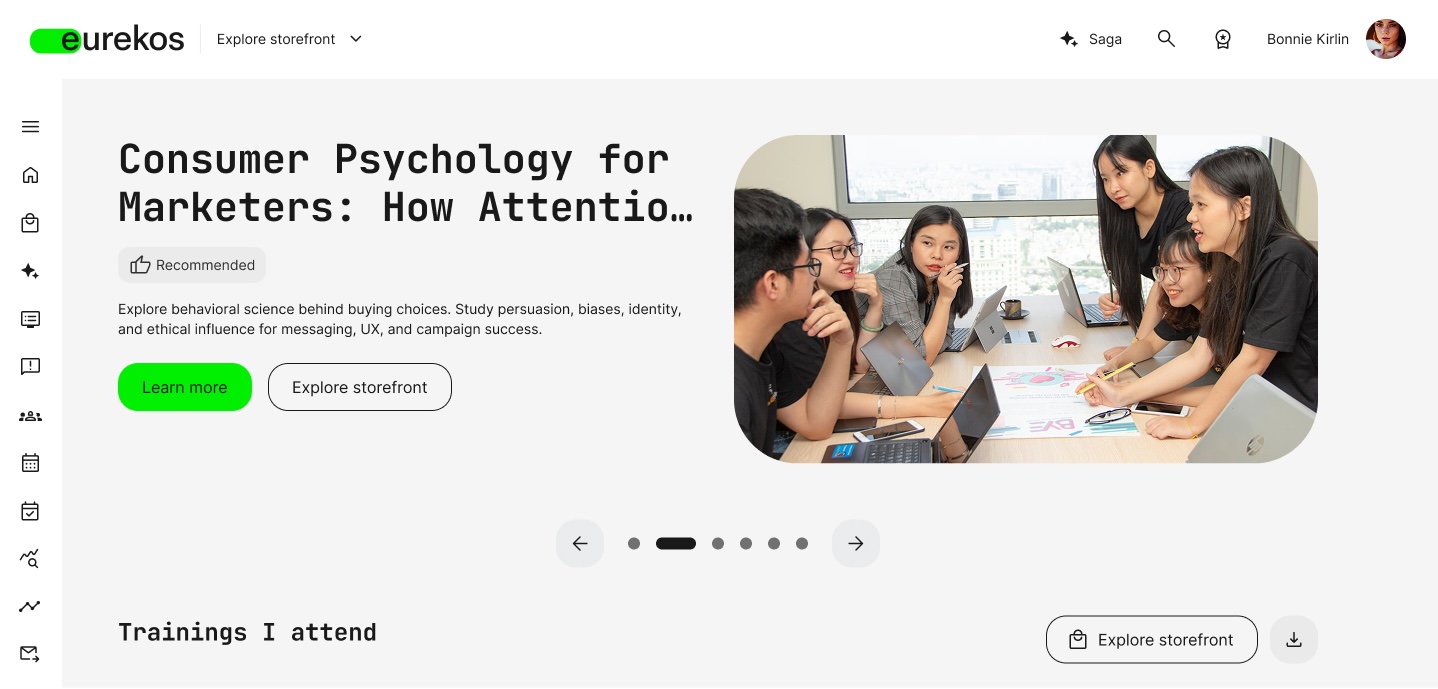
Admins can now decide what this section recommends, from a new Recommendations page in Settings. Combine the learner's last visited activity, activities in progress, bookmarked activities, AI-driven personalized recommendations and hand-picked activities from the storefront, in the order you prefer. When there is more than one recommendation, the section becomes a carousel. A new Vivid layout shows the activity banner across the full section, with the title and description on top and an overlay you can customize. Together, these changes give every learner a relevant place to start, from their very first login.
Features and Benefits
No more empty dashboards: Admins can recommend specific storefront activities to all learners, such as an introduction course or a popular starter training. New users therefore always have something to begin with, even before they're enrolled in anything. This reduces the need for onboarding rules that exist only to fill the dashboard, and gives learners a clear first step on their learning journey.
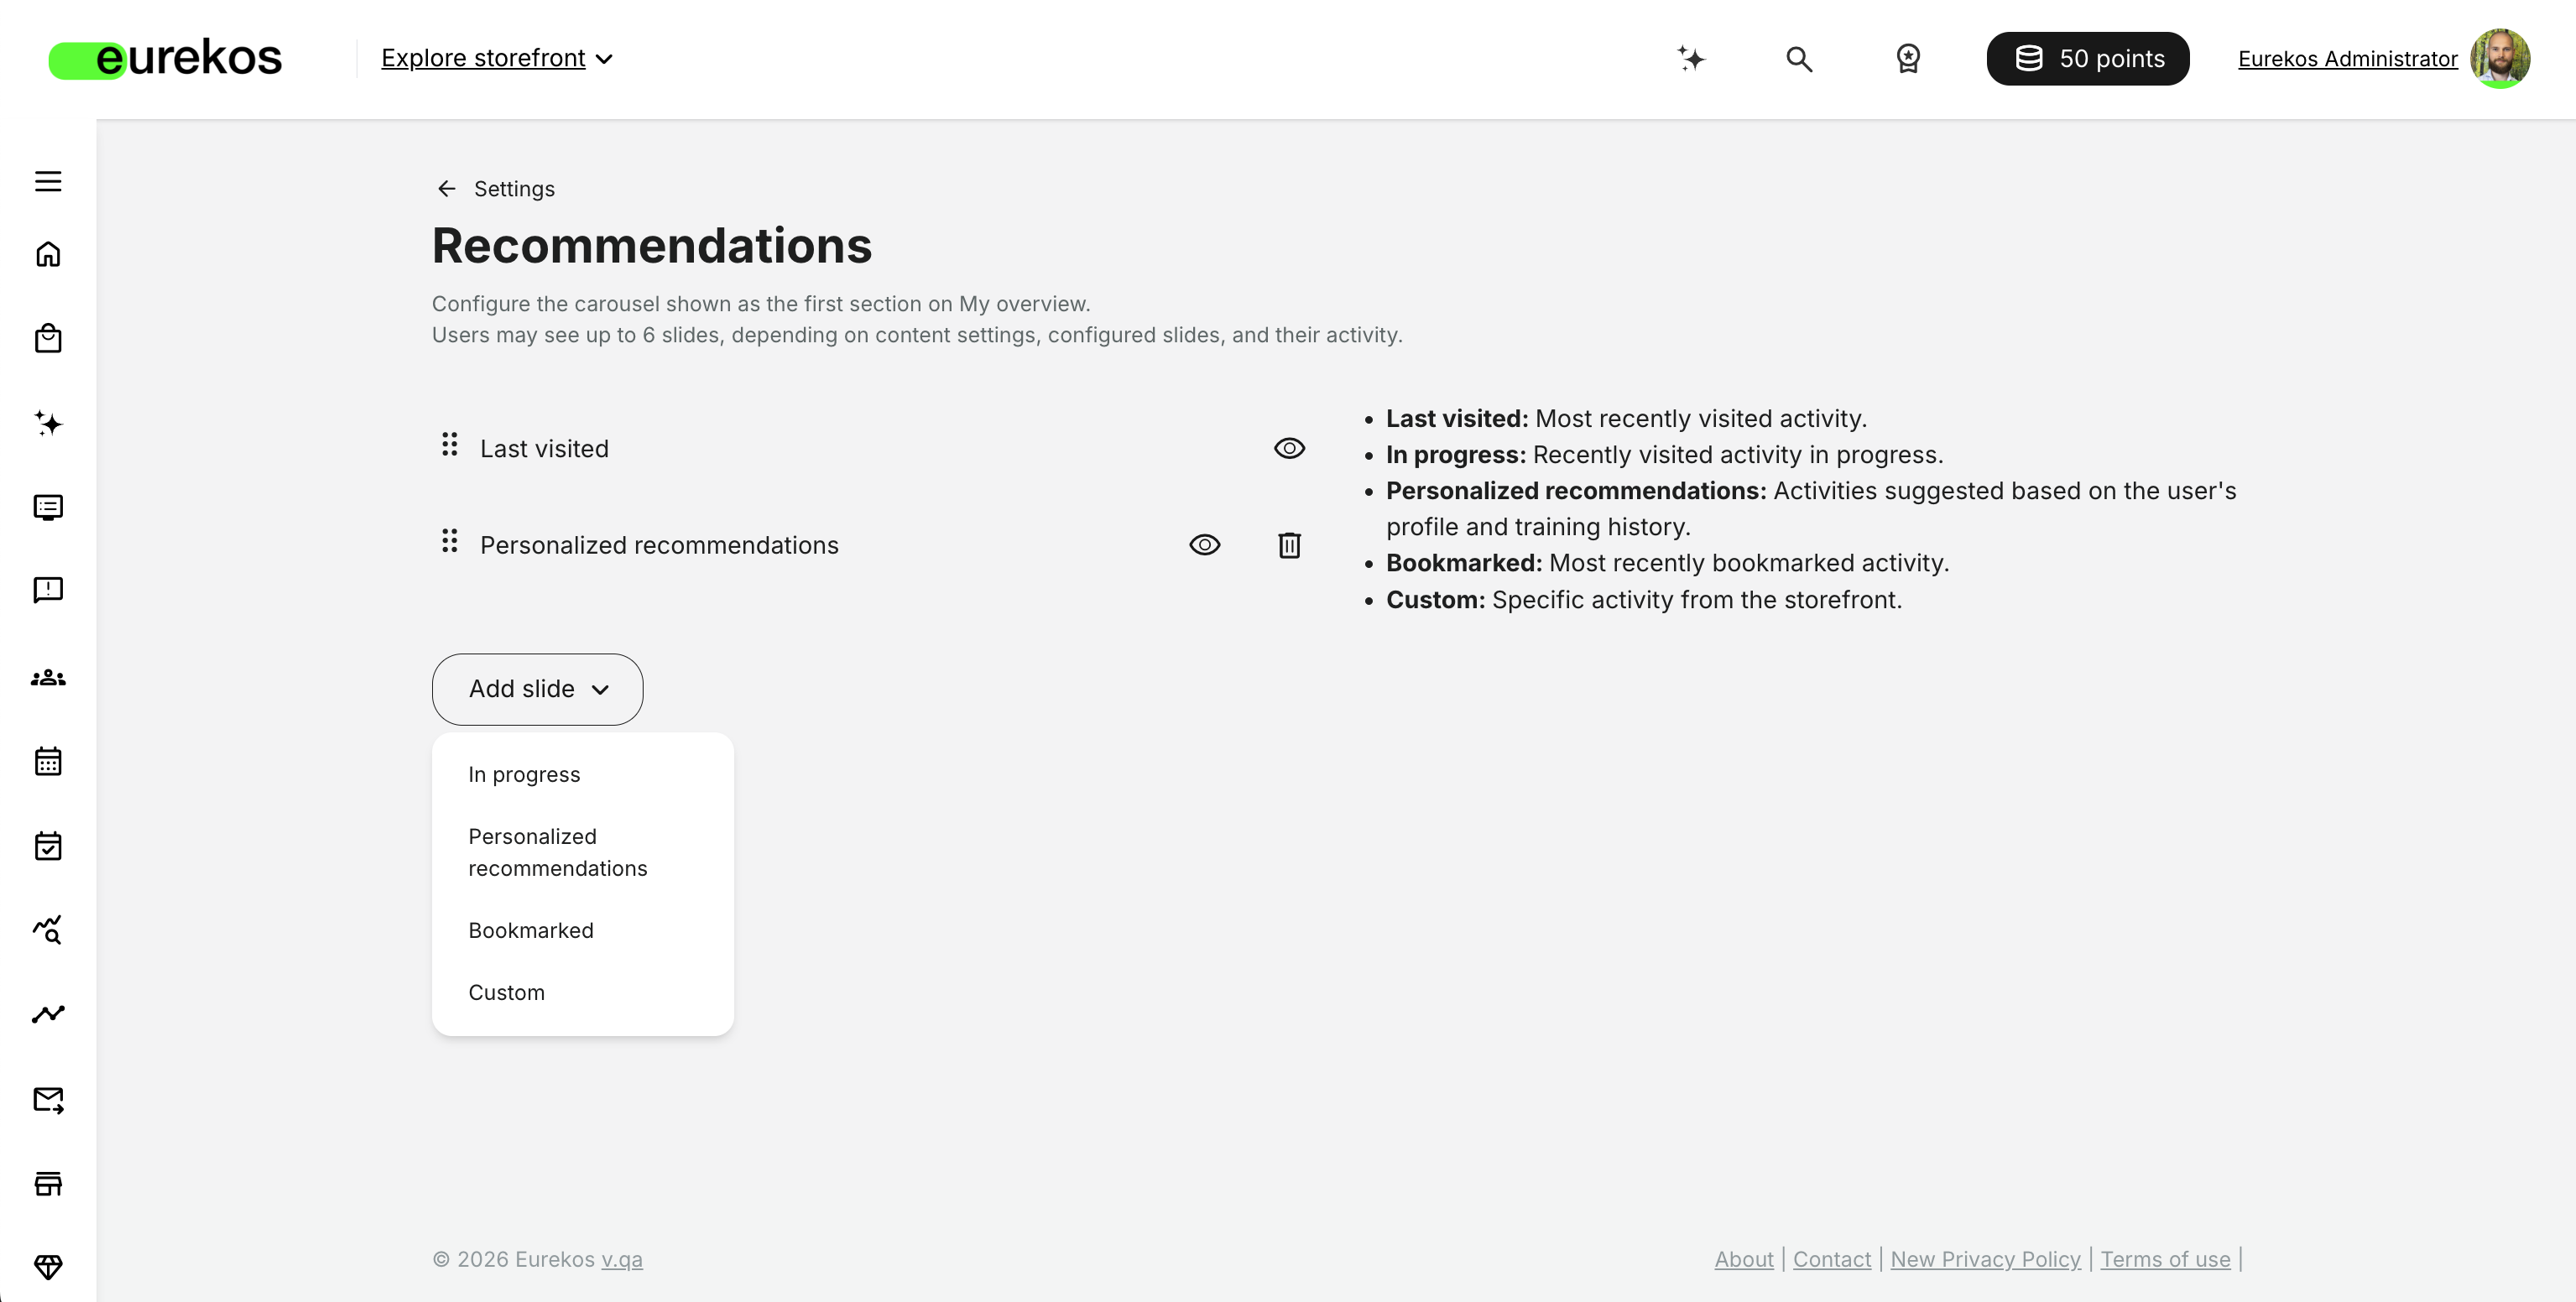
Five recommendation types, in your order of priority: Build the carousel from any combination of slide types:
|  |
All types except Last visited can be added more than once. For example, three Personalized recommendations slides show the learner's top three recommendations, in order of relevance. Learners only see slides that apply to them: if three Bookmarked slides are configured but a learner has bookmarked just one activity, that learner sees one Bookmarked slide.
AI-driven personalized recommendations: The new recommendations engine uses machine learning to suggest what each learner should take next. It finds other learners with a similar profile (based on organization and sub-organization, country, language, category, job function and skills, with or without levels) who have taken the same trainings. It then looks at which activities they went on to take. Only activities the learner can self-enroll in from their storefront are recommended, so every suggestion is one they can act on right away. Paid activities are ranked higher, so the engine also helps promote your commercial training offering. This brings the kind of "learners like you also took…" guidance familiar from consumer platforms to your academy, and helps learners discover relevant training they might otherwise miss.
Compact or Vivid layout: Under the new Recommendations tab in Settings → Appearance, choose how the carousel looks. Compact keeps the current design, with the title and description on the left and the activity banner on the right. The new Vivid layout shows the activity banner, image or video, across the whole section, with the text on top of an overlay. Video banners play automatically without sound. You can use the default overlay or set your own colors, gradient direction and text color, so the text stays readable and on brand. A darker overlay appears when learners hover over the slide. You can also choose whether the carousel plays automatically, and for how long each slide is shown.
 |  |
Configuration
After the update, the Recommendations page contains two slides: Last visited and Personalized recommendations. Learners therefore keep seeing their last visited activity, and from the day after the update, a personalized recommendation too. You can adjust, add or hide slides at any time.
To configure which recommendations learners see, go to Settings → Recommendations:
- Select Add slide and choose a slide type: In progress, Personalized recommendations, Bookmarked or Custom.
- For a Custom slide, select the storefront activity to recommend. To change it later, select the edit icon next to the slide.
- Drag and drop the slides into your preferred order. The carousel shows them in this order.
- Use the visibility icon to hide a slide without deleting it, or the delete icon to remove it. Last visited can be hidden but not deleted.
To configure the carousel's appearance, go to Settings → Appearance → Recommendations:
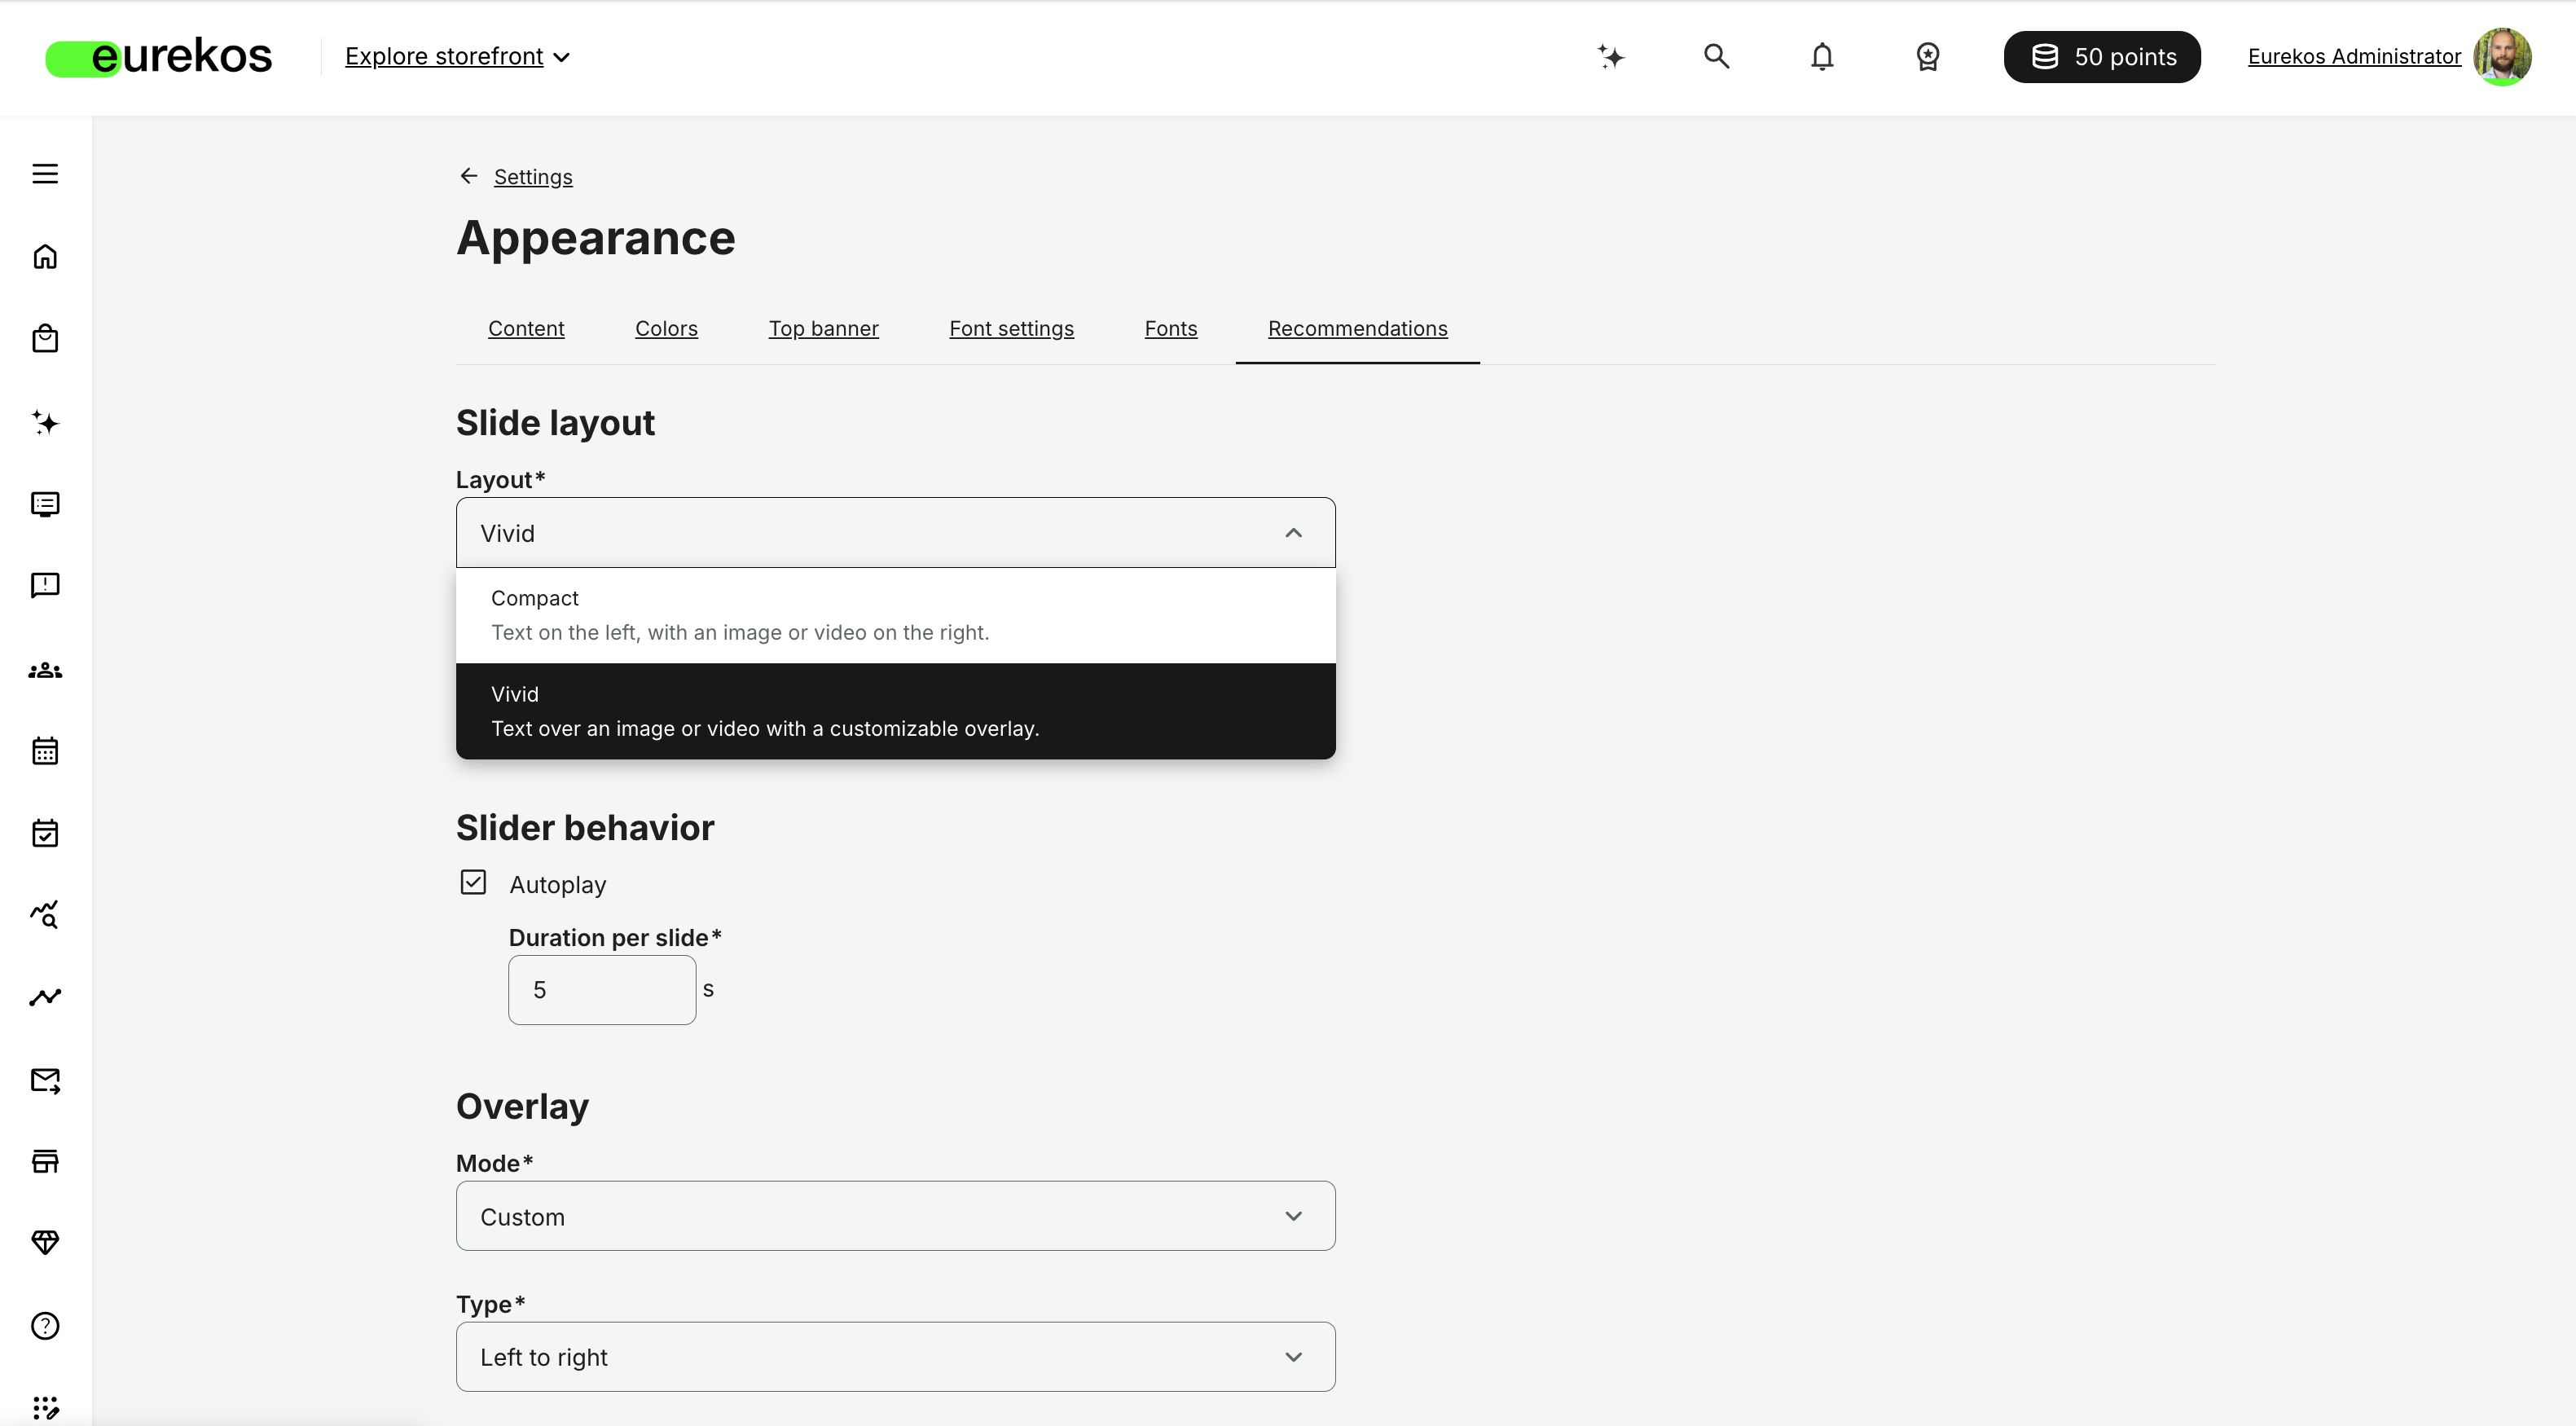
- Under Slide layout, choose Compact or Vivid as the Layout.
- Under Slider behavior, select Autoplay to rotate slides automatically, and set the Duration per slide in seconds.
- For the Vivid layout, set the Overlay. Choose Default as the Mode to use the standard overlay, or Custom to define your own. With Custom, choose a Type (Solid, Top to bottom, Bottom to top, Left to right or Right to left), set the Start color and End color with their positions, and adjust the Text color so it stays readable over the activity banner.
Considerations
- Personalized recommendations are updated daily: The recommendations engine refreshes overnight. Personalized recommendations therefore first appear the day after the update, and changes to a learner's profile or training history show up the following day.
- Personalized recommendations need a starting point: The engine bases its suggestions on the trainings a learner is enrolled in or has completed. A brand-new learner with no training history won't get Personalized recommendations yet. To make sure new users always see something, add at least one Custom slide.
- Only relevant, available activities are recommended: Personalized recommendations, Bookmarked and Custom slides never show an activity the learner is already signed up for (registered, on the waiting list or reserved). They also don't show activities that aren't available to the learner in their storefront, for example because of storefront visibility settings or because the activity is closed, cancelled or completed. A Custom slide is only shown to learners who can see that activity in their storefront.
- Up to six slides: Learners see a maximum of six slides, even if more are configured.
- Hiding all slides hides the section: If every slide is hidden, the Recommendations section doesn't appear on My overview.
Storefront Filters - A New Filter Sidebar, Available Across the Storefront
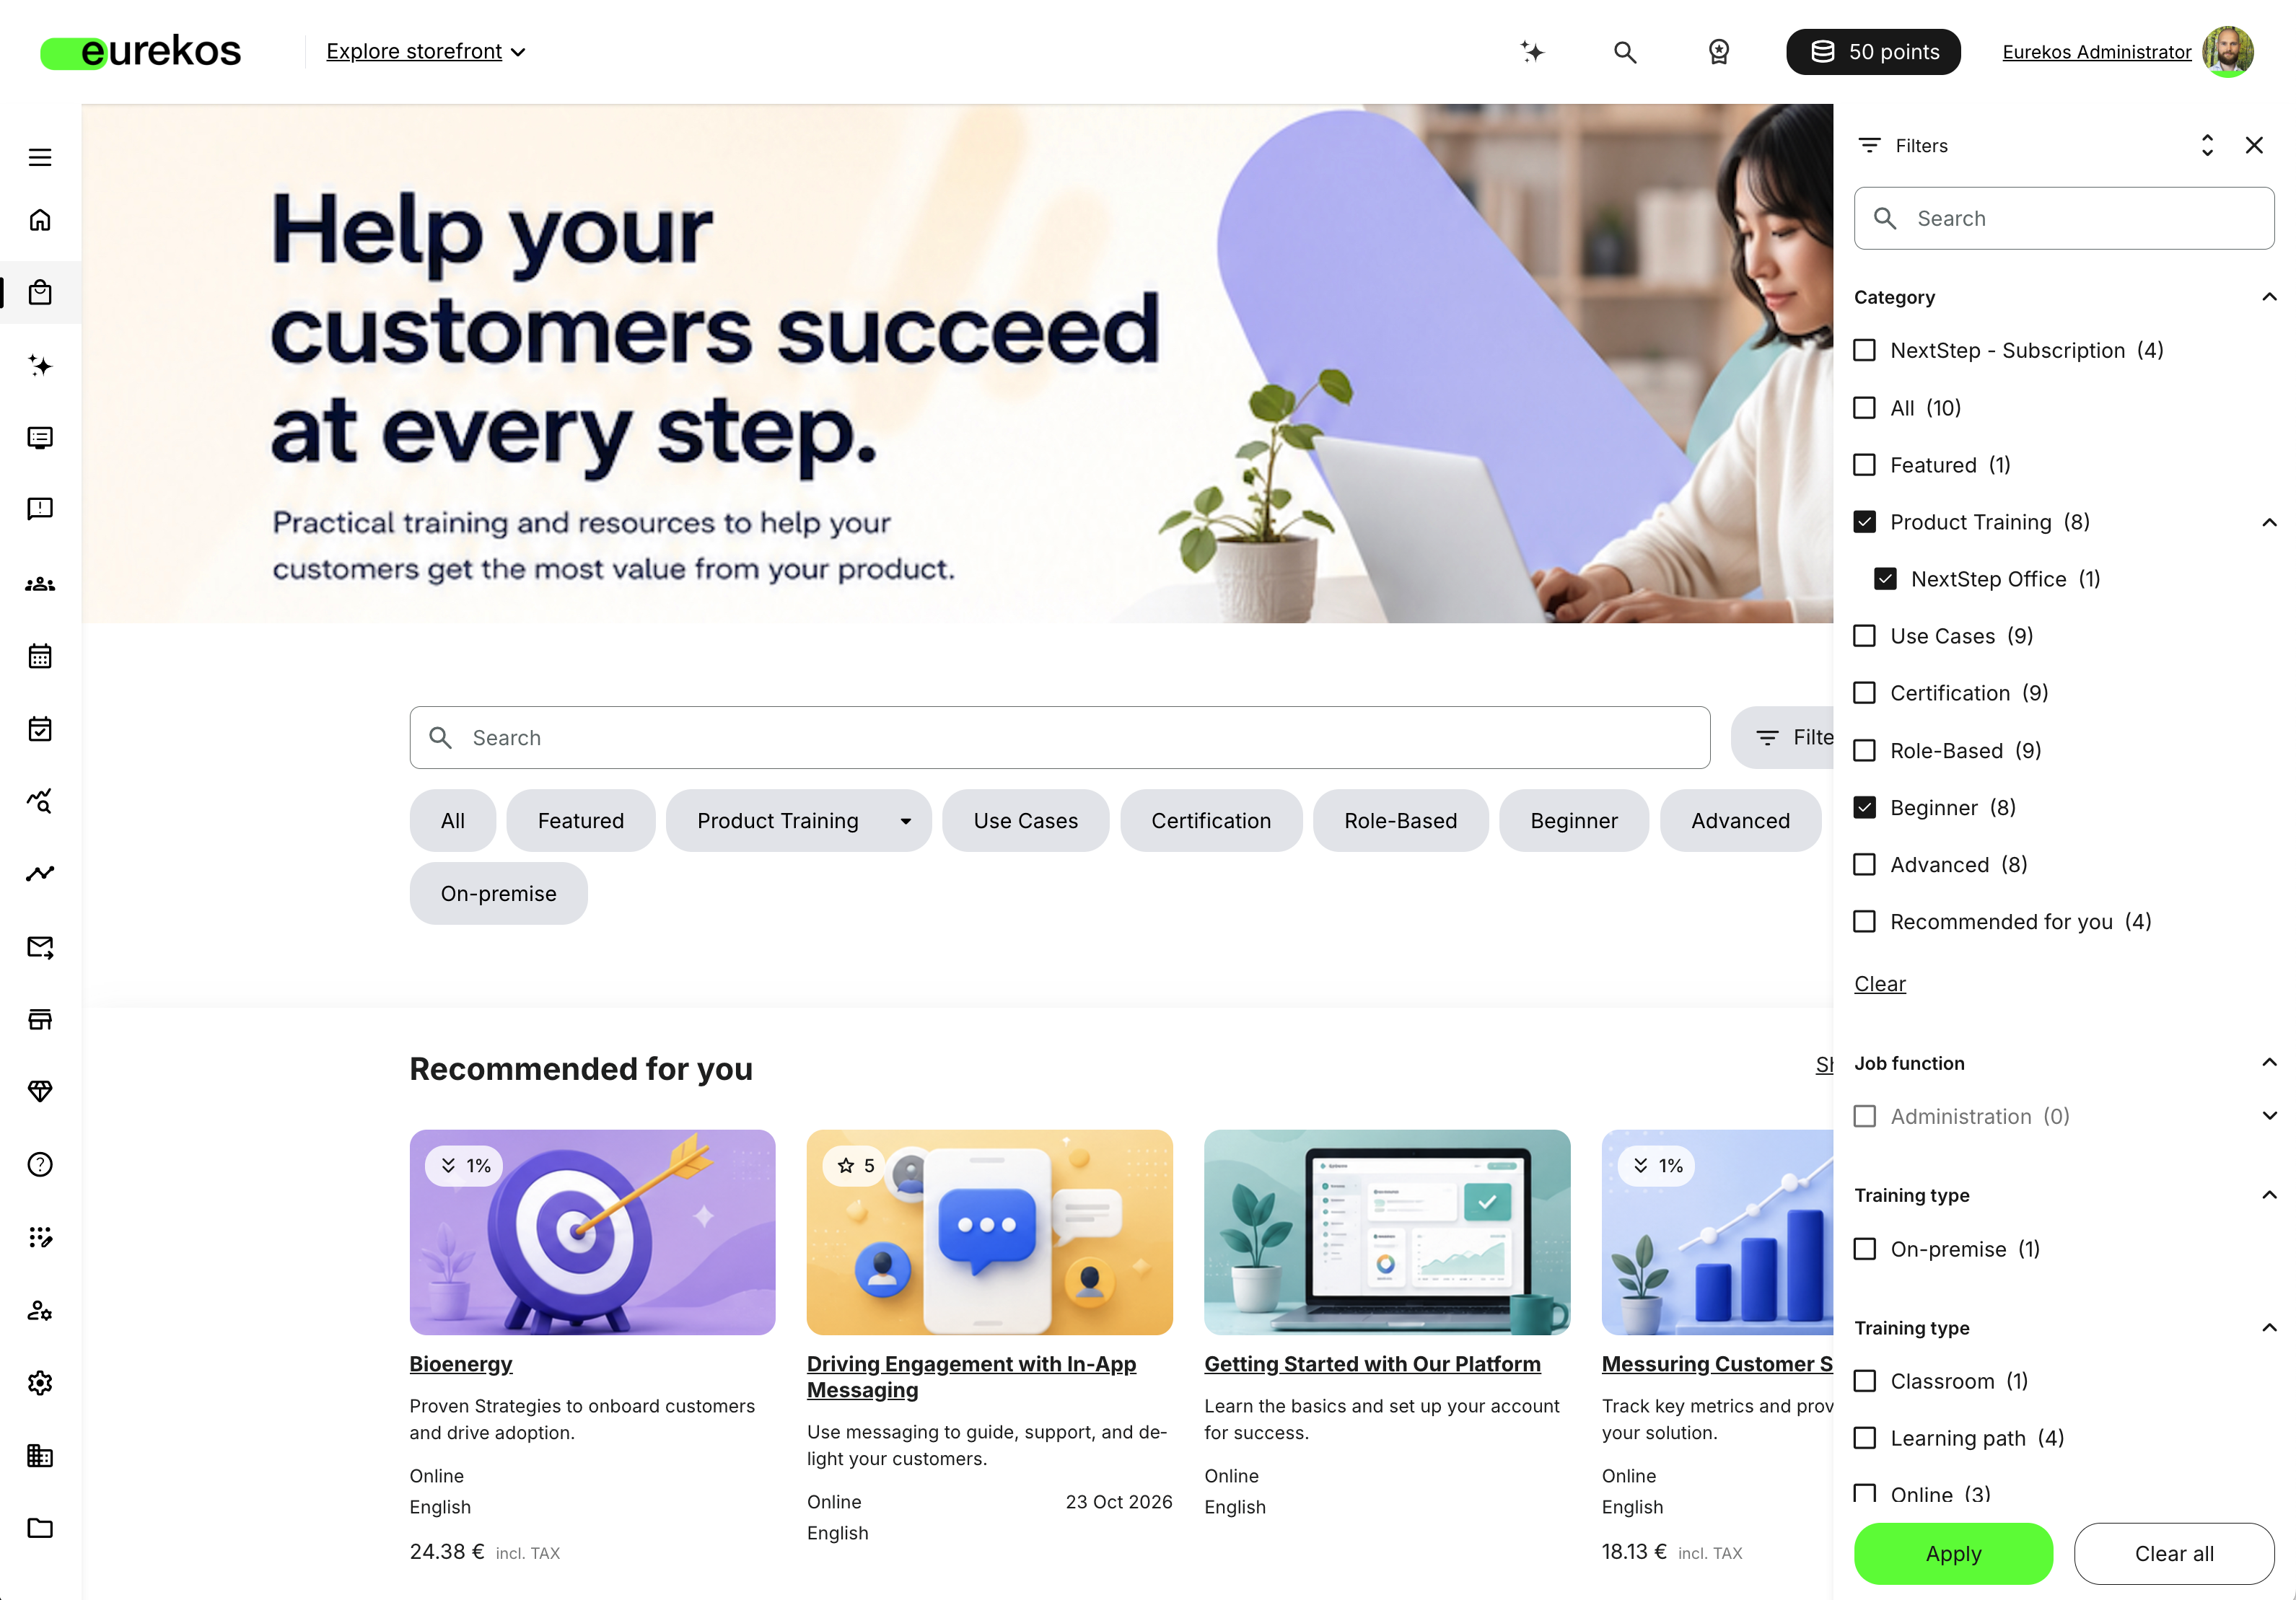
Storefront filtering has been rebuilt around a new filter sidebar. Until now, filters opened as a fullscreen page that listed every vocabulary as a column, and they were only available from the main storefront page. The new sidebar opens alongside the storefront, so learners keep sight of the content they're browsing. Filters are now also available on more storefront pages: storefront row pages, the search results page and the scheduled activities view (Timeline and the new Agenda view).
The sidebar comes with a set of improvements that make large catalogs much easier to navigate. Tags can now be organized in up to 10 levels in every vocabulary used on activities, learners can search within the filters, and each filter option shows how many activities it contains. Search results can also be shown as a grid or a list. Whether your storefront has a few dozen activities or several hundred, learners can narrow it down to what's relevant to them in a few clicks.
Features and Benefits
A sidebar that keeps learners in context: Select Filters to open the sidebar next to the storefront content, without leaving the page. Each filter group can be expanded or collapsed, and all groups can be expanded or collapsed at once. Learners select the options they want and choose Apply, or reset everything with Clear all. Each group also has its own Clear option. The sidebar works on mobile devices too.
Filtering on every storefront page: Filters are now available on the main storefront, on storefront row pages (the "show more" pages that list all activities in a row), on the search results page and in the scheduled activities view (Timeline and Agenda). On each page, the filters only show tags from the activities available to the learner on that page. Applying filters on a row page or in the scheduled activities view filters that page directly, so learners can, for example, narrow down upcoming scheduled training without leaving the calendar. From the main storefront, applying filters takes learners to the search results page.
Multi-level tags in every vocabulary: All vocabularies used on activities now support tag hierarchies of up to 10 levels. Previously, only Category and Job function supported a single extra level. The filter sidebar shows the full tree, so you can organize a large catalog in a way that matches how learners think about it, for example Product Training → Product family → Specific product. Selecting a parent tag automatically selects all the tags below it, and a parent shows as partially selected when only some of its child tags are selected.
Counters for every filter option: Each filter option shows how many activities it contains, so learners can see what to expect before they apply a filter. With the AND filter operator, counters also update as learners make selections, and options with no matching activities are greyed out. This keeps learners from filtering their way to an empty page. See Considerations for how counters work with the default OR operator.
Search within the filters: A search field at the top of the sidebar finds matching tags across all filter groups and every level. Matching child tags are shown together with their parent tag, so learners always see where a tag belongs in the hierarchy.
Grid or list view for search results: Learners can now switch the search results page between a grid and a list view with a new toggle, and admins decide which view learners see by default.
Configuration
The filter sidebar is the new default layout for all platforms. Under Settings → Storefront → Appearance settings → Navigation:
- Under Filter layout, choose Sidebar or Fullscreen (the previous layout).
- Under Search results default view, choose Grid or List as the view learners see first on the search results page. The default is List.
To organize tags in multiple levels, go to Settings → Tags:
- Select Edit vocabulary for the vocabulary you want to organize, select the Enable sublevel tags checkbox and save.
- The tags in that vocabulary become clickable. Select a tag to open its page, where you can create child tags below it. Repeat on a child tag to add further levels.
- In the vocabulary's tag list, each tag shows how many child tags it has.
The following are set up by Eurekos support. Please contact your Customer Success Manager or support@eurekos.com if you need them:
- Additional filter groups: By default, the storefront filters show Category, Job function and Training type. Other vocabularies, Language and Availability can be added as filters if they haven't already been enabled on your platform. Vocabularies must also be enabled for activities under Settings → Tags.
- Filter operator: By default, filter groups are combined with OR: activities matching a selection in any group are shown. With AND, activities must match the selections in every group. Within a group, OR always applies.
Considerations
- Counters with the default OR operator: Most platforms use the OR operator. With OR, counters show the number of activities per filter option when the sidebar opens, but they don't update as learners make selections, and options aren't greyed out. To get counters that update with each selection, ask Eurekos support to switch your platform to the AND operator. Keep in mind that this also changes how filter groups are combined.
- Sidebar only: Multi-level tags, counters and search within the filters are only available in the sidebar layout. If you switch back to Fullscreen, filters work as before.
- Relevant tags only: The sidebar only lists tags used on activities the learner can access on the current page. Tags that aren't used on any accessible activity don't appear.
Storefront - A New Agenda View for Scheduled Training
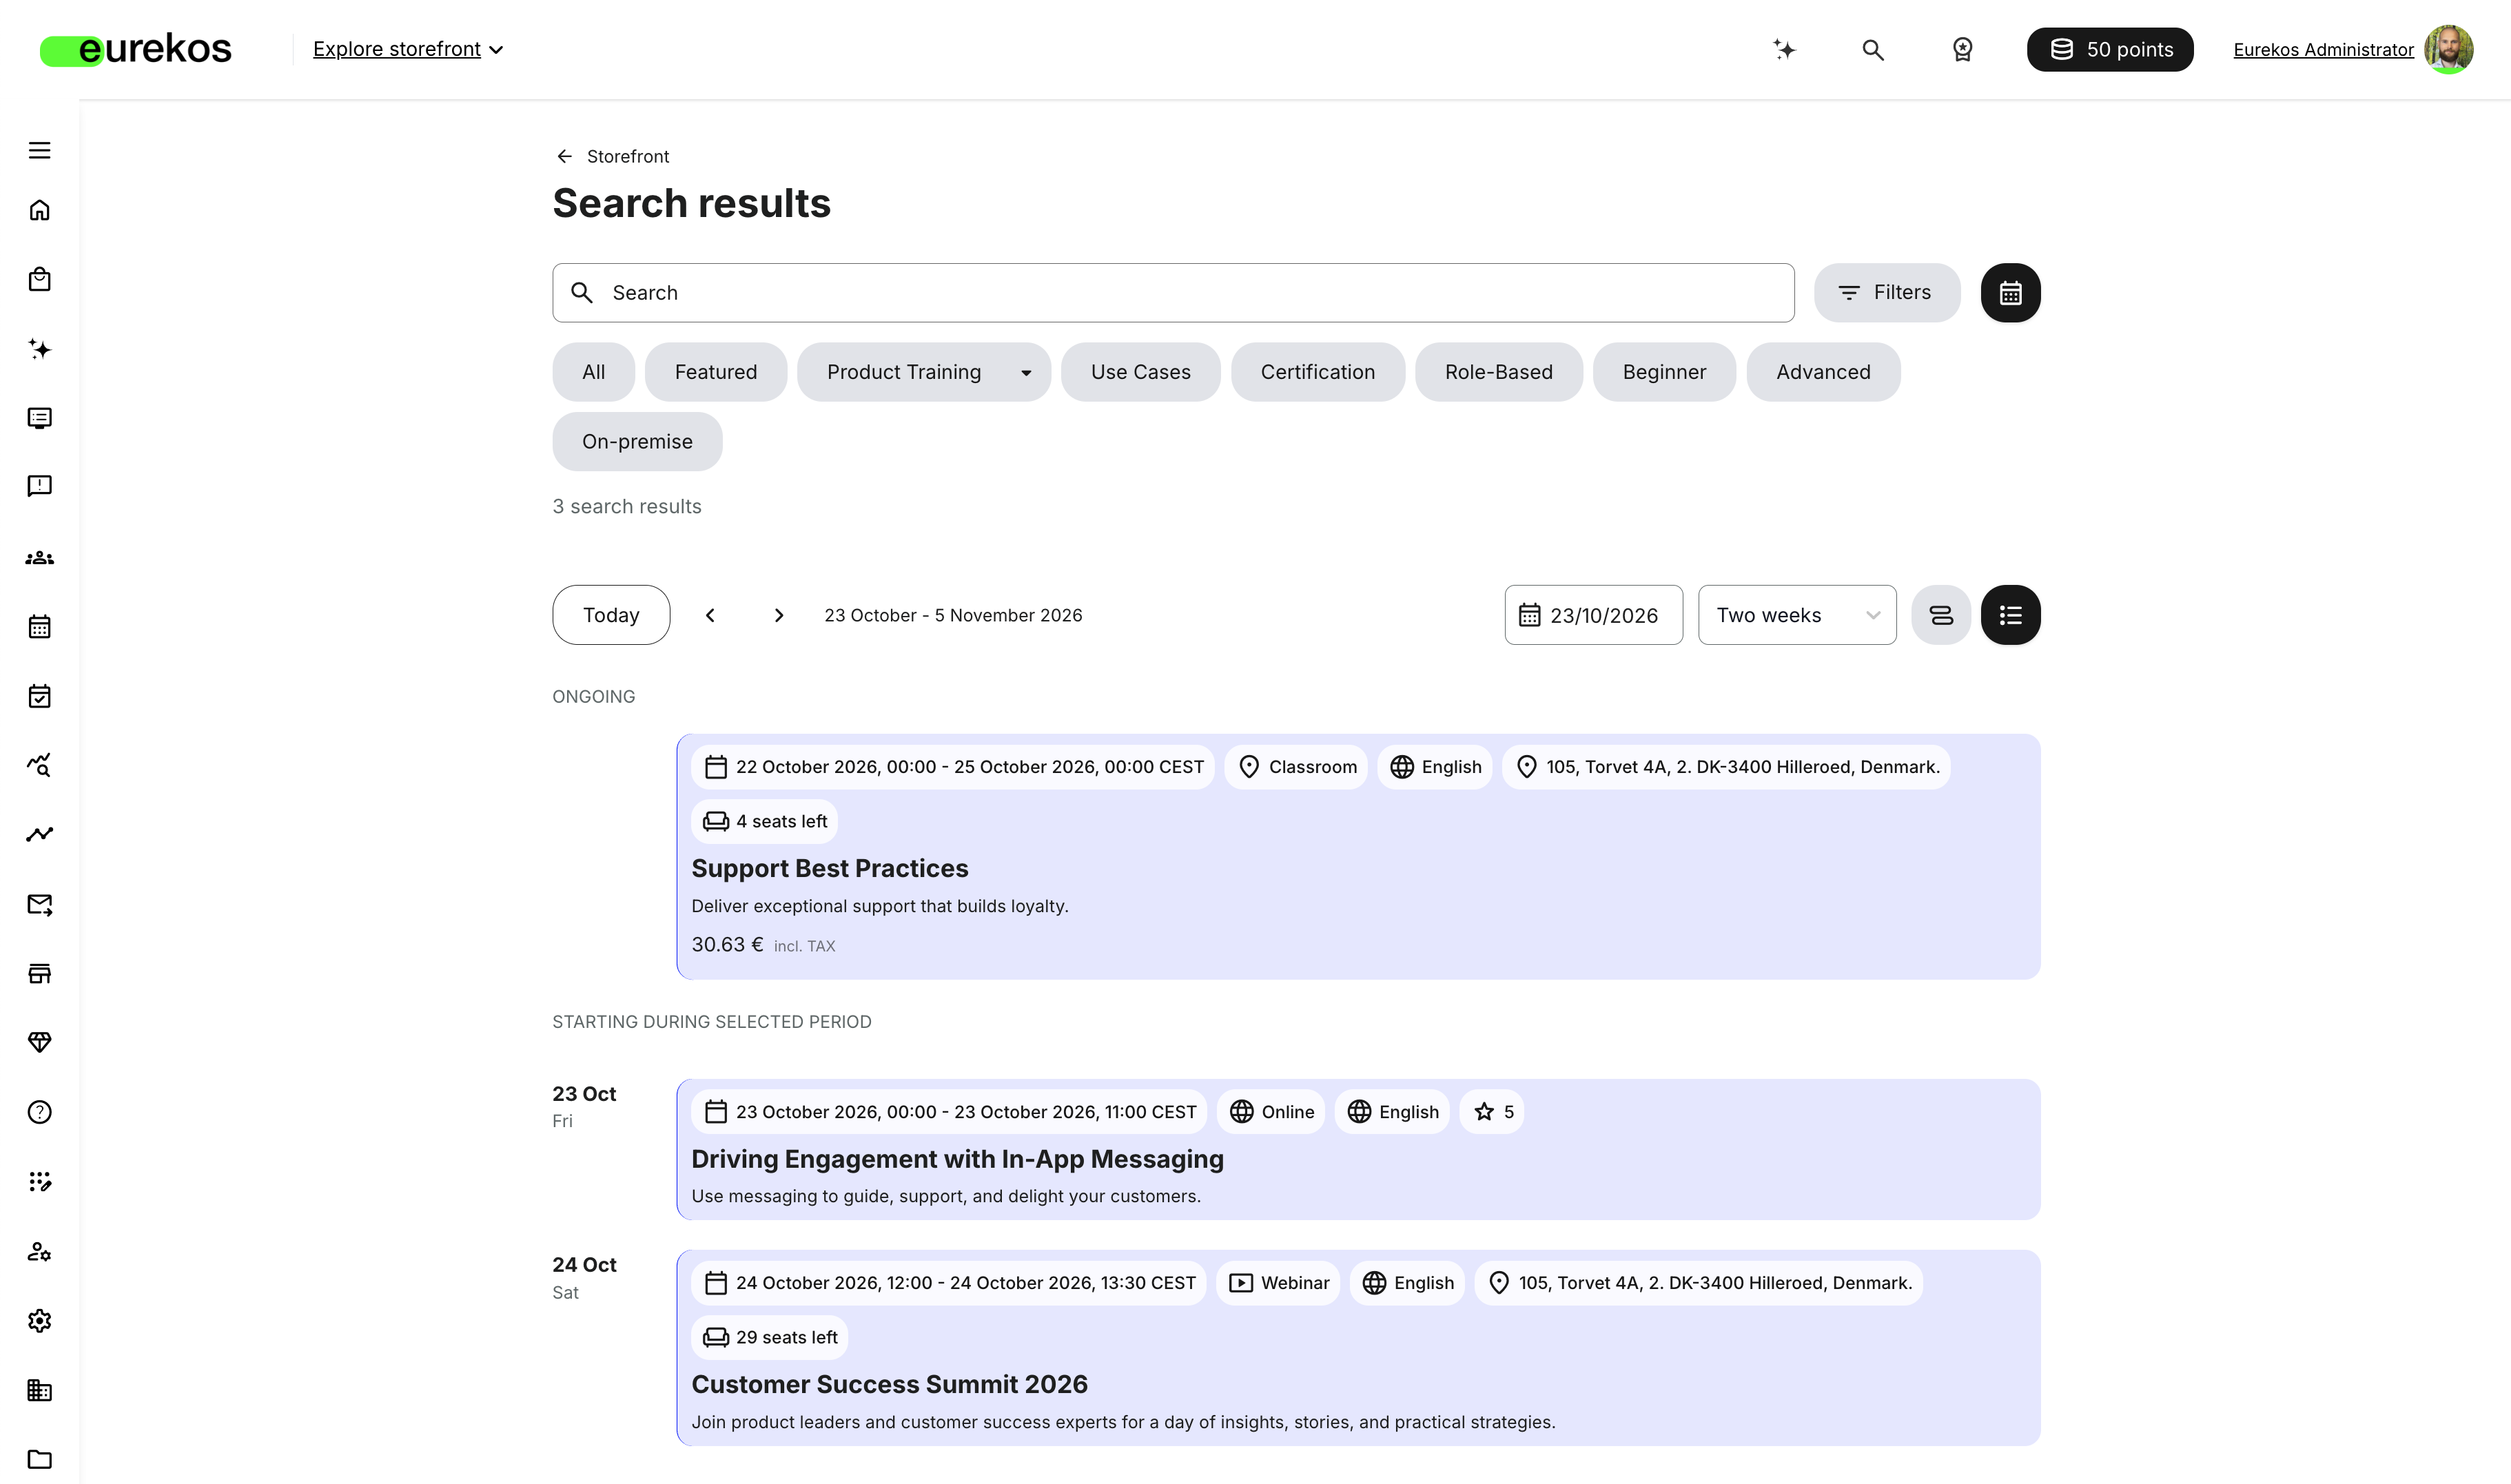
The storefront's scheduled trainings page now offers two ways to browse upcoming training: the existing Timeline view and a new Agenda view. Until now, scheduled activities could only be shown in the calendar-style timeline, which is great for seeing when sessions take place and how long they run, but doesn't leave much room for detail. The new Agenda view lists upcoming scheduled activities by day, on cards that show the key details learners need to choose a session, such as time, format, location, available seats and price.
This is especially useful for academies with a large offering of instructor-led and virtual instructor-led training, where learners often need to compare several sessions before they sign up. The button that opens the page has also been renamed from Timeline view to View scheduled trainings, to reflect that it now opens both views.
Features and Benefits
Switch between Timeline and Agenda: A new toggle on the scheduled trainings page lets learners switch between the Timeline and Agenda views at any time. Both views share the same period selection (Week, Two weeks or Month), date picker, search and filters, so learners can, for example, find all upcoming classroom sessions in their language next month and compare them in the format that suits them best.
Key details at a glance: Each Agenda card shows the activity's title and schedule, along with details such as its short description, activity type, language, location, seats left, rating, price and keywords. Admins choose which of these details are shown, and each detail only appears when the activity has that information. Selecting a card opens the activity description page, where learners can sign up.
Organized by day: Activities are listed under the day they start, in chronological order. Multi-day activities appear under their start date. When a learner picks a later start date, activities that start before the selected period and continue into it are listed at the top under Ongoing, followed by the activities Starting during selected period. For example, if a learner selects a date two weeks ahead, a three-week course starting next week appears under Ongoing. If there are no such activities, the list isn't grouped.
Configuration
To set the default view, go to Settings → Storefront → Appearance settings → Navigation and choose Timeline or Agenda under Scheduled activities default view.
To choose which details are shown on Agenda cards, go to Settings → Commerce → General, and select the relevant checkboxes in the Activity information block, such as Description, Type, Language, Rating, Price and Keywords. Two new checkboxes, Location and Seats, have been added to support the Agenda view.
Considerations
- Only upcoming activities are shown: As elsewhere in the storefront, activities that have already started are not shown in the Timeline or Agenda view, even if they haven't ended yet. This ensures learners don't sign up for, or pay for, training that is already underway.
- Location and Seats only affect the Agenda view: Enabling the new Location and Seats checkboxes doesn't change how activities are shown elsewhere in the storefront.
- Returning from an activity: When a learner opens an activity from the scheduled trainings page and then goes back, the page opens in your platform's default view (Timeline or Agenda), even if the learner had switched to the other view.
- Fixed card color: The color of the Agenda cards can't be customized.
- Smaller screens: On mobile devices, only the Week period is available. On tablets, Month isn't available.
- Only activities with a schedule: Both views only show activities with a schedule set on the activity itself.
Learning Paths - Clearer Progress for Nested Training
Learning paths that include other activities through the Existing training module now give participants a much clearer picture of what they actually need to complete. The Existing training module is often used to build larger programs, for example a parent learning path made up of several separate learning paths. Until now, the learning path page treated each nested activity as a single item. A participant in a learning path with three nested activities, each containing four courses, was told they had "3 trainings left", with no sign of the twelve courses behind them.
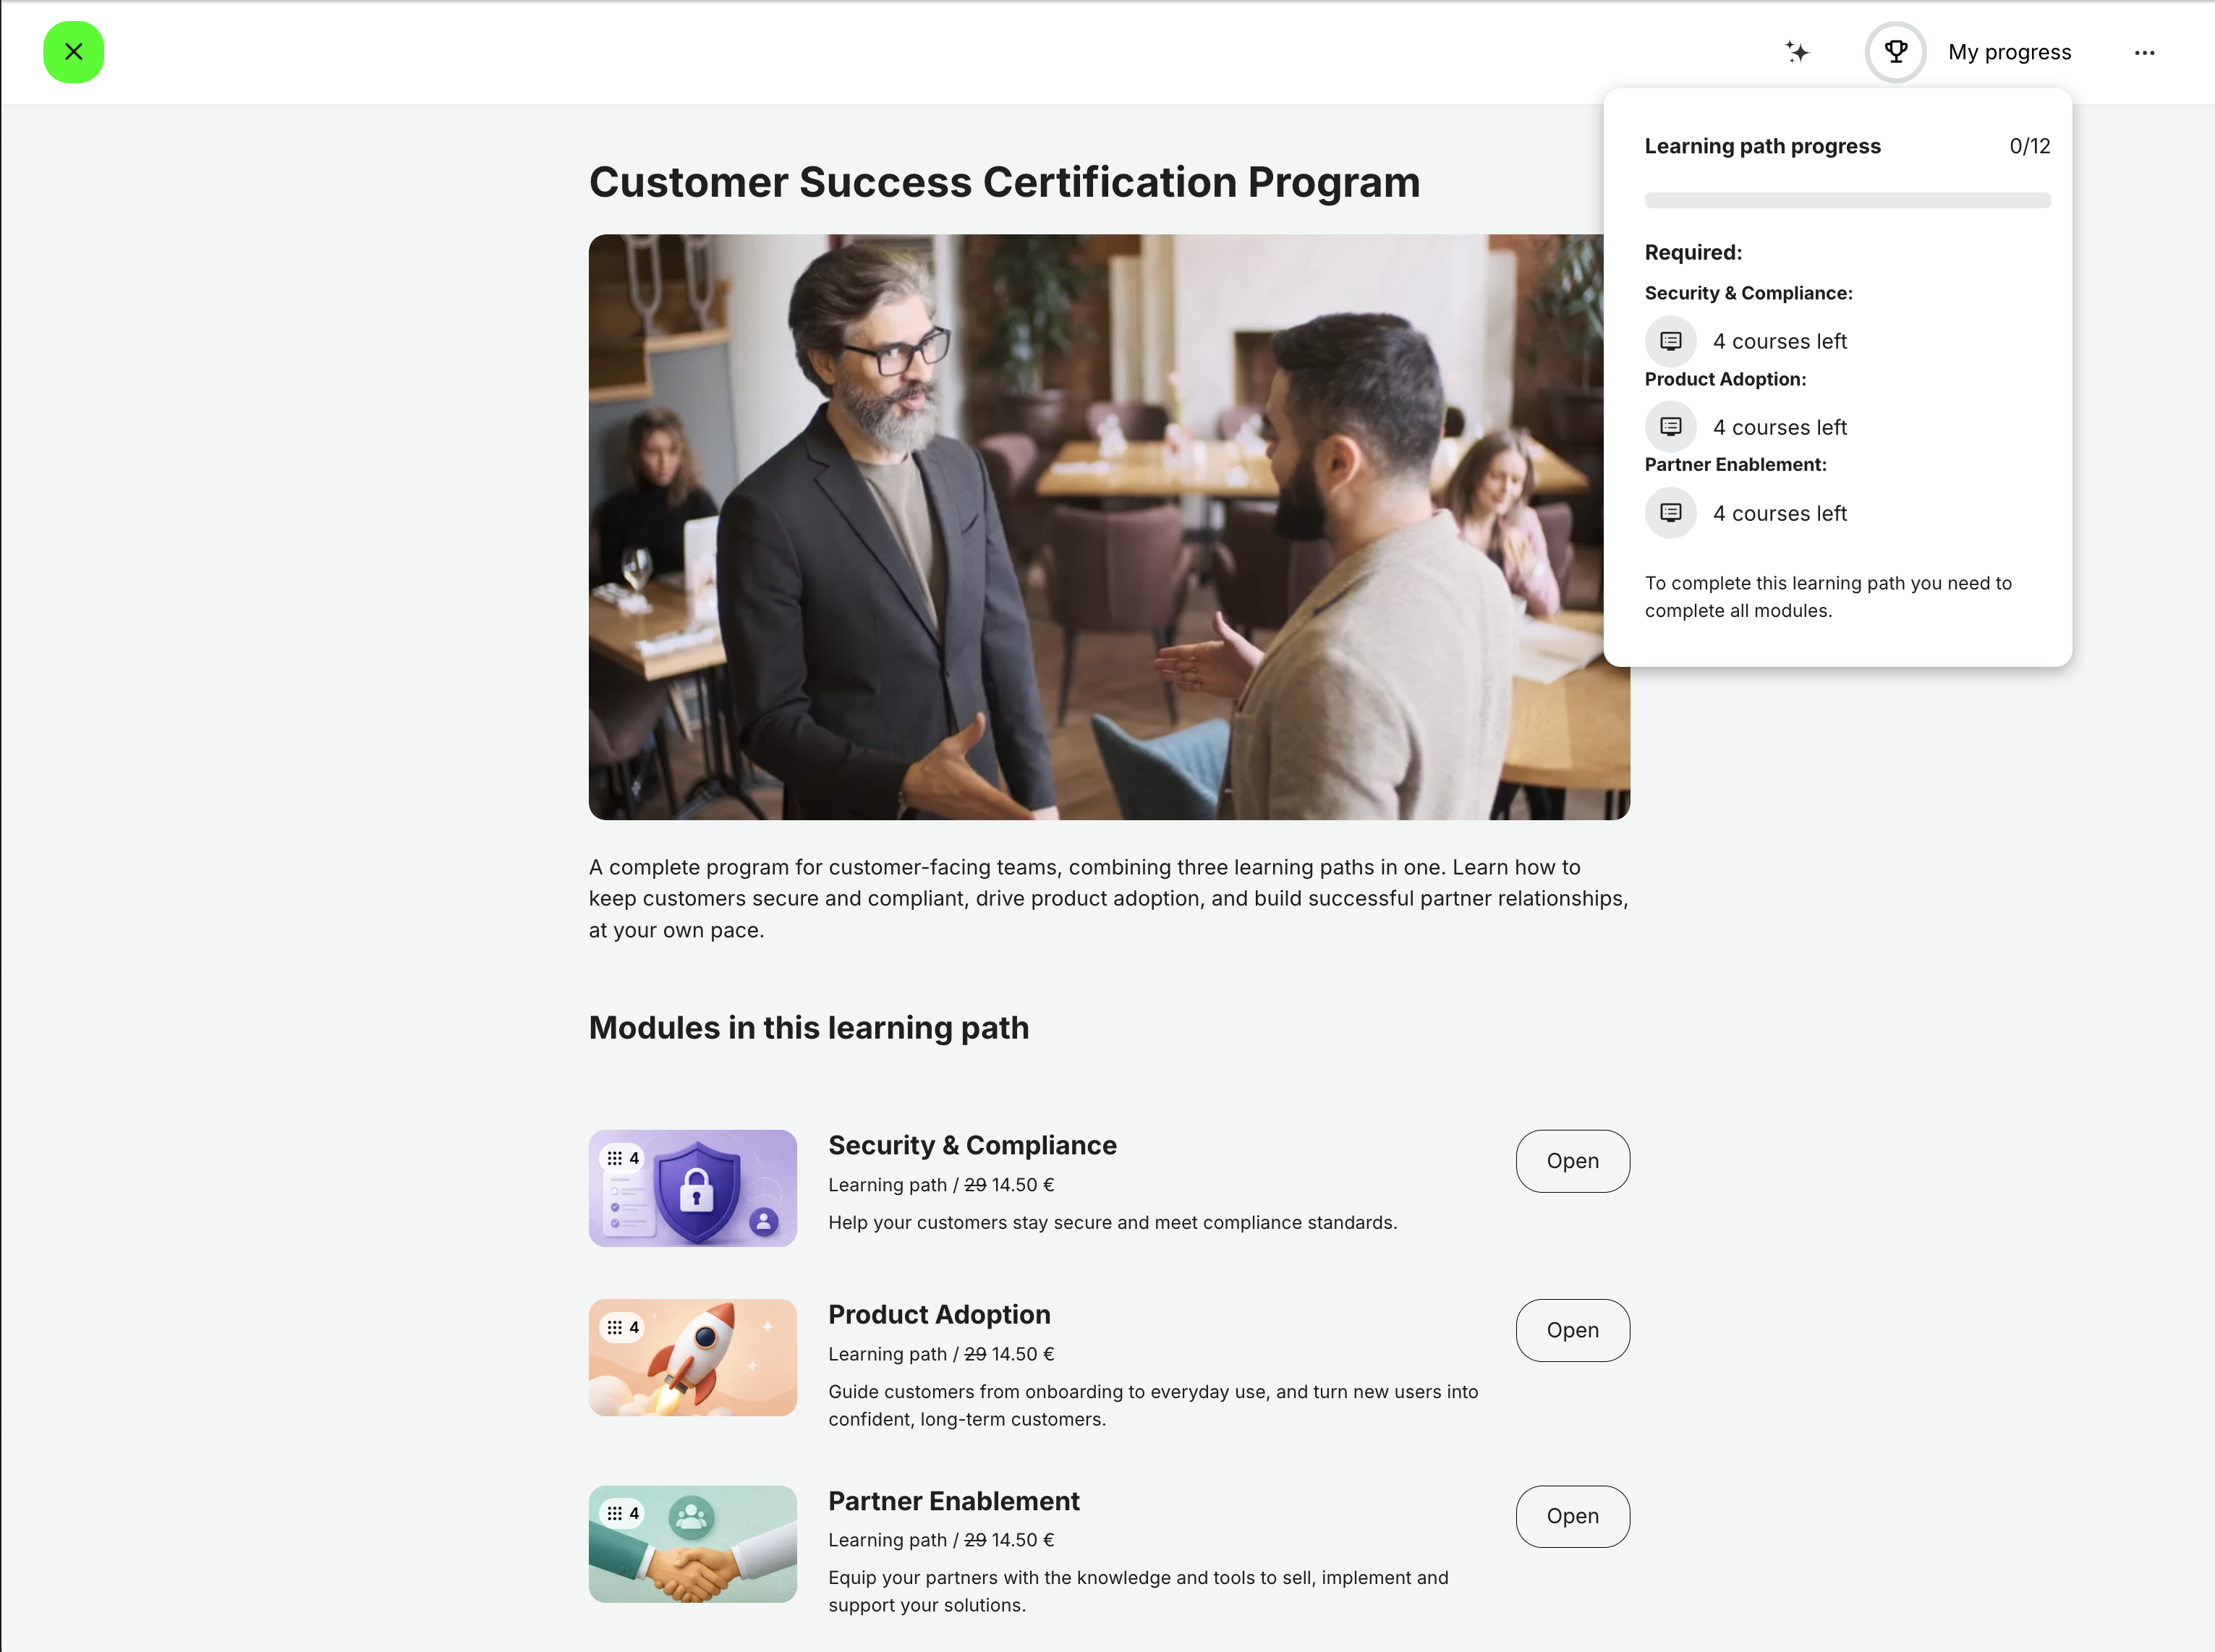
With this update, the My progress panel on the learning path page breaks nested activities down into the modules they contain, and counts those modules in the overall progress. Each nested activity's banner also shows how many modules it includes. Participants can see the real scope of a program at a glance, plan their time better, and track their progress more accurately.
Features and Benefits
Progress that reflects the real workload: The My progress panel now lists each nested activity by name, with the number of modules left in it, such as "Security & Compliance: 4 courses left". The overall Learning path progress counts these modules individually: in the example above, participants see 0/12 instead of 0/3. The progress bar now moves forward each time a participant completes a module in a nested activity, instead of only when the whole nested activity is completed. As participants complete modules, the counts update, and nested activities they have completed drop off the list.
Module counts on nested activity banners: In the Modules in this learning path list, the banner of each nested activity now shows how many modules it contains, the same way learning paths show their module count elsewhere on the platform. Participants can see at a glance which steps are short and which are larger programs in their own right.
Only what's required is counted: The panel only shows content that participants must complete to finish the learning path. Optional modules, including modules made optional through adaptive learning rules, are excluded at every level of nesting. This works for multiple levels too, for example an Existing training module inside an activity that is itself nested.
Considerations
- Depends on progress tracking: The breakdown is only shown for Existing training modules with Enable tracking progress turned on. When tracking is off, the nested activity isn't part of the parent's progress, so it isn't shown in the panel.
- Participants must be enrolled in the nested activity: The module breakdown and the module count label only appear once a participant is enrolled in the nested activity, for example after choosing a training under Select training. Until then, each Existing training module counts as one training, as before.
- Learning path page only: The changes apply to the learning path page. Module counts on My overview are unchanged, and existing progress analytics aren't affected.
Questionnaires - Insert Questions Anywhere and Present Answers as Tiles
Building and maintaining questionnaires is now faster and more flexible. Questionnaires are used across the platform for training feedback, NPS surveys, enrollment and approval forms, onboarding and adaptive learning, and some of them contain dozens or even hundreds of questions. Until now, new questions could only be added at the bottom of the list and then had to be dragged to the right position. In long questionnaires, even small edits could take a lot of time.
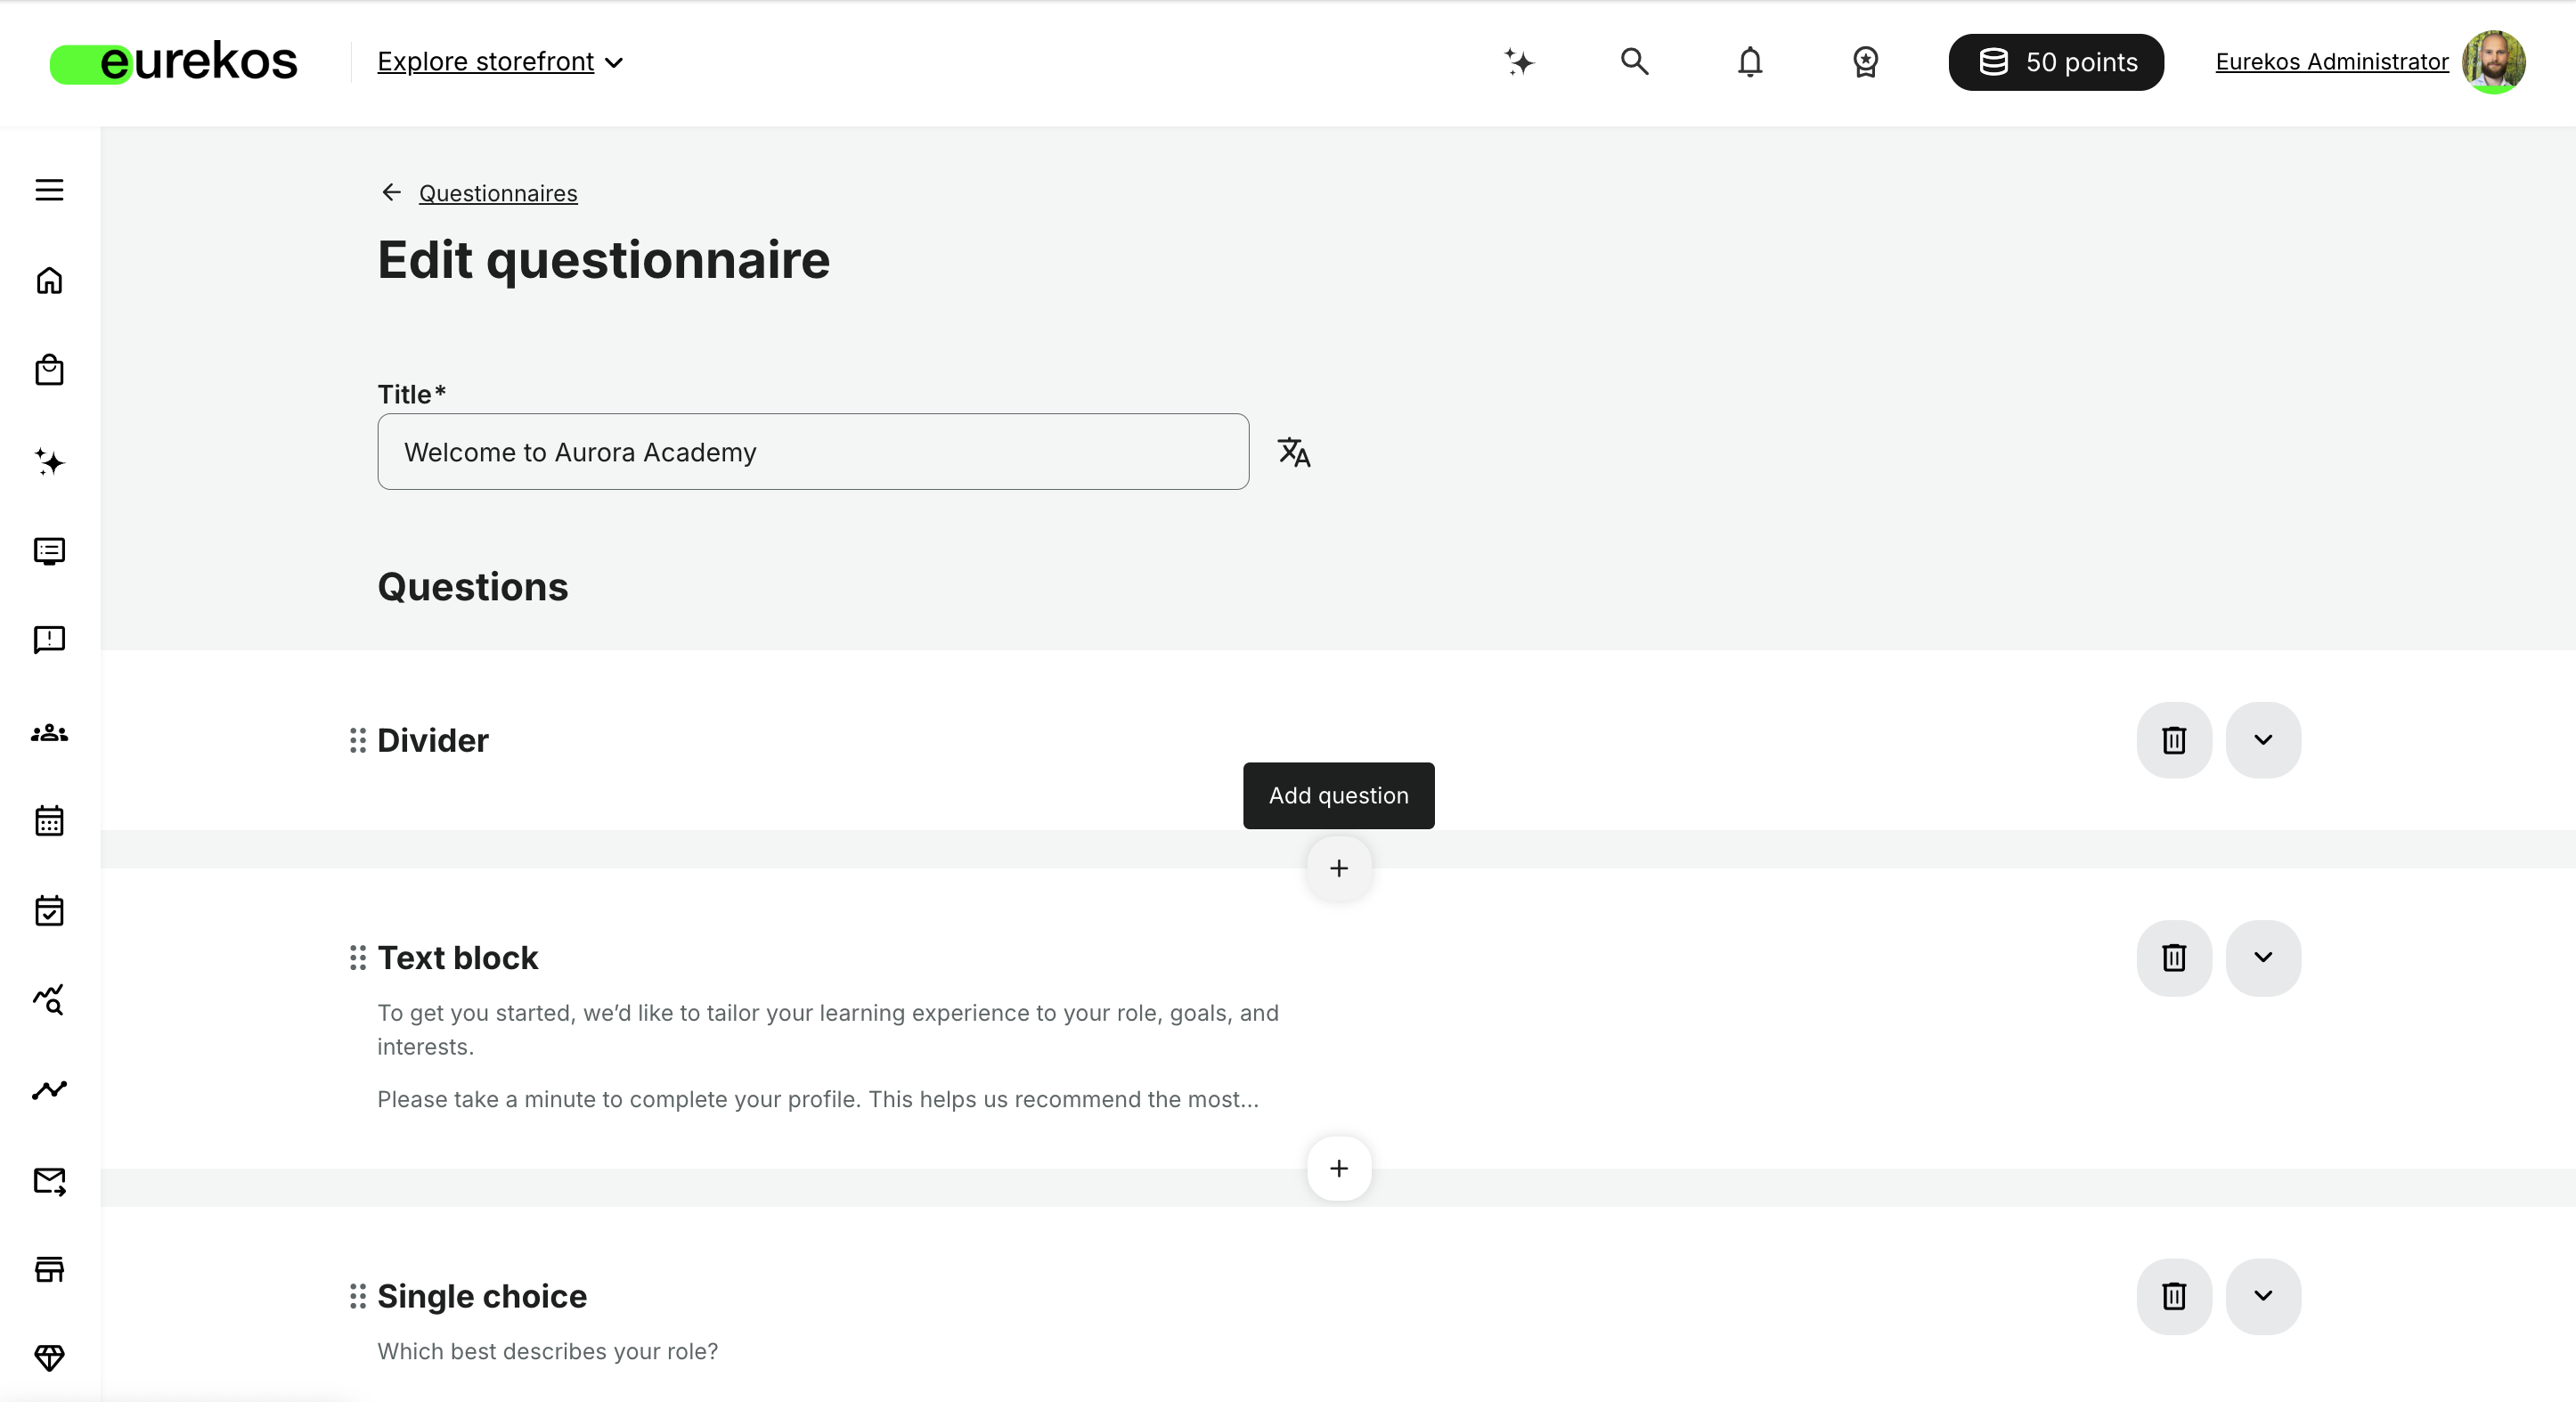
With this release, admins can insert a question at any point in the questionnaire, directly where it belongs. Single choice and Multiple choice questions also get two new options: a Tiles layout that presents answer options as cards, and help text for each answer option, so respondents get the context they need to choose the right answer.
Features and Benefits
Insert questions exactly where they belong: When you hover over a question, a + button appears above and below it. Selecting it opens the question type selection and inserts the new question at that position, so there's no more dragging new questions up from the bottom of a long questionnaire. Headings, text blocks and dividers can be inserted the same way, which makes it easy to add a new section in the middle of an existing questionnaire. The Add question button below the list is still available for adding questions at the end.
A clearer overview of question types: Selecting Add question now opens an overlay with all available question types shown as tiles with icons, the same pattern used when adding widgets in the course authoring tool. This makes it quicker to find the right question type.
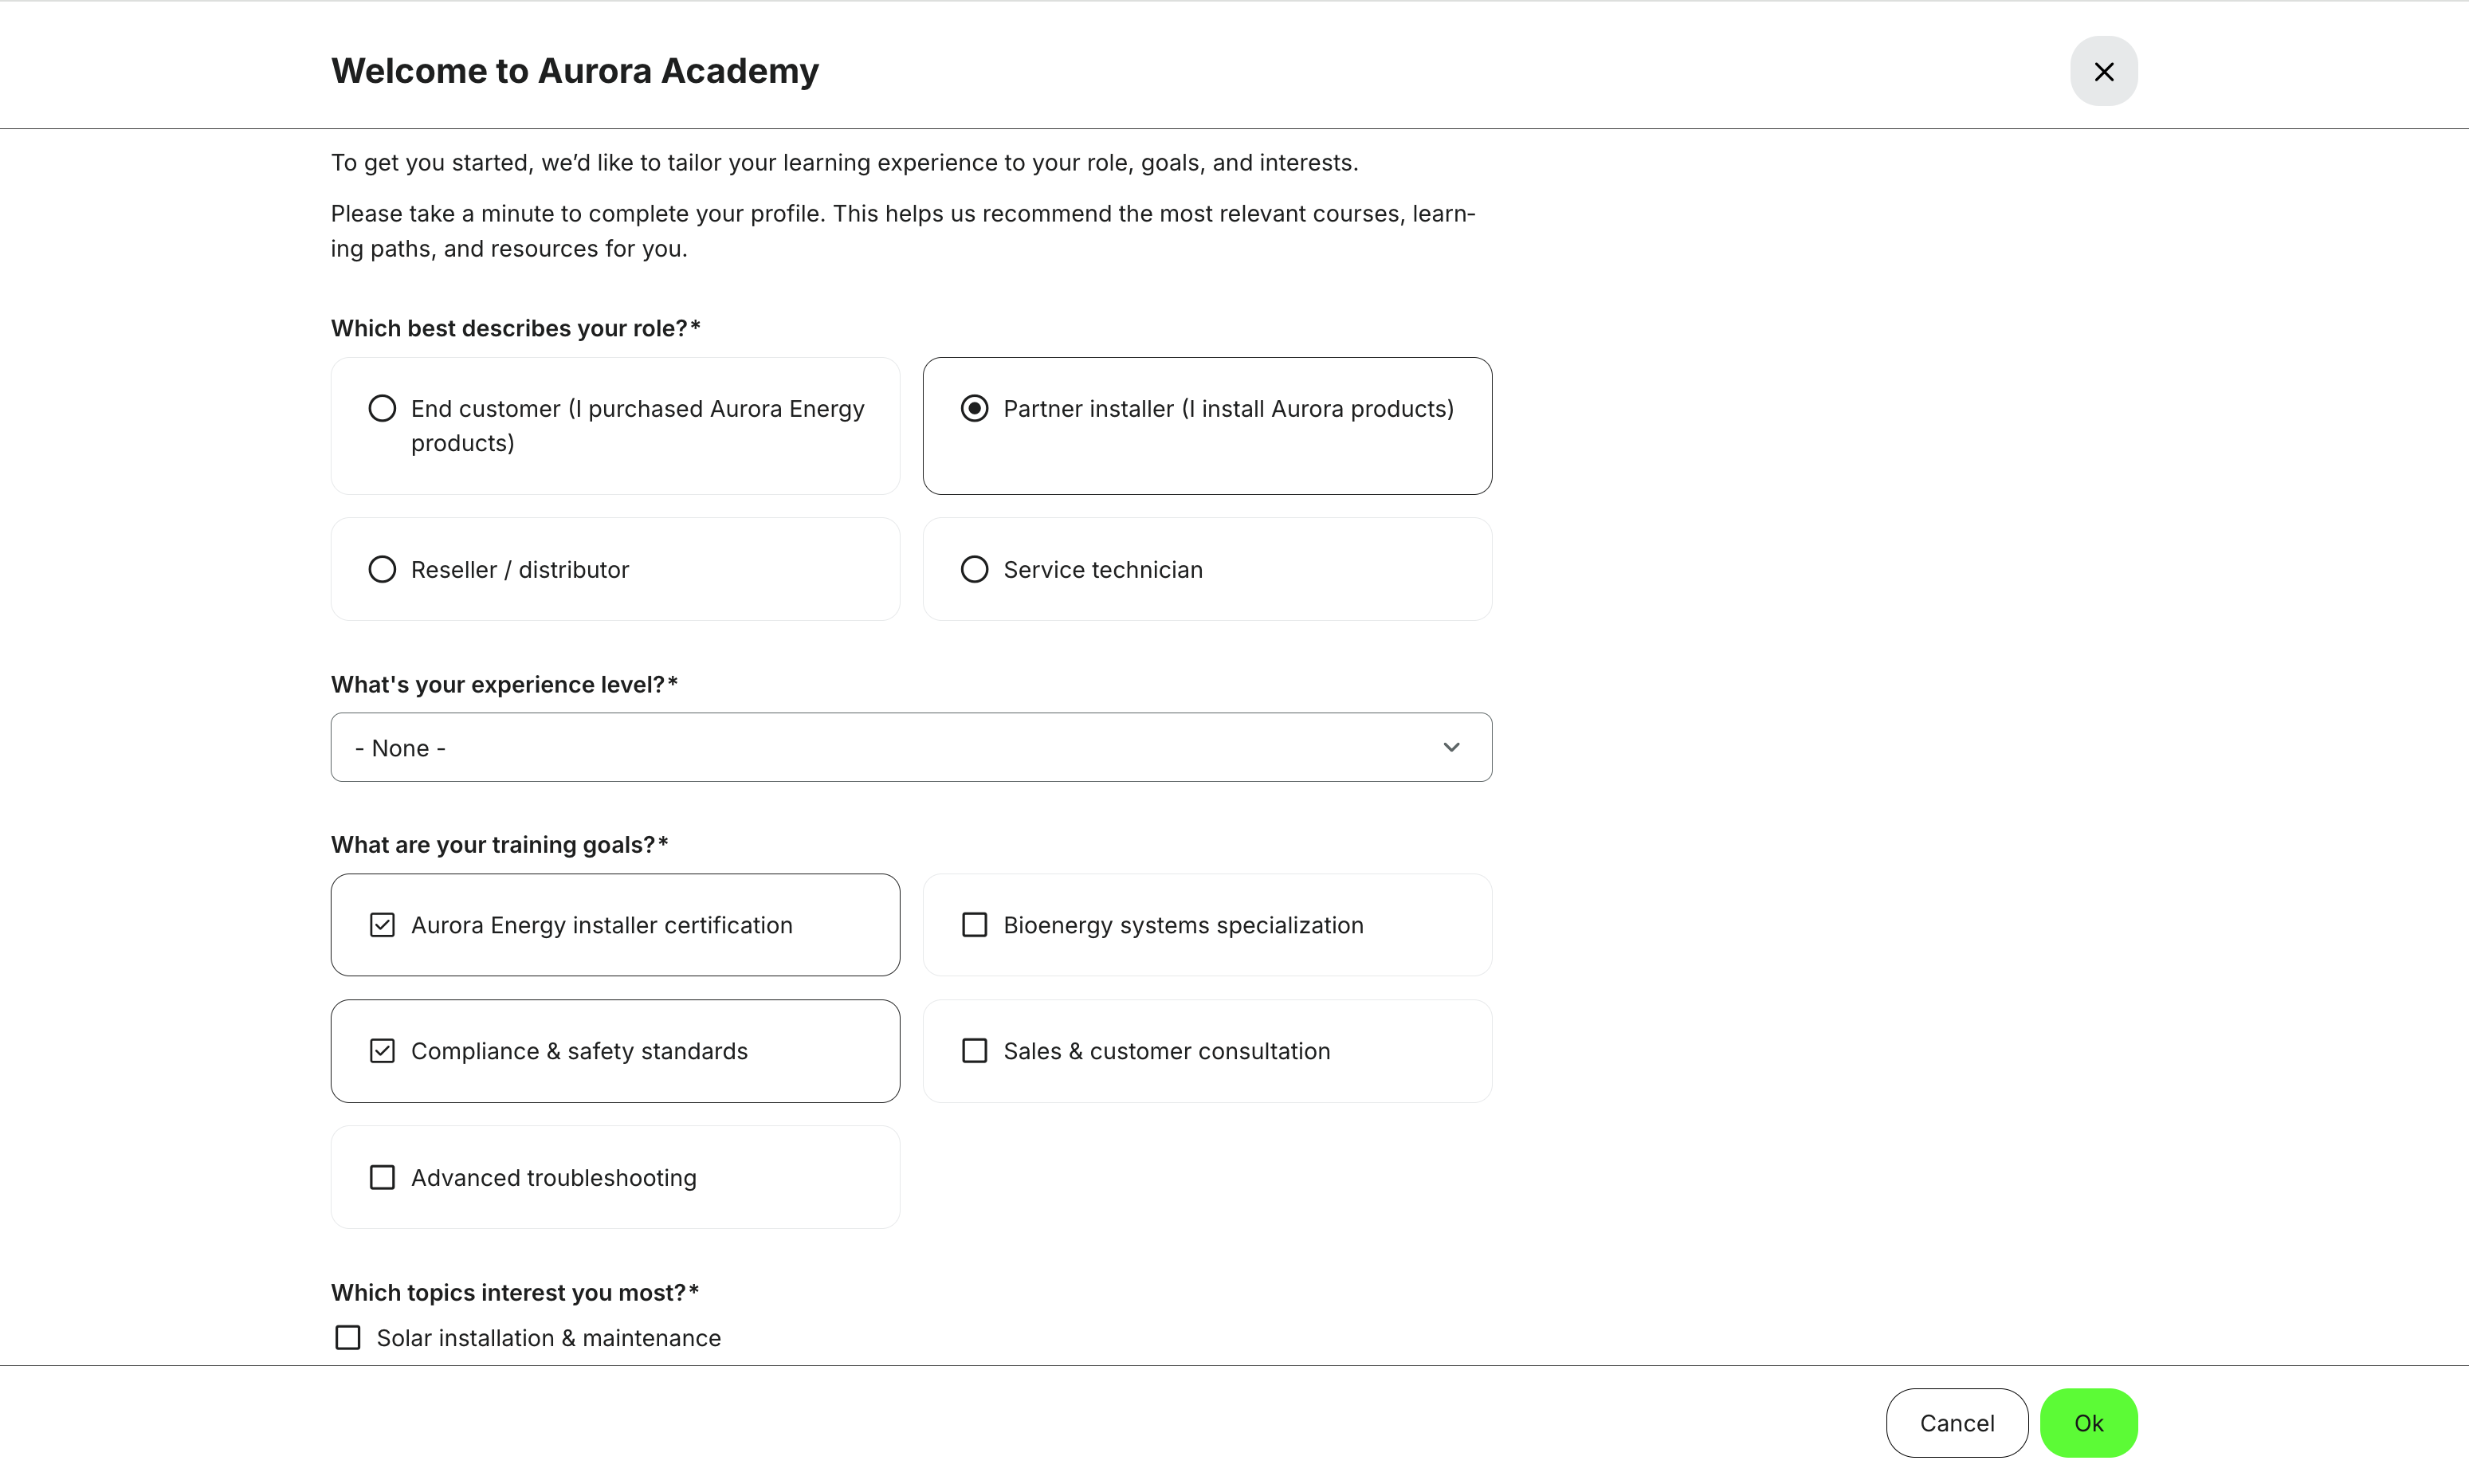
Tiles layout for Single and Multiple choice questions: A new Options layout setting lets you choose how answer options are shown to respondents: as a classic List of radio buttons or checkboxes, or as Tiles, where each option is shown as a card. Tiles give each option more space and make questionnaires feel more modern and visual, especially for questions with short, distinct answers.
Help text for each answer option: You can now add help text to each answer option in Single and Multiple choice questions, in addition to the question itself. Use it to explain what an option means, give an example, or clarify the difference between similar options. Option help text supports translations, just like the option labels, and is shown below each option in both the List and Tiles layouts. Across all question types help text is now added with a + Add help text link instead of a checkbox.
Configuration
To set the layout and add help text for a Single or Multiple choice question, go to Course Administration → Questionnaires and create or edit a questionnaire:
- Add a Single choice or Multiple choice question, or expand an existing one.
- Under Options layout, choose List or Tiles.
- Below each answer option, select + Add help text and enter the help text for that option. To remove it again, select the delete icon next to the help text field.
- Select Save, or use Preview to check how the questionnaire looks to respondents.
Considerations
- Existing questionnaires are unchanged: List is the default layout, so all existing Single and Multiple choice questions keep their current appearance until you change them.
- Single and Multiple choice only: The Tiles layout and option help text are available for Single choice and Multiple choice questions. Other question types with answer options, such as Dropdown, Linear scale and Consent, are unchanged.
- Very long lists of options: There's no limit on the number of answer options in the Tiles layout. For very long lists where respondents only need to select one option, the Dropdown question type is often a better fit, since it lets respondents search the options.
- Supplemental questions: When a Single or Multiple choice question is linked to a question in a supplemental questionnaire, the layout is taken from the linked question in the supplemental questionnaire.
Stripe Checkout - A New Payment Option With Dozens of Local Payment Methods
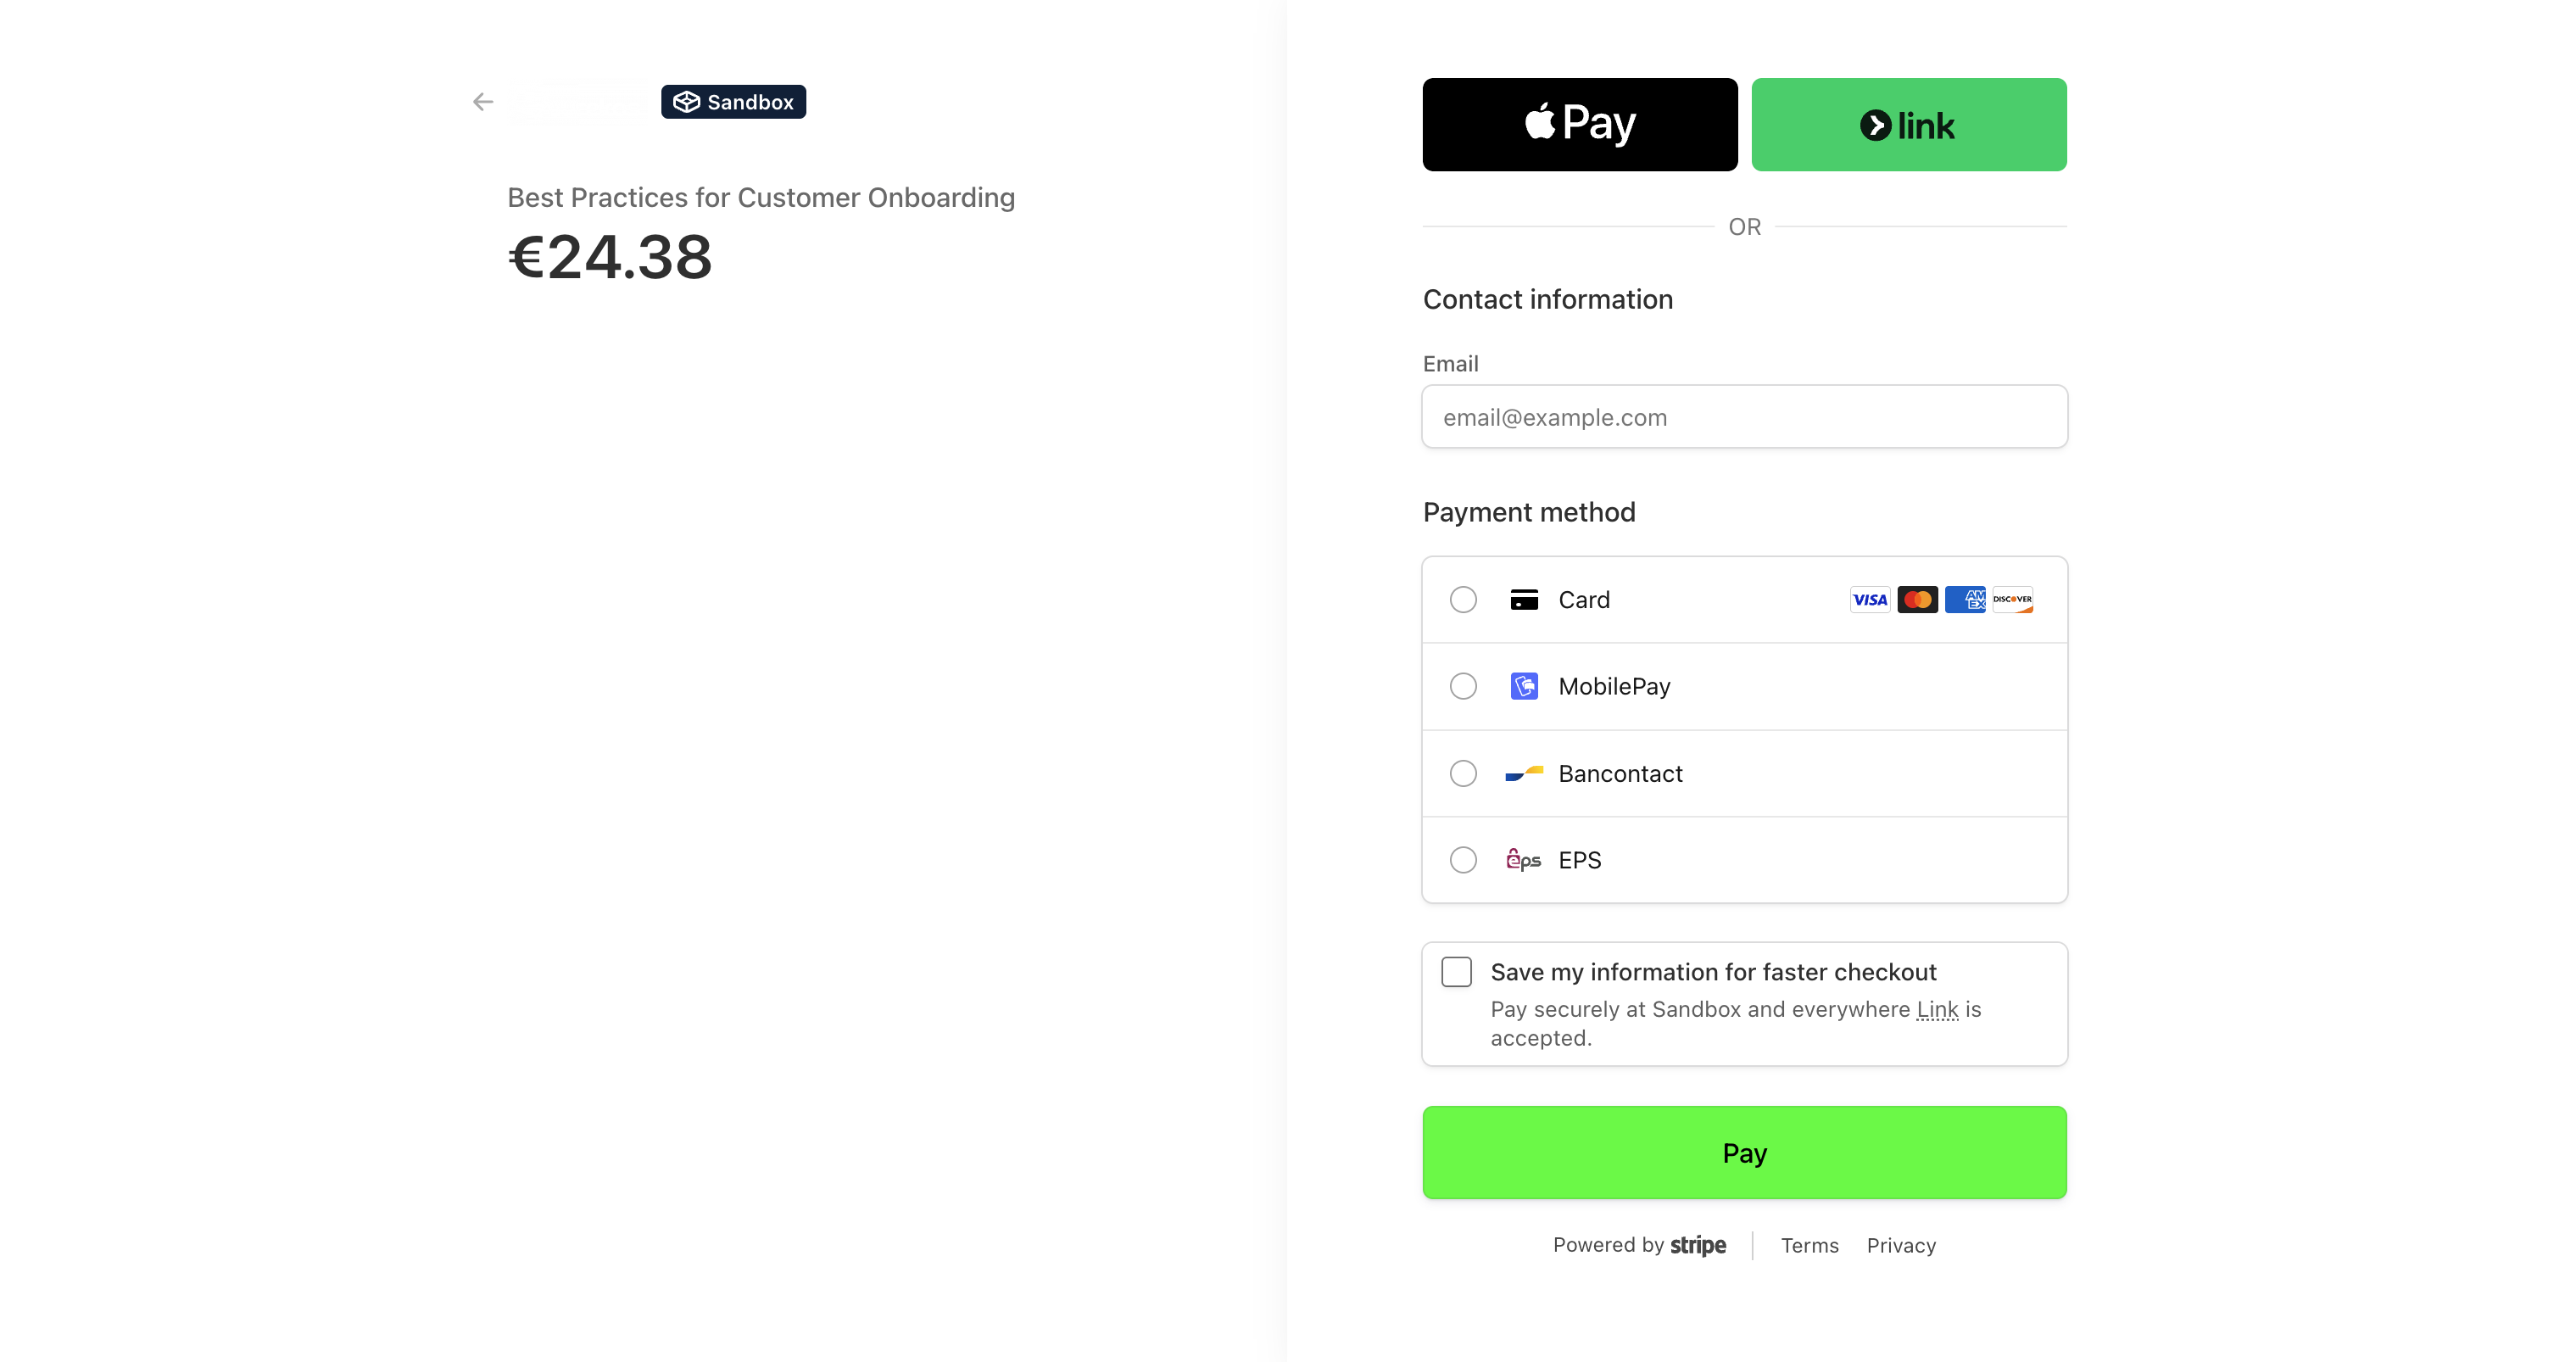
Eurekos now supports Stripe Checkout as a new payment method for activity purchases. Until now, the Stripe integration supported Stripe (Cards) and Stripe (Wallets), with learners entering their payment details directly on the Eurekos checkout page. With Stripe (Checkout), learners are redirected to a secure, Stripe-hosted payment page to complete their purchase, and then return to Eurekos with access to their training.
The main benefit is choice. Stripe Checkout gives you access to the wide range of payment methods Stripe supports, from cards and wallets such as Apple Pay and Google Pay to local and regional options such as TWINT, Klarna, iDEAL, Bancontact and SEPA Direct Debit. You manage these methods in your Stripe account, so you can offer your customers the ways they prefer to pay in each market, without waiting for a separate Eurekos integration for each method.
Features and Benefits
Many payment methods through one integration: Once Stripe Checkout is enabled in Eurekos, the payment methods offered to learners are managed in your Stripe Dashboard. Turn on a method such as TWINT or Klarna in Stripe, and it becomes available to your learners without any further changes in Eurekos.
The right payment methods for each learner: Stripe automatically shows the payment methods that fit each purchase, based on the methods enabled in your Stripe account, the currency and the learner's location. For example, TWINT is offered for payments in Swiss francs, while learners elsewhere see the options that are relevant to them.
A familiar, secure payment experience: Learners pay on Stripe's hosted checkout page, which many already know from other online purchases. After a successful payment, they're returned to Eurekos and enrolled right away. If they cancel, they're taken back to the Eurekos enrollment page.
Support for delayed payment confirmation: Some payment methods, such as bank debits, take time to confirm. In these cases, learners see a message that their payment is being processed, and the enrollment is completed automatically once Stripe confirms the payment, even if the learner has closed the page in the meantime.
See how each order was paid: Under Course Administration → Transactions, each Stripe Checkout transaction shows the payment method the learner used on the Stripe page, for example Stripe (Checkout) (Card). Payments made with Apple Pay, Klarna, TWINT or another method are labeled the same way, so you can follow up on orders and reconcile payments without switching to Stripe.
Configuration
- Connect your Stripe account: Stripe Checkout uses your existing Stripe connection under Settings → Third party integrations → Stripe. If you already use Stripe (Cards) or Stripe (Wallets), no additional setup is needed here.
- Enable Stripe Checkout: Go to Settings → Commerce → General. Under Payment methods, select Stripe (Checkout).
- Choose which customer types can use it: In the Customer types block, select Stripe (Checkout) in the Available payment methods table for each customer type (for example Private, Company and Government institution) that should be able to use it.
- Choose your payment methods in Stripe: In your Stripe Dashboard, enable the payment methods you want to offer, such as TWINT or Klarna, under Settings → Payments → Payment methods.
If Payment methods on activity level is enabled, you can also enable or disable Stripe Checkout for individual activities.
Considerations
- Activity purchases only: Stripe Checkout is available for activity purchases. Subscriptions continue to use Stripe (Cards) and Stripe (Wallets).
- Prices, taxes and discounts are managed in Eurekos: Stripe Checkout features such as Adaptive Pricing, Stripe Tax and Stripe coupons aren't supported in this version. Continue to manage prices, currencies, tax rules and discount campaigns in Eurekos, as today.
- Payment method availability is decided by Stripe: Which methods learners see depends on your Stripe account, the currency of the purchase and the learner's location. Each method has its own requirements, such as TWINT requiring payments in Swiss francs. See Stripe's documentation for details on each payment method.
- Existing Stripe payment methods are unchanged: Stripe (Cards) and Stripe (Wallets) continue to work as before and can be offered alongside Stripe Checkout. The update to the Stripe connection is applied automatically, so you don't need to change anything in your Stripe Dashboard.
Discount Campaigns - Organization Discounts and Expiration Dates in One Place
Discount campaigns, introduced in 13.0.0, now cover organization discounts as well. Until now, there were two separate places to manage profile-based discounts: Discount campaigns under Course Administration, and a discount setting on each organization's settings page. With this release, organization discounts are managed as discount campaigns, and the discount setting has been removed from the organization settings page. Existing organization discounts have been migrated automatically.
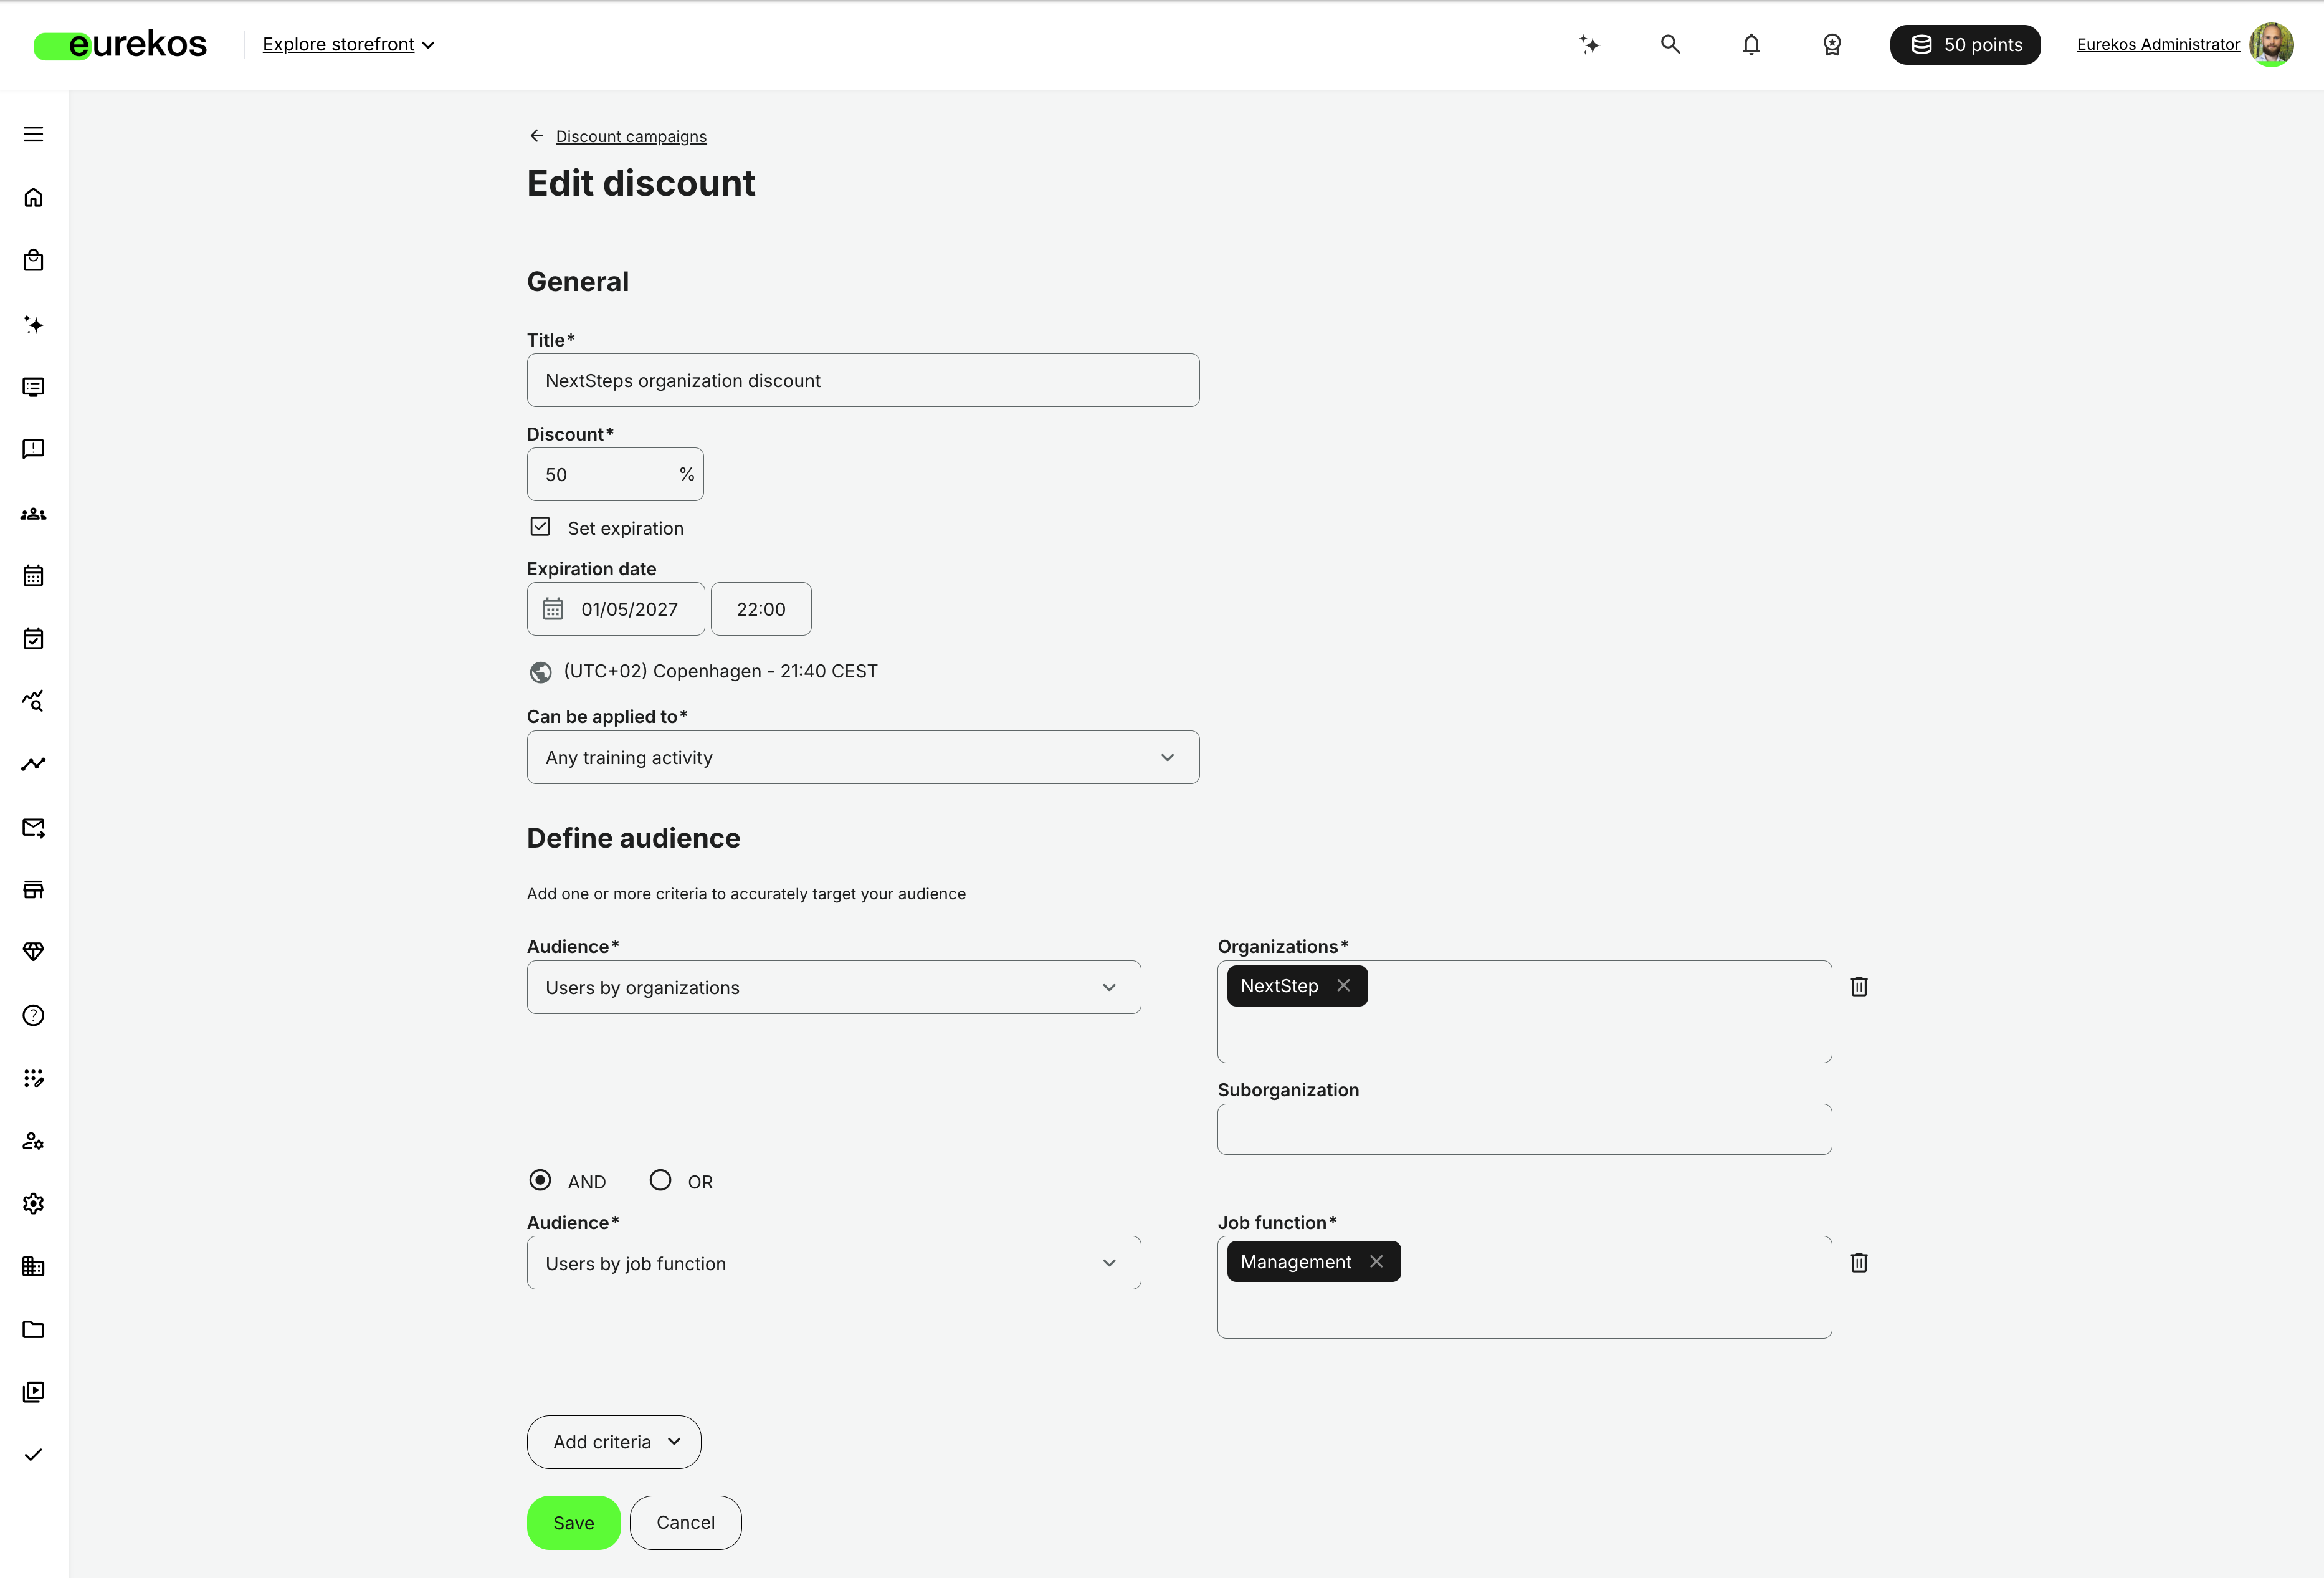
To support this, discount campaigns have two new options: Organizations as an audience criteria, including sub-organizations, and an optional expiration date. Admins now have one place to manage all discount rules, and can create more targeted discounts by combining organizations with other criteria such as job function or role.
Features and Benefits
One place for all discounts: All profile-based discounts, including organization discounts, are now created and managed under Course Administration → Discounts. Admins no longer have to check individual organization settings pages to find out which discounts apply, and the discounts list gives a complete overview.
Organizations as an audience criteria: Discount campaigns can now target users by organization. Choose one or more organizations, and optionally narrow the discount down to specific sub-organizations. Organization discounts work the same way as before: a discount for an organization also applies to members of its sub-organizations, and a discount set up for a specific sub-organization takes priority for that sub-organization's members. Previously, organization discounts had to be set up on each organization's settings page.
More targeted discounts: The organization criteria can be combined with any other audience criteria using AND or OR logic. For example, give a 50% discount to managers in the Finance department of a specific partner organization, by combining Users by organizations with Users by job function.
Expiration dates for discounts: Discounts can now have an expiration date and time, so time-limited offers end automatically without anyone having to remember to remove them. The expiration date is shown in the discounts list, so you can see at a glance which discounts are about to end.
Configuration
To create or edit a discount, go to Course Administration → Discounts and open the Discounts tab:
- Select Create, or the edit icon next to an existing discount.
- Enter a Title and the Discount percentage.
- To end the discount automatically, select Set expiration and choose the Expiration date and time.
- Under Can be applied to, choose whether the discount applies to Any training activity or to specific activities.
- Under Define audience, select Users by organizations as the Audience, choose one or more Organizations and, optionally, one or more Suborganizations.
- To target more precisely, select Add criteria, choose AND or OR, and add other criteria such as Users by job function.
Considerations
- Existing organization discounts were migrated automatically: Each organization discount has been converted into a discount campaign that targets the same organization, with the same percentage and, where one was set, the same expiration date. Review them under Course Administration → Discounts after the update. Permissions are unchanged: the same admin roles manage discounts as before, just from a new place.
- Organization settings page: The discount setting is no longer available on the organization settings page, and discount fields have been removed from organization import and export files.
- Organization and sub-organization discounts: A discount campaign that targets an organization also applies to members of its sub-organizations. If another campaign targets a user's own sub-organization and applies to them, that campaign is used instead of the one for the parent organization, even if the parent organization's discount is higher. This is the one exception to the rule below that the highest discount applies.
- Discounts no longer add up: Previously, an organization discount was applied on top of a matching discount campaign. Now that organization discounts are discount campaigns, a user who matches several discounts gets only the highest one. For example, a user who matches both a 50% and a 25% discount now gets 50% off, where both discounts used to be applied one after the other. Coupon codes still apply on top: a 50% coupon used at checkout is calculated from the already discounted price. If your platform used both organization discounts and discount campaigns, review your discounts to make sure the resulting prices are what you intend.
Security Improvements 🔐
- Dependency updates: Updated third-party libraries and dependencies to address known security vulnerabilities and improve application security.
- Integrated components: Improved security and stability of integrated components and third-party library management.
- H5P compatibility: Enhanced compatibility and reliability of H5P libraries.
During the preparation of this release, two critical PHP security vulnerabilities were identified by the PHP community:
- CVE-2026-109618: A vulnerability in PHP's memory management that could allow attackers to execute malicious code on the server by triggering memory exhaustion.
- CVE-2026-109619: A vulnerability in how PHP handles memory between requests that could allow attackers to access sensitive information or execute malicious code on the server.
Both vulnerabilities have been addressed in version 14.0.0, with the corresponding security fixes also delivered separately as part of the 13.7.0 patch release.
Shortlist of Additional Noticeable Changes
- Explore storefront dropdown for unregistered users: The Explore storefront dropdown in the page header, introduced for registered users in 13.6.0, can now also be shown to unregistered visitors. Enable it under Settings → Storefront → General, and set up its storefront sections and custom links separately from the dropdown for registered users. The option is off by default, and is only available when the storefront for unregistered users is enabled under Settings → General.
- More accurate prices including tax on the storefront: When Show tax label (incl./excl. tax) is enabled under Settings → Commerce, prices shown with "incl. TAX" on the storefront and activity description page now match the price at checkout, including activity-specific tax rules such as tax based on the activity's location or seller country. Registered users see the price including tax when a tax rule applies to the country in their profile (or the platform's default country). Otherwise, and always for unregistered visitors, the price is shown with "excl. TAX", and tax is calculated at checkout. No label is shown if your platform has no tax rules.
- HubSpot: subscription and product purchases synced: The HubSpot integration now syncs all transactions, including subscription and product purchases, not only activity purchases. Three new transaction properties make it easy to filter and report on purchases in HubSpot: Product type (activity, subscription or product), Product title and Transaction date. Product title replaces the previous activity title field, and existing mappings are carried over automatically. To sync the new properties, create the corresponding properties in HubSpot and enter their internal names under Settings → Third party integrations → HubSpot, in the edit form for the transaction sync.
- Preview for system emails: System emails under Settings → Email sending now have a Preview button, so you can check how an email will look, including your branding, before you save your changes. Select Refresh preview to update it after editing.
- New email when a signup is reactivated: A new system email, Signup reactivated - user (category Activities), lets participants know when they've been registered for an activity again after their signup was cancelled, for example when an admin restores a participant who had unenrolled.
- Manager notification for reserved-seat enrollments: The Organization member enrollment - manager system email (category Organizations), which notifies managers when a member of their organization or sub-organization enrolls in an activity, is now also sent when the member enrolls using a reserved seat, including through an invitation. As before, the email isn't sent for enrollments that use the simple enrollment flow for free activities.
- BankID verification when opening a training: Users who don't yet have BankID in their profile, for example accounts created through the API, can now verify their identity with BankID the first time they open a training that requires it, instead of only at checkout. Once verified, they aren't asked again. Choose the new verification type under Settings → Third party integrations → BankID, and require BankID verification per activity under Registration details. This also works for free activities, and is supported for Denmark, Norway and Sweden.
- Match users by SSO unique identifier when importing: A new option in the advanced settings of each SAML and OIDC SSO provider adds a unique identifier column to user import files, for both Import users and Import users to activity. When the option is enabled, imports first match users by their SSO unique identifier and only fall back to email. This means an existing user's profile, including their email address, can be updated even if their email has changed. The column is optional, and imports without it still match by email, as before. The unique identifier is also included in the user export, making it easy to match accounts, for example when merging SSO and non-SSO accounts.
- Standard files in the File list widget: When adding a folder with the File list widget in the course authoring tool, you can now also select folders from the Standard files part of the archive. Previously, only folders from Shared and My files were available.
- Onboarding questionnaires on a separate page: Onboarding rules that show a questionnaire can now open it on a separate page instead of the default popup window. Select Open on a separate page when creating or editing an onboarding rule with a questionnaire under Settings → Onboarding.
- Submitted assignments are locked after the due date: When Lock assignment after the due date is enabled for an assignment module, participants can no longer edit or delete a submitted assignment once the due date has passed, even if it hasn't been assessed yet. This applies to both individual and group submissions, and ensures that what instructors assess is exactly what was submitted by the deadline.