User Profile - Article
Summary
The user profile is the central identity and qualification record in the platform. It connects personal data, roles, permissions, learning activity, skills, and certifications, forming the foundation for automation, access control, reporting, and operational workflows.
In this article you will learn:
- How the user profile acts as the central hub for identity and learning data
- How roles, organizations, and attributes influence access and automation
- How profiles connect to skills, certifications, and learning activity
- How administrators and users can view and manage profile information
The User Profile as the Central Junction
At the core of the platform sits a single, unifying construct: the user profile.
Every person who interacts with the system—learners, instructors, administrators, partners, or external users—is represented by a profile. And every meaningful system decision ultimately resolves back to that profile.
In practice, the user profile acts as a junction point where identity, access, learning context, and business logic meet.
For example:
- An administrator sees additional navigation, reporting, and configuration options because their profile carries a specific role and permission set
- A learner belonging to a customer or partner group may be automatically enrolled into mandatory training, see a curated storefront, or qualify for specific incentives—based entirely on attributes stored on their profile
- An instructor can only be scheduled for sessions they are skilled and available for, because their profile connects skills, availability, and role permissions
- A manager may only access certain certifications or product training because their organizational relationship is defined on the profile
None of this logic lives in the courses, certificates, or storefront themselves. It lives in the profile.
Where Everything Connects
The user profile is not just a personal page—it is the anchor point for identity, learning context, and operational logic across the platform.
Every major feature interacts with the user profile in some way, for example:
- Roles and permissions determine what a person can see, do, and manage
- Organizations, groups, and audiences define what training, storefront content, and incentives are available
- Skills and certificates describe capability, readiness, and qualification
- Questionnaires extend the profile with business-specific attributes such as experience, education, or eligibility
- Incentives, points, and rewards reflect engagement and effort over time
- Security and authentication settings protect identity and govern access
Once those attributes exist on the profile, they drive automation across the platform. In many scenarios, user profiles are not created or maintained manually.
Profiles are often enriched or updated automatically through authentication and identity systems, such as SSO or external user directories. These systems may populate or update fields like organization, role, job function, or customer status—ensuring that users always appear in the right context without manual administration.
The user profile is the system’s memory, control surface, and point of truth—making it one of the most important concepts to understand well.
Viewing the User Profile
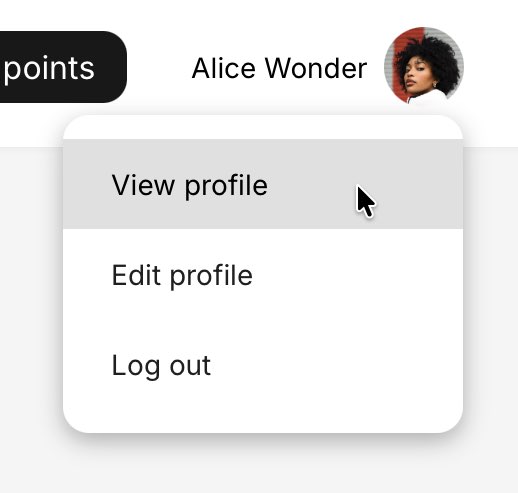
Users access their own profile by clicking their name in the top-right corner and selecting View profile. Administrators can access and edit user profiles via Users → Edit on any user they are authorized to see.
For administrators, managers, and instructors, the profile view is a key tool for supervision, validation, and follow-up. For learners, it serves as a personal record of progress, achievements, and participation across the platform.
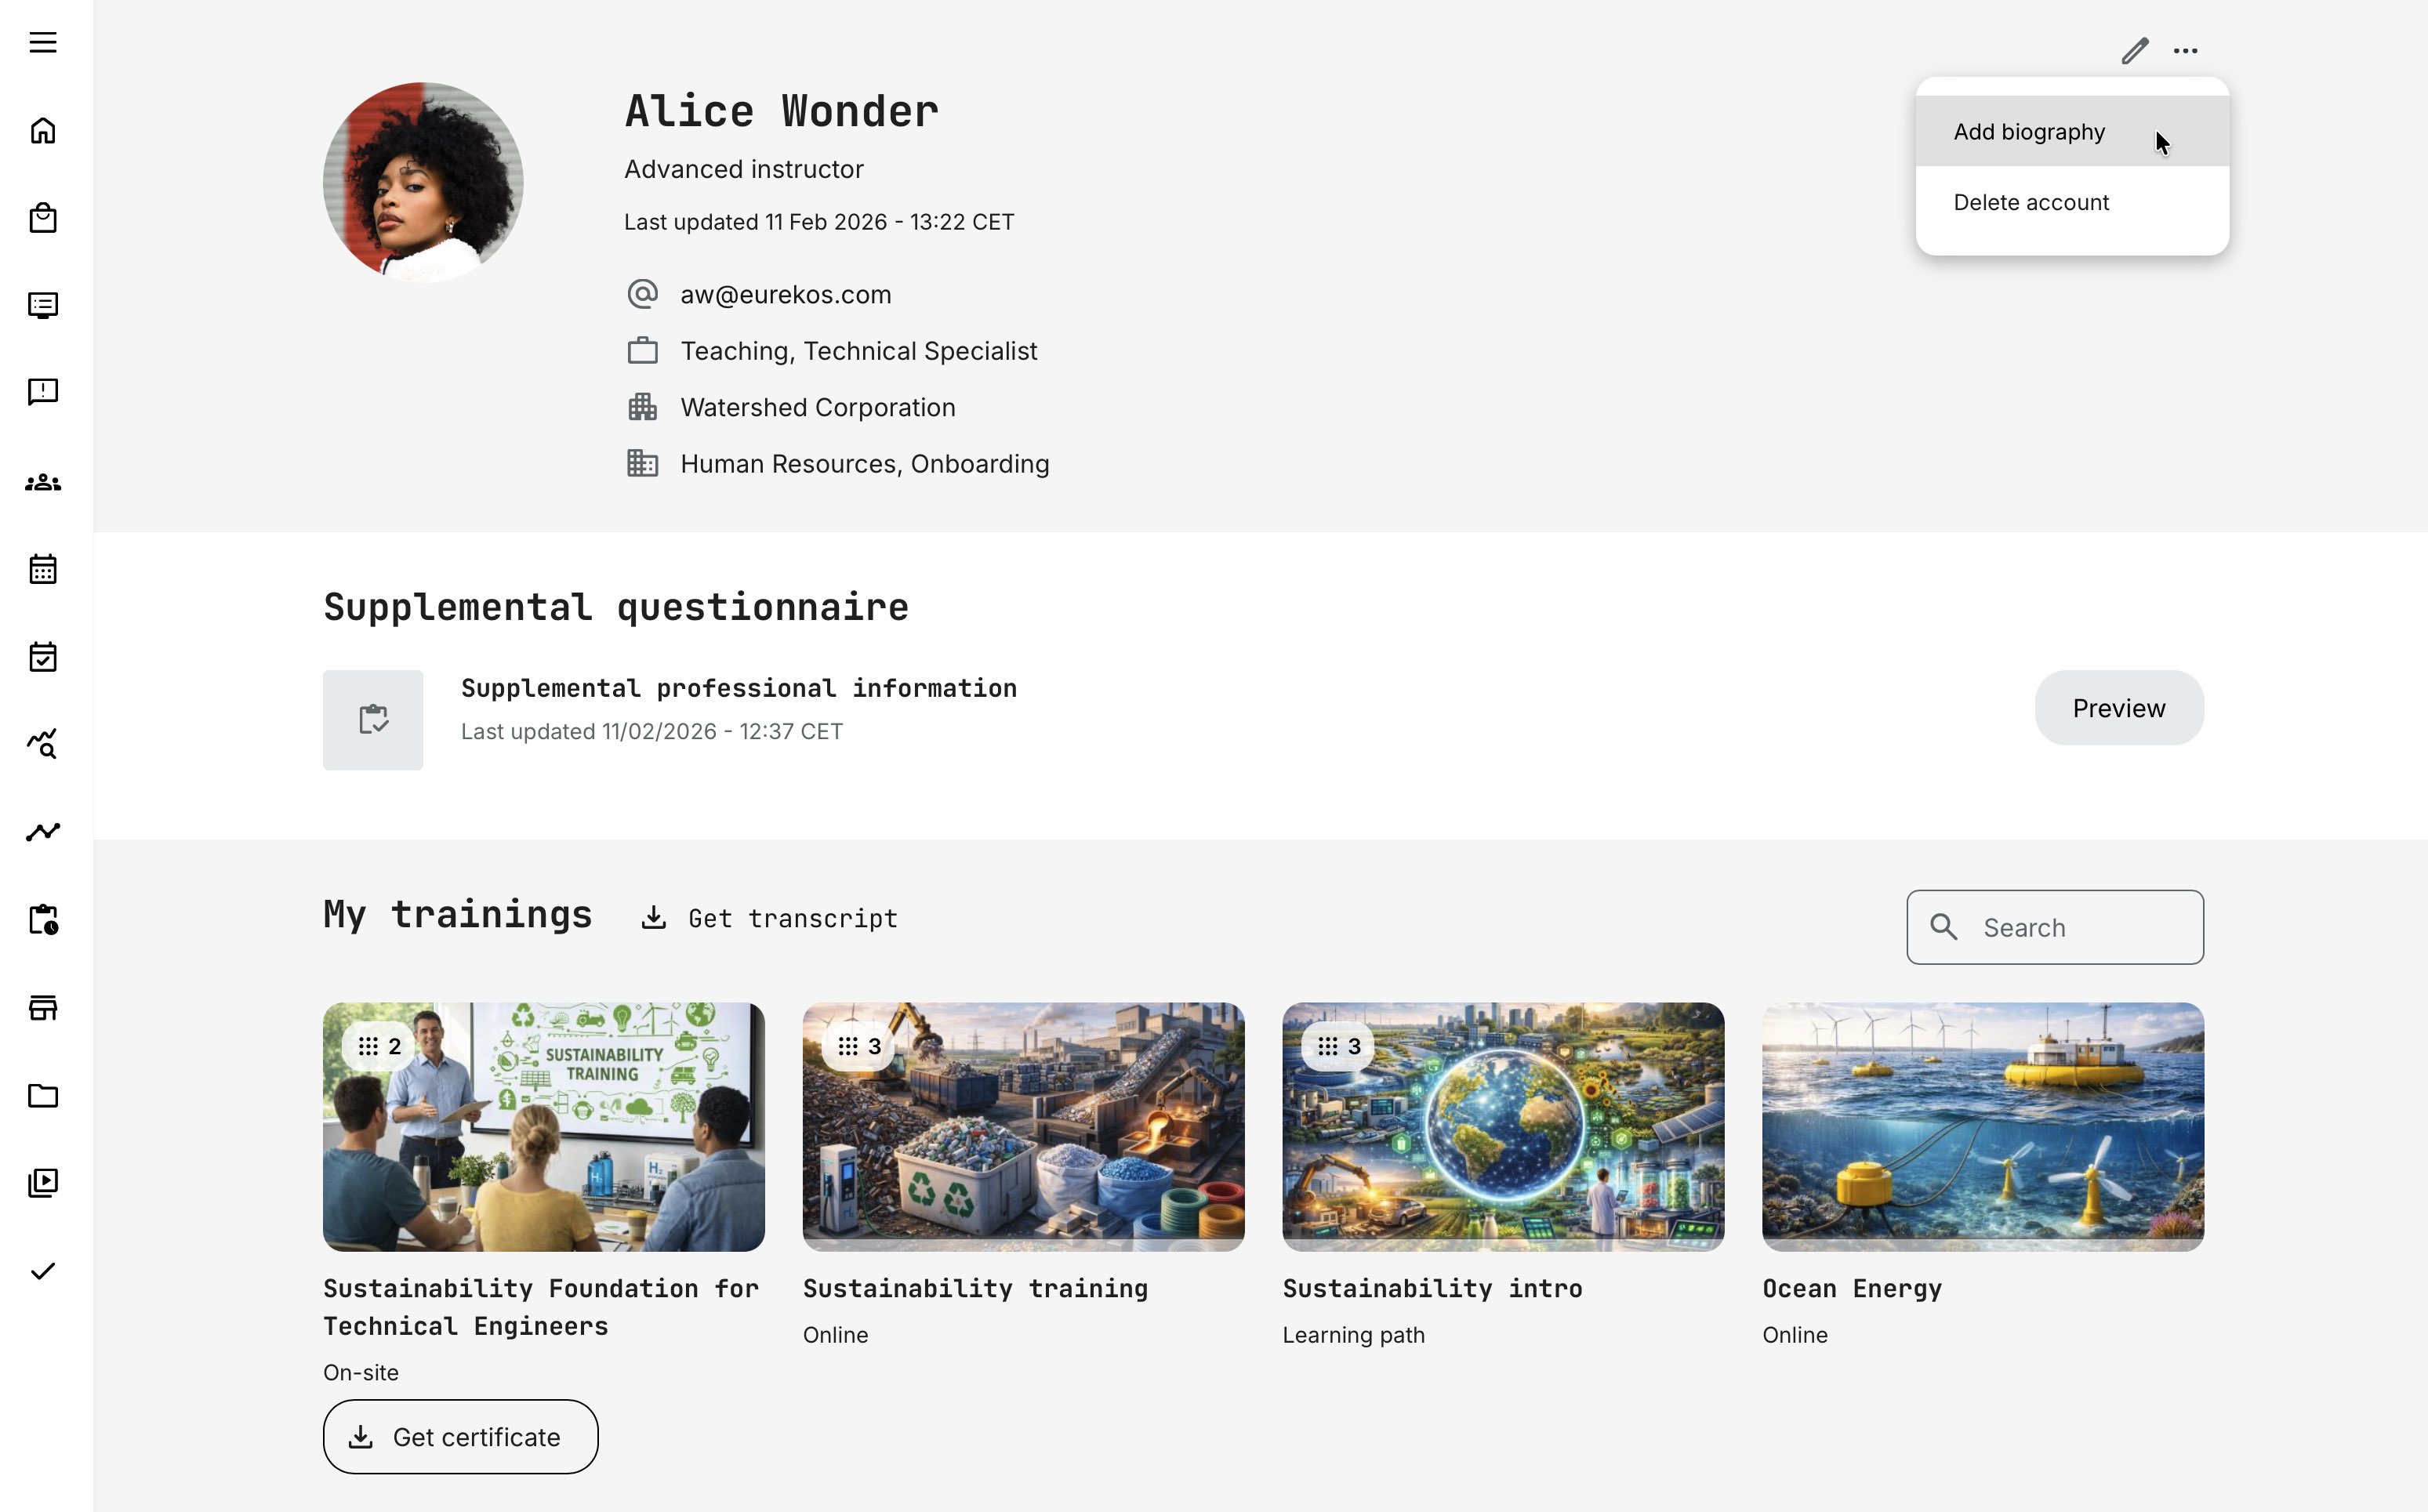
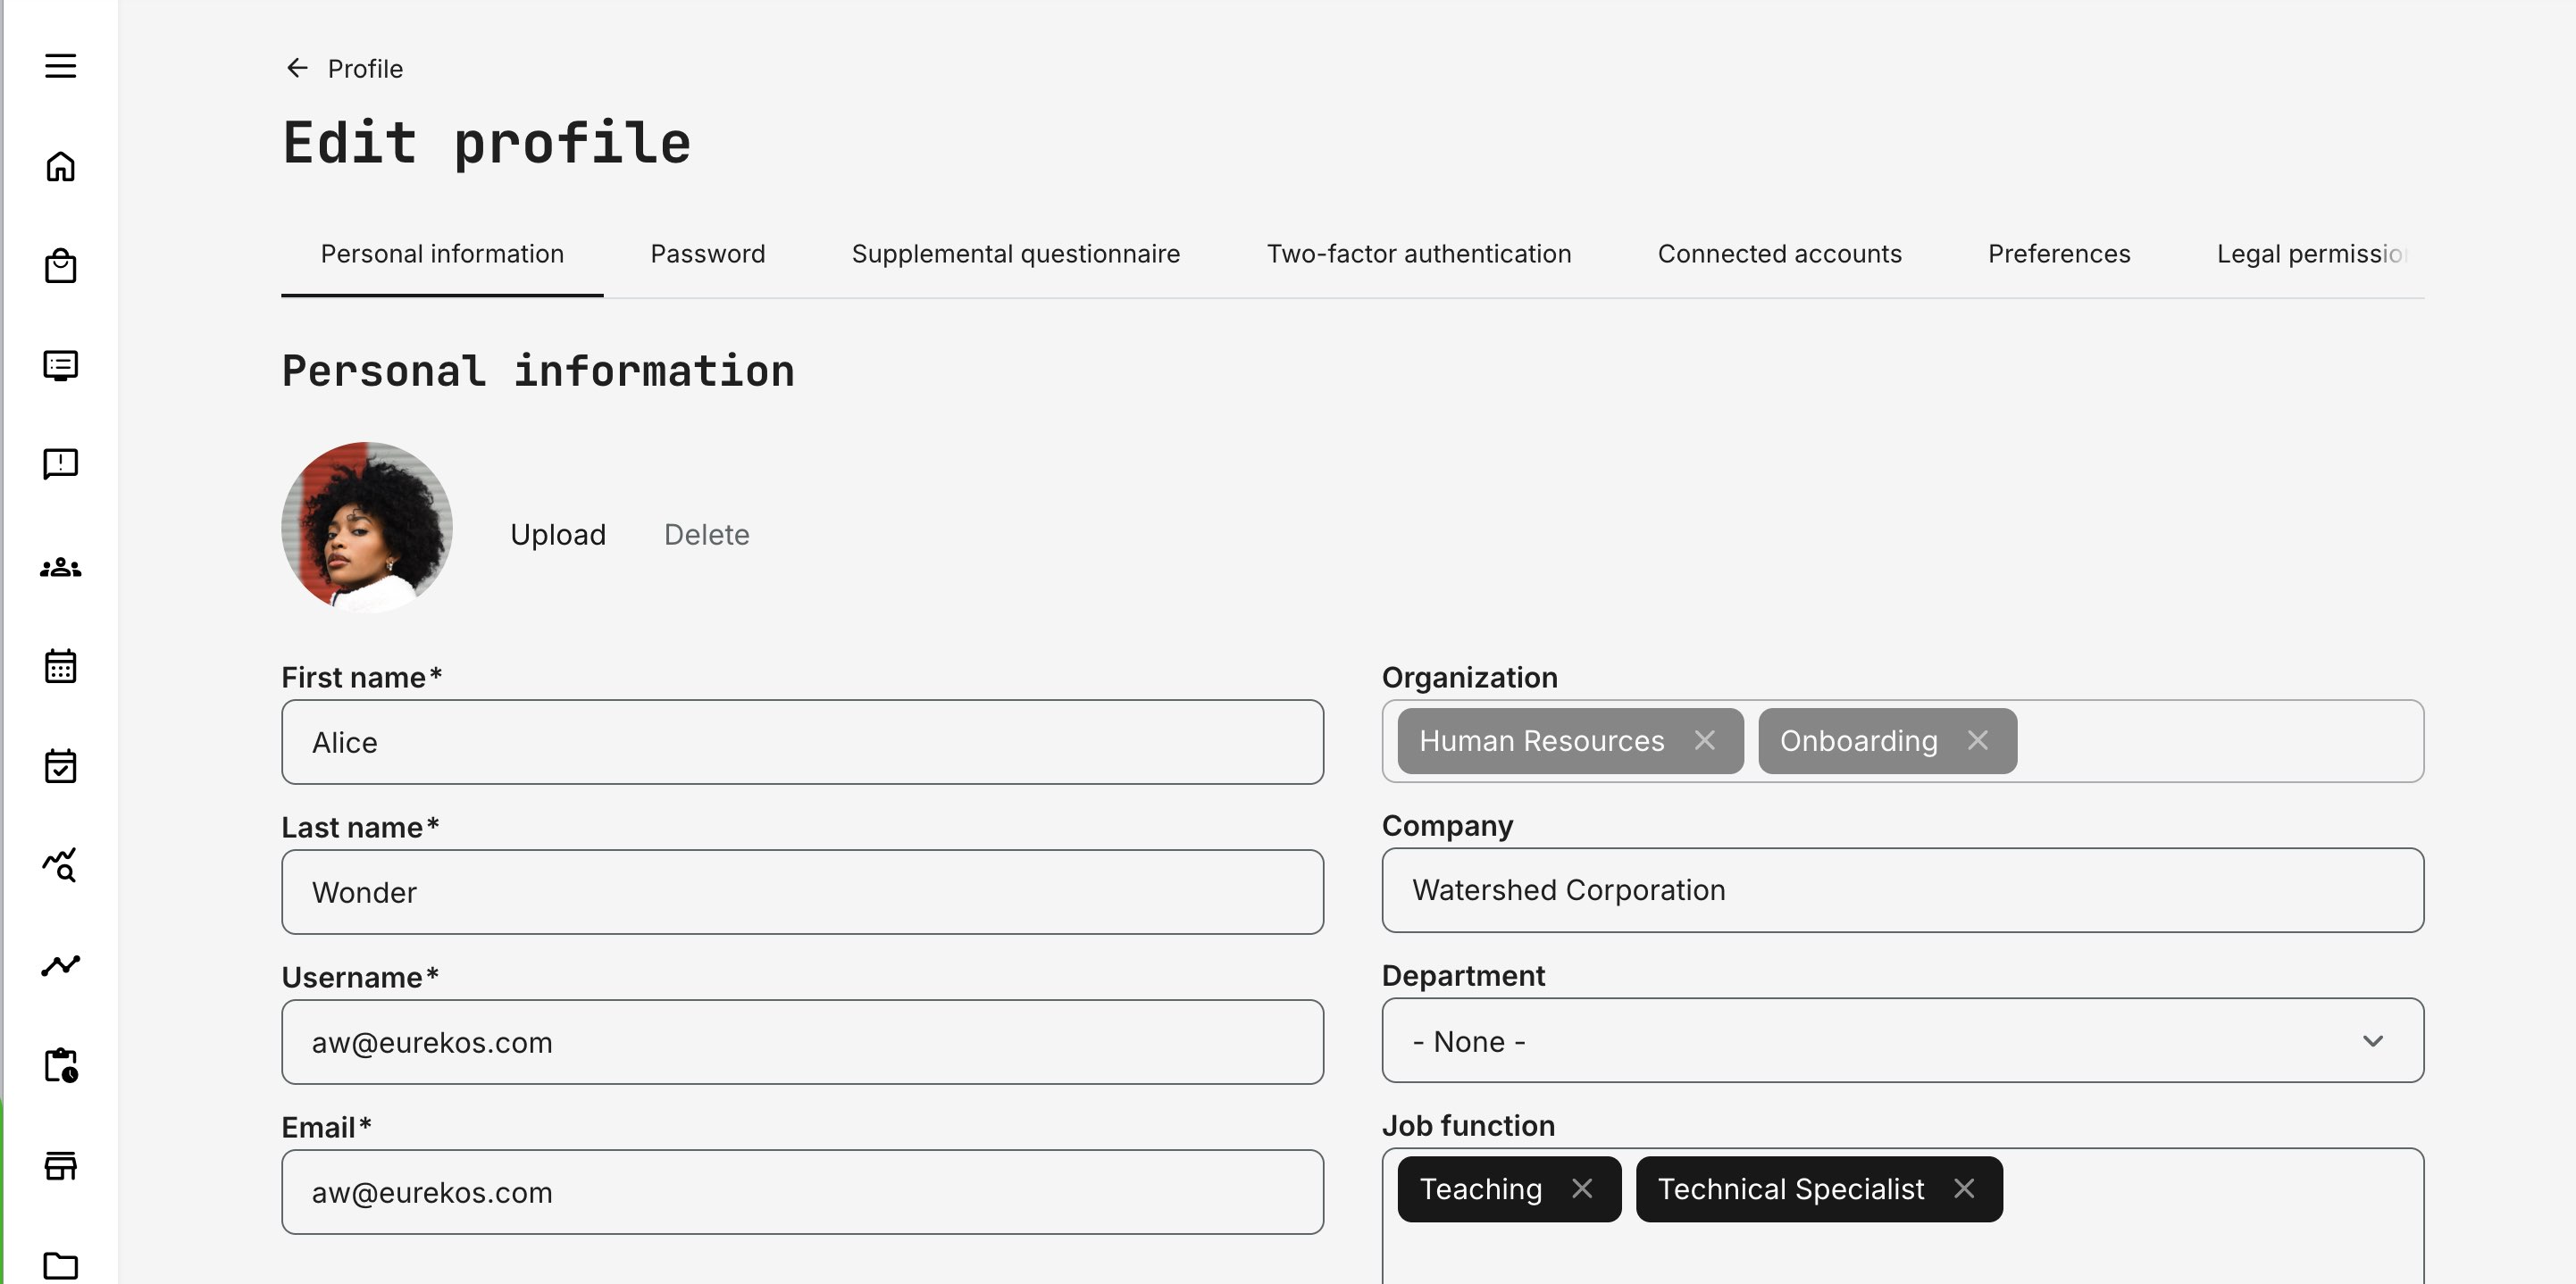
At the top of the profile, core identity and contact information is displayed, based on which profile fields are enabled. This typically includes an automatically generated avatar using the user’s initials (for example, AL for Alice Lange), with the option to upload a profile image. Additional information may include Title, Role, First Name, Last Name, Email, Company, and Phone number.
This section always reflects the current state of the user profile, regardless of how the information was populated—whether through manual edits, questionnaires, imports, or integrated identity systems. The availability and behavior of these fields are configurable, as described in this and related articles.
Additional options are available via the More (⋯) menu, subject to role-based permissions:
- Add biography – Allows eligible users (such as instructors and administrators) to create and maintain a short professional description
- Delete account – By default, users can delete their own account directly from their profile. Administrators can delete other users’ accounts
Biography
This feature allows eligible users—typically instructors and administrators, but not participants—to maintain a public-facing biography.
This is most commonly used for instructors—internal or external—so learners can easily see who is delivering a webinar or training and understand their background, expertise, and experience before enrolling. This context is especially important for instructor-led and live training, where credibility and relevance influence participation.
Instructor biographies are surfaced in several places, including:
- Activity and event descriptions prior to enrollment
- Event modules within learning paths
- Parts of the enrollment and confirmation flow
Because biographies are intended to support discovery and decision-making, they are available via a public URL and can be viewed without requiring login or registration.
Each biography includes its own dedicated profile image (separate from the user avatar), a title, and a rich free-text section. The editor supports rich formatting and multimedia, including images and video, allowing instructors to present themselves professionally and consistently across the platform.
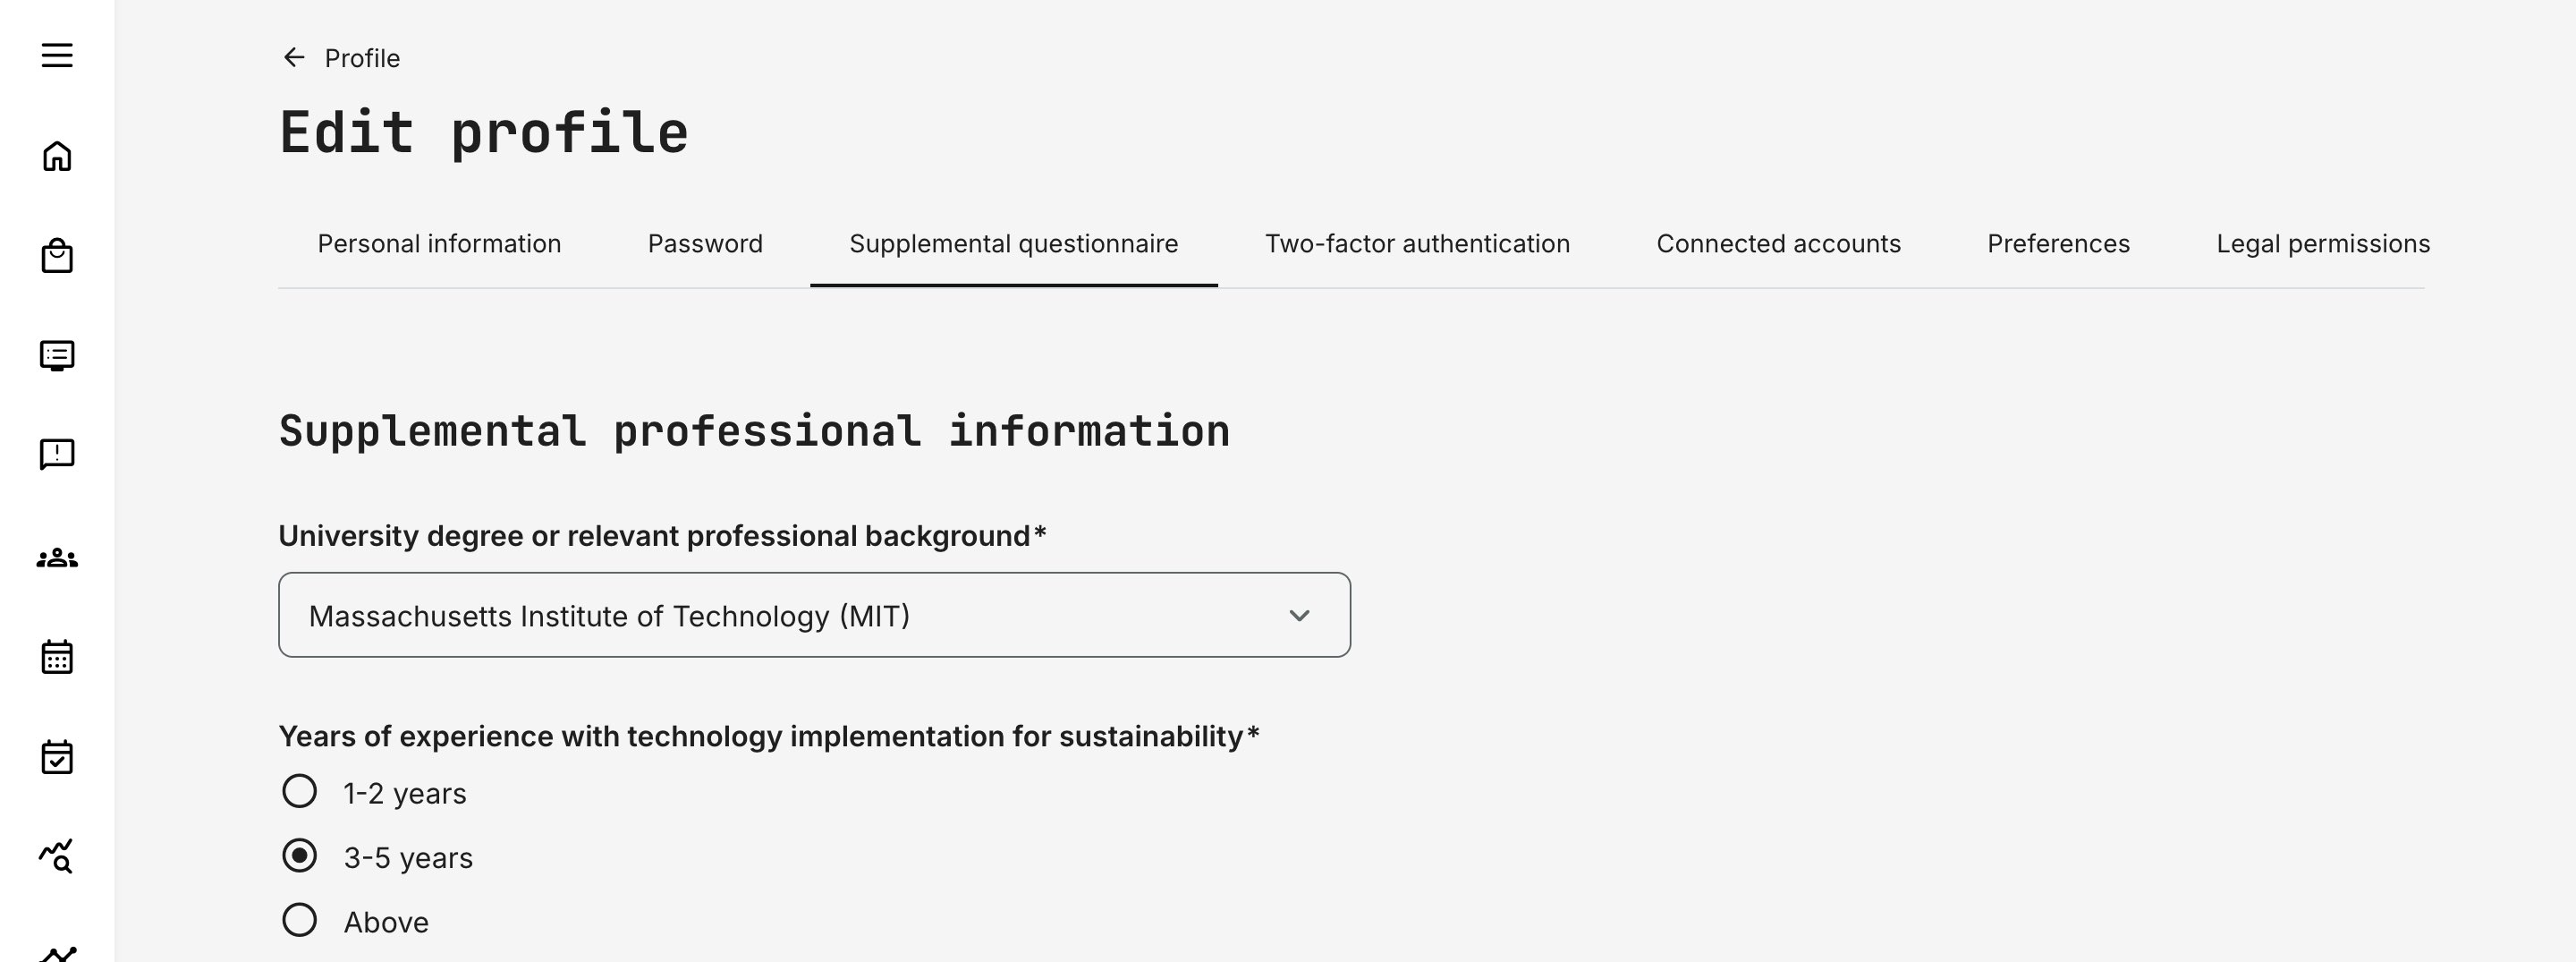
Supplemental Questionnaire
If a supplemental questionnaire is configured and completed (submitted), a dedicated block appears directly below the core identity information on the profile. The block displays the questionnaire name, the date it was last updated, and provides a quick preview of the submitted responses. It can be reopened or updated via the More (⋯) menu.
This makes structured, business-specific information—collected outside the standard profile fields—readily accessible. It supports not only participants, but also administrators and other authorized roles who need to review, validate, or act on this data as part of approvals, compliance, or operational workflows.
More information about configuring supplemental questionnaires can be found in the Questionnaires section. Additional context on how they appear and function within the profile is covered later in this article.
My Trainings
The My Trainings section is the learner’s operational overview of all assigned, enrolled, and completed training activities. It provides a structured view of learning status, prioritization, and progress—helping users quickly understand what requires attention and what has already been achieved.
At the same time, this section also functions as a personal training archive. As long as a training activity remains available on the platform and the user retains access, it will continue to appear in this list—including completed activities.
If access to a training is time-limited (for example, available for 12 months after completion), the activity will automatically disappear from the list once access expires.
Importantly, historical credentials are not affected by this:
- Certificates already earned remain valid (until their own expiry date, if configured)
- Skills granted through certificates follow their configured expiration logic
- Incentive points and rewards already earned are not impacted
- Historical records remain preserved for audit and reporting purposes
This means that while access to learning materials may expire, proof of achievement and historical data remain intact.
Display Order and Prioritization
Trainings are automatically grouped and prioritized to reflect urgency and relevance. The system applies the following hierarchy:
- Last visited
- Mandatory
- In progress
- Overdue
- Not started
- Recertification
- Completed
Within each group, items are further ordered by:
- Signup creation date
- Activity ID
This structure ensures that active and required learning appears before historical records, while still maintaining predictable internal sorting.
Users can search within My Trainings to quickly locate specific activities. This is particularly helpful in environments with large course portfolios or recurring certification programs.
Special Behaviors
- Blocked users can still see their assigned trainings, but no training status or progress bar is displayed.
- Participants cannot view other participants’ training overviews.
- The view reflects the user’s current access rights and status permissions at all times.
User Transcript (Learning History Report)
The User Transcript is a formal, downloadable PDF record of a user’s complete learning history on the platform. It serves as both:
- A personal learning archive for the user
- A compliance and audit document for administrators and managers
The transcript provides a structured, exportable report suitable for documentation, HR records, accreditation reviews, or partner validation. The report follows a consistent layout and training table columns include:
| Field | Description |
|---|---|
| Trainings with modules | Lists the activity and any included modules |
| Schedule | Activity schedule or module completion date |
| Registration | User registration date (platform date format) |
| Attendance | Attendance status (for events) |
| Status | Completed, In progress (with %), Not started |
| Completion | Completion date (if applicable) |
| Certificate | Download link if certificate exists |
| Certificate expiration | Expiry date of issued certificate |
| Recertification expiration | Next recertification deadline (if configured) |
| CEU | Continuous Education Units (if enabled) |
| Program number | Program identifier (if enabled) |
Important Behavioral Rules
- Cancelled signups are not shown
- Blocked users’ historical data remains visible in transcripts
- Expired activities may omit activity type display
- Certificates and certification expiration are preserved for record integrity
The transcript reflects actual historical training states, even if the user is later blocked.
The same transcript can be generated from multiple locations across the platform, depending on role—ensuring easy access, convenience, and a consistent user experience for learners, managers, and administrators alike.
Balance and Orders
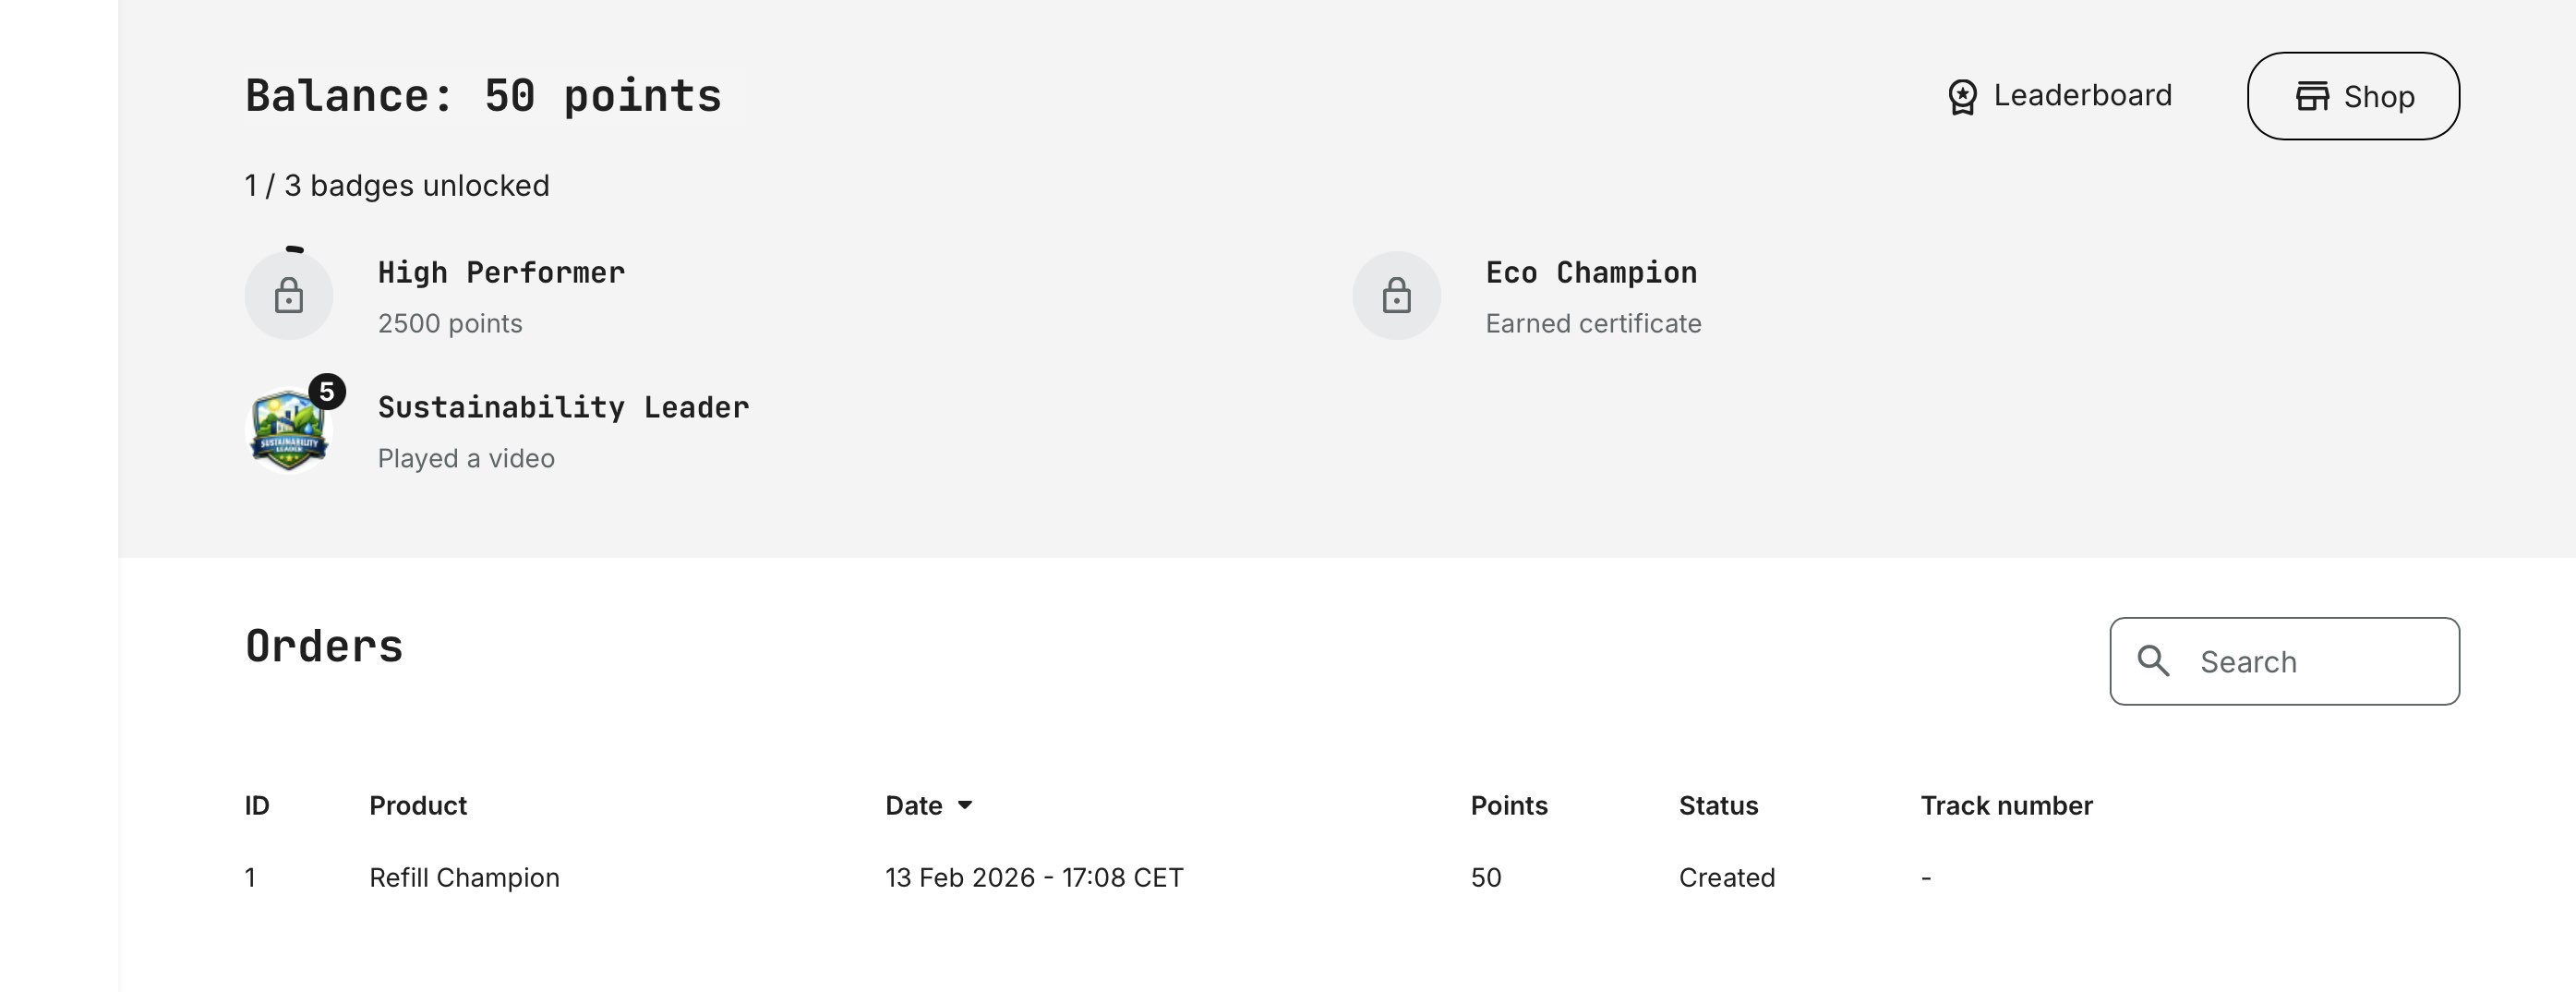
When Incentives are enabled, the user profile includes a dedicated Balance and Orders section that connects learning activity with tangible rewards.
- Balance shows the user’s current point total, reflecting earned points from completed actions, as well as any redeemed or expired points based on configured rules and expiry schedules. This provides a real-time overview of engagement and progress within the incentive program.
- Orders lists all redeemed rewards, including their status (e.g., created, in progress, shipped, completed). This allows learners to track fulfillment and gives administrators transparency into the operational lifecycle of each reward.
Together, these elements make incentives visible, accountable, and easy to follow—bridging effort, recognition, and reward within the user’s personal record.
Skills
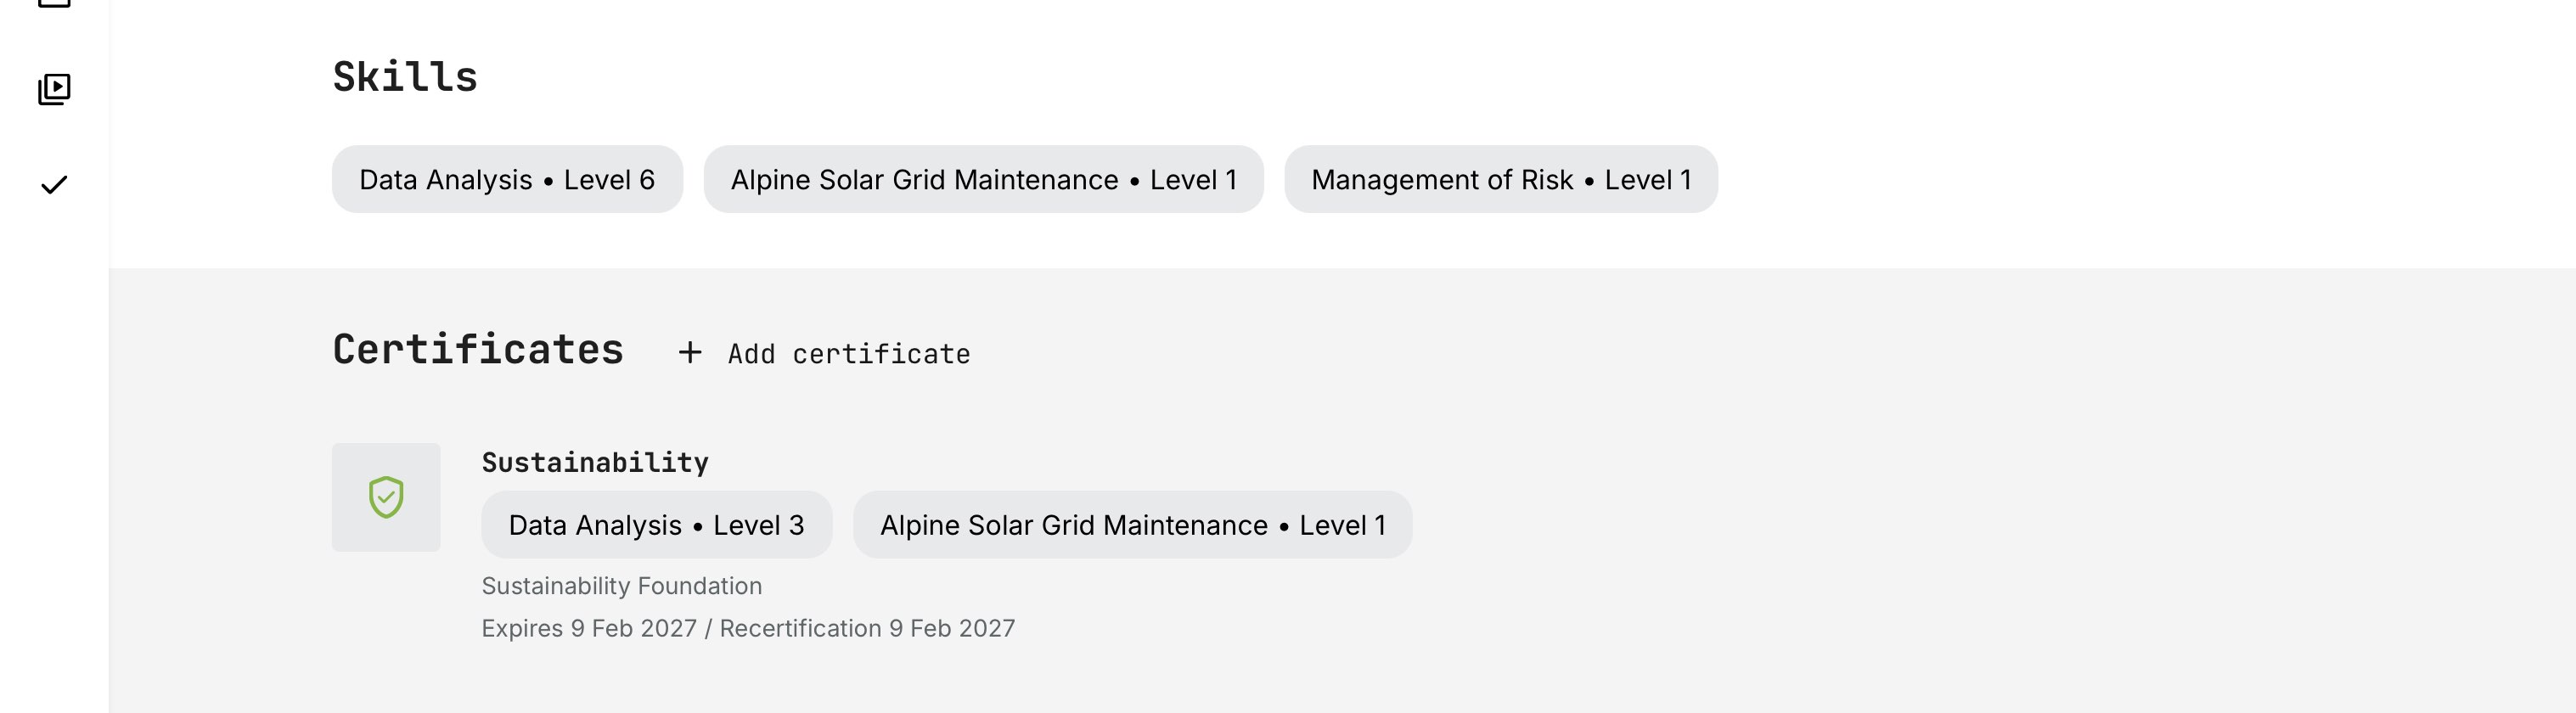
The Skills section on the user profile provides a consolidated overview of a learner’s current competencies.
Skills appear when they are:
- Earned through certificates with skills enabled
- Manually assigned by an administrator
If levels are configured, each skill displays its total accumulated level. The platform applies cumulative logic, meaning:
- Levels from multiple certificates containing the same skill are added together
- Manually assigned levels are included in the total
- If a certificate expires, the associated skill level is automatically deducted from the total
Learners can expand the section to view all skills in detail. The profile always reflects the current, valid state of the user’s competencies.
Certificates
The Certificates section provides a complete and historically accurate overview of a learner’s earned credentials.
Certificates remain visible on the profile regardless of whether:
- The related course is no longer available
- The training activity has been archived or removed
- The certificate itself has expired
This ensures that the profile reflects true learning history and documented achievement. Even when a certificate expires for compliance or recertification purposes, the accomplishment itself remains part of the learner’s record. Expiry affects current validity—not historical fact.
Certificates are fully data-driven. When downloaded, they are generated dynamically using stored completion data. This means:
- Branding updates or layout improvements are reflected immediately
- Text changes or token adjustments apply going forward
- Historical completion dates and credential data remain intact
This approach preserves data integrity while giving administrators flexibility to refine visual presentation and communication over time—without altering past records.
Each certificate entry typically displays:
- Certificate title
- Completion date
- Expiration date (if configured)
- Recertification deadline (if applicable)
- Download link to generate the certificate
For learners, this section functions as a verified portfolio of credentials.
For administrators and managers, it provides a reliable validation layer for compliance, qualification, and readiness—past and present.
Communities
When the Communities feature is enabled, the user profile and dashboard may display a Communities widget, giving users quick access to their collaborative spaces.
Communities bring a social and collaborative layer to the platform—connecting learning with discussion, shared resources, events, and teamwork.
The Communities widget shows:
- Internal (native) communities the user is a member of
- External communities (e.g., Microsoft Teams or Slack) linked through activities with an active Community connection
By clicking a community in the widget:
- Internal communities open directly within the platform
- External communities open in a new browser tab (e.g., MS Teams or Slack)
This creates a unified entry point for collaboration—regardless of whether the interaction is hosted natively or through an integrated service
Limited Profile View
In some scenarios, a user may access another profile via a direct link without full permissions.
In these cases:
- A limited profile view is shown
- Only basic identity elements are visible (name, teams)
- Personal data (email, phone, organization, certificates) is hidden
Additional rules apply:
- Participants cannot view other participants’ profiles
- Organization filters restrict cross-organization visibility
- Unauthorized access results in a 403 page
This ensures privacy and compliance while still supporting contextual linking (e.g. instructor references).
Editing the Profile
Users access their own profile by clicking their name in the top-right corner and selecting View profile or Edit profile, depending on permissions. Administrators can access and edit user profiles via: Users → [Edit] on any user visible.
The user profile is organized into tabs, each serving a distinct purpose and described in detail in the following sections.

Personal Information
The Personal Information tab is the structural foundation of every user profile. It holds the core attributes that identify who a user is, where they belong, and how they relate to the organization and the platform.
These fields are not just informational. They are actively used across the system to:
- Determine organizational context and audience membership
- Drive enrollment logic, storefront visibility, and incentives
- Enable reporting, certificates, and automation
- Support identity management, security, and integrations
What appears on this tab—and who can edit it—depends on how the Profile Form is configured by administrators and whether values are populated manually, through imports, questionnaires, or external identity systems (such as SSO).
Administrators configure this form under Settings → Forms → Profile, and in some cases which vocabularies are activated in Settings → Tags:
- Enable or disable specific fields
- Control whether end users may edit each field
- Reorder fields for clarity and relevance
- Provide multilingual labels and help text
Administrative users can always edit profile fields (with the exception of fields locked by identity integrations), while learner edit permissions depend on how each field is configured.
Profile Fields Overview
These fields represent the core standard profile fields. Additional configurations, enabled features, or integrations may extend or modify what is available.
| Field | Description and Usage |
|---|---|
| Title | Optional personal title (e.g. Mr, Mrs). Used for formality and personalization in communication |
| First name | The user’s given name. Appears throughout the platform, including certificates, emails, and reports |
| Last name | The user’s family name, used consistently across lists, certificates, and exports |
| Username (email) | The primary login identifier. If not specified at creation, the email address is used by default |
| Primary contact address for login, notifications, and communication. Often managed via SSO and read-only for users | |
| Role | Defines permissions, navigation access, and administrative capabilities within the platform |
| Status | Indicates whether the account is active or blocked. Blocked users cannot access the platform |
| Mobile phone | Optional contact number, typically used for operational or logistical communication |
| Phone | Optional general contact number |
| Organization | Defines the user’s organizational affiliation. Central to enrollment logic, storefront visibility, incentives, reporting, and automation |
| Company | Free-text field used primarily for grouping and filtering external users. Does not drive automation by itself |
| Immediate manager | Allows linking one or more managers to a user. Used for reporting, approvals, and organizational context. Users cannot select themselves |
| Hire date | Supports onboarding logic, tenure-based reporting, and training statistics |
| Birthday | Optional personal date field, sometimes used for personalization or internal reporting |
| Graduation date | Tracks educational milestones where relevant |
| Probation end date | Used in onboarding, compliance, or eligibility workflows |
| Audit date | Often used for compliance, quality assurance, or periodic review processes |
| Last working day | Supports internal off-boarding workflows and access planning |
| Country | Used for localization, region-based reporting, and audience targeting |
| State / Province | Regional context for reporting and filtering |
| City | Supports geographic grouping and logistics |
| Street | Address detail, primarily for physical fulfillment or records |
| Street number | Complements street address for accuracy |
| Postal code | Used for logistics, reporting, and regional segmentation |
| Job function and other Vocabularies | Describes the user’s functional role. Commonly used for targeting training and reporting |
| Employment type | Often used to indicate exempt vs. non-exempt status or similar classifications |
| Employee ID | Internal identifier used for integration, reporting, or audits |
| BankID | Used for secure identification in certain purchase or verification flows. May be auto-populated via authentication systems and read-only for users |
| Contact manager | Optional role extension that allows users to invite others to activities and receive promotional notifications (when promotions are enabled) |
Important Notes for Administrators
- Profile fields are not static: once enabled, they become available for filtering, reporting, onboarding rules, imports/exports, and APIs
- Some fields may be read-only for learners when managed by authentication or identity systems (SSO)
- Vocabulary-backed fields provide consistency and are strongly recommended for any field used in automation or reporting
- Changes to profile data can affect enrollments, access, storefront visibility, incentives, and workflows immediately
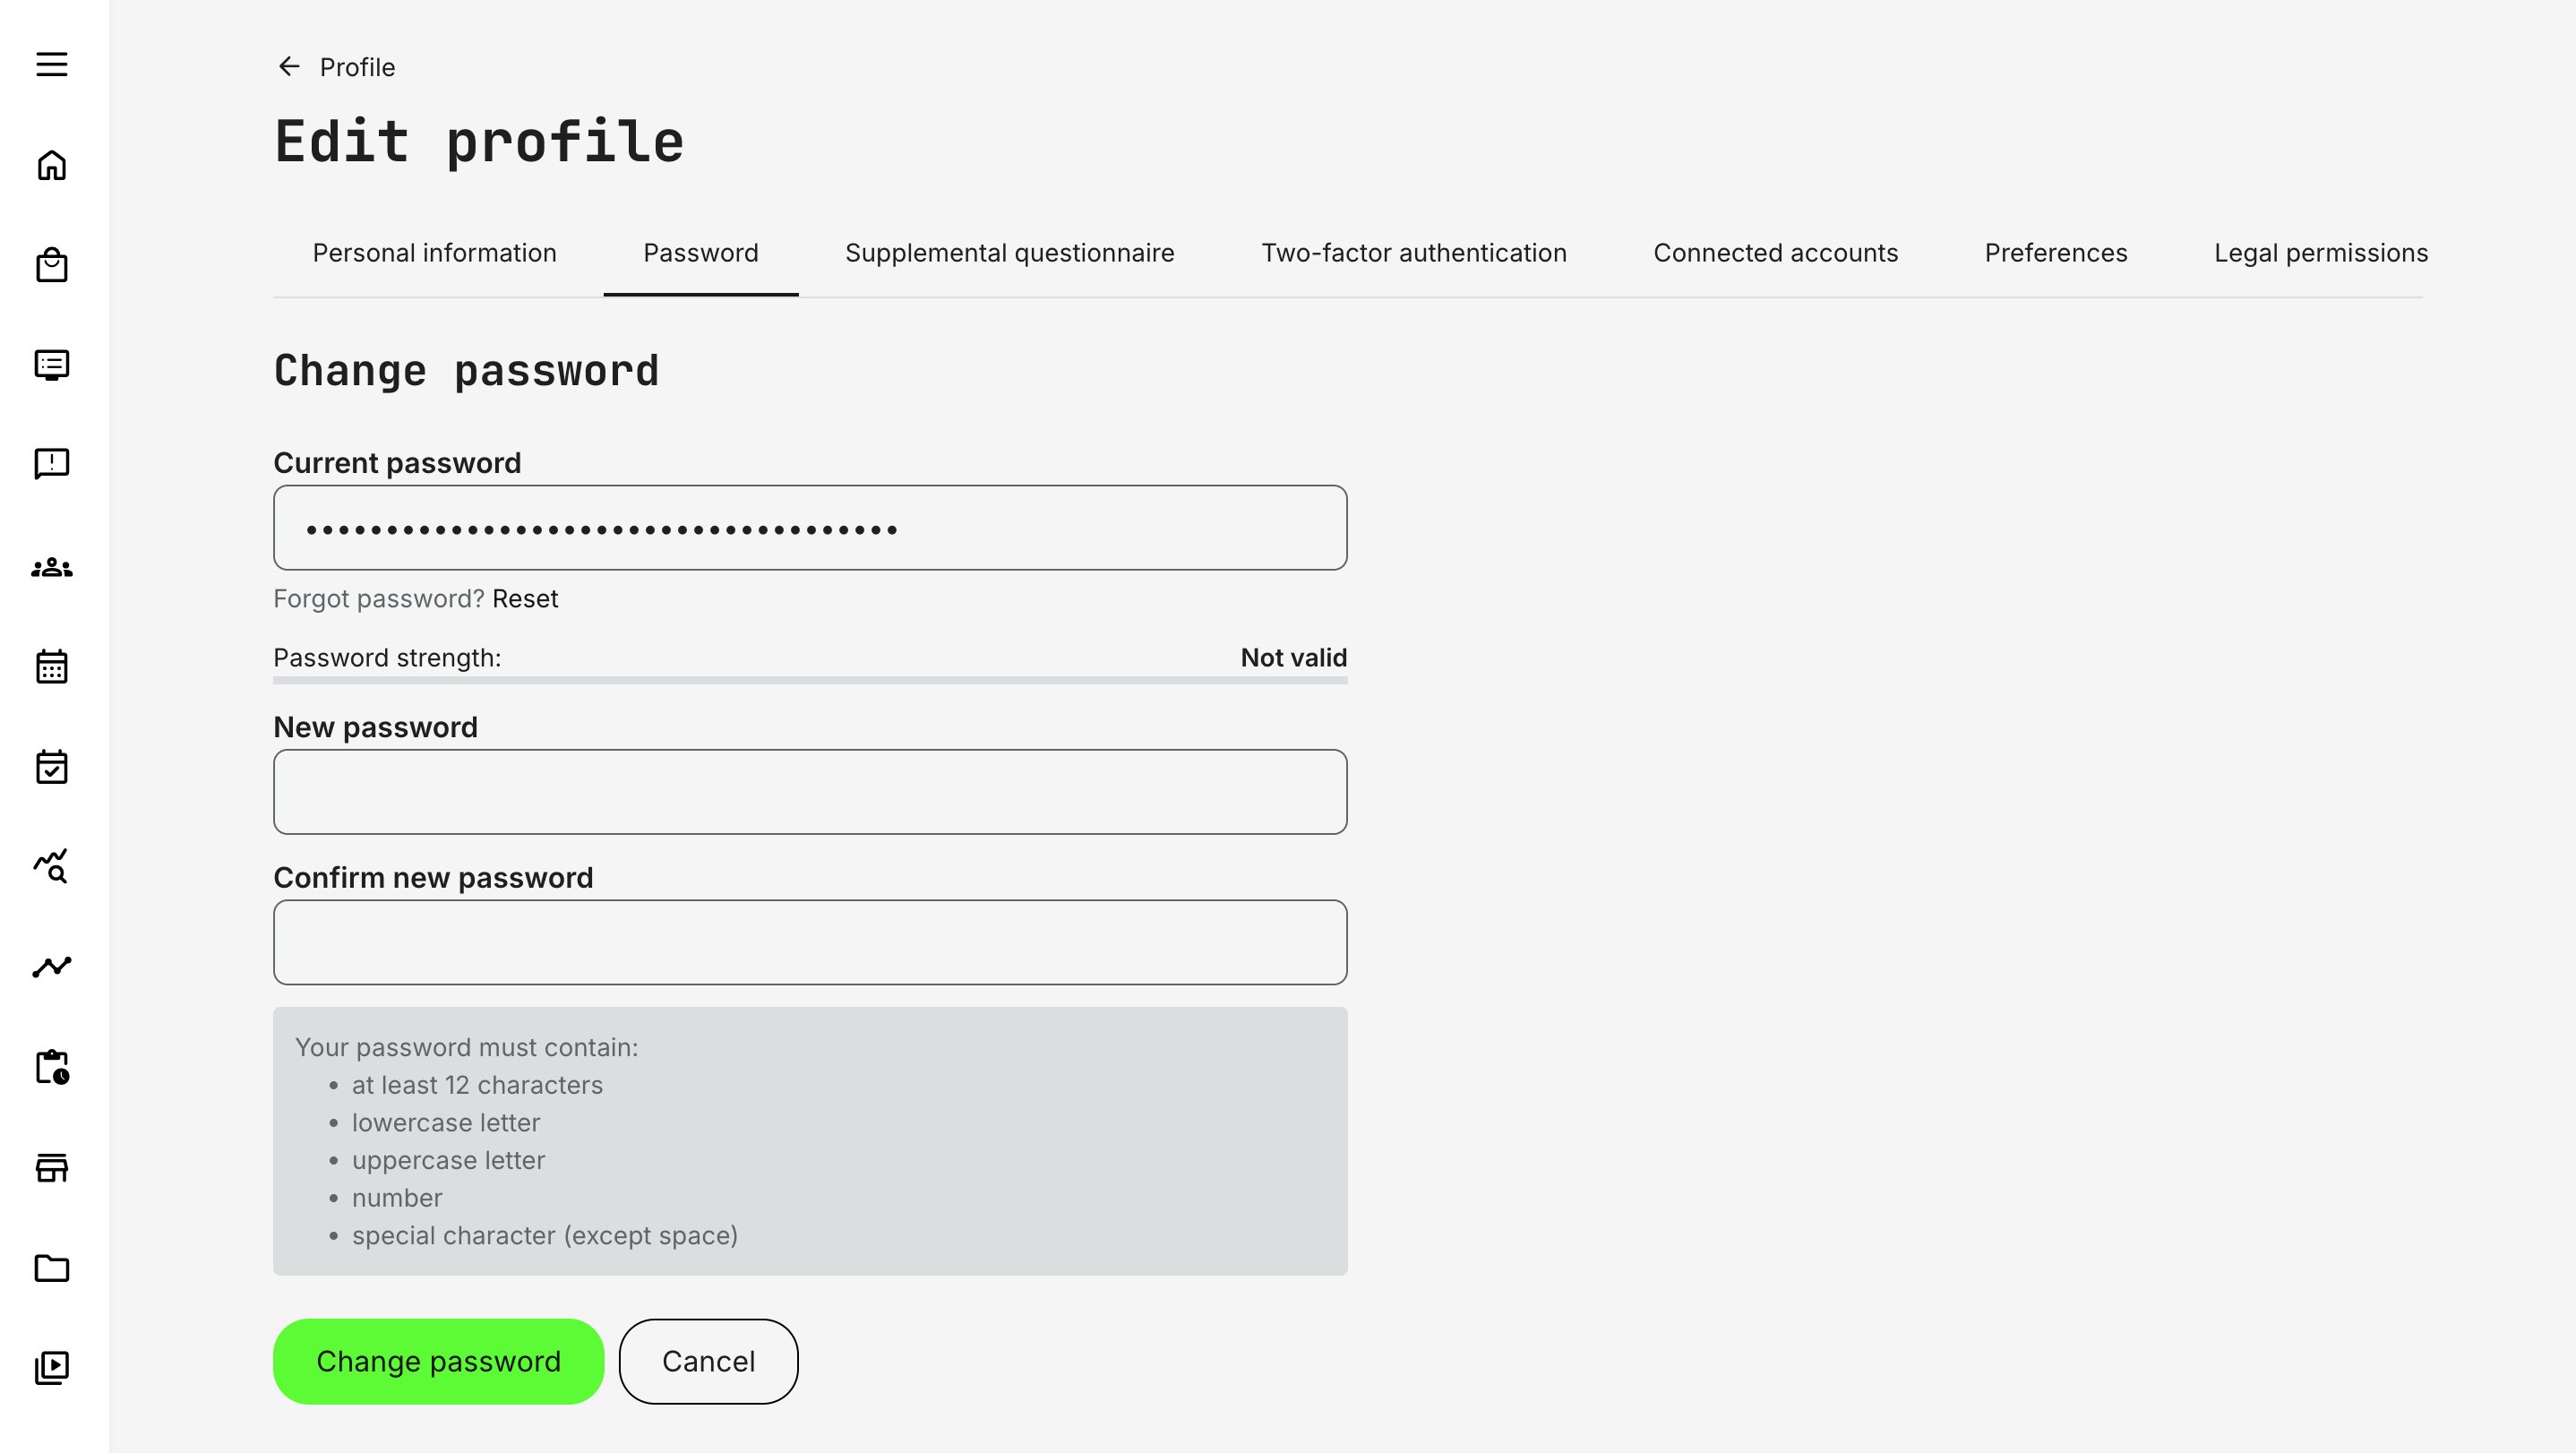
Password Management and Account Security
The Password tab on the user profile governs how users authenticate when local (username/password) login is used. It is a critical part of account security and identity management—especially on platforms that combine internal users, partners, and external audiences.
Password management in the platform is deliberately strict, role-controlled, and consistent across all entry points (user creation, password change, and password recovery). This ensures predictable security behavior regardless of how users are onboarded.
Who Can Change Passwords
- All users can change their own password from the Password tab on their profile.
- Only Administrators can access the Password tab on other users’ profiles.—even via masquerade or direct URL. This includes Platform Administrator, Global Administrator and Course Administrator.
No user—including administrators—can in any way visually inspect or extract user passwords, but they can enforce a new. This allows organizations to strike a balance between central IT control and operational flexibility, depending on internal governance and support models.
Password Rules and Requirements
All password creation and updates—whether during signup, admin-created accounts, or password resets—must comply with the same rules. The interface provides inline validation hints and confirmation matching between New password and Confirm password.
Password requirements:
- Minimum 12 characters
- At least one lowercase letter
- At least one uppercase letter
- At least one number
- At least one special character
Supported special characters include: !"#$%&'()*+,-./:;<=>?@[\]^_`{|}~
Contact the Eurekos Service Desk if you want to adjust the minimum password length to meet your security requirements. Any change will apply to new users and future password updates, and will not affect existing passwords.
Here’s a concise, platform-accurate section you can drop in as its own subsection. It keeps the what / why / impactframing without getting overly technical.
Passwords and SSO Considerations
Password management behaves differently depending on whether users authenticate locally or through an external identity provider (SSO/IAM).
When local authentication is used, users can create, change, and recover their passwords directly within the platform, subject to the configured password policy and MFA settings.
When Single Sign-On (SSO) or another external identity provider is enabled, authentication control can shift entirely outside the platform:
- Password creation and changes may be disabled in the user profile
- Password recovery and MFA flows are handled by the external identity provider, not by the platform
- The availability of local passwords alongside SSO depends on how authentication is configured for each audience
This flexibility allows organizations to support different access models—for example:
- Partners authenticating through an external IAM system
- Internal users using corporate SSO
- Other user groups using local credentials
Important Behavior To Be Aware Of
If a user initially has a locally created password and later logs in using an external authentication service:
- The external identity provider becomes the authoritative login method
- The locally stored password is disabled
- The user can no longer change or reset their password within the platform
- Any future password changes, recovery, or MFA configuration must be performed through the external system
For this reason, authentication strategy should be planned early—especially in environments where multiple audiences, partners, or identity sources coexist.
Supplemental Questionnaires — Extending the User Profile with Business Context
Standard profile fields cover identity, contact information, and organizational structure—but in many real-world scenarios, they are not enough.
Organizations often need to capture contextual, domain-specific, or evolving information about users that goes beyond fixed profile attributes. This is where Supplemental Questionnaires come in.
Supplemental questionnaires allow you to extend the user profile with structured, purposeful data that reflects who the user is in your business context, not just who they are in the system.
In practice, organizations rarely operate with a single, static user model. Common examples include:
- Capturing education, certifications, or professional background at onboarding
- Collecting experience level, product familiarity, or regional responsibility for partner programs
- Asking for compliance declarations, eligibility confirmations, or prerequisites before granting access
- Gathering application data for programs, roles, or accreditations
- Periodically re-validating information that changes over time (e.g. job role, specialization, consent)
Encoding this information directly into core profile fields would make the profile rigid and difficult to evolve across audiences, or require extensive customization and validation of data input. Supplemental questionnaires solve this by introducing a flexible, structured extension of the profile—without altering the underlying user model.
How Supplemental Questionnaires Work Conceptually
A supplemental questionnaire is a profile-bound questionnaire whose responses become part of the user’s extended profile context.
Key characteristics:
- Responses are linked to the user profile, not to a course or activity
- Data can be structured, validated, and reused across workflows
- Questionnaires can be targeted to specific audiences
- Responses can be used for filtering, automation, reporting, and decision-making
- Questionnaires can be reissued or updated when information must be refreshed
Once configured, supplemental questionnaire data becomes part of the profile and can be viewed and edited directly from the user profile, subject to permissions. Only one questionnaire can be associated with the profile at any given time.
Configuration Relationship
Supplemental questionnaires are created and configured within the Questionnaires feature, where a questionnaire can be explicitly marked for use as a profile-level (supplemental) questionnaire. When marked, the Supplemental questionnaire tab is enabled.
From that point on:
- The questionnaire defines which data is collected
- The profile defines where the data lives and how it’s accessed
- Permissions control who can view or edit responses
This separation ensures that data collection logic stays flexible, while the profile remains the single point of reference.
Supplemental questionnaires are most often used when organizations need to capture intentional, contextual information about users—information that goes beyond identity and organizational structure and may change over time.
They commonly support onboarding and application flows, eligibility and approval processes, extended-enterprise programs such as partner or reseller enablement, and compliance scenarios where declarations or acknowledgements are required. They are also frequently used to enrich capability and talent views with background details such as experience, education, or domain focus.
Unlike standard profile fields, this information is deliberately collected with context, explanation, and often validation. That makes it more reliable for operational decisions and better suited for use in workflows where accuracy and intent matter.
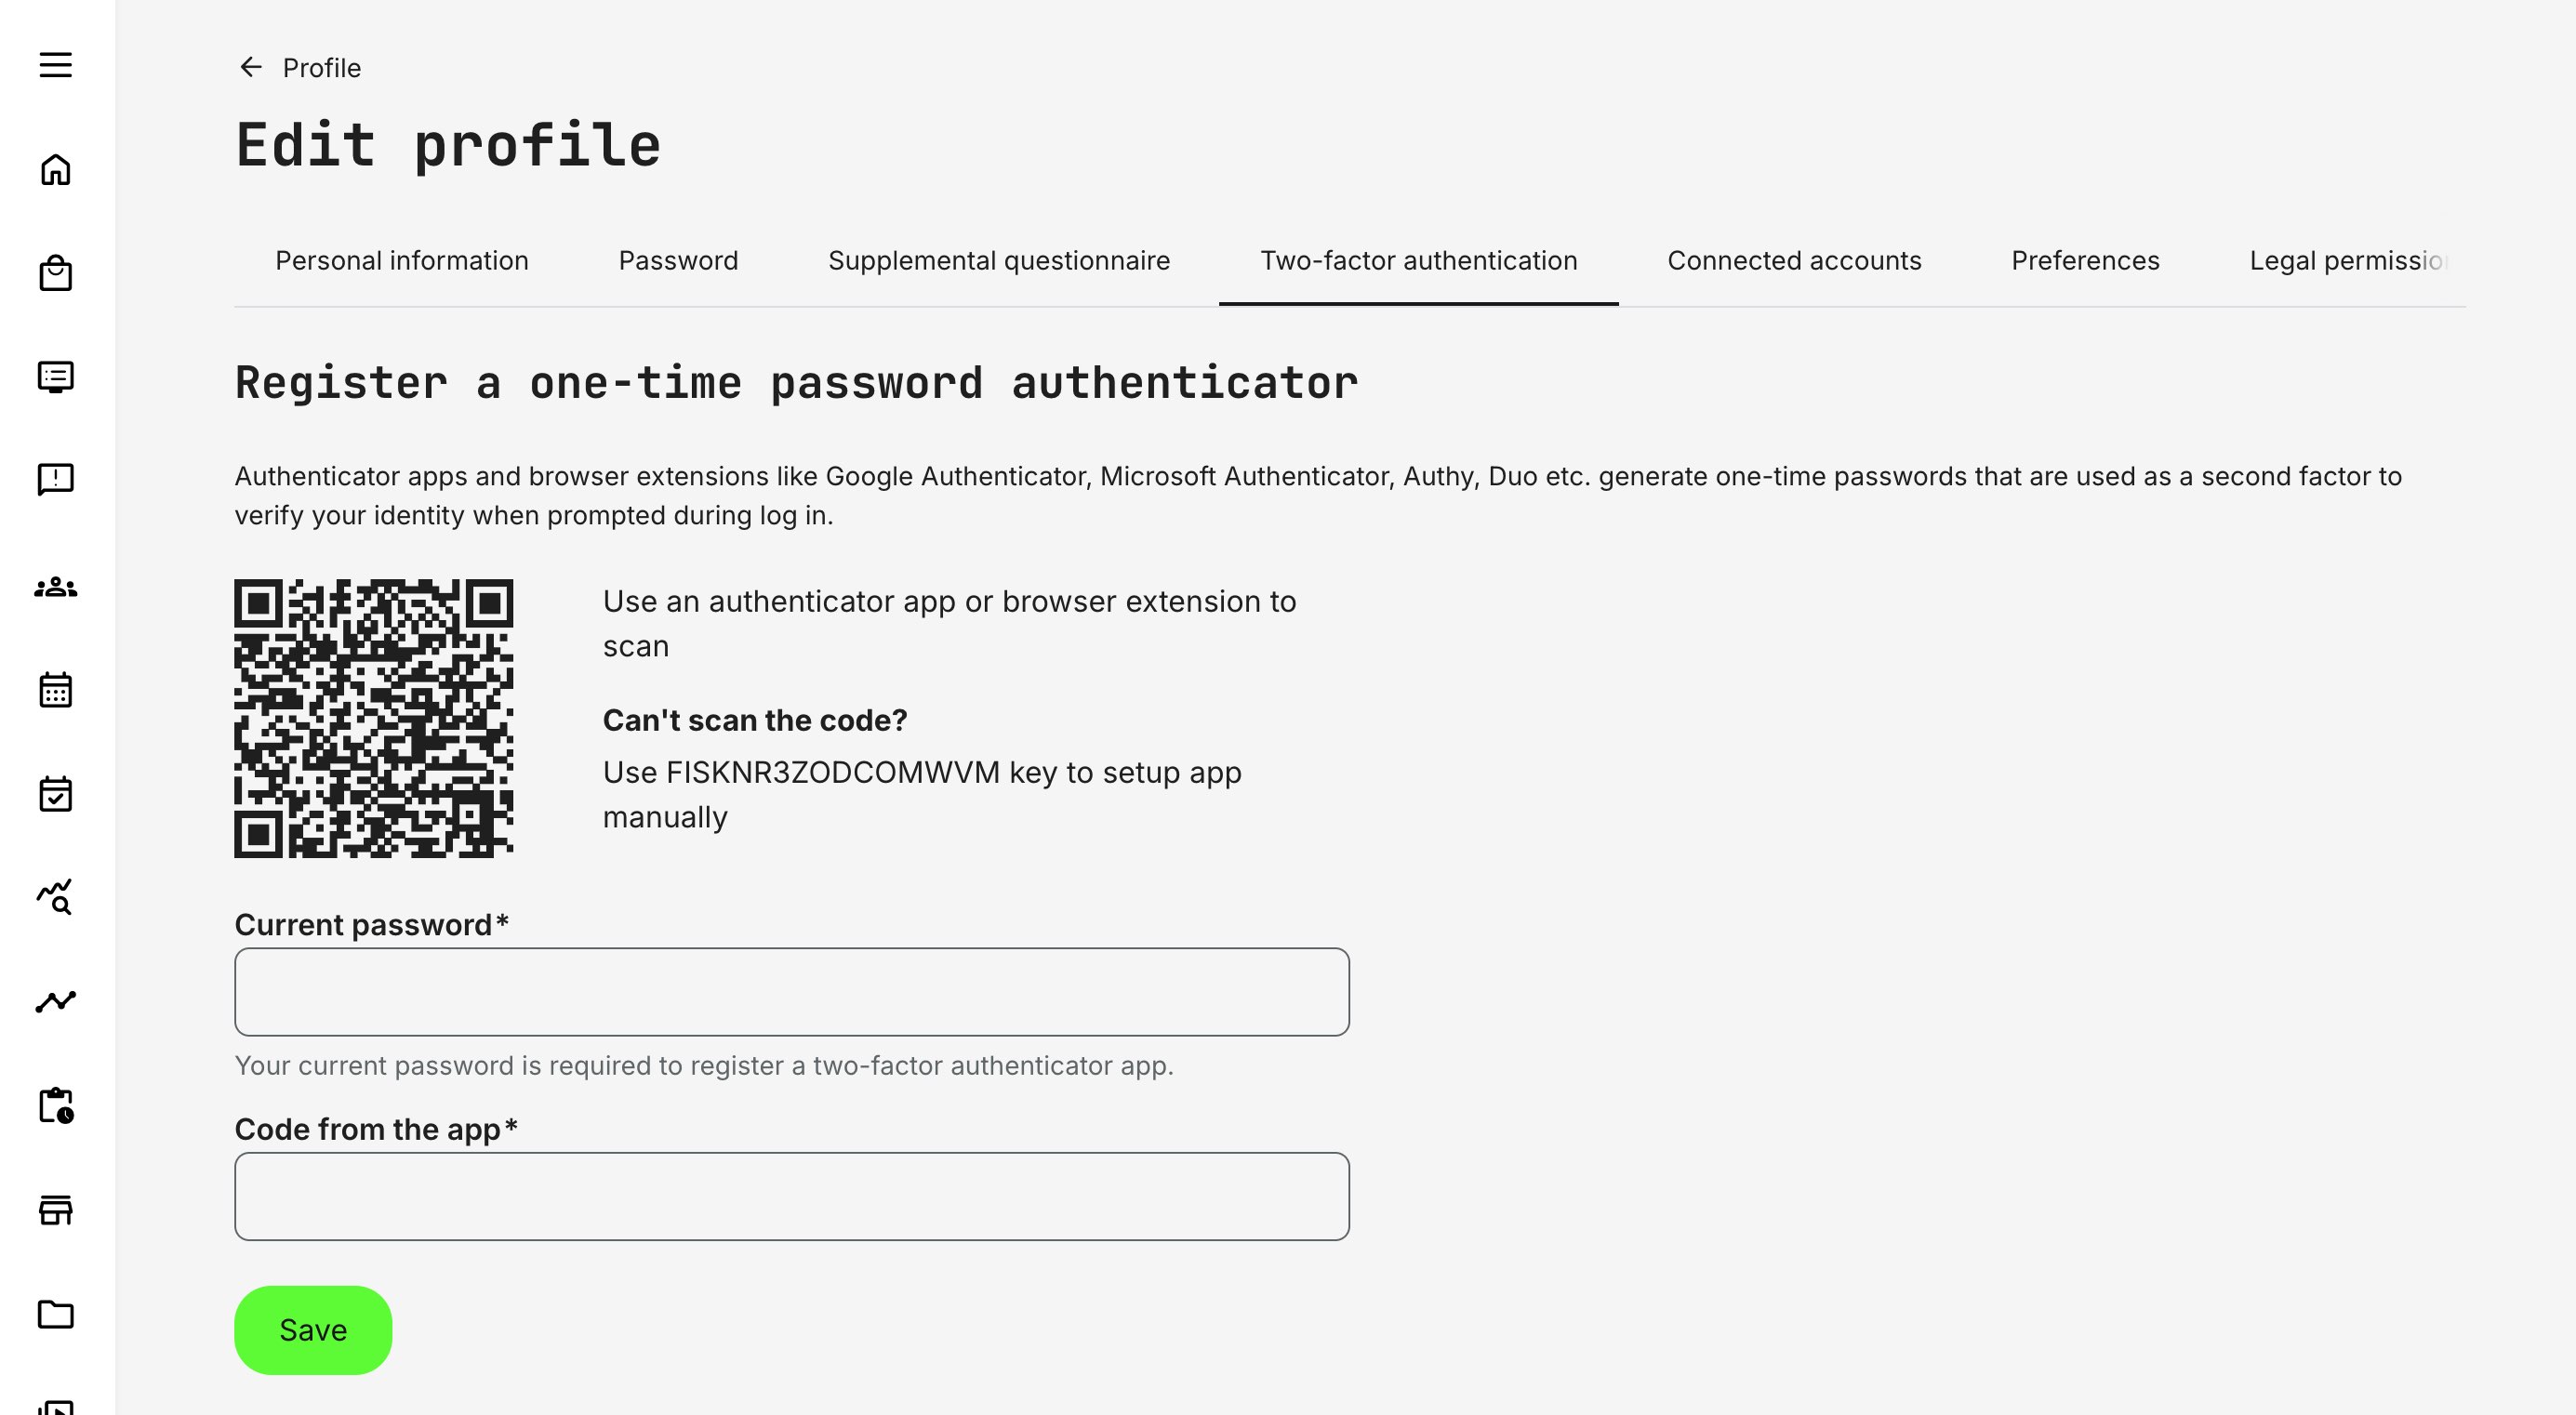
Two-Factor Authentication (2FA)
Two-factor authentication adds an additional security layer to user accounts by requiring a one-time verification code during login, in addition to the username and password. This significantly reduces the risk of unauthorized access—especially for users with elevated permissions or access to personal data.
From a governance and security perspective, enabling 2FA is considered best practice for protecting:
- Personal and sensitive user data (PII)
- Administrative access to users, reports, and configurations
- Proprietary training content, intellectual property, and certifications
- Business-critical workflows such as approvals, enrollments, and transactions
Native 2FA is particularly valuable in scenarios where external identity providers or centralized MFA solutions are not available, not practical for all audiences, or intentionally scoped to specific user groups.
Once enabled:
- A Two-factor authentication tab becomes available on the user profile
- The tab is shown only for users who can authenticate using email and password
Who Can Configure 2FA
Two-factor authentication is user-managed, not administrator-enforced:
- Users can enable or disable 2FA only for their own account
- Administrators cannot enable, disable, or configure 2FA on behalf of another user
- The 2FA tab is not available when viewing other users’ profiles
- The tab is also hidden when using masquerade mode
This design ensures that the second authentication factor remains private and secure, while still allowing organizations to strongly recommend or mandate 2FA through policy and process.
The setup process involves:
- Scanning a QR code or entering a setup key using a supported authenticator app or browser extension (e.g. Google Authenticator, Microsoft Authenticator, Authy, Duo)
- Confirming the setup by entering the account password/valid one-time code generated by the authenticator
Once completed, two-factor authentication is immediately active for the account.
Two-Factor Authentication – Login, Management, and Security Behavior
| Area | What happens |
|---|---|
| Login with 2FA enabled | Users first enter their username and password. If credentials are valid, they are redirected to a second step where a one-time code from their authenticator app is required. Access is granted only after both factors are successfully validated |
| Disabling two-factor authentication | Users can disable 2FA from their own profile’s Two-factor authentication tab. Disabling requires confirmation with the account password. No authenticator code is required. Once disabled, login returns to password-only authentication |
| Security controls and rate limiting | To protect against brute-force attempts, the platform enforces a limit of 5 failed attempts within a 3-hour window. This applies to both incorrect passwords and incorrect 2FA codes. If the limit is exceeded, login or changes are temporarily blocked and the user sees: “Too many failed attempts. Try again later.”The same behavior applies when attempting to disable 2FA |
2FA and SSO Considerations
When external authentication or SSO is in use, behavior depends on configuration:
- If a user logs in via an external identity provider, native passwords and 2FA may be disabled entirely
- If both SSO and regular login are allowed:
- Logging in via SSO overrides the use of native credentials
- Password resets and MFA enforcement are handled by the external system
- From that point forward, any password or MFA changes must be managed outside the platform
This allows organizations to clearly separate responsibility between internal security policies and external identity systems, while still supporting mixed authentication models for different audiences. It complements—not replaces—enterprise-grade SSO and MFA solutions
Below is a clean, administrator-friendly description of Connected accounts that fits the tone and depth of your other feature articles. It explains what it is, why it exists, and how it works—without turning into technical documentation or duplicating integration setup guides.
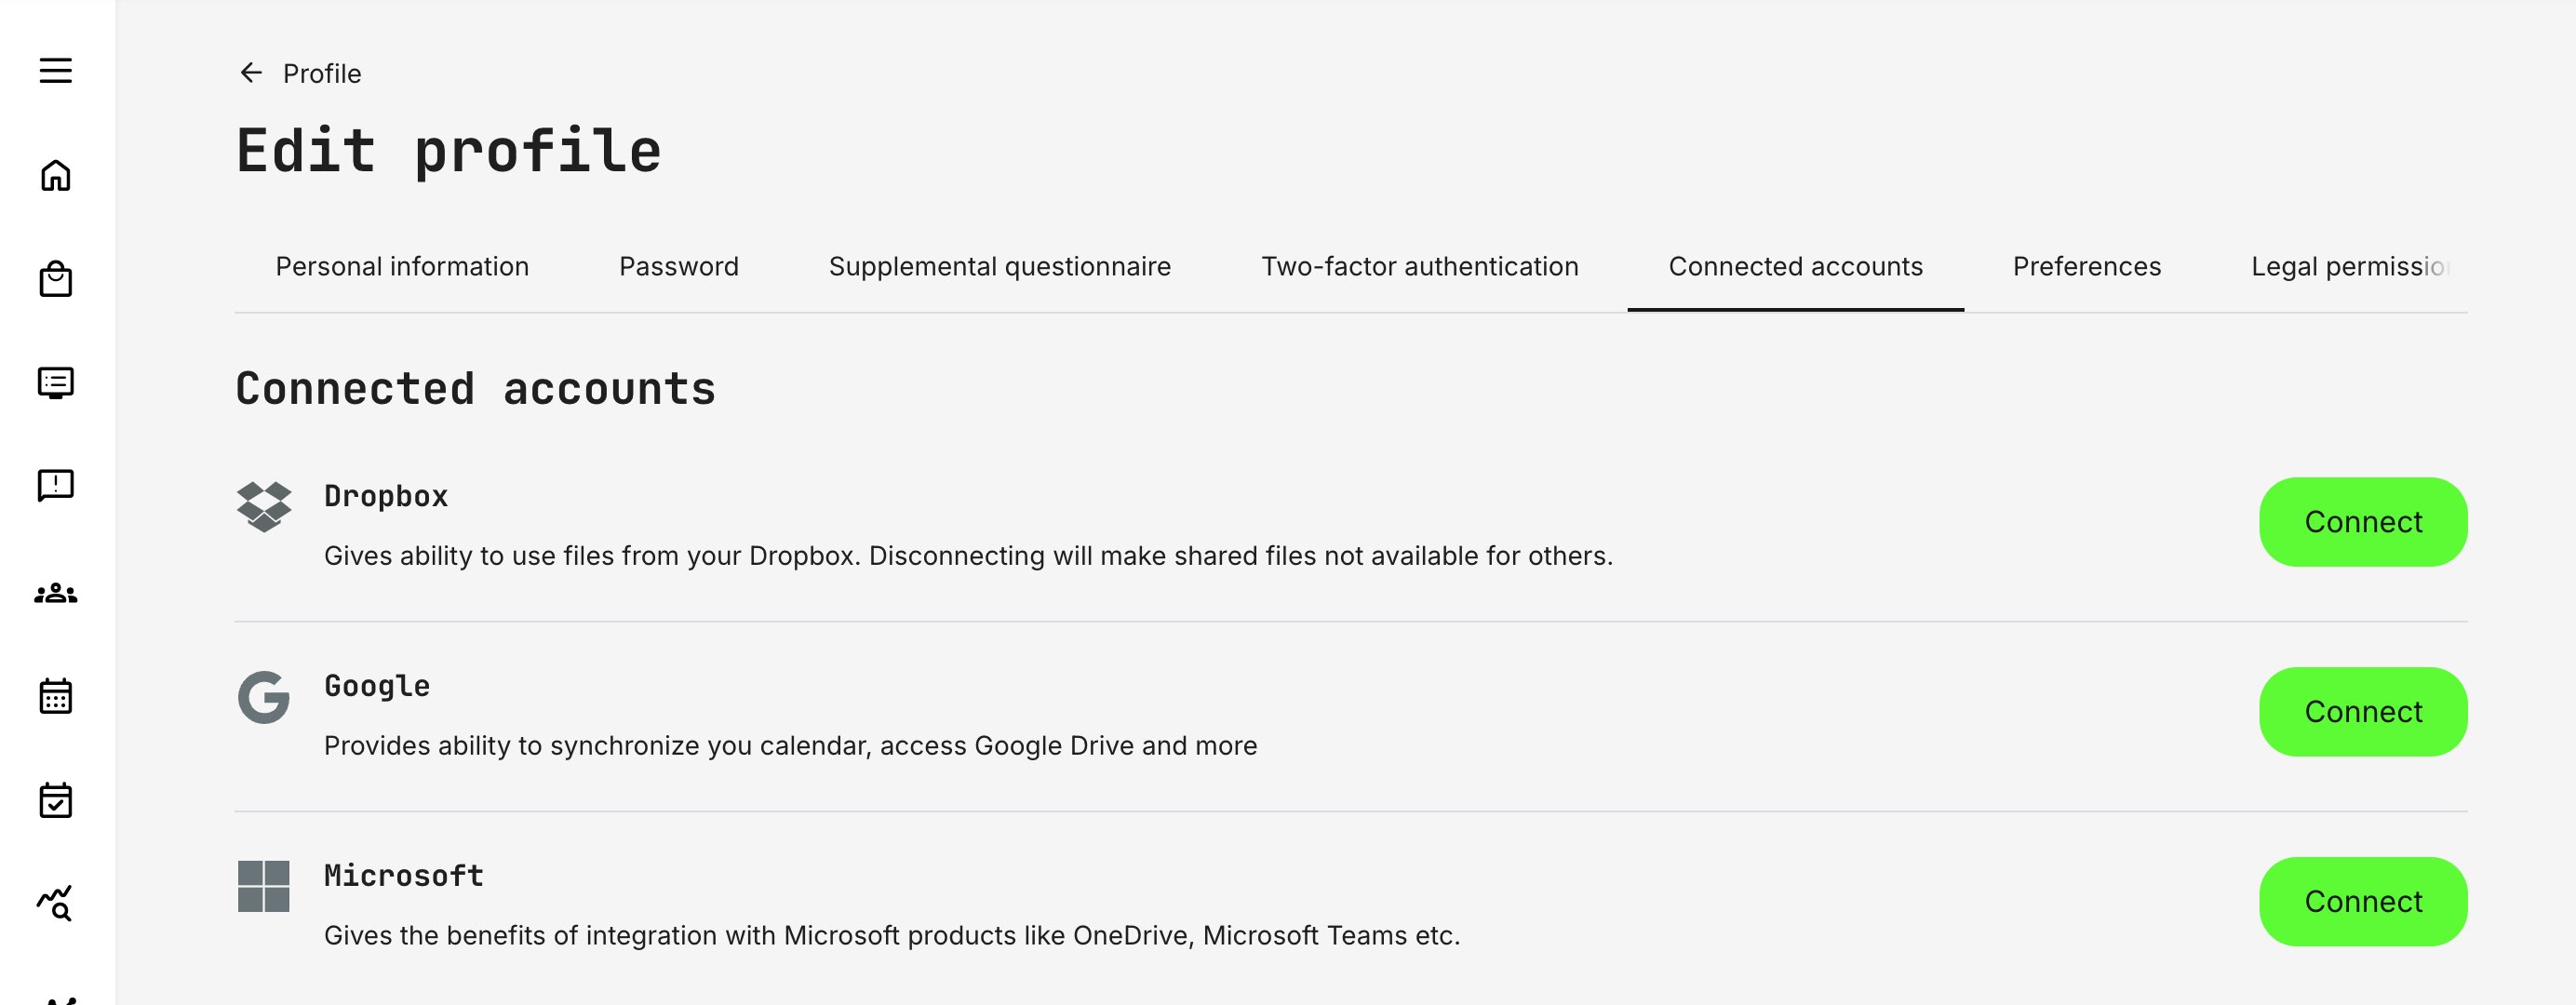
Connected Accounts
The Connected accounts section allows users to securely link their platform profile to external services that have been enabled by administrators. These connections are always user-initiated and consent-based, ensuring that data sharing follows both security best practices and third-party service requirements.
While administrators configure which integrations are available at platform level, the actual connection to a third-party service happens on the user’s own profile. Many modern learning and enablement scenarios depend on tools that live outside the platform itself—calendars, document storage, collaboration spaces, and video conferencing.
This design ensures that:
- Users remain in control of what external services they connect
- Integrations respect the security and permission model of each provider
- Features are only activated when both platform configuration and user consent are in place
How It Works in Practice
When an integration (such as Microsoft, Google, Dropbox, etc.) is enabled by administrators, it becomes visible under the Connected accounts tab.
From here, users can:
- See which services are available
- Connect or disconnect their own accounts
- Reconnect services if access tokens expire or permissions change
Once connected, the platform can activate the related features that administrators have configured for that integration. If a connection becomes invalid—for example, due to expired tokens or revoked permissions—the interface clearly indicates this and prompts the user to reconnect.
Example: Microsoft Integration
The Microsoft integration is a good illustration of how connected accounts work in a real business context.
After administrators configure Microsoft at platform level (Azure application, permissions, service account, and enabled services), individual users can connect their Microsoft account from their profile. Once connected, this may unlock capabilities such as:
- Outlook calendar integration: Training events, sessions, and responsibilities can appear in the user’s Outlook calendar, including updates and cancellations
- OneDrive access: Users can browse and insert OneDrive files directly when creating or editing content, enabling online collaboration and document reuse
- Microsoft Teams meetings: Events can be created with Teams video conferencing, with meeting links generated automatically for users who have connected their Microsoft account
Which of these features become available depends entirely on how administrators have configured the integration. The connected account simply enables the user to participate.
What Connected Accounts Are Not
Connected accounts do not replace authentication or role management, and they do not automatically grant access to features. They simply enable approved integrations to function as designed.
A user may see a service listed under Connected accounts even if not all related features are active—this reflects platform configuration, not an error.
Connected accounts are the user-level consent layer that makes relevant third-party integrations secure, flexible, and compliant—allowing organizations to extend the platform into everyday tools without compromising control or trust.
Preferences
The Preferences tab allows users to control a small but important set of personal settings that influence how the platform communicates with them, presents content, and interprets their context. Unlike structural profile fields (such as organization or role), preferences are primarily about experience, localization, and communication.
These settings are typically user-editable, though availability and default values may be influenced by platform-level configuration.
Language
The Language preference defines the user’s preferred interface language.
This setting determines:
- The language used for navigation, labels, and system messages
- Which language versions of content are prioritized when language filtering is enabled
- The language used in platform-generated communication where supported
In multilingual environments, this helps ensure that learners see relevant content without needing to manually filter or search across languages.
Time Zone
The Time zone preference controls how dates and times are displayed throughout the platform.
This directly affects:
- Event schedules and calendar views
- Deadlines and availability windows
- Notifications and reminders tied to time-based activities
Accurate time zone settings are especially important in global programs where instructors, learners, and administrators may operate across regions.
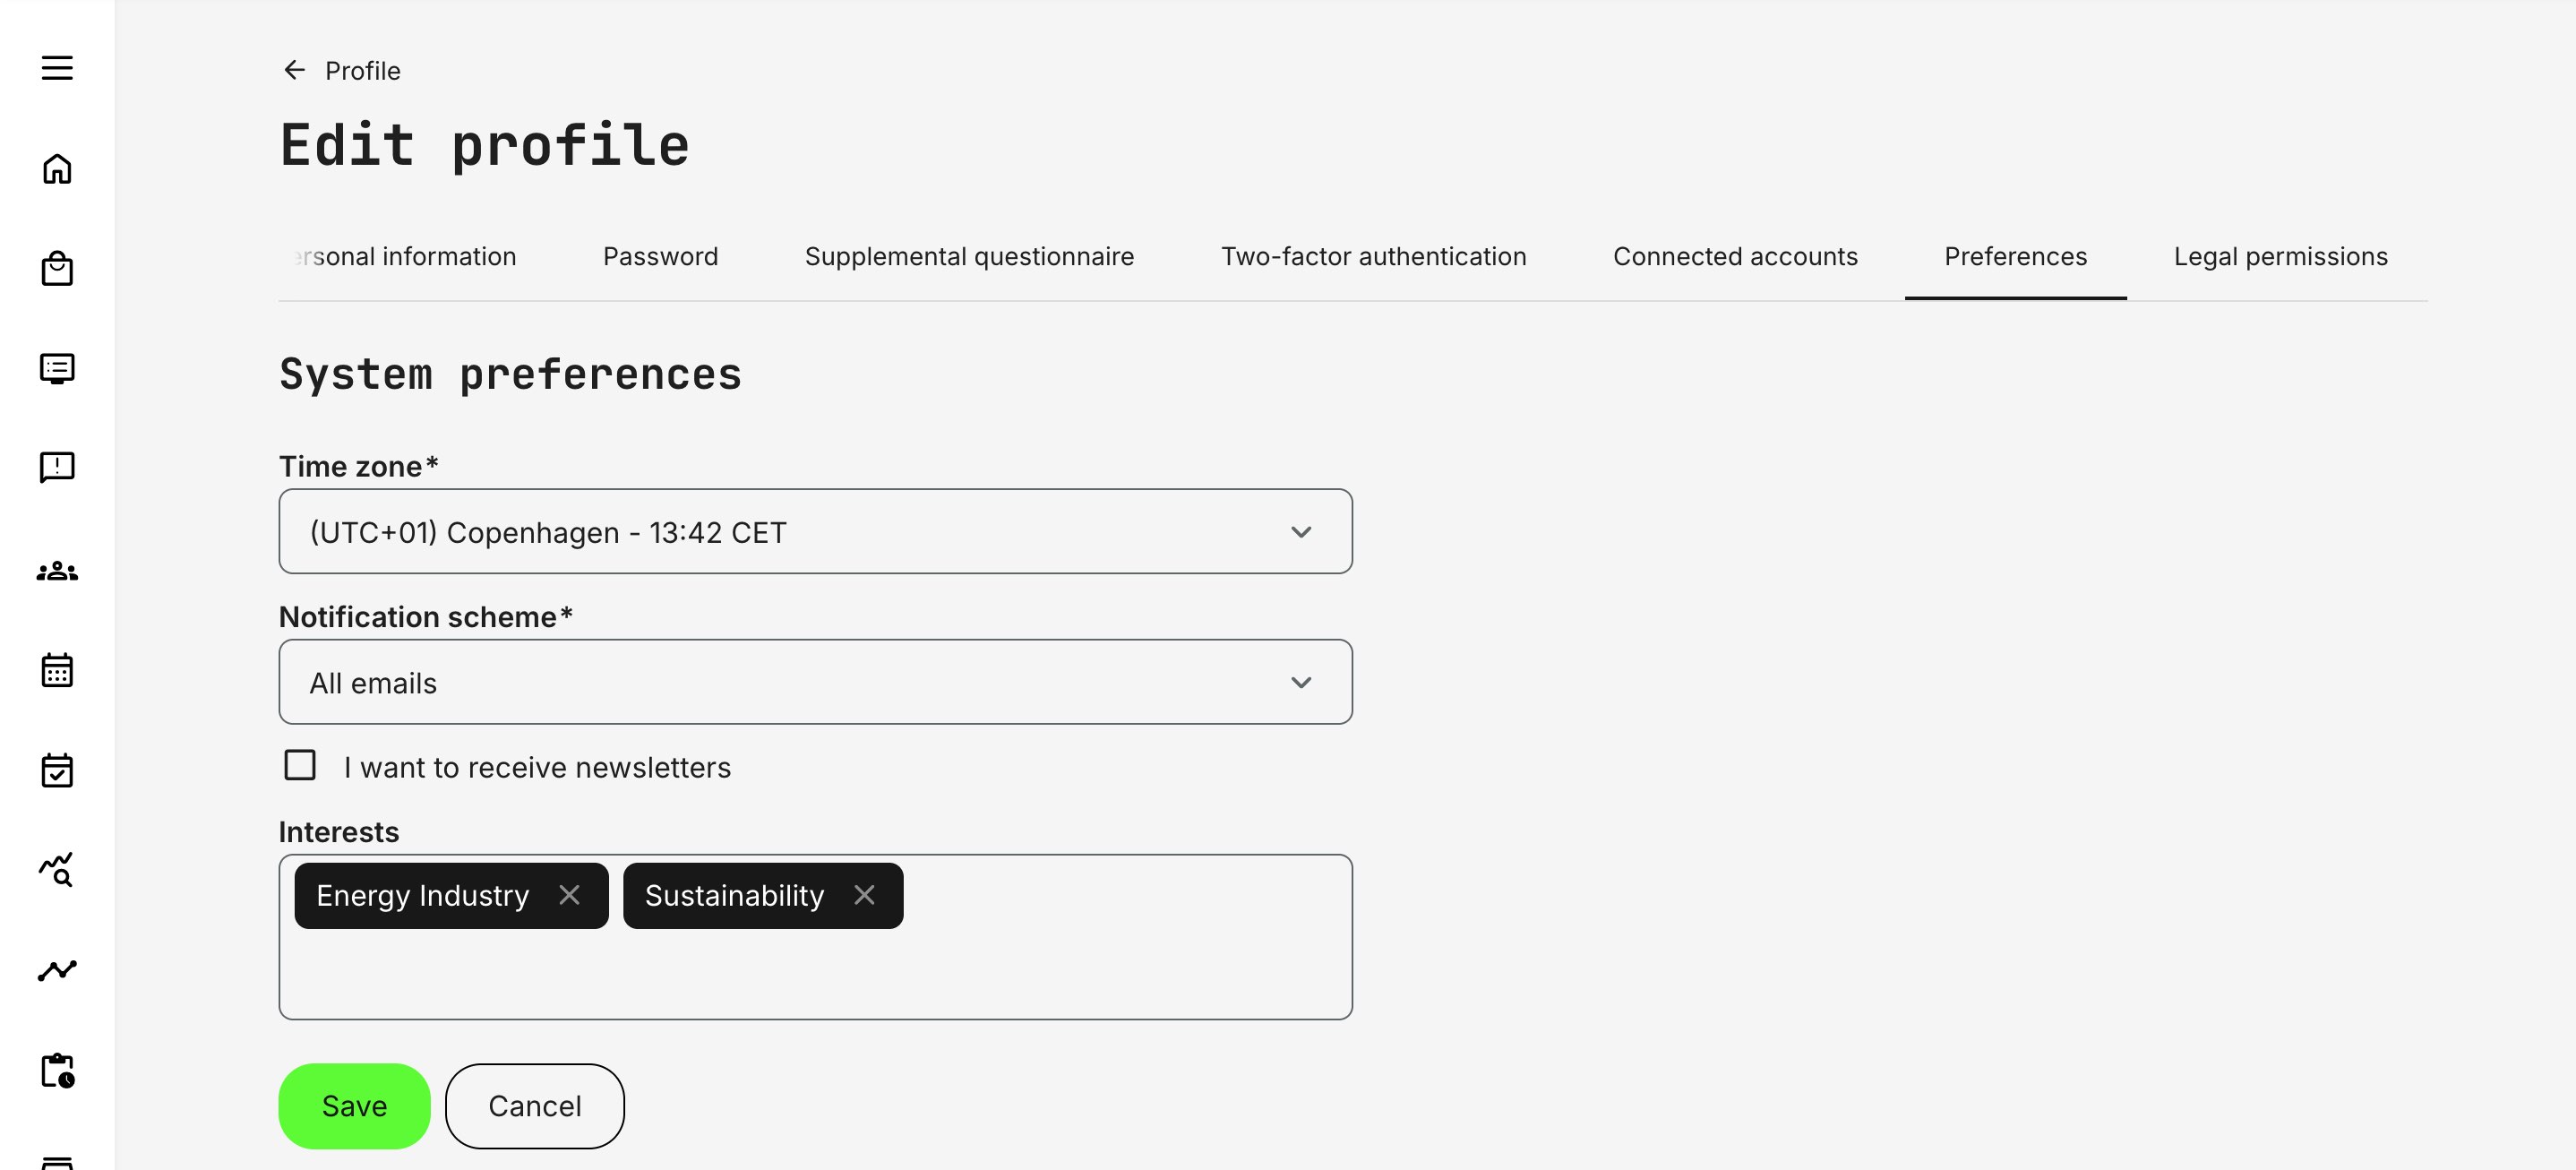
Notification Scheme
The Notification scheme defines how a user receives system-generated notifications.
Notification schemes operate on a three-level model—as in All, Important, or No emails. Each system email is mapped to one of these levels by a Platform Administrator, ensuring that essential communications are consistently delivered across the platform.
Users can then select the scheme that best matches their preferences, controlling the overall intensity of notifications they receive. While users cannot fine-tune individual email types, this approach balances governance with flexibility: administrators retain control over what is considered critical, while users can reduce noise without missing important actions, updates, or responsibilities.
Interests
The Interests field helps personalize content discovery across the platform. Interests are based on predefined tags configured in by system administrators in Settings → Tags (Category) and can be populated in two ways:
- Manually, by the user selecting relevant topics
- Automatically, when the user is enrolled in activities that have category tags applied
Once set, interests may influence:
- Storefront content visibility
- Recommendations and discovery flows
- How content is grouped or prioritized for the user
This field builds a lightweight, history-based profile of the user’s interests through categorization. Category tags are typically associated with products, services, or training topics and are populated automatically as users enroll in activities over time.
Users can adjust these values manually if needed, allowing personal relevance to override purely historical data. This creates a soft personalization layer that supports discovery, relevance, and contextual insight—without restricting access or enforcing rigid segmentation rules.
Newsletter Subscription
The “I want to receive newsletters” option allows users to explicitly opt in or out of general, non-transactional platform communications.
- This preference is purely informational and does not affect system behavior, access, or feature availability. Its purpose is to establish a compliant communication boundary between essential system messages and broader informational or promotional communication.
- In many setups, the platform is the primary—or only—direct contact point with users. Capturing this preference makes it possible to communicate about updates, initiatives, or related topics outside mandatory system notifications, while remaining aligned with data-protection and consent requirements.
- Users can update this preference at any time from their profile. The value is included when exporting data from the Users report, making it easy to segment audiences for external communication tools.
From a compliance and trust perspective, this ensures users retain clear control over non-essential communication while allowing organizations to communicate responsibly and transparently.
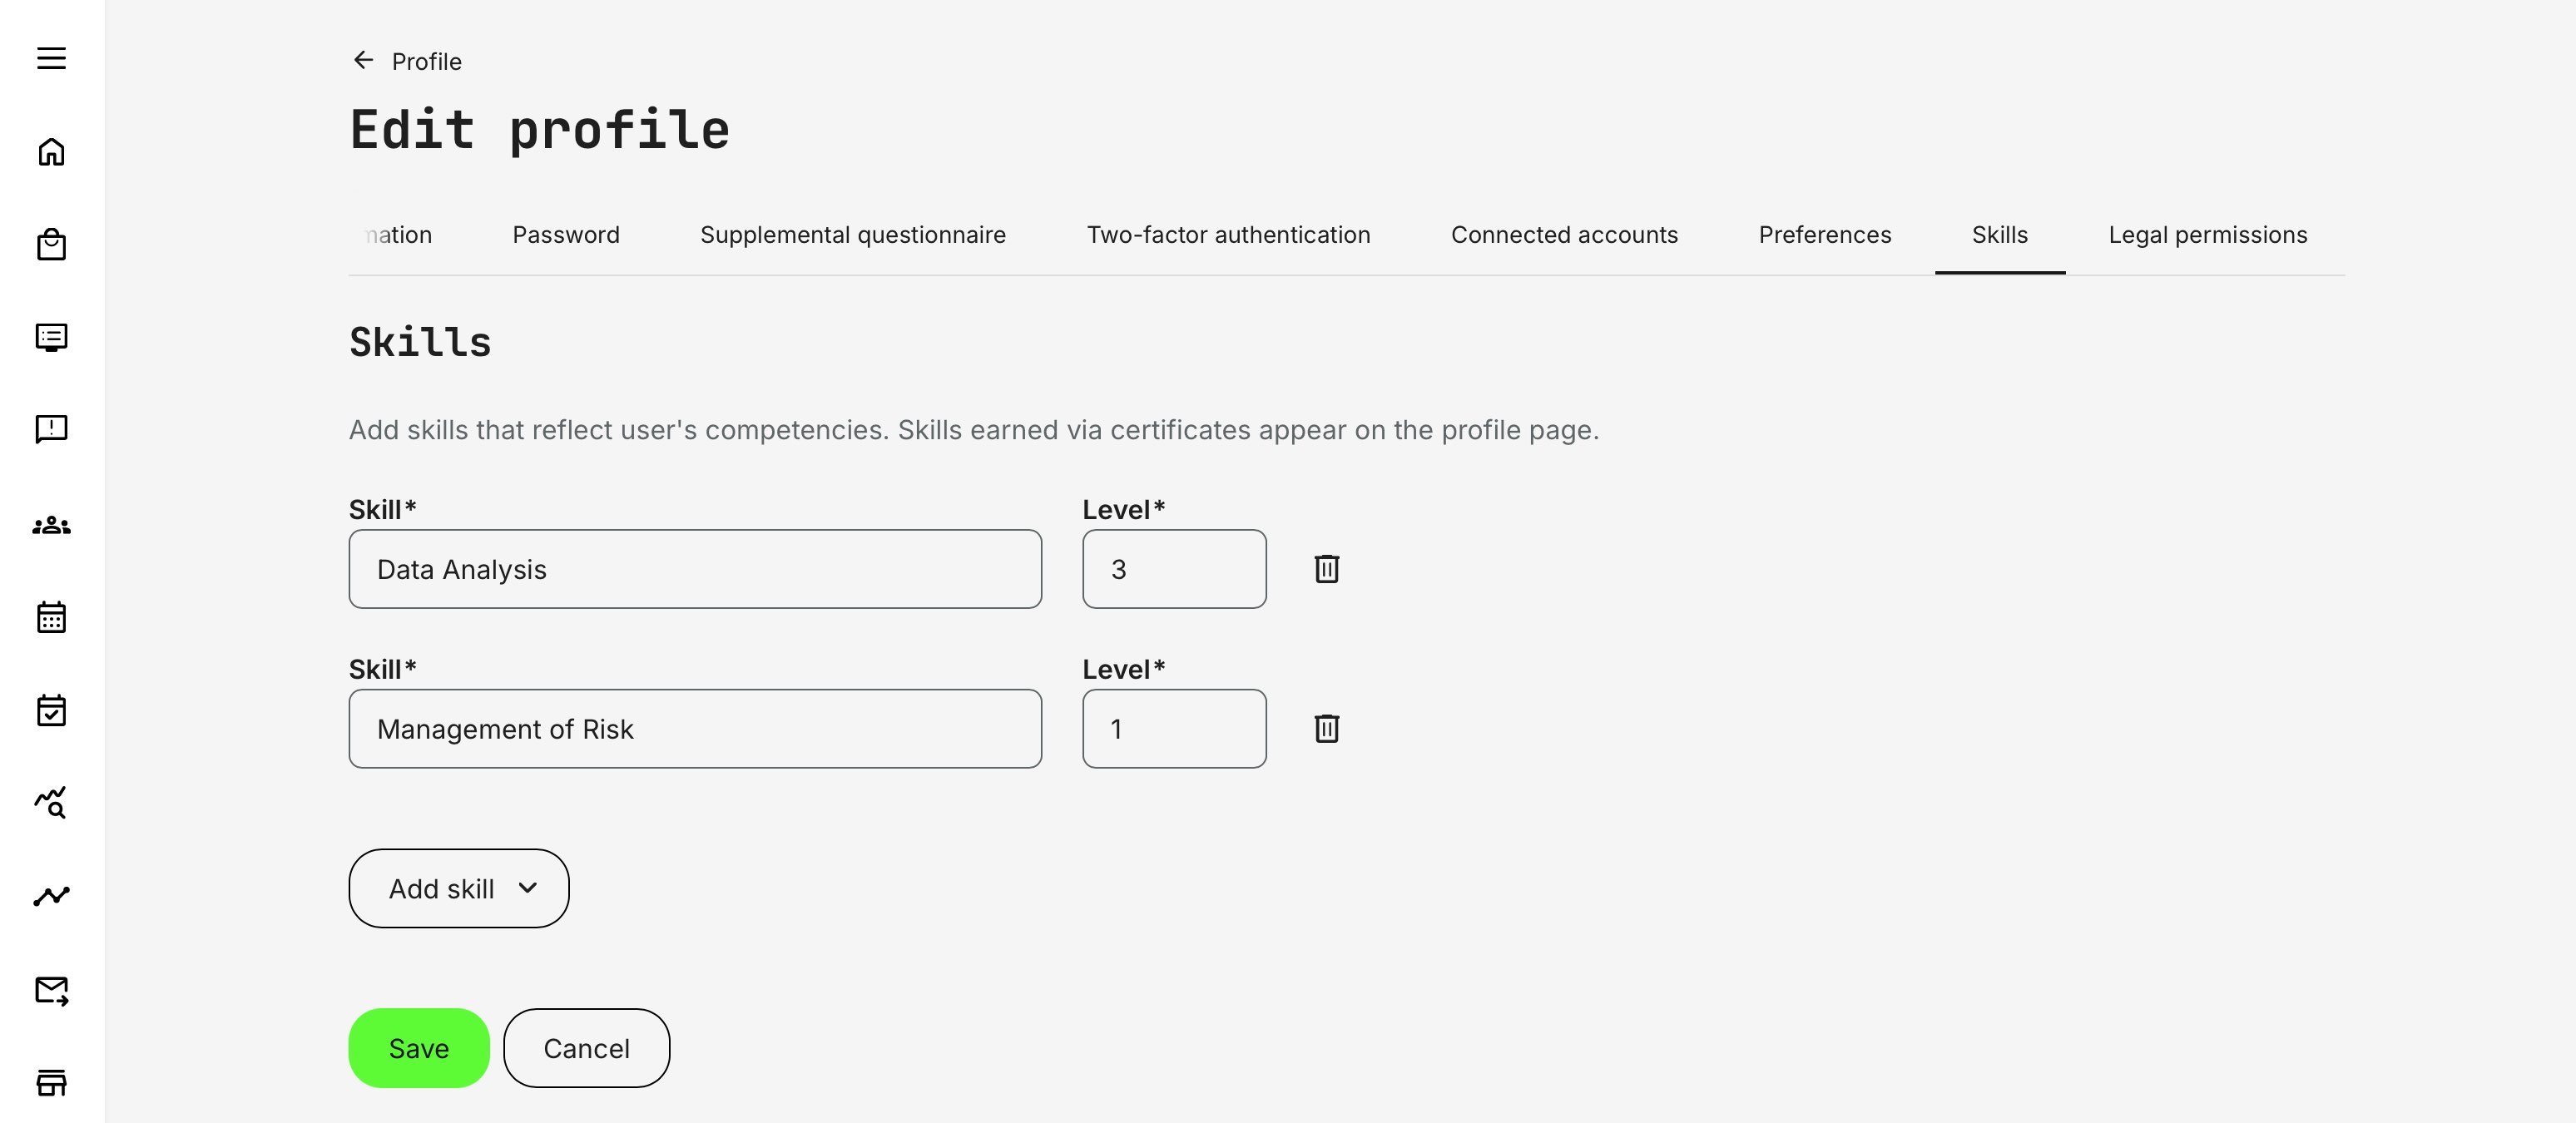
Skills
From the Skills tab on a user’s profile, administrators can manually add skills to reflect competencies gained outside formal training—such as prior experience, external certifications, partner accreditation, or validated on-the-job capability.
To assign skills manually:
- Click Add skill and select the relevant skill from the list.
- If skill levels are enabled on the platform, enter the appropriate Level (decimal values can be used to represent intermediate proficiency).
- Repeat as needed
How Manual Skills Behave
- Manually assigned skills appear alongside certificate-earned skills on the user’s profile, providing a complete and consolidated view of capability.
- Manual skills do not expire automatically. They remain active until an administrator removes them—unlike skills granted through certificates, which may expire based on certificate validity or recertification rules.
- This approach is well suited for real-world validation scenarios, such as manager sign-off, partner verification, HR imports, or documented experience, where proficiency exists but was not acquired through the platform itself.
Manual assignment ensures the skills profile remains accurate, credible, and aligned with reality—without forcing every capability to be earned through structured learning paths. capability without forcing every skill to be earned through the platform—while still keeping certificate-based skills as the structured, auditable “earned” pathway.
Here’s a clear, platform-aligned description of the Legal permissions tab that fits the tone and structure of your other profile sections, while grounding it in real compliance and operational context.
Legal Permissions
The Legal permissions tab provides a consolidated, transparent view of all privacy-related acknowledgements and consent decisions associated with a user profile. It is designed to support compliance, trust, and auditability by clearly showing what a user has agreed to, when, and under which policy or questionnaire.
This tab is available when editing a user profile and brings together two key sources of legal agreement:
- Platform-level privacy policy—shows the user has accepted the latest version of the platform's privacy policy
- Consent questions collected through questionnaires
Together, these form the legal record governing how personal data may be processed, communicated, or used across the platform.
Required Consents
Required consents represent mandatory legal agreements collected through questionnaires.
- These consents are not editable by the user once accepted
- They typically cover areas where consent is legally required for participation, access, or processing (for example, data processing agreements or regulatory acknowledgements)
- The tab shows the user’s current status and acceptance timestamp for each required consent
Because these consents are essential for lawful operation, they are locked for both users and administrators after submission.
Optional Consents
Optional consents allow users to make ongoing, reversible choices about non-essential data usage or communication preferences.
Key characteristics:
- Optional consents can only be changed by the user themselves
- Administrators—including when masquerading—cannot modify consent responses on behalf of another user
- When a user updates an optional consent, a confirmation dialog appears to ensure the change is intentional
Once updated:
- The consent status is immediately reflected in the Legal permissions tab
- A system message records the change, including the questionnaire name, selected option, and date
- An Updated consent email is sent to the designated mailbox that receives questionnaire-related notifications, ensuring traceability
This design balances user autonomy with organizational accountability.