13.4.0 - Release notes
Adaptive Learning Fingerprints - Turn Engagement Data Into Personalized Training Decisions
Organizations that have invested in adaptive learning paths often reach the same point: participants complete the path, but some still carry knowledge gaps that only surface later, in the field or on the job. One-to-one tutoring closes those gaps reliably, but it doesn't scale. With this release, we're introducing Adaptive Learning Fingerprints, which gives you a way to find out, at scale, who actually needs that closer follow-up and who doesn't.
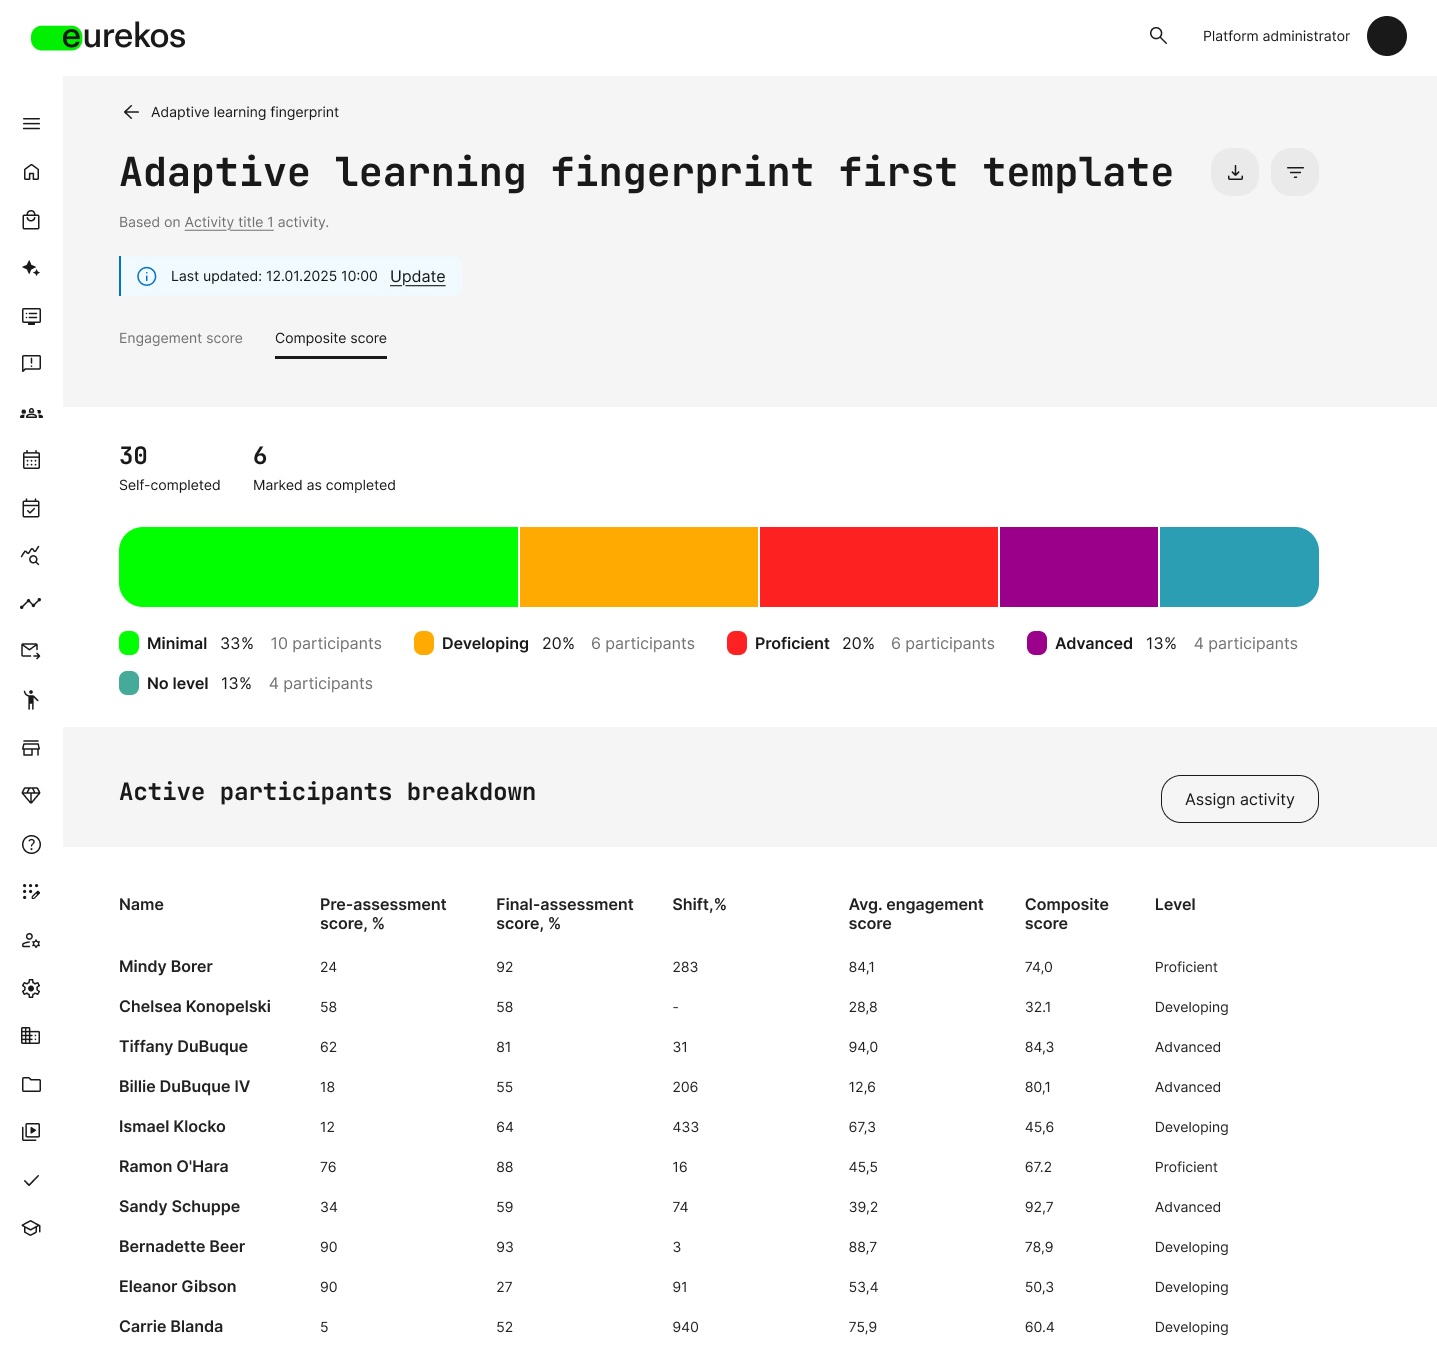
Adaptive Learning Fingerprints combines two signals for every participant in an activity: how they engaged with the content, and how their competence changed across a pre- and final-assessment. Together, these produce a composite score that groups participants into levels. From there, you can filter participants by level, organization, department, and other attributes, and assign follow-up activities to the groups that need it. This turns a manual, time-consuming triage process into something you can do in a few clicks, freeing up instructor time for the participants who need it most.
How Adaptive Learning Fingerprints Works
Adaptive Learning Fingerprints is built around a simple loop: create a analytics template for an activity, let Eurekos turn each participant's activity into engagement and competence data, and use that data to decide what happens next.
You start by creating a template tied to an activity that includes a pre- and final-assessment (H5P Quiz (Question Set)). From that point on, Eurekos analyzes how every participant engaged with the activity's content, combines it with their assessment results, and turns this into an engagement score and a composite score per participant, with the composite score translating into a performance level. This gives you an at-a-glance view of who's excelling and who's falling behind, without anyone having to manually cross-reference quiz results and completion data.
From there, you can drill into the engagement data by module, page, or participant to understand exactly where people spent time, struggled, or needed extra content; download any of this as a report; or move straight to action by filtering participants by level, organization, or other attributes and assigning a follow-up activity to exactly the group that needs it, in bulk.
Features and Benefits
Composite scores that combine competence and engagement: For every participant, we calculate a composite score, weighted 70% on final-assessment results and 30% on engagement with the activity content, and translate it into one of five levels: Minimal, Developing, Proficient, Advanced, or No level (with default ranges of 1-49, 50-69, 70-84, and 85-100, respectively). This gives trainers a single, comparable number to sort participants by instead of piecing together quiz scores and completion data manually. If you'd like the level names or score ranges adjusted to match your organization's own competency language, reach out to Eurekos support.
Engagement scoring built from real interaction data: Each participant's engagement score is calculated from time spent on content before and after completion, weighted according to whether the modules and pages involved were optional, supplemental, or recommended for that specific participant — and adjusted with a bonus or penalty depending on how they responded. Completing a module or page that became optional for them earns a bonus; leaving one that became supplemental or recommended unfinished costs points (completing it later removes the penalty). Two participants who took the same course can end up with quite different engagement scores, depending on how the adaptive logic treated their individual journey through it and how they acted on it.
Adaptivity — and the engagement insight it generates — works at the module level for any content in the learning path, including SCORM & xAPI packages. Eurekos courses can go a level deeper: every individual page within the course can also be optional, recommended, or supplemental, giving you page-level engagement insight that SCORM & xAPI content doesn't offer.
Granular performance breakdowns: Drill from a modules overview into individual pages and individual participants, and export any of these breakdowns — by module, by participant, or per participant — as a downloadable report.
Bulk activity assignment based on real performance data: From the Composite score view, filter participants by level, organization, workplace, department, job function, country, or language, and assign a training activity to the whole filtered group in one action. If the activity has a Questionnaire attached, you can filter and assign based on questionnaire responses too.
Cohort-level insight for trainers: Selecting a group of participants and opening View cohort (or the Details view for everyone) surfaces each participant's three weakest pages and modules by engagement score, giving trainers a concrete starting point for what to cover in follow-up sessions.
Adaptive Learning Fingerprints works with any activity that includes a pre- and final-assessment, but it delivers the most value for activities already built with adaptive learning paths (optional, supplemental, and recommended content). Without adaptive elements, you'll still get composite scores based on assessment shift and general engagement, just without the recommended/supplemental/optional signal that sharpens the picture.
Setting Up and Using Adaptive Learning Fingerprints
- Go to Analytics → Adaptive Learning Fingerprint and click Create template.
- Give the template a Title, and select the Activity it should analyze. Only activities with at least one course containing a Quiz (Question set) H5P are available.
- Select a Pre-assessment test and a Final-assessment test from the Quiz (Question set) tests included in the activity's courses. The same test can be used for both.
- Click Create. The template's data is generated automatically the first time it's opened.
- Use the Engagement score and Composite score tabs to review performance, drill into modules, pages, or participants, and export reports.
- Filter participants by level, organization, department, and other attributes, then select participants and click Assign activity to enroll them into a follow-up activity in bulk. Use View cohort first if you want to see their weakest pages and modules before deciding.
- Data isn't refreshed automatically after the first load — click Update on the template page whenever you need the latest data.
Access follows your existing analytics permissions, scoped to each user's organization and activity access, at a high level:
| Role | Create templates | View analytics | Assign activities |
|---|---|---|---|
| Global administrator, Platform administrator | Yes | All activities | Yes |
| Course administrator, Assistant | No | Activities they're responsible for | Yes |
| Instructor, Advanced instructor, External instructor | No | Activities they're responsible for | Only if Allow to manage participants in their training activities is enabled under Settings → General → Features for instructors |
| Trainer, Partner | No | Activities they're responsible for | Yes, within their organization |
| All other roles | No access | No access | No access |
Considerations
- Data freshness: Engagement and composite scores are calculated the first time a template is created, and only updated when someone clicks Update on that template. There's no scheduled refresh, so make updating part of your routine before making assignment decisions based on the data.
- Level thresholds and labels are support-managed: The default level ranges and names can be adjusted for your platform, but this isn't self-service — reach out to Eurekos support to have it reconfigured.
- Certificates and multiple attempts: For activities that issue certificates, engagement and assessment data reflect each participant's latest attempt only.
- Viewing isn't the same as assigning: Being able to view a template's analytics doesn't automatically mean you can assign activities to every participant in it — bulk assignment still respects each user's existing enrollment and organization permissions.
- Only Quiz (Question Set) H5Ps are supported for assessments: The Pre-assessment test and Final-assessment test must both be the H5P "Quiz (Question Set)" type. No other H5P type, and not the Assignment module, can be used for either assessment.
Subscriptions Improvements - More Control for Subscription Owners and Administrators
This release brings a handful of improvements to Subscriptions: two give subscription owners more direct control over their team, and three give administrators better oversight and flexibility when working with Managed subscriptions.
Subscription owners can now enroll their members directly into training from the Storefront, and see progress and performance analytics scoped to their own subscribers. On the administrative side, ownership of a newly created Managed subscription must now be explicitly accepted before it becomes active, Managed subscriptions can be backdated to align with a customer's own billing calendar, and the subscriptions overview now shows seat counts at a glance.
Features and Benefits
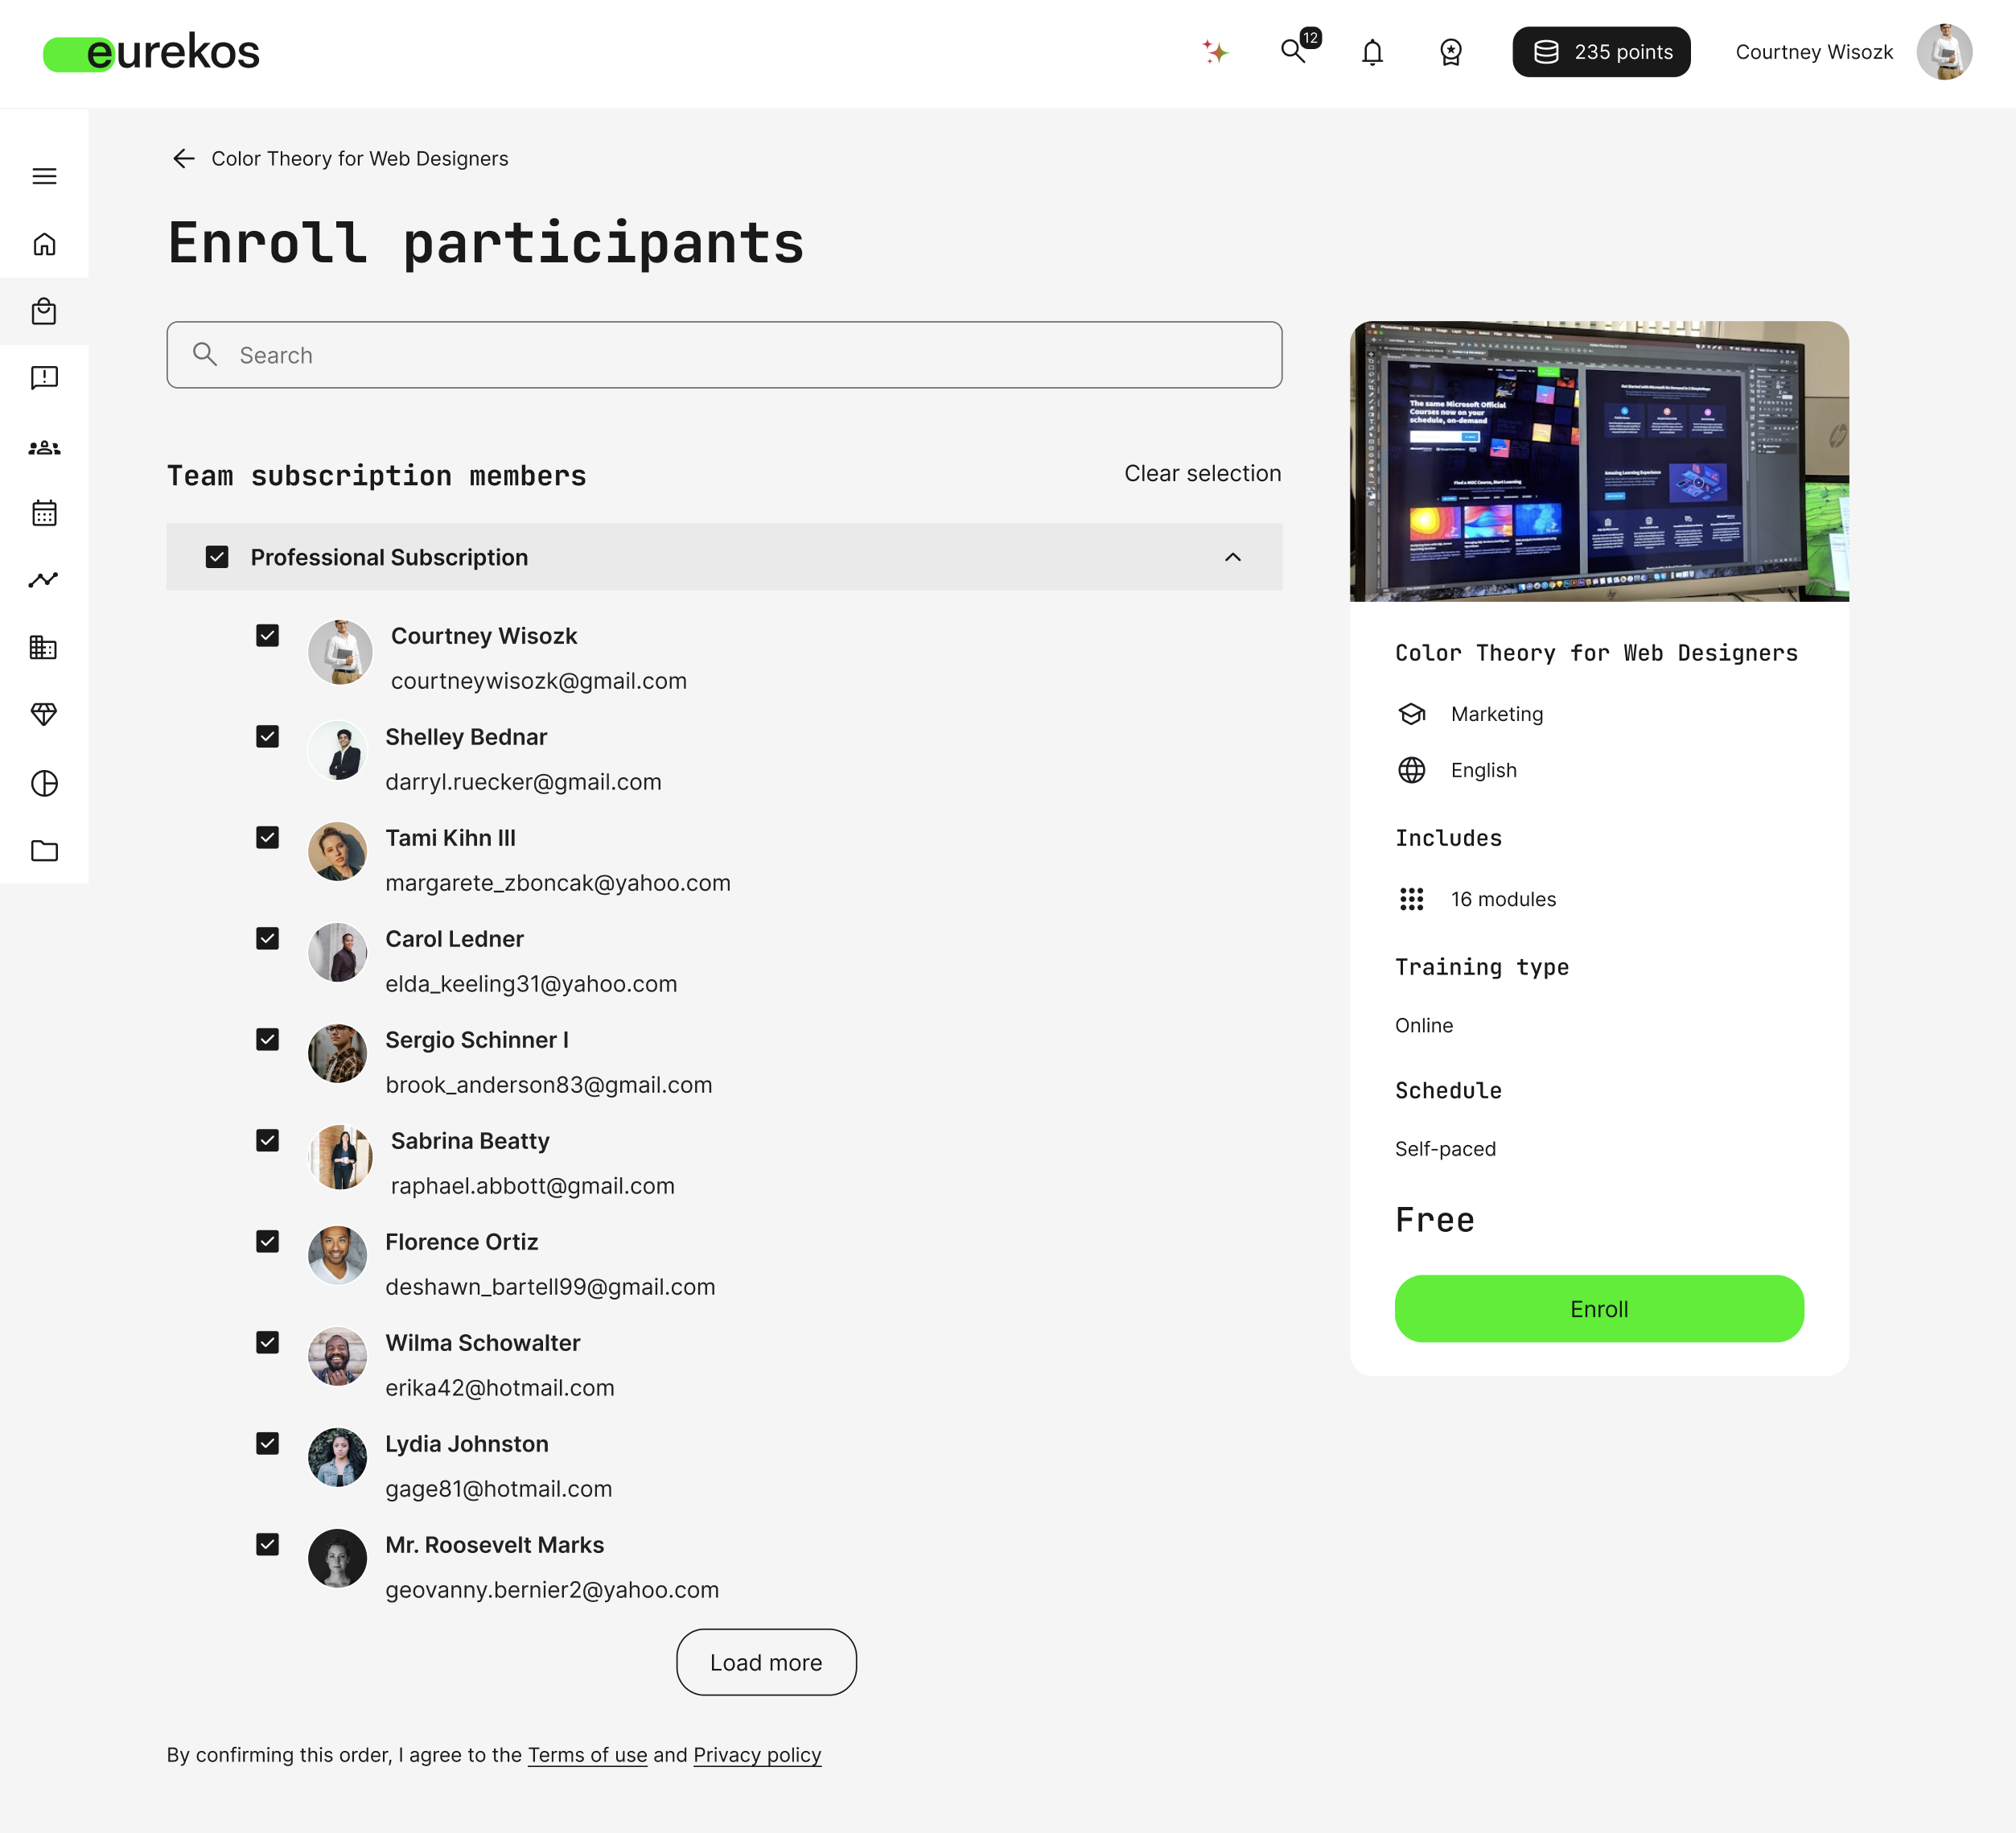
Enroll subscription members directly from the Storefront: Previously, a subscription owner could only enroll themselves into an activity included in their subscription, and only if they held a seat in it themselves. Now, when an owner finds an activity that's part of their subscription in the Storefront and clicks Enroll, they can select any of their subscription's seat holders and enroll them in bulk — mirroring how organization managers can already enroll members of their organization. This works even if the owner doesn't hold a seat in the subscription themselves.
Scoped analytics for subscription owners: Subscription owners can now see how their own subscribers are progressing. If an owner's existing platform role already grants access to the Progress, Learning Performance, or Active users analytics dashboards, they'll now see an additional My Subscribers tab on each, scoped to just the people who hold a seat in their subscription. A shortcut button on the subscription management page also jumps straight to the Progress analytics for that subscription.
Managed subscriptions now require the owner to accept ownership: When an administrator creates a Managed subscription, the designated owner starts out in a pending state rather than becoming owner immediately. They can accept the invitation in a few ways:
- Clicking the invitation link in the email they receive
- Clicking Accept next to the pending subscription under Subscriptions in the main menu
- Clicking Purchase on the subscription's Storefront page, which redirects them into the acceptance flow instead of checkout
Only once the invitation is accepted does the subscription become active and manageable by the owner. This applies to newly created Managed subscriptions going forward, existing ones are unaffected.
Managed subscriptions created through the API bypass this acceptance flow — the subscription becomes active immediately, without requiring the owner to accept an invitation.
A Start date field for Managed subscriptions: The Create managed subscription form now includes a Start date. Previously, the start date was always the creation date, which limited how much control administrators had over the billing cycle. The start date can now be set in the past or the future, anchoring the recurring billing cycle from that date — including aligning a Managed subscription with a customer's own financial year.
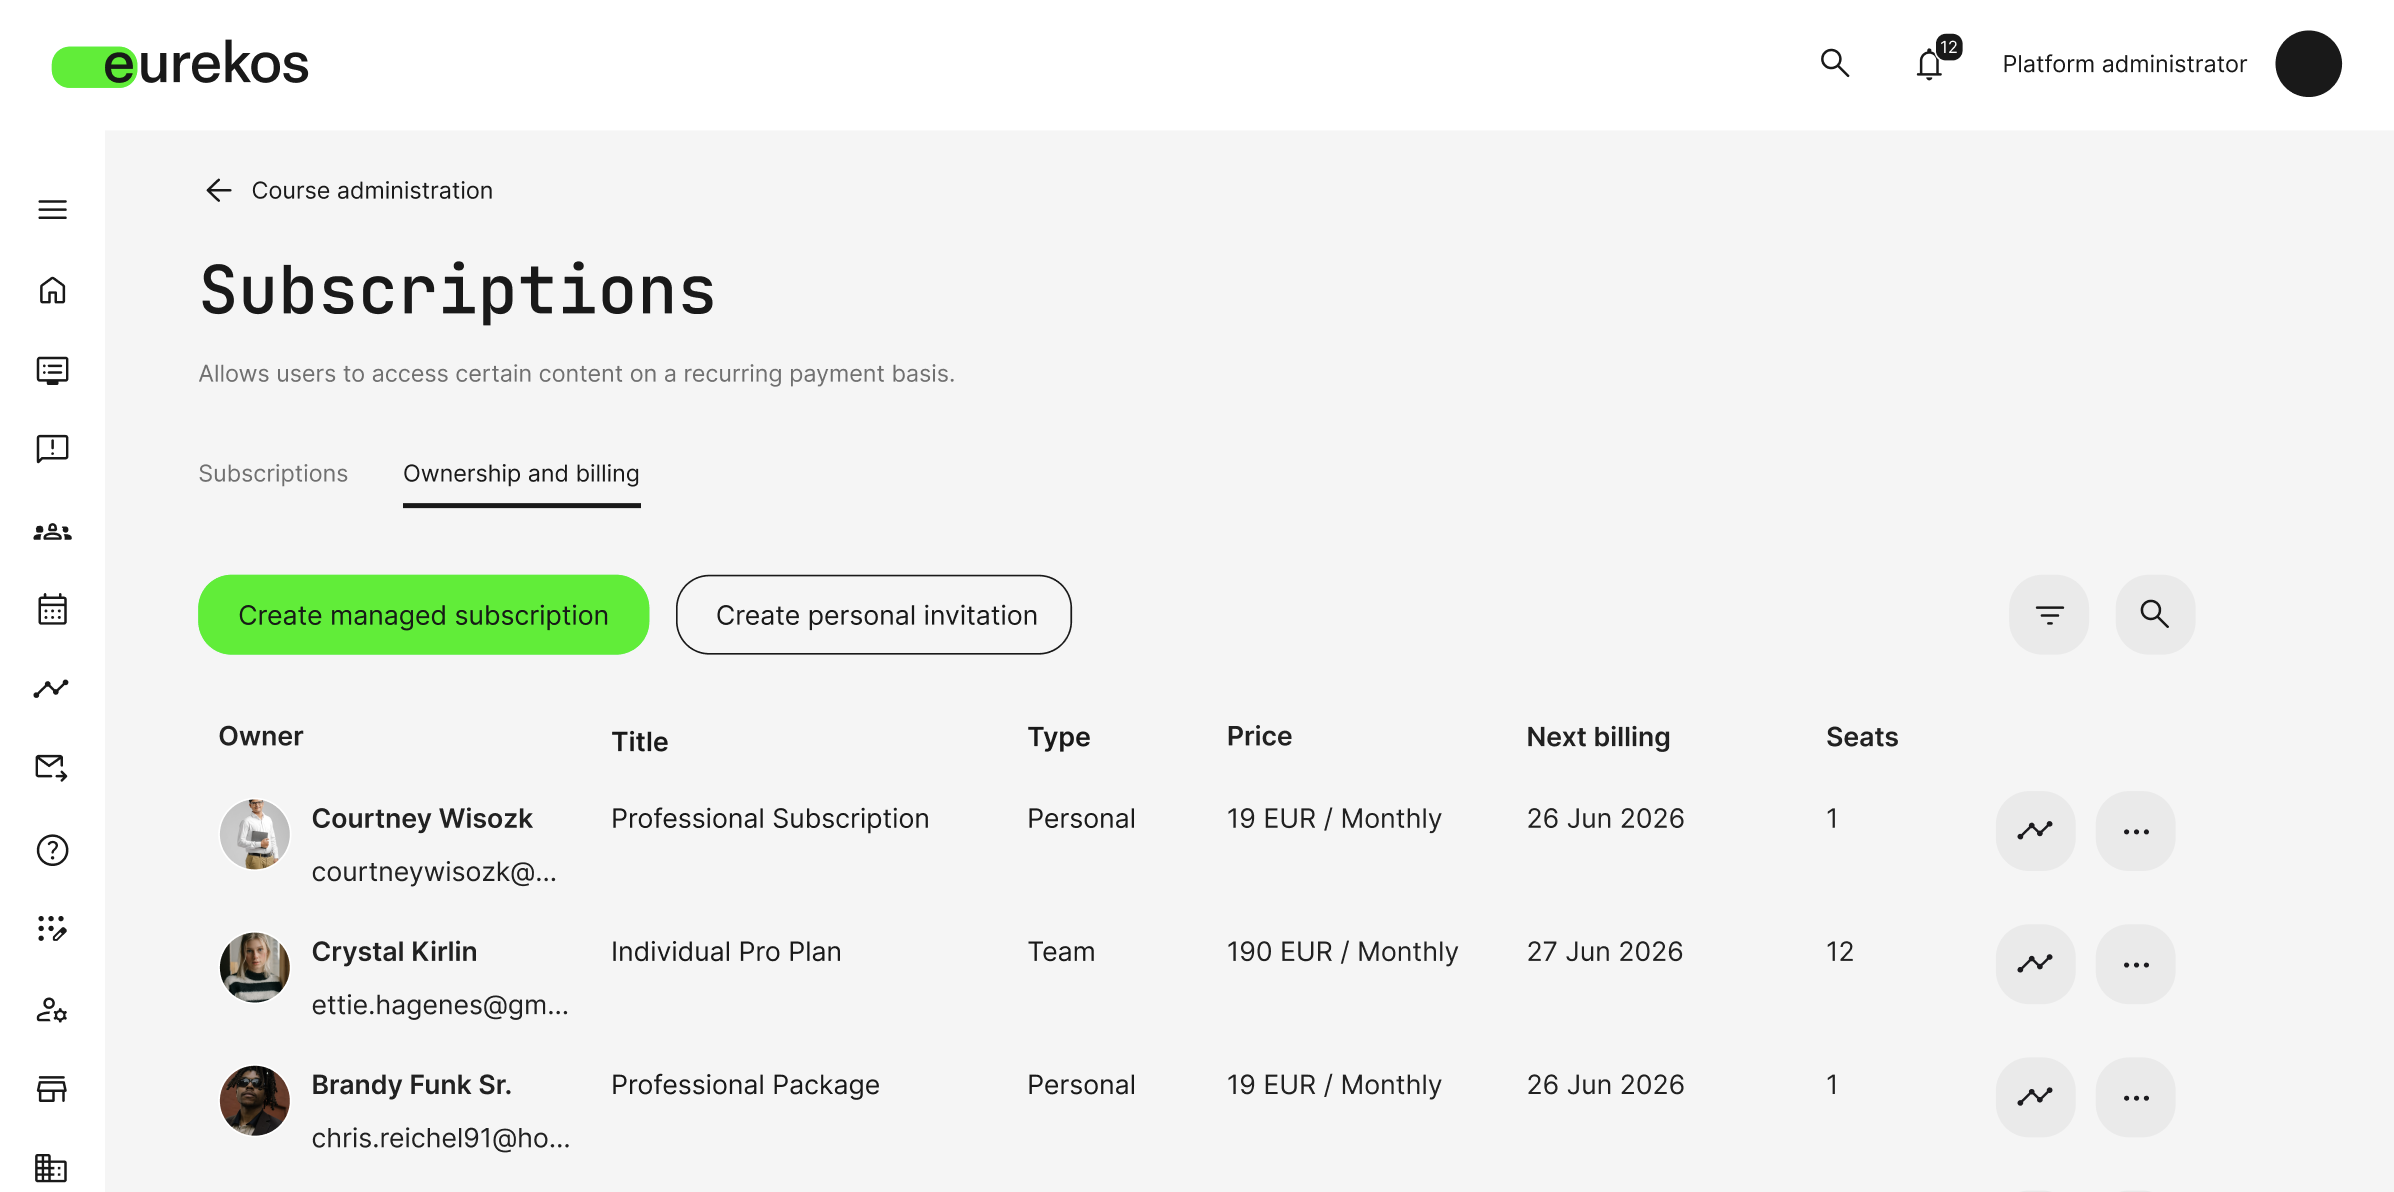
A Seats column on the Ownership and Billing overview: The admin overview at Course Administration → Subscriptions → Ownership and Billing now includes a Seats column, so administrators can see how many seats each subscription includes without opening each record individually.
Considerations
- Declined invitations don't create a subscription: If the invited owner declines instead of accepting, the administrator is notified by email and no subscription is created. To offer ownership to someone else, the administrator creates a new Managed subscription with a different owner.
- Scoped analytics reflect current seat holders only: If a member's seat is unassigned, they drop out of the owner's My Subscribers view, even though their training history and certificates remain intact elsewhere on the platform.
- No new role is required for owners: The ability to enroll members and see scoped analytics comes with being a subscription owner itself, not a separate permission. The My Subscribers analytics tab only appears for owners whose existing platform role already has access to that specific dashboard.
For background on how Managed subscriptions and seat management work generally, see Managed Subscriptions in the help center.
Storefront Improvements - More Ways to Design, Target, and Gate Content
Whether you're guiding visitors toward a clear next step or making sure the right content reaches the right audience, this release gives you sharper tools to do both. A new button plugin makes calls to action easier to build directly into your Storefront text, while three additions to Target Audience and self-enrollment rules let you fine-tune exactly who sees a section and what's required of them before they can enroll.
Features and Benefits
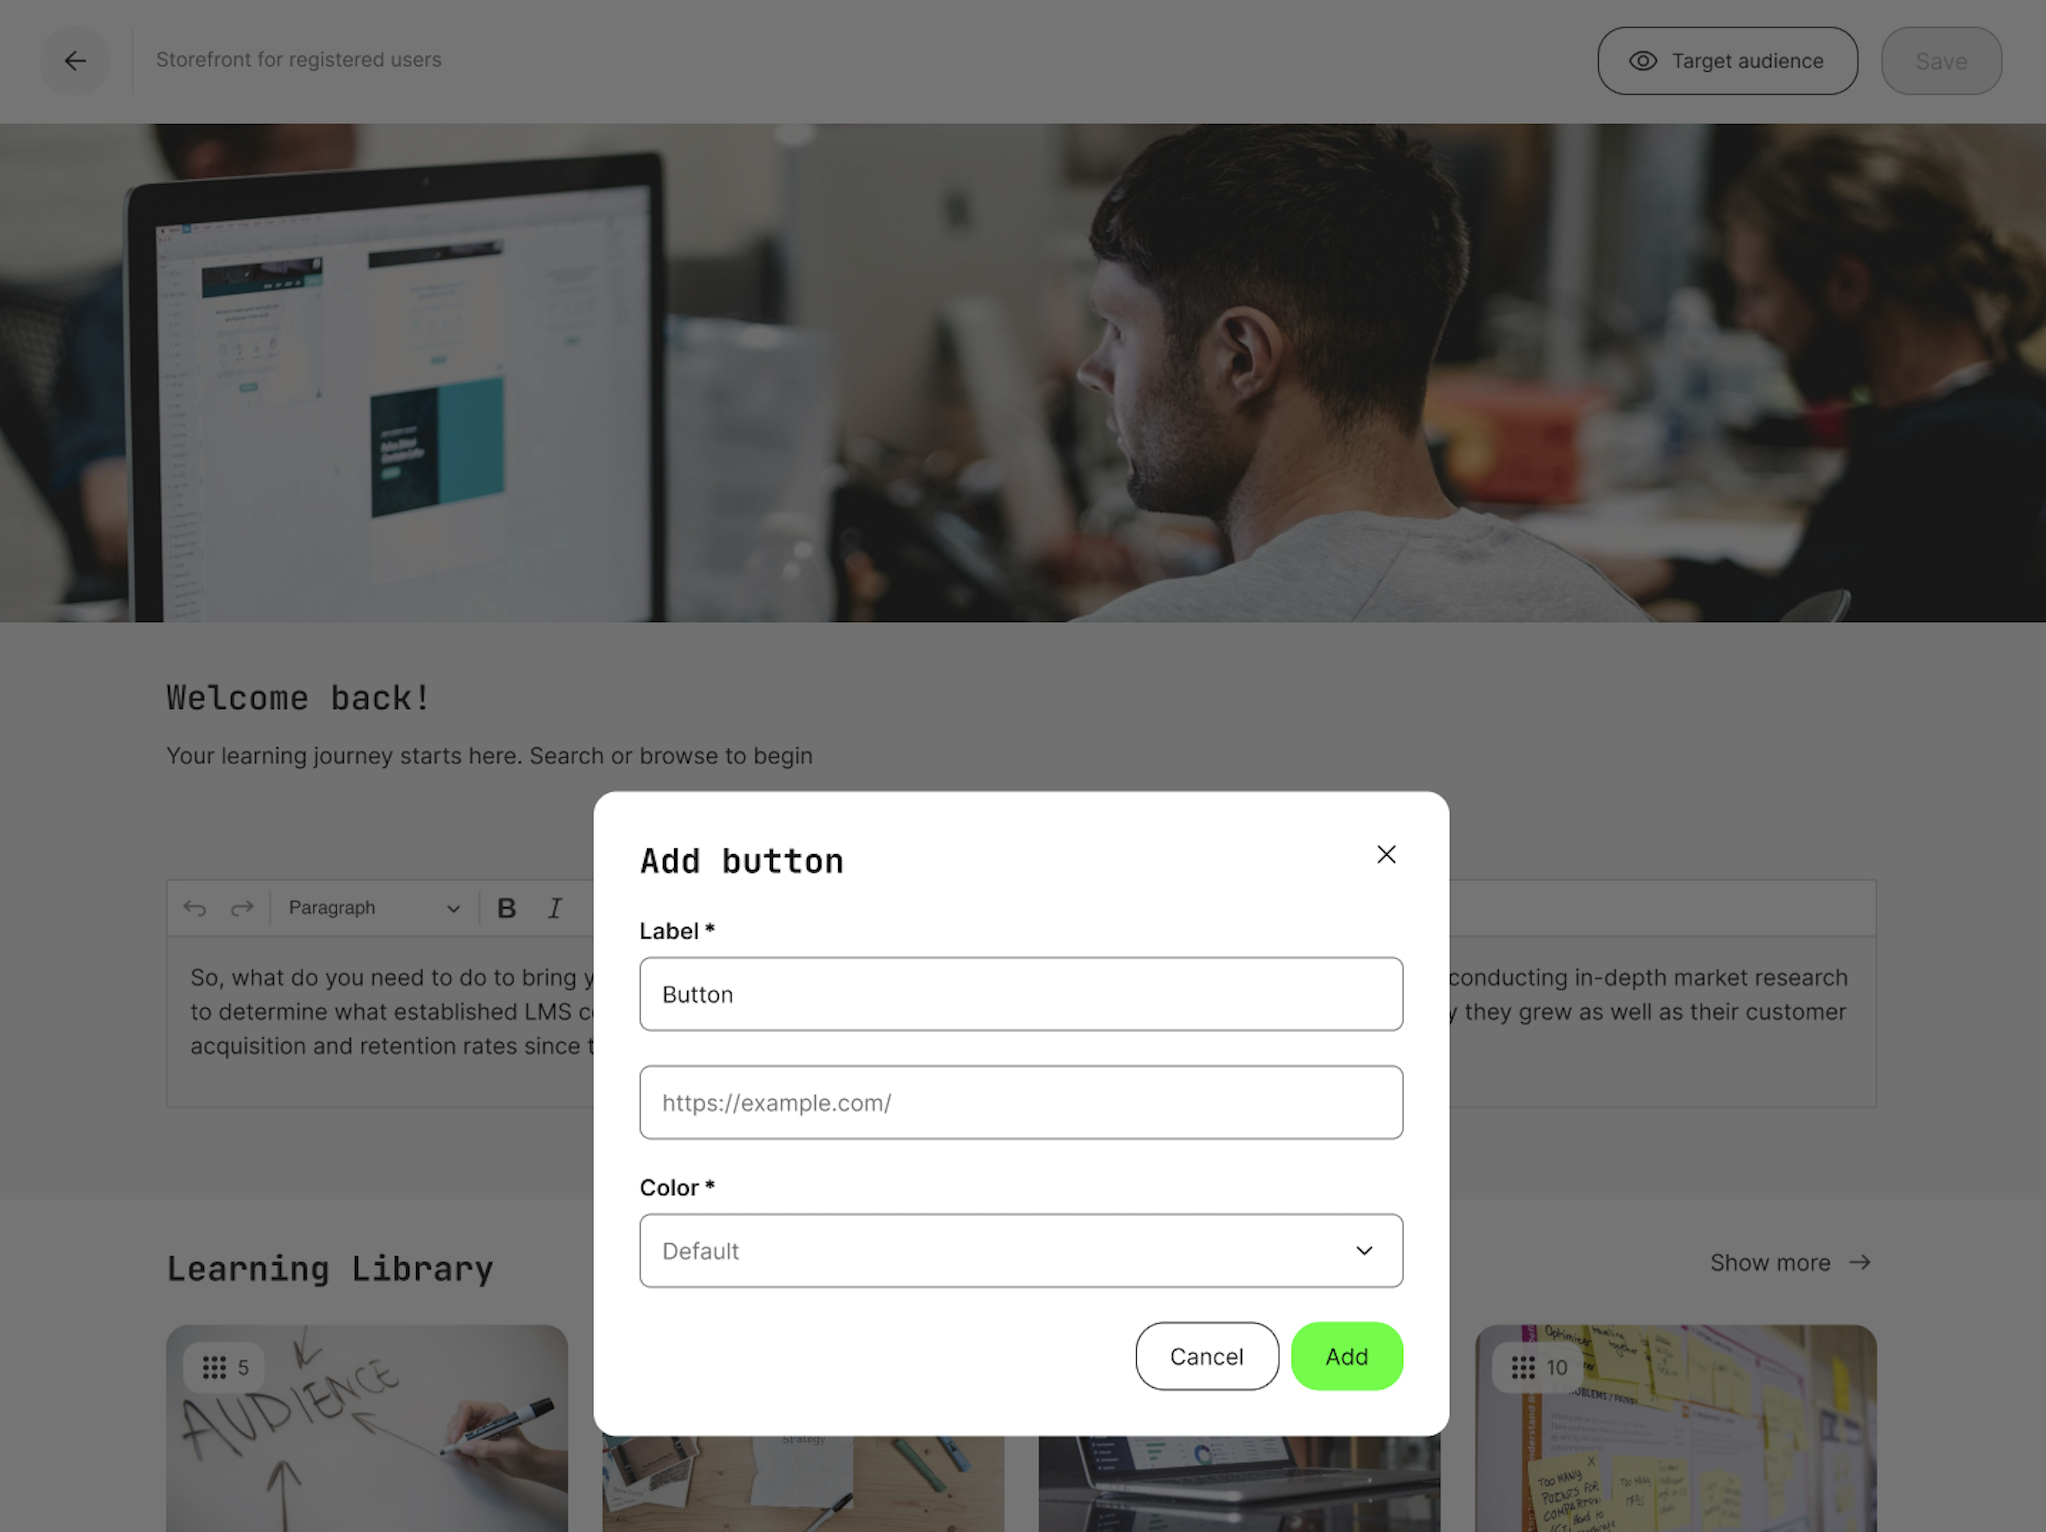
Buttons in the Storefront text editor: The rich text editor used in Storefront text sections now includes a button plugin. Add a button with a label, alignment, and color to match your visual style, and link it out to a URL — a cleaner, more prominent alternative to a plain hyperlink when a section should end with a clear call to action.
Target Storefront sections by Skills: Target Audience now supports Skills as a criterion, including skill levels, for registered users. Select one or more skills and choose whether a section should be visible to users who have any of them, or hidden from users who have them — useful for surfacing next-step content to people who've already built certain skills, or steering people who haven't toward the training that gets them there.
"Any" and "Exclude" now available for every Target Audience criterion: Following last release's addition for Organization, every Target Audience criterion now supports Any (match if a user has any of the selected values, rather than requiring all of them) and Exclude (hide the section from users who match), using dedicated toggle switches next to each field. This makes it much easier to build precise, audience-specific Storefront experiences without needing a separate section for every combination.
Two new criteria for self-enrollment requirements: The "restrict self-enrollment until criteria are met" option — which shows an activity in the Storefront but only allows enrollment once certain requirements are satisfied — now supports Job Function and Organization, alongside existing criteria such as Pass test, Complete course, Earn certificate, and Acquire skill. Until a user meets the requirements, the Enroll button shows as See requirements, listing everything still needed.
Considerations
- Existing audience rules aren't affected: Sections already configured with a Target Audience keep working exactly as before — Any and Exclude are new options to opt into, not a change to the default matching behavior.
- Button links are URL-only: The new button plugin links out to a URL only; it doesn't support deep-linking directly to an activity, course, or other Storefront section.
For background on how Target Audience rules work more broadly, see Target Audience Controls in the help center.
Checkout - Cleaner Profile Data and More Contact Fields for Company and Government Purchases
We're brining two improvements to checkout with this release: one fixes a source of data confusion, and one gives administrators more control over what's collected when someone enrolls on behalf of a company or government institution.
Together, they make transaction records more reliable: the personal information entered at checkout stays exactly as entered, and administrators can now capture a dedicated contact for Company and Government institution purchases, separate from the enrolling user's own profile.
Features and Benefits
Checkout no longer overwrites the user's profile: The checkout page pre-fills the personal information block with the enrolling user's profile data. Until now, any edits made there during checkout — name, phone, street address, and so on — were saved back to that user's profile, which caused confusion when someone adjusted details just for that specific order and ended up permanently changing their platform profile instead. Edits made during checkout are now stored only at the transaction level; the user's profile stays exactly as it was. To keep that data easy to find, transactions now include a new Personal information section on the Transaction page (Course Administration → Transactions), showing exactly what was entered at checkout — even when it differs from the current profile.
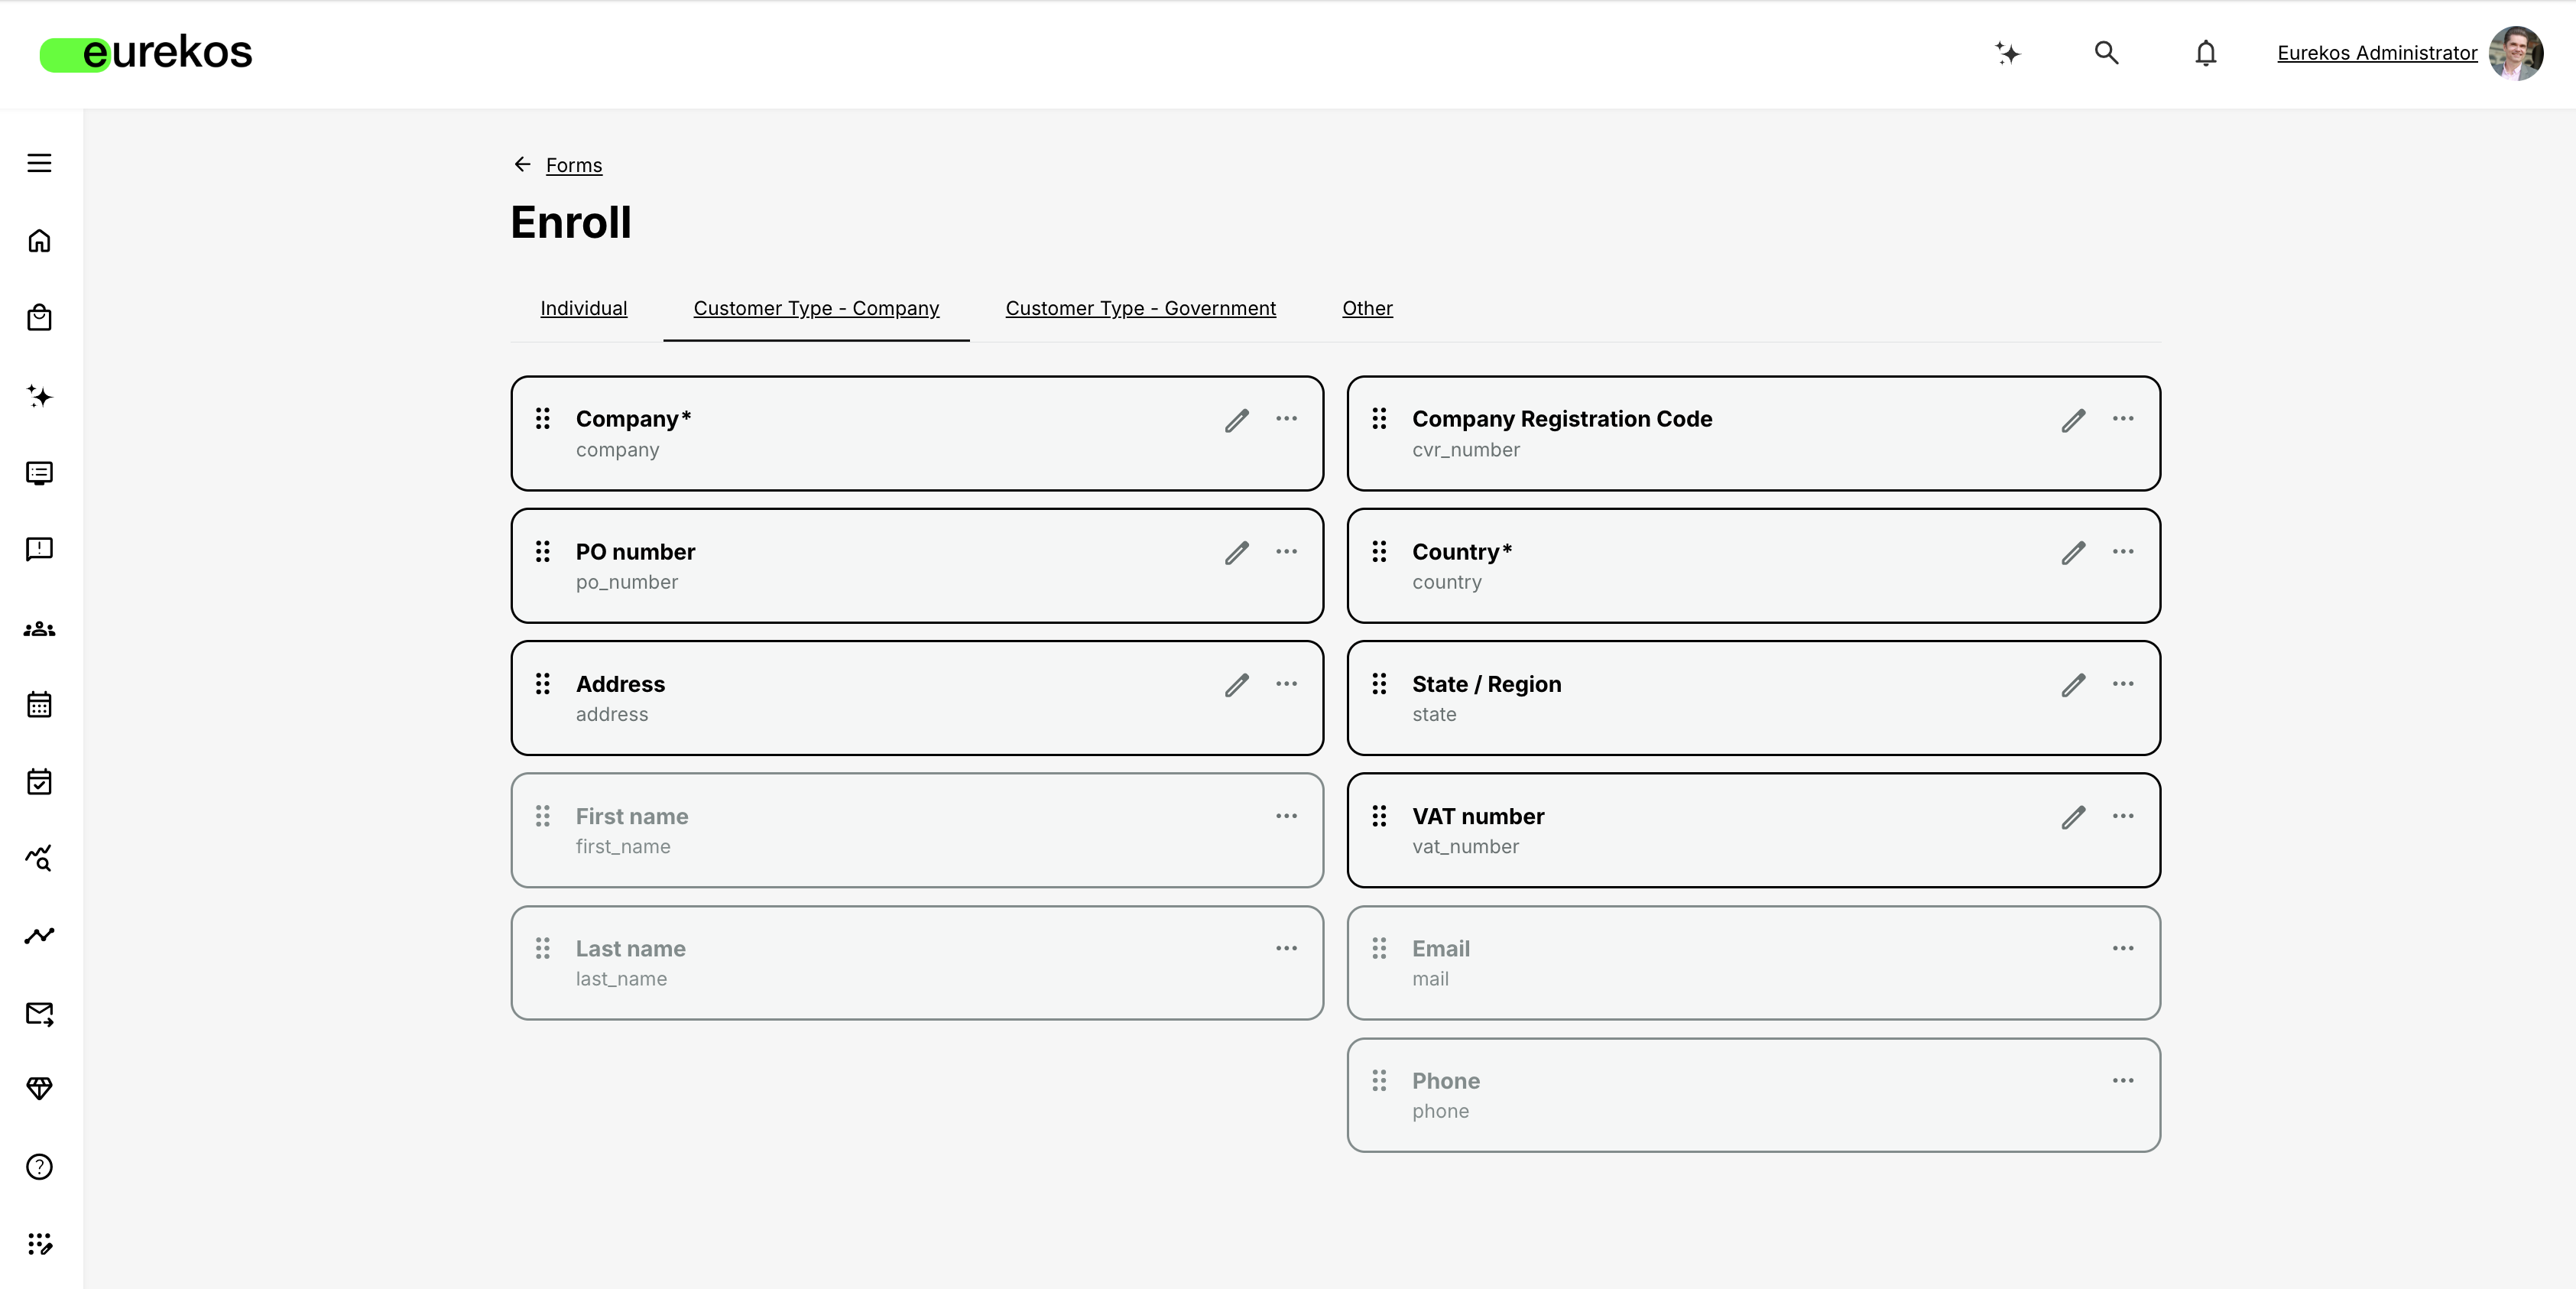
New contact fields for Company and Government institution checkout: If your platform has the Company and/or Government institution customer types enabled (Settings → Commerce), you can now also collect First name, Last name, Phone, and Email as part of that customer type's enroll form — separate from the enrolling user's own personal information. This is useful when the person completing the purchase isn't the right point of contact for the order itself, for example capturing a procurement or invoicing contact's phone number and email, which may differ from the enrolling user's own details. These fields are disabled by default; enable them and mark them required or optional, like any other field, from Settings → Forms → Enroll. Once enabled, they're also included on the Transaction page and in the Transactions report (Analytics → Transactions), just like any other enroll form field.
Considerations
- Configured independently per customer type: The new First name, Last name, Phone, and Email fields are enabled separately for Company and Government institution under Settings → Forms → Enroll — you can turn them on for one customer type without affecting the other.
- Checkout can no longer be used to enrich profile data: Edits made to personal details during checkout now stay at the transaction level only and are no longer applied to the user's profile.
Invoicing - EU VAT Reverse Charge Support
For organizations selling training across EU borders, some transactions need to be invoiced under the reverse charge mechanism — where VAT liability shifts from the seller to a VAT-registered business customer in another EU member state, and the invoice must state that explicitly instead of charging VAT. This release adds what's needed to generate invoices in Eurekos that reflect this correctly.
Features and Benefits
New Invoice PDF tokens for VAT and reverse charge details: Six new tokens are available for your Invoice PDF template (Settings → Commerce → Invoice PDF): [transaction vat number], [transaction company name], [transaction company address], [transaction quantity], [transaction vat rate], and [transaction reverse charge]. Add them to your template so invoices display the buyer's VAT and company details, and — when applicable — a clear reverse charge statement, without any manual editing.
Reverse charge applied automatically based on Tax rules: Tax rules (Settings → Commerce → Tax rules) now support reverse charge. When creating or editing a rule with Applies to set to Buyer, Customer type set to Company or Government institution, and the tax rate set to 0%, an Apply reverse charge checkbox appears. Enabling it means VAT won't be charged on matching transactions, and the invoice states that the buyer is responsible for accounting for the VAT themselves — exactly what's required for eligible cross-border B2B sales within the EU.
Configuration
Reverse charge is set up per Tax rule, under Settings → Commerce → Tax rules → Create rule (or when editing an existing rule):
- Set Applies to to Buyer.
- Set Customer type to Company or Government institution.
- Set the tax rate to 0%.
- Once all three conditions are met, an Apply reverse charge checkbox appears — enable it to activate reverse charge for transactions matching that rule.
Add the new tokens to your Invoice PDF template to display the relevant details on generated invoices.
Considerations
- This only applies if you use Eurekos' native invoicing feature: if your organization generates invoices through a separate billing or ERP system instead of Eurekos' Invoice PDF, these features will not apply.
- The "Apply reverse charge" checkbox only appears once its conditions are met: it's hidden until Applies to is set to Buyer, Customer type is Company or Government institution, and the tax rate is 0%. If you don't see it while setting up a rule, check these three fields first.
- The reverse charge statement text is customizable: the wording that appears on the invoice when reverse charge applies can be edited from Settings → Translations, so you can match your organization's own legal phrasing.
User Interface - Activity ID Now Visible to Participants
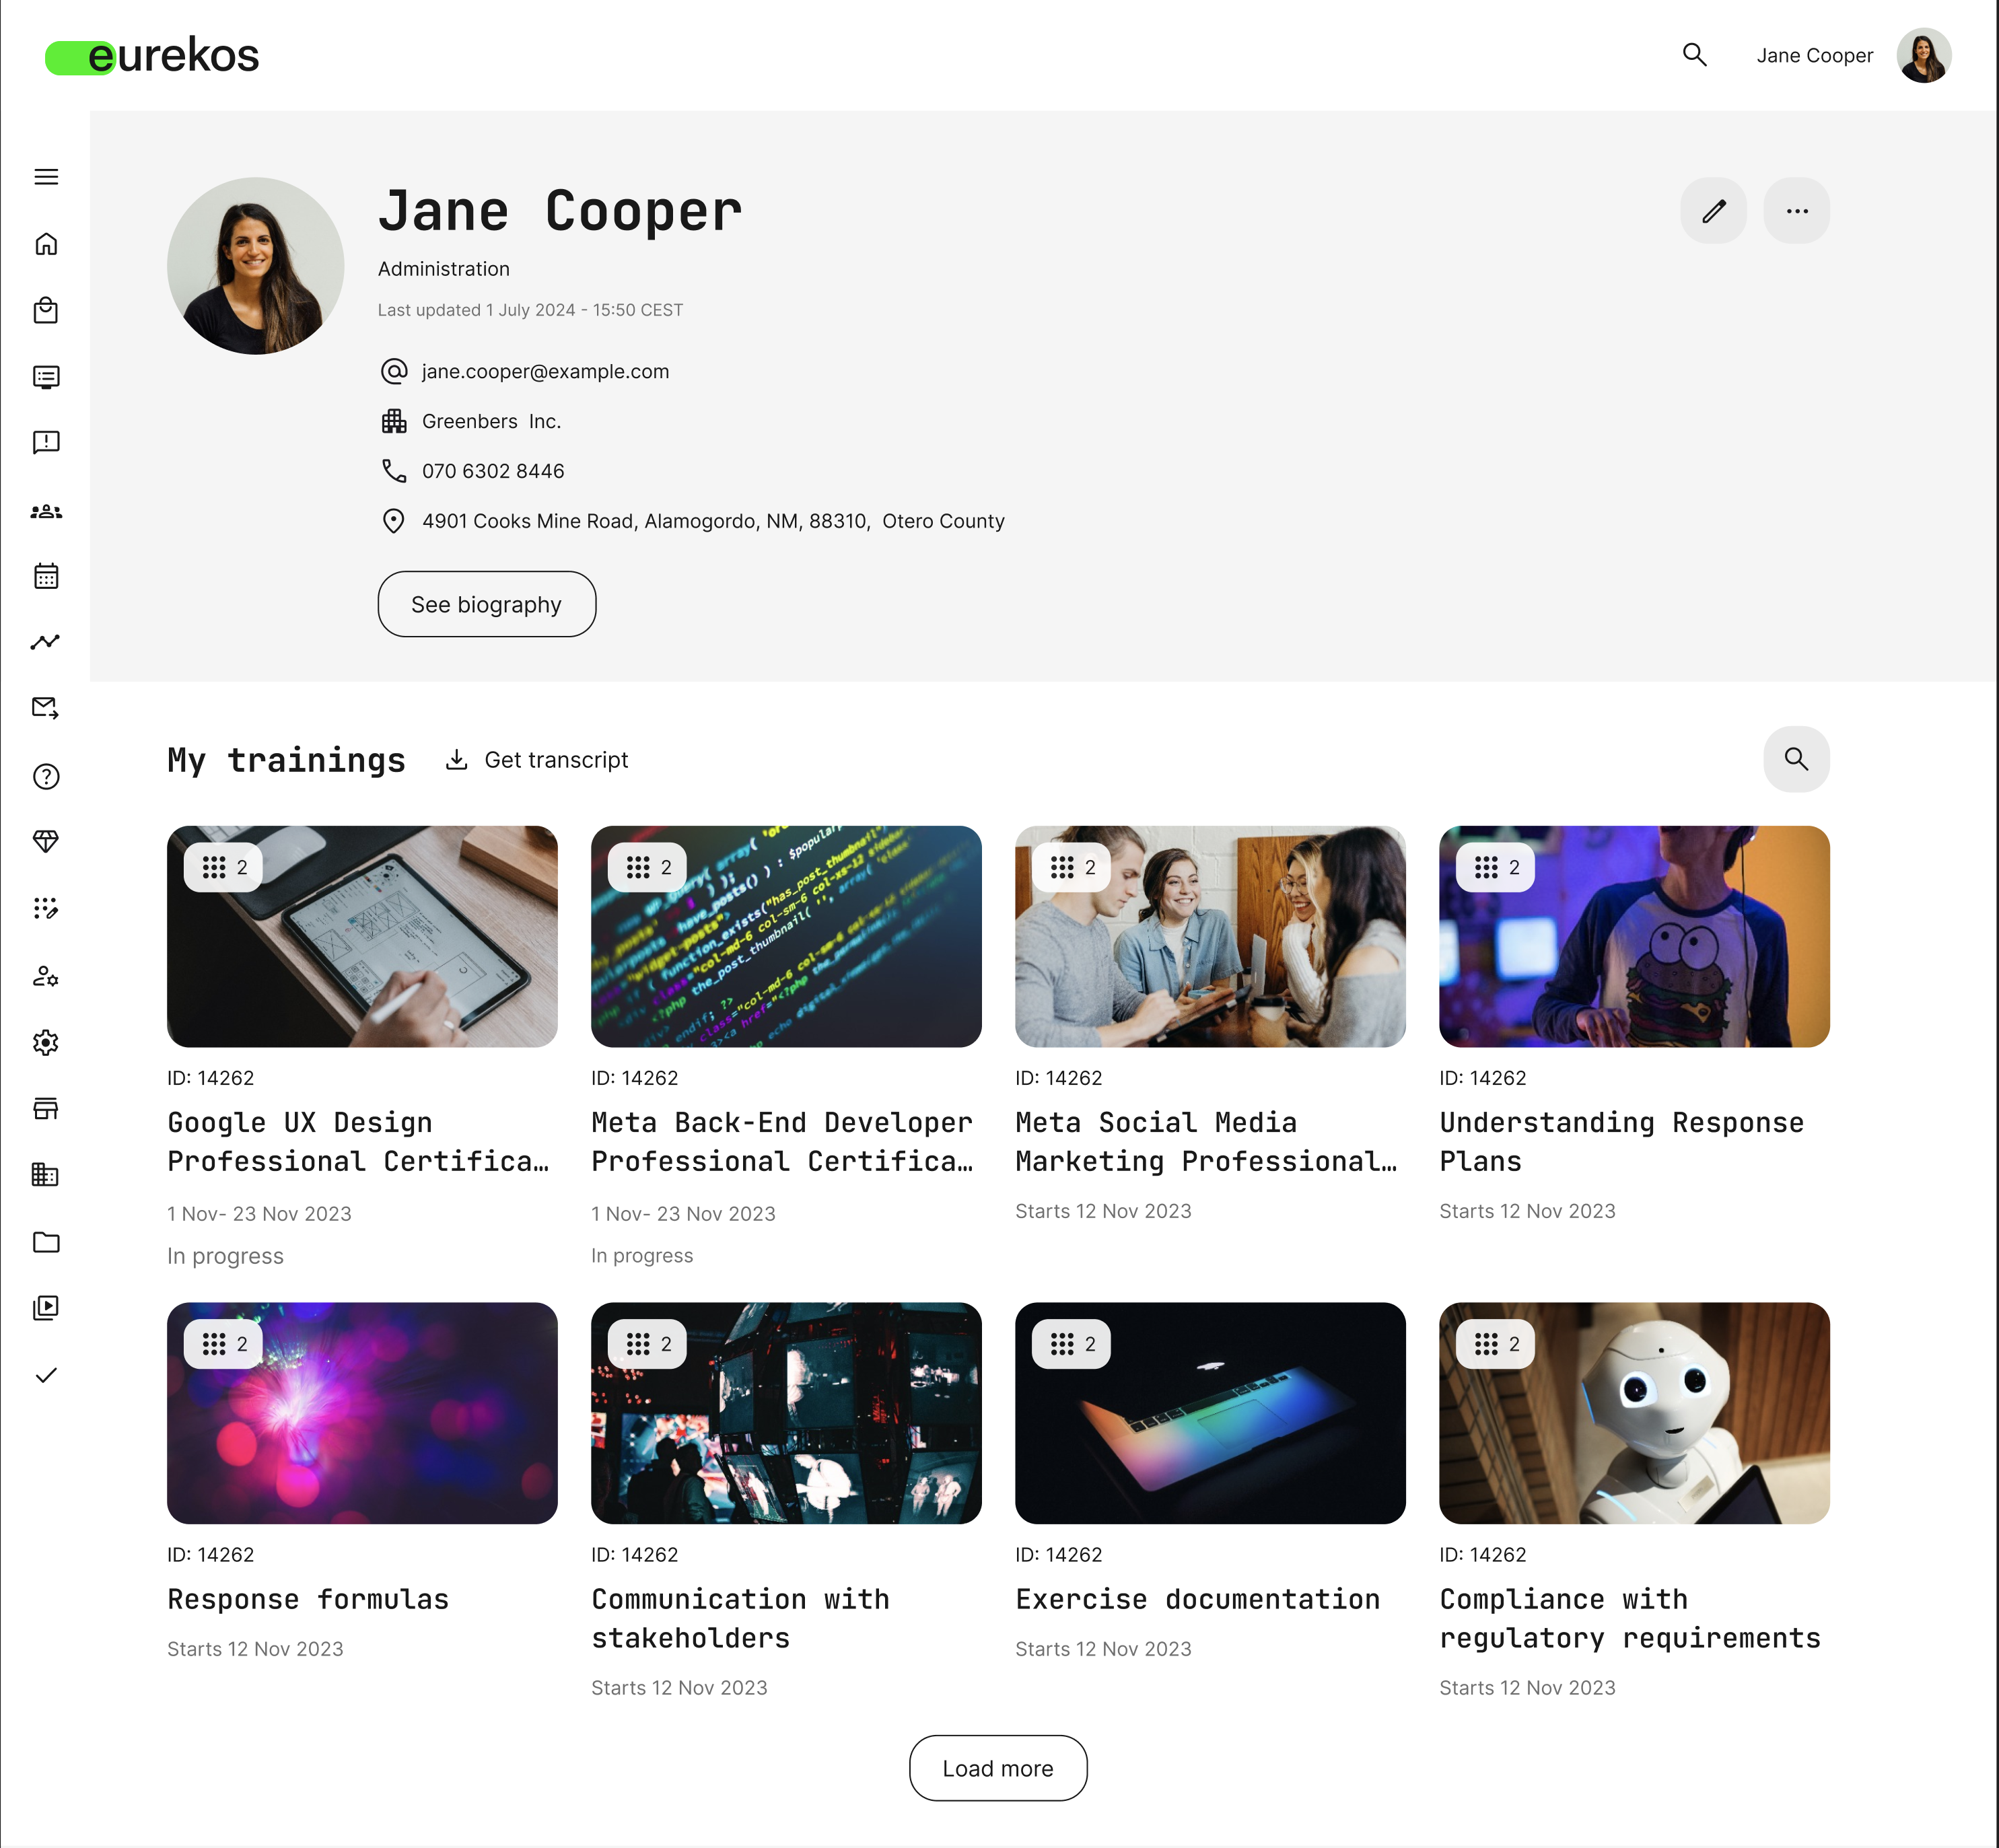
Activity titles aren't guaranteed to be unique, which can make it hard for a participant to say exactly which activity they mean when they run into an issue and reach out for support. This release allows surfacing each activity's Activity ID directly to participants, giving them a precise, unambiguous reference to quote instead.
Features and Benefits
Activity ID now visible to participants in several places: Once enabled, participants can see an activity's Activity ID in:
- The My Overview dashboard, under each activity in "Trainings I attend"
- The Profile page, under "My trainings"
- The downloadable training transcript PDF
- The enrollment block on the Activity Description Page, where it's turned on by default
Activity ID available in emails regardless of the display setting: The Activity ID is automatically included in the "Welcome to the training" system email sent for free activities enrolled through the simple enrollment flow. Administrators can also add an [Activity ID] token to any other activity-related system email, or use it in Automated Email Workflows to build custom email campaigns that reference it.
Configuration
- Activity ID display is off by default, and can only be enabled by contacting Eurekos Support. Once enabled, it appears across the My Overview page, the Profile page, and the training transcript PDF, and is turned on by default in the enrollment block on the Activity Description Page. Email visibility — the "Welcome to the training" email and the [Activity ID] token — isn't affected by this setting either way.
Incentives - A Library of Ready-Made Badge Designs
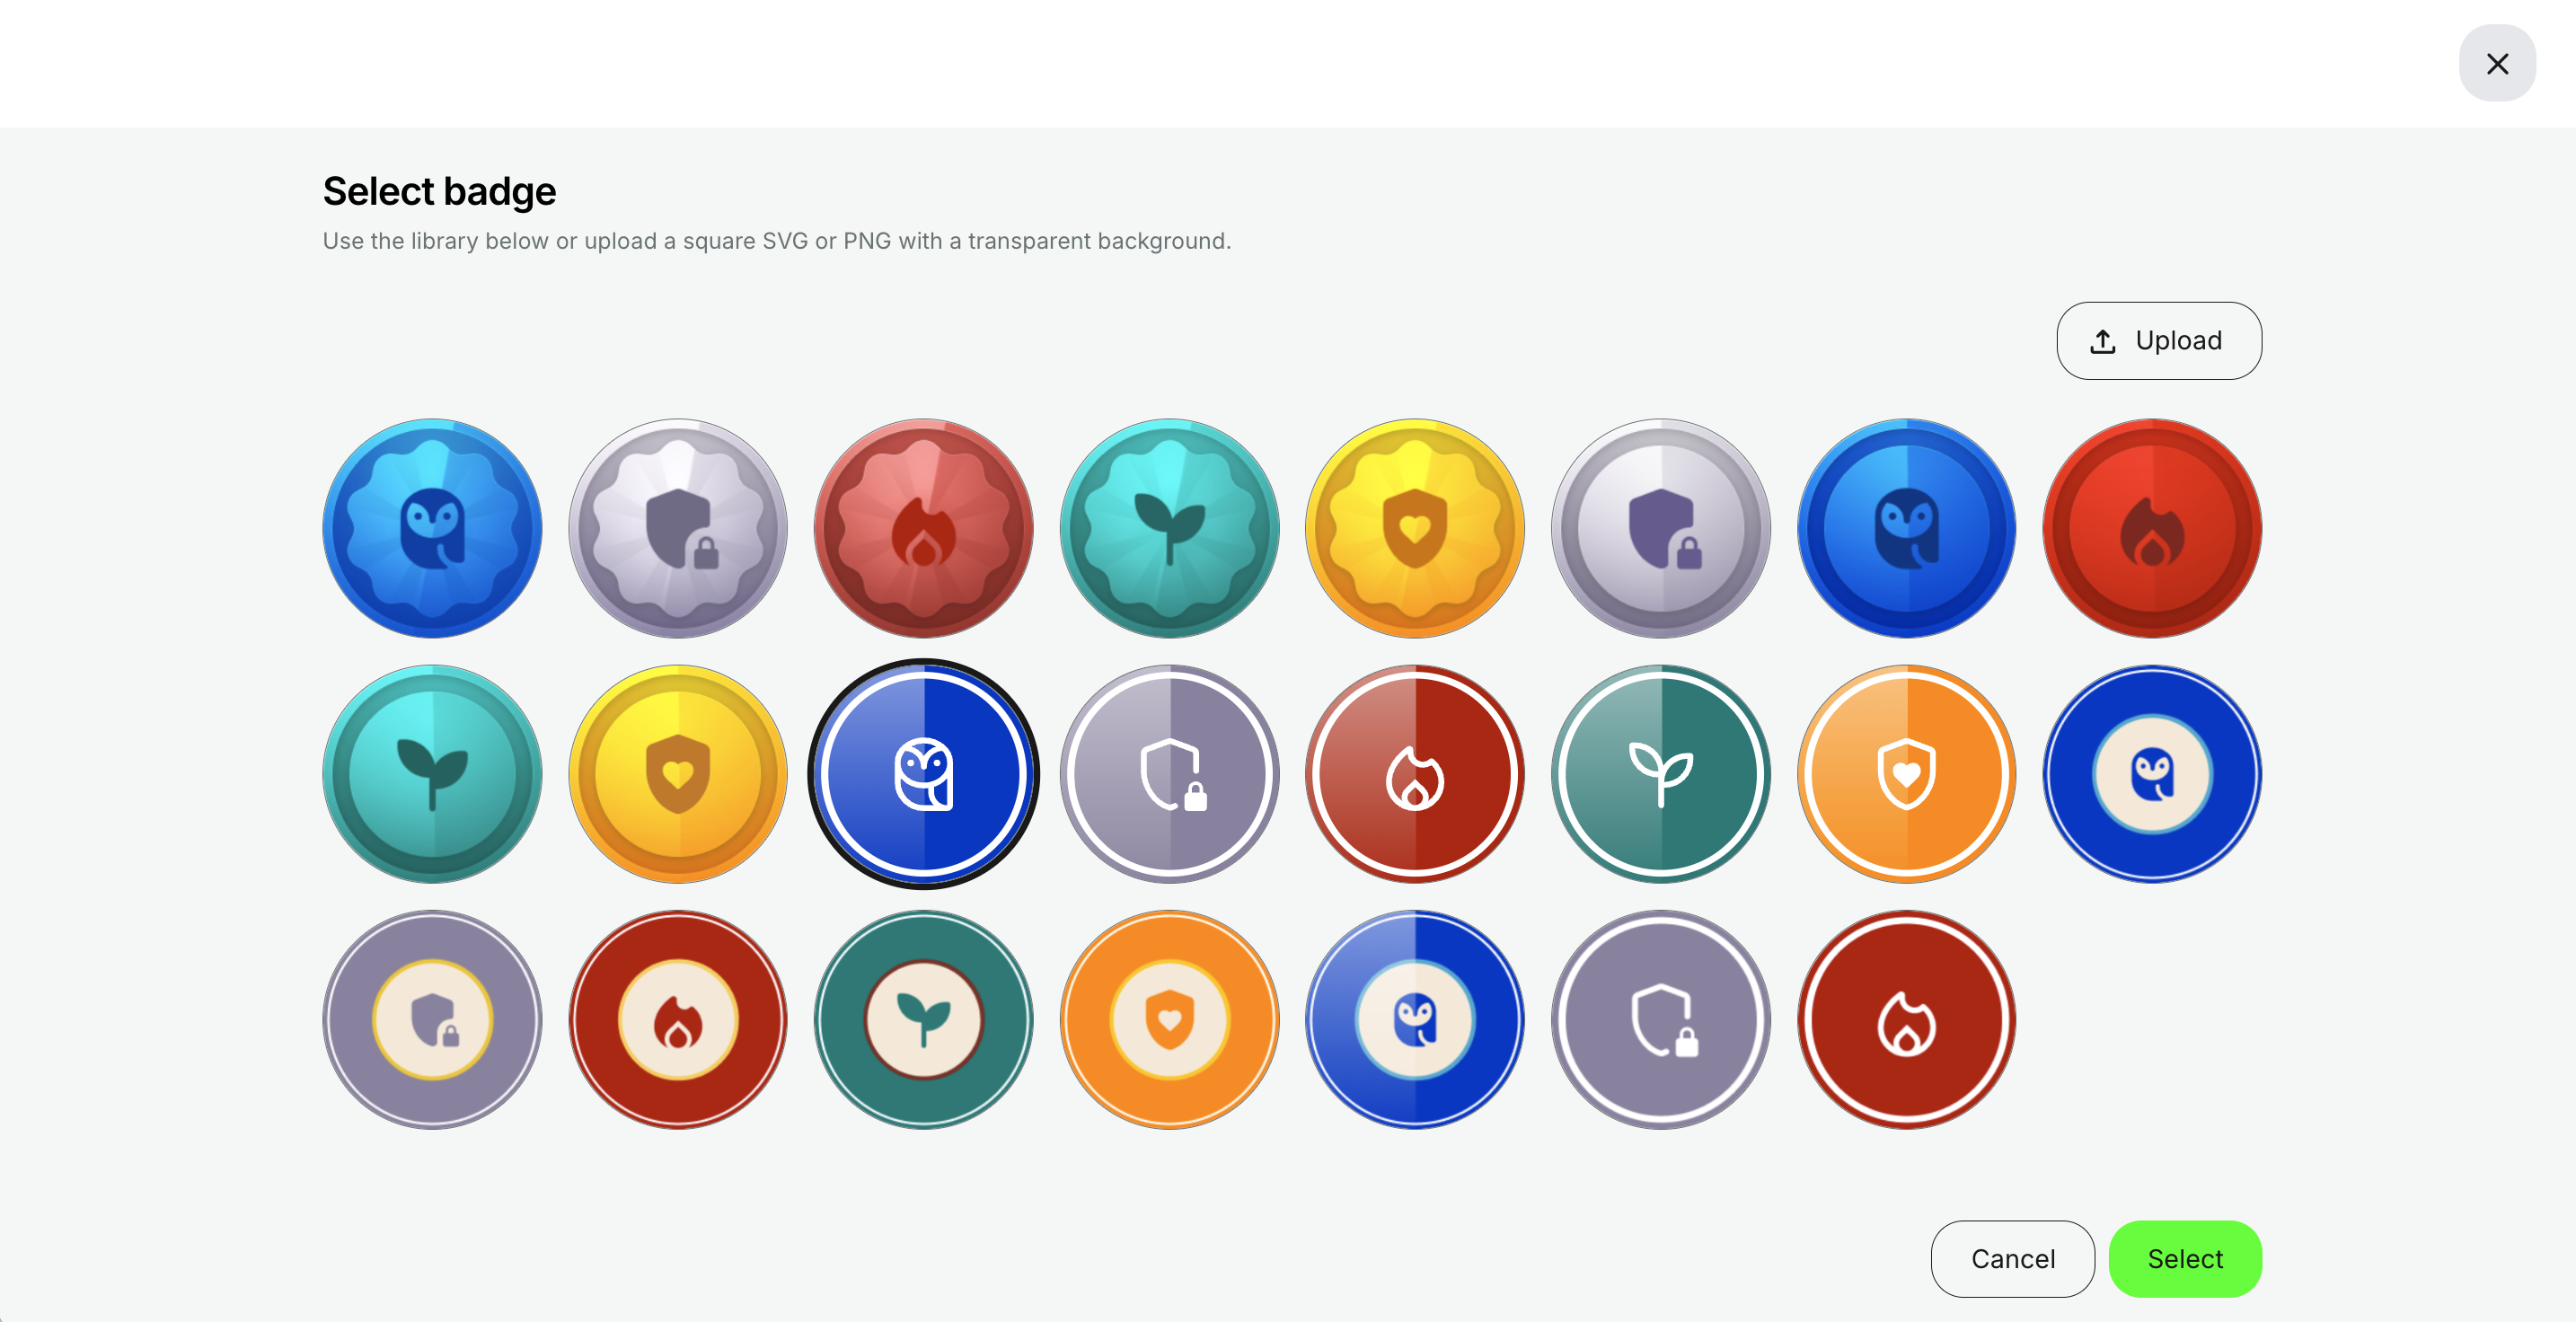
Creating badges for your Incentives program just got faster. When setting up a badge, you can now pick from a built-in library of standard badge designs instead of sourcing or creating your own image first.
Features and Benefits
A built-in library of standard badge thumbnails: When creating or editing a badge (Settings → Incentives → Badges → Create badge), clicking Select badge now opens a library of ready-made designs to choose from, alongside the existing option to upload your own square PNG with a transparent background. This removes the need to source or design a badge image before you can start setting up point-based or rule-based badges, making it faster to launch an Incentives program from scratch.
For background on setting up badges and the wider Incentives feature set, see Setting Up Incentives in the help center.
Security Improvements 🔐
- Introduced Content Security Policy (CSP), providing an additional layer of protection against Cross-Site Scripting (XSS) and other content injection attacks. CSP allows administrators to define which sources of scripts, styles, images, fonts and other resources are trusted by the browser, helping prevent malicious content from being executed. The policy can be configured under Settings → Security → Content Security Policy (/settings/security/csp).
- Updated third-party libraries to the latest secure versions, incorporating fixes for multiple publicly disclosed security vulnerabilities.
- Improved the security of underlying platform components through dependency updates, ensuring continued protection against known threats and alignment with current security best practices.
Shortlist of Additional Noticeable Changes
- Multilevel Vocabularies: Vocabularies (Settings → Tags) can now include a sublevel of tags nested under each top-level tag. Enable sublevel tags when editing a Vocabulary and give the sublevel its own field name.
- New "Municipality" vocabulary: A new out-of-the-box Municipality vocabulary is now available alongside existing ones like Job function and Department, ready to use for tagging without having to set it up manually.
- Job function as an Announcement audience criterion: When targeting an Announcement, you can now use Job function as an audience criterion, alongside existing options like Organization and Role.
- Schedule a future account block: From a user's Create/Edit page, administrators can now schedule an account to be automatically blocked at a future point — a set number of days after inactivity, first enrollment, or account creation, or on a specific date — instead of having to remember to block it manually.
- Role-based permission to edit other users' profile fields: A new configuration lets you grant specific roles — Support, Manager, Course Administrator, or Partner — permission to edit all profile fields for the users they manage - even fields not editable by the user themselves.
- Remove organization restrictions from an activity: When the organization filter is enabled, an activity created by a user is automatically restricted to their own organization and those below it, which could prevent an activity from being published to the public, unregistered Storefront, without support from a Global Administrator. A new Remove organization restrictions option, available from an activity's More (...) menu when such a restriction exists, lifts it after a confirmation prompt.
- New "Signup registration date" column in the Certificates report: The Certificates report (Analytics → Certificates) now includes a Signup registration date column, showing when the participant registered for the activity behind each certificate.
- New API endpoints for Subscriptions: The API now supports creating and managing Subscriptions programmatically — see the full reference under Settings → Third-party integrations → API, once you've received version 13.4.0.
- Activity change log extended: The activity change log (accessible via the More menu on an activity in Course Administration → Activities) now captures a significantly broader range of changes, including: modules added, modified, or removed; changes within existing modules (such as a course replacement within a module); certificates added or changed; and changes to activity-level settings such as responsible instructor or course administrator, location, automated email workflows, access restrictions, and checkbox options.