OIDC - Article
Summary
Connect Eurekos with an external identity provider using OpenID Connect (OIDC) to enable secure single sign-on (SSO), centralized user management, and automated user provisioning across the platform.
In this article you will learn:
- How OpenID Connect integrates with Eurekos for authentication and provisioning
- How user data is synchronized and governed through an identity provider
- How login behavior and access control are managed
- How to configure and validate the integration step-by-step
- How OIDC supports security, scalability, and user lifecycle management
Business Context
In many organizations, user identity is already managed centrally through systems such as Microsoft Entra ID (Azure AD), Okta, or OneLogin. These systems define who users are, how they authenticate, and what they are allowed to access.
The OpenID Connect integration allows Eurekos to plug directly into this ecosystem.
Instead of creating and managing users manually inside Eurekos, the platform relies on the organization’s Identity Provider (IdP) as the single source of truth. This fundamentally changes how users are handled:
- Users do not need separate Eurekos credentials
- Authentication follows existing company policies (including MFA/2FA)
- User data is automatically provisioned and maintained
- Access is controlled externally
A practical example:
- A new employee joins your organization and is created in Azure AD
- When they access Eurekos for the first time, their account is automatically created with the correct name, email, and organizational structure—without any manual setup
- When a user is disabled or removed from the Identity Provider, they immediately lose access to Eurekos.
This removes the need for manual deactivation and ensures alignment with corporate security and compliance requirements.
Feature Overview
The OpenID Connect integration transforms Eurekos from a standalone authentication system into a connected application within your identity infrastructure.
From an administrator perspective, the integration enables three key capabilities:
1. Authentication through SSO → Users log in using their existing corporate credentials. This means:
- No additional passwords to manage
- Seamless login experience
- Built-in support for enterprise security policies
2. Automated User Provisioning → When a user logs in for the first time:
- Eurekos checks whether the user already exists
- If not, a new user account is created automatically (if enabled)
- Profile data is populated using information from the Identity Provider
This is often referred to as just-in-time provisioning.
3. Ongoing Data Synchronization → User data can be kept continuously aligned with the Identity Provider. For example:
- If a user changes department in the IdP
- If their manager or role is updated
- If organizational structure changes
These updates automatically flow into Eurekos on login, ensuring that reporting and access structures remain aligned with the organization while minimizing administrative overhead.
How the Integration Works
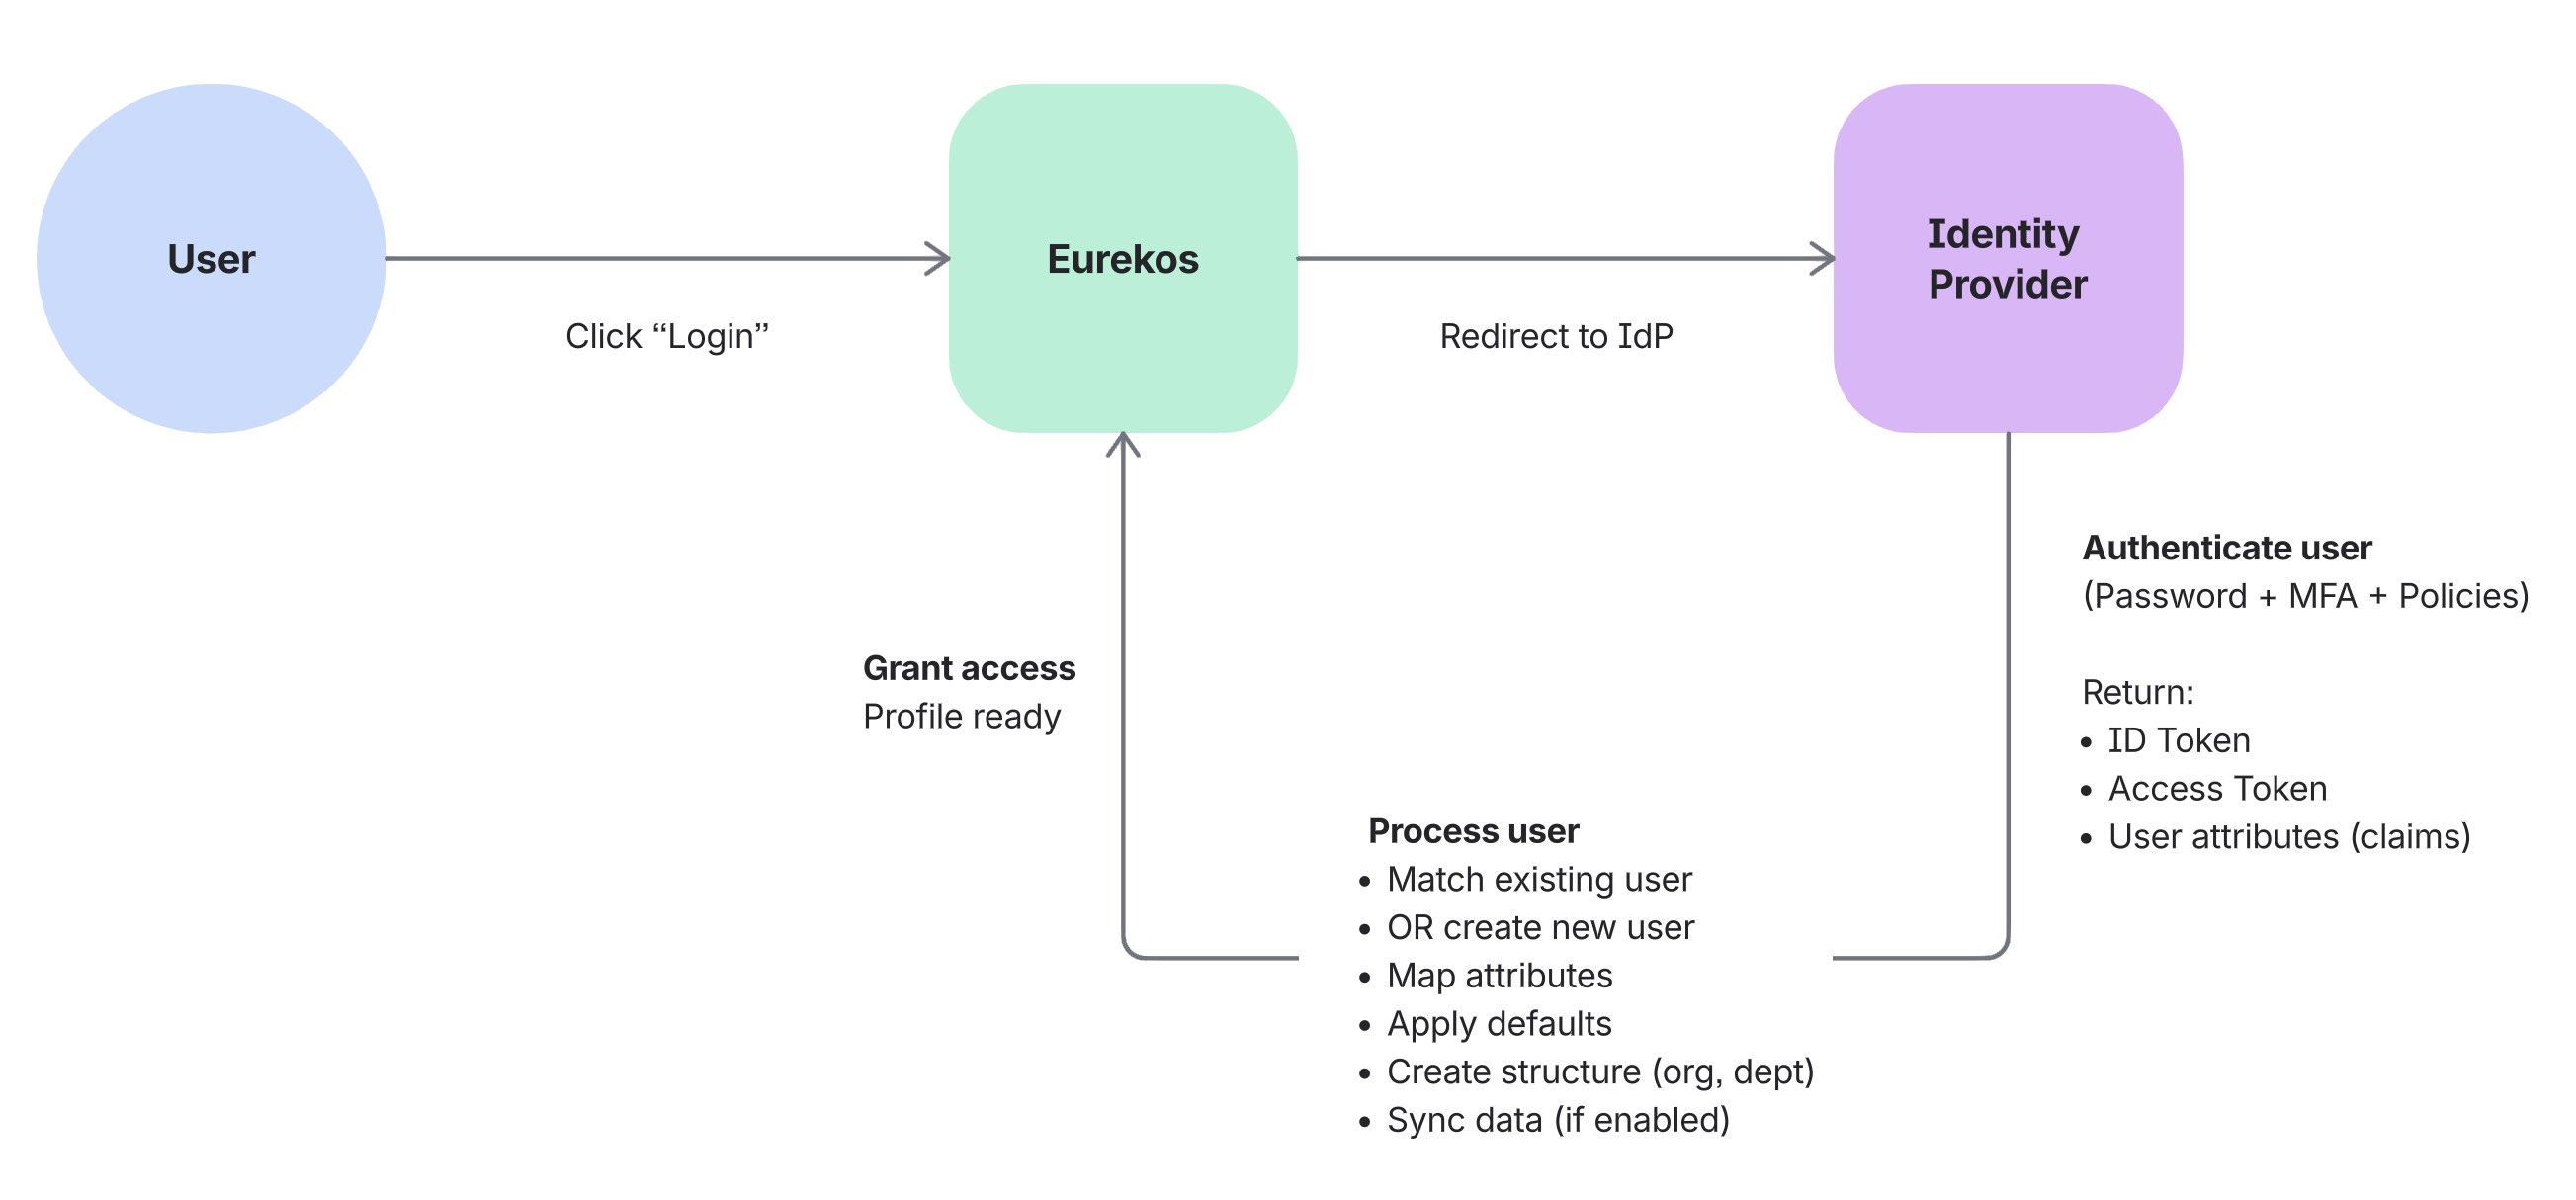
At a high level, the integration follows a simple but powerful sequence.
When a user clicks “Log in”:
- User is redirected to the Identity Provider → The login process happens entirely outside Eurekos
- Authentication is performed by the IdP → This may include password validation, MFA, or conditional access policies
- Identity data is returned to Eurekos → This includes user attributes such as email, name, and other configured fields
- Eurekos processes the user → Creates the user (if new) → Updates profile data (if configured) → Grants access to the platform
Eurekos does not validate passwords or manage authentication security. Instead:
- The Identity Provider handles authentication
- Eurekos focuses on user context and learning experience
This separation is key to scalability and security.
Login Experience and Behavior
Once configured, OpenID Connect becomes part of the Eurekos login experience and can be adapted to different user groups and access models.
Users may see SSO as a login option alongside other methods such as email/password, depending on how the login form is configured. Administrators control this behavior in Settings → Forms → Login.
Here, you can define:
- Which login methods are primary or secondary
- Whether SSO is visible or hidden
- How login options are presented to users
Multiple identity providers can be supported simultaneously, allowing flexibility across different user groups or organizational contexts.
This flexibility makes it possible to design login experiences that align with:
- Fully centralized identity environments
- Mixed audiences (internal and external users)
- Controlled rollout or testing scenarios
The following section outlines common login experience models and when to use them.
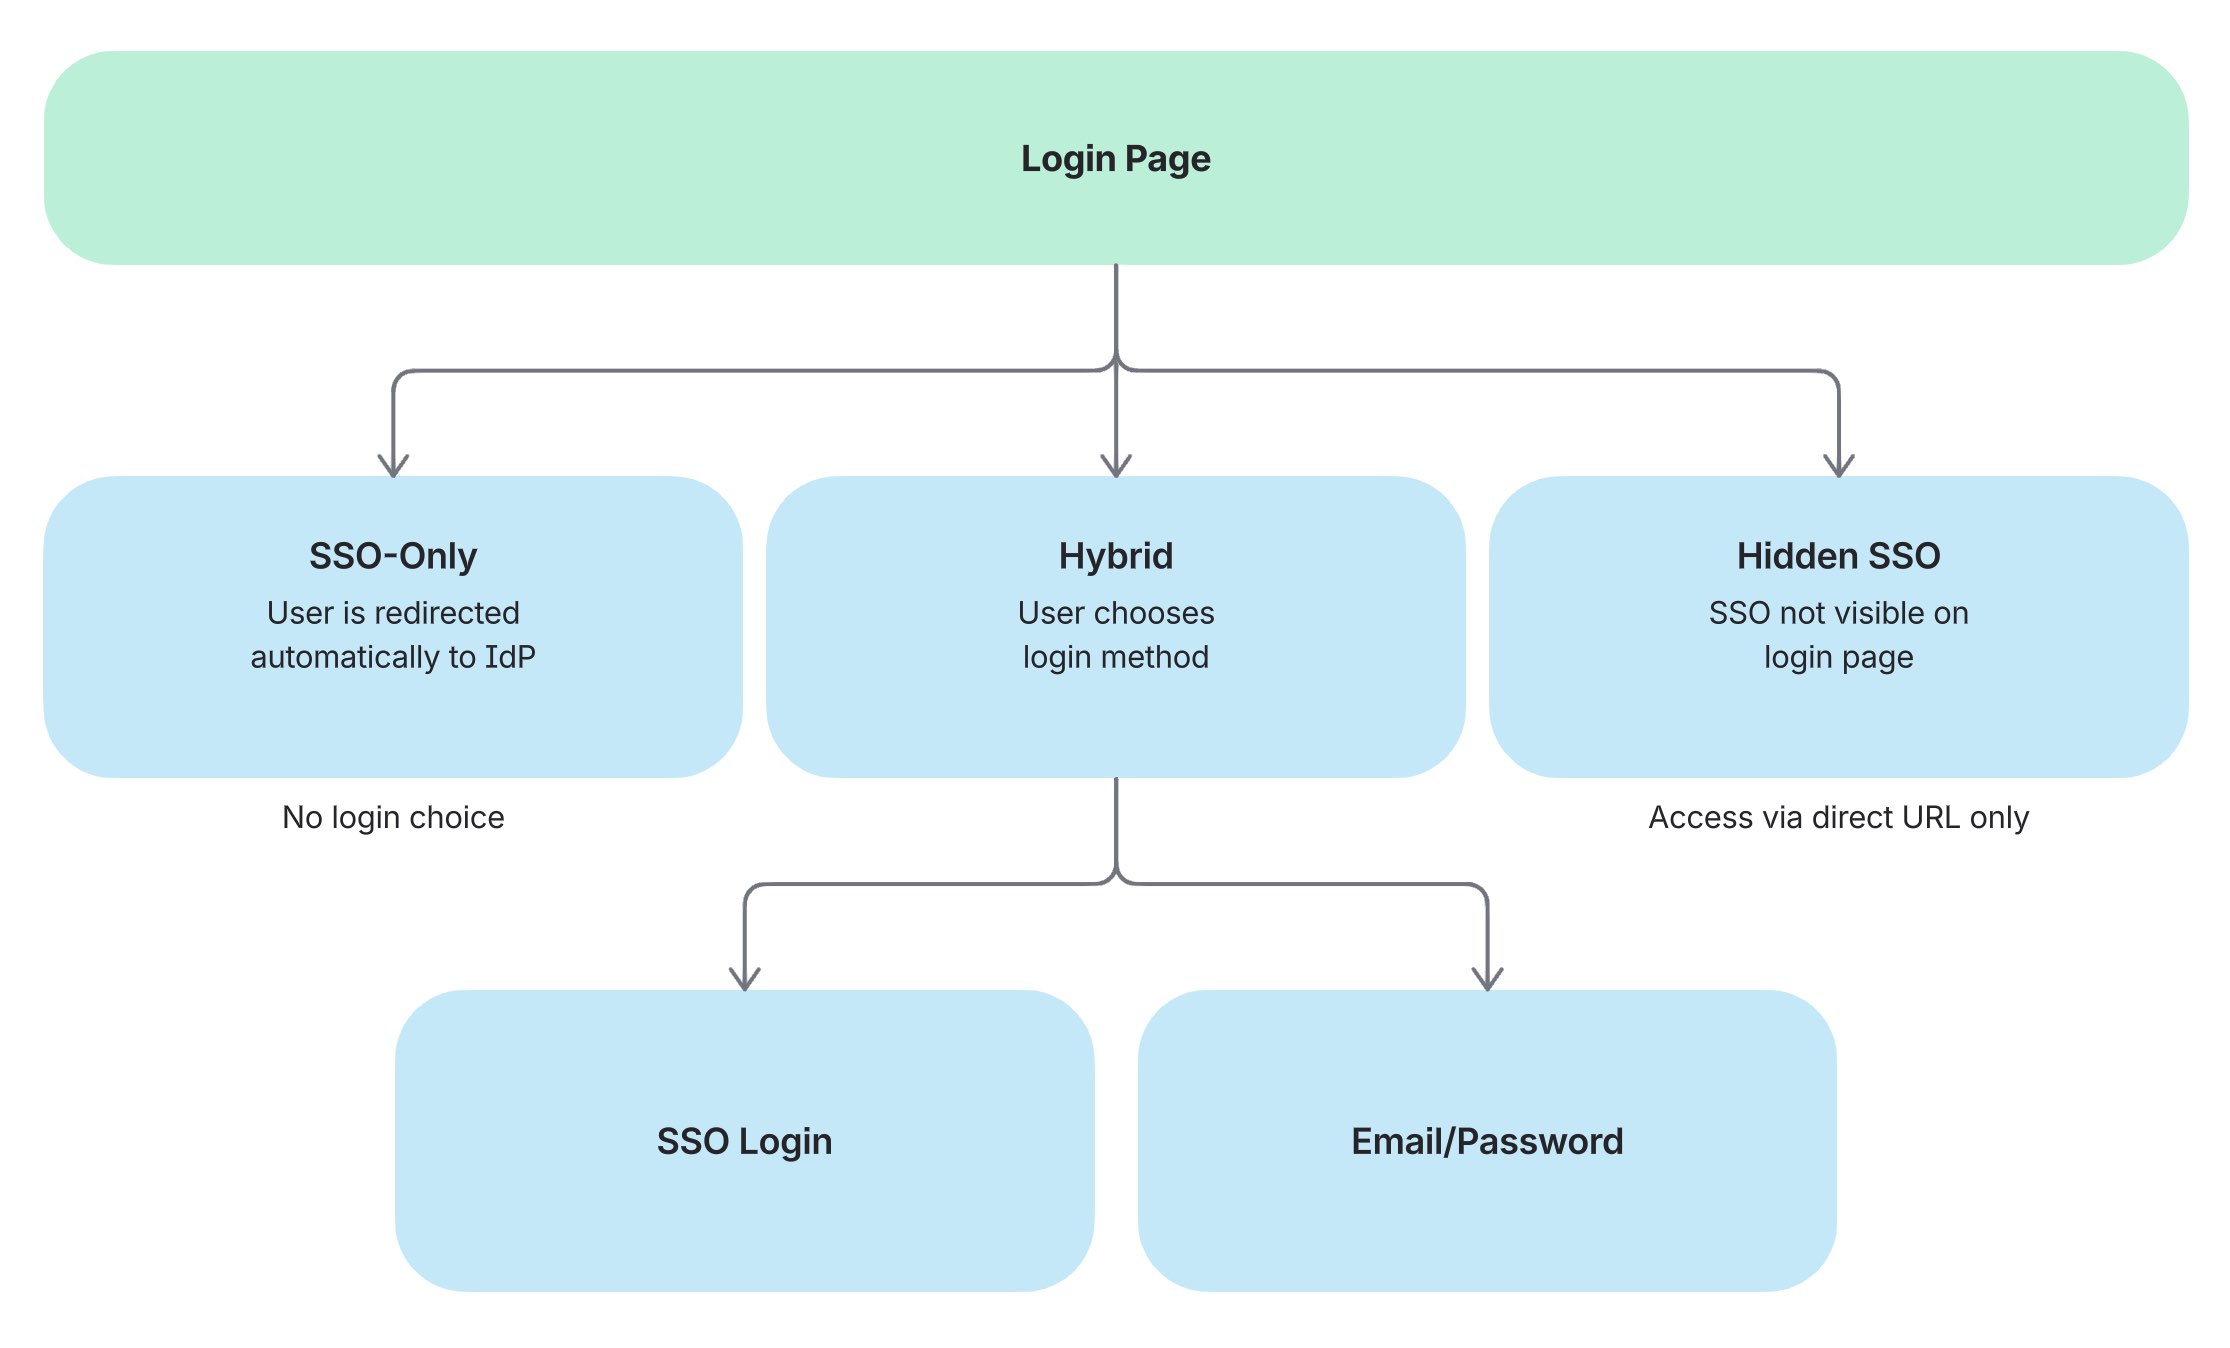
Login Experience Scenarios
Depending on how OpenID Connect and login settings are configured, different authentication experiences can be created in Eurekos. These configurations allow organizations to align login behavior with their user base, security requirements, and operational model.
| Scenario | Typical Use Case | Key Characteristics |
|---|---|---|
| SSO-only environment All users authenticate exclusively through the Identity Provider. The login process is fully centralized and controlled externally | Internal platforms where all users belong to the same organization and are managed in a central identity system (e.g. employees via Azure AD or a centralized partner portal) |
|
| Hybrid environment Both SSO and local login are available, allowing different user groups to authenticate using different methods | Platforms with mixed audiences, such as internal employees and external partners, customers, or learners |
|
| Hidden SSO SSO is enabled but not visible on the standard login screen. Access is provided through a direct login URL | Controlled access scenarios (funnels), also pilot groups, specific clients, or staged rollouts. Is sometimes used in combination with other scenarios |
|
How To Choose the Right Approach
The appropriate setup depends on your organizational context:
- Use SSO-only when all users are managed centrally and security policies must be enforced consistently
- Use Hybrid when supporting multiple user types with different identity sources
- Use Hidden SSO for controlled rollouts, testing, or segmented access strategies
💡 In practice, many organizations begin with a hybrid or hidden setup during implementation and transition to an SSO-only model once fully validated.
Existing Users, Login Behavior, and Transition to SSO
When OpenID Connect is introduced in an existing Eurekos environment, users may already have accounts created through email/password or manual administration.
Eurekos is designed to support a seamless transition to SSO without creating duplicate users or requiring manual migration.
Existing User Handling
When a user logs in via the Identity Provider for the first time:
- Eurekos attempts to match the incoming identity with an existing account
- Matching is typically based on a unique identifier, most commonly the email address (or another configured identifier)
- If a match is found, the existing account is reused and linked to the Identity Provider
This ensures that users retain:
- Learning history
- Enrollments and progress
- Roles and permissions
No data is lost, and no duplicate accounts are created.
Login Behavior After SSO Is Introduced
Authentication behavior depends on how login options are configured.
If “Use regular login” is enabled:
- Users can log in using both SSO and email/password
- Users who authenticate via SSO may need to reset their password before using email/password login, as SSO accounts are assigned a system-generated password
If disabled:
- Users are expected to log in exclusively via SSO
- Authentication is fully delegated to the Identity Provider
What This Means In Practice
Organizations can introduce SSO gradually without disrupting existing users.
For example:
An organization enables SSO after months of platform usage. Existing users log in via SSO, their accounts are automatically recognized, and their data remains intact—while authentication shifts to the Identity Provider.
OpenID Connect enables a controlled transition from locally managed users to centrally managed identities, without requiring data migration or changes to existing user accounts.
User Provisioning and Profile Mapping
One of the most important aspects of the integration is how user data is transferred, interpreted, and structured within Eurekos. When a user logs in via OpenID Connect, Eurekos receives a set of attributes (claims) from the Identity Provider.
These attributes must be mapped to the corresponding user profile fields in Eurekos to ensure that users are created correctly and that their data is usable for reporting, grouping, and access control.
For example:
| Identity Provider Attribute | Eurekos Field |
|---|---|
| Email (unique identifier) | |
| given_name | First name |
| family_name | Last name |
| department | Department |
| manager | Immediate manager |
This mapping determines:
- How users are uniquely identified in the platform
- How they appear across the user interface
- How they are grouped, filtered, and reported on
- How they align with organizational structure and governance
Profile Fields and Field Identifiers
The available fields in Eurekos are detailed further through the profile form configuration, which controls both the structure of user data and how it is presented in the platform.
For a complete overview of available fields and configuration options, refer to the Profile Forms configuration article.
Each field in Eurekos has:
- A label (what users and administrators see)
- A machine name (ID), which is used for integrations and attribute mapping
Even if a field label is renamed in the interface, the underlying machine name (ID) remains unchanged and must be used when mapping attributes from the Identity Provider.
In practice, this means:
- The Identity Provider must send attributes that match the expected field IDs
- Mapping must be aligned with the technical field identifiers, not just visible labels
- Changes to field names in Eurekos do not affect integration behavior
For example:
- A field labeled “Business Unit” in the UI may still have a machine name like department
- The IdP must continue to send department for the mapping to work correctly
Successful user provisioning depends on precise alignment between Identity Provider attributes and Eurekos field identifiers. The profile form configuration defines the structure, while the integration relies on the underlying field IDs to map and maintain user data correctly
Handling Missing Data and Dynamic Structure
In real-world identity integrations, user data is not always complete or consistent. Attributes may be missing, structured differently, or introduced over time as the organization evolves.
To ensure stable provisioning, Eurekos supports both fallback handling and dynamic structure creation.
Handling Missing Or Incomplete Data
Administrators can define:
- Default values for required fields
- Fallback logic when expected attributes are missing
This ensures that users can still be created and access the platform, even when data from the Identity Provider is incomplete.
For example:
- If department is not provided → assign a default department
- If notification scheme is missing → apply platform defaults
Dynamic Data Creation
In more advanced scenarios, the Identity Provider may supply structured data that does not yet exist in Eurekos, such as new departments, organizations, or tags.
Instead of requiring manual setup:
- Eurekos can automatically create these entities during login
- Users are assigned to the newly created structure immediately
For example:
- A new department is introduced in the Identity Provider
- A user logs in with that department
- Eurekos creates and assigns the department automatically
Eurekos can adapt dynamically to identity data, allowing organizations to scale and evolve their structure without constant administrative maintenance.
Synchronization Behavior
Synchronization determines how user data evolves over time and, more importantly, which system is responsible for maintaining that data.
When integrating with an Identity Provider, organizations must decide whether Eurekos should act as a consumer of identity data or retain some level of local control over user profiles. This decision has a direct impact on governance, reporting accuracy, and administrative workload.
The two approaches can be compared as follows:
| Aspect | One-time provisioning (static) | Continuous synchronization (dynamic) |
|---|---|---|
| Data lifecycle | Data is set once during initial login | Data is updated on every login |
| Source of truth | Eurekos (after creation) | Identity Provider |
| Updates from IdP | Not reflected automatically | Always reflected on login |
| Profile editing in Eurekos | Allowed | Restricted (read-only fields) |
| Administrative control | Local control within Eurekos | Centralized control via IdP |
| Typical use case | Flexible environments where data may differ from IdP | Enterprise environments with centralized identity governance |
| Risk/limitation | Data may become outdated over time | Less flexibility for local overrides |
Practical example
Consider a user who moves from the Sales department to Marketing in the Identity Provider.
- With one-time provisioning, the user remains assigned to Sales in Eurekos unless manually updated
- With continuous synchronization, the change is applied automatically on the next login
As a result:
- Reports reflect the correct department
- Access and grouping remain aligned with the organization
- No manual updates are required
💡 Choose one-time provisioning for flexibility and local control, or continuous synchronization for consistency, scalability, and alignment with your identity system.
Configuration
Configuring OpenID Connect requires coordination between Eurekos administrators and the IT team managing the Identity Provider. The objective is not only to establish a secure connection, but also to ensure that authentication, user provisioning, and data governance behave as expected in your organization.
In practice, this means configuring both systems so that authentication works seamlessly and user data is structured correctly from the first login onward.
Step 1: Configure Identity Provider
The setup begins in your Identity Provider (e.g. Microsoft Entra ID, Okta, OneLogin), where Eurekos must be registered as an OpenID Connect application.
At this stage, you define how Eurekos is allowed to authenticate users and what identity data it will receive.
This typically involves:
- Creating an OpenID Connect application
- Defining the redirect URI (provided by Eurekos), which allows users to return to the platform after authentication
- Configuring scopes such as openid, email, and profile, which determine what identity data is shared
- Defining claims (attributes) such as email, name, department, or other organizational data
These attributes are critical, as they will later be mapped to Eurekos user profile fields. If attributes are missing or inconsistently defined, user provisioning may fail or result in incomplete profiles.
💡 In most implementations, this step is handled by IT, but it should be aligned with how user data is expected to appear and behave in Eurekos.
Step 2: Configure Identity Provider in Eurekos
Once the Identity Provider is configured, the connection is completed in Eurekos.
Navigate to Settings → Third party integrations → OpenID Connect.
Start by defining a clear name (e.g. Company SSO) and keep the provider disabled during setup to avoid exposing incomplete configurations. It can also be hidden from the login page while testing.
You will then configure the connection using:
- Client ID and Client Secret, which identify Eurekos to the Identity Provider
- Authorization, token, and user info endpoints, which define how authentication and data retrieval are handled
A critical detail is that Eurekos requires the token endpoint authentication method to use POST (credentials in body). If this does not match the Identity Provider configuration, authentication will fail even if all other settings are correct.
At this stage, you are effectively defining:
Where users authenticate, and how Eurekos retrieves their identity afterward.
Step 3: Configure Attribute Mapping and User Provisioning
With the connection established, the focus shifts to how user data is interpreted and managed.
This is the most important part of the setup, as it determines how users are created, structured, and maintained in Eurekos.
Each attribute received from the Identity Provider must be mapped to a corresponding Eurekos user field. These fields are defined in the profile form configuration and rely on underlying field IDs (machine names) rather than visible labels.
For example, even if a field is labeled “Business Unit” in the interface, the mapping must use its original identifier (e.g. department).
In real-world setups, it is also common that some attributes are missing or not consistently populated. To handle this, you can define:
- Default values for required fields
- Fallback logic to ensure users can still be created
For example:
- If no department is provided → assign a default value
- If a referenced organization does not exist → create it automatically during login
This allows Eurekos to adapt dynamically to incoming data without requiring constant manual setup.
Step 4: Define Synchronization and Login Behavior
Next, you define how user data evolves over time and how users will authenticate.
You must decide whether:
- Users should be created automatically on first login
- User data should be synchronized on every login or only once
If synchronization is enabled, Eurekos continuously reflects the Identity Provider, and profile fields become read-only. If not, Eurekos allows local control after initial provisioning.
At the same time, you define login behavior:
- If regular login is enabled, users can log in via both SSO and email/password (though SSO users may need to reset their password to use this option)
- If disabled, authentication is fully delegated to the Identity Provider
This step is particularly important in real-world scenarios such as:
- Gradual SSO rollout
- Supporting both internal and external users
- Transitioning from local accounts to centralized identity
Step 5: Configure Advanced Login Behavior
Advanced settings allow you to shape how authentication is presented to users and how Eurekos fits into your broader access and navigation flow. While the core authentication is handled by the Identity Provider, these options determine how users enter and exit that flow.
- Auto-login can be used to automatically redirect users to the Identity Provider when accessing the login page. This removes the need for users to choose a login method and creates a seamless SSO experience. It is typically used in internal environments where all users are managed centrally and no alternative login methods are required.
- Pre-login and post-logout redirects allow Eurekos to integrate into a wider ecosystem of applications. For example, users may access Eurekos from a company portal or learning hub, and after logging out, be redirected back to that environment. This helps maintain a consistent user journey across systems.
- The Identity Provider can also be hidden or selectively exposed on the login screen. This is particularly useful during phased rollouts, testing, or when supporting multiple user groups with different authentication methods. Even when hidden, the Identity Provider can still be accessed via a direct login URL.
In practice, these settings are often used to:
- Gradually introduce SSO without disrupting existing users
- Support both internal and external audiences with different login flows
- Embed Eurekos as part of a larger platform or portal experience
💡 These options do not change how authentication works, but they significantly influence how users experience it—making them especially important in implementations where user access and navigation span multiple systems.
Step 6: Test and Validate
Before enabling the integration for all users, it is essential to validate the full authentication and provisioning flow in realistic conditions. A successful OpenID Connect setup is not only about confirming that users can log in, but also about ensuring that identity data is interpreted correctly, existing accounts are handled safely, and the chosen login experience aligns with your organizational model.
As a first step, use Save and make test login to verify the technical connection. This allows you to:
- Confirm that authentication completes successfully
- Verify that the expected attributes are returned from the Identity Provider
- Inspect whether mapped values correspond correctly to Eurekos user fields
This initial test should then be followed by scenario-based validation.
6.1 Validate authentication flow
Test that the basic login flow works as intended:
- User is redirected to the Identity Provider
- Authentication succeeds
- User is returned to Eurekos without error
- Login works from the intended entry point (standard login page, direct URL, or auto-login flow)
This confirms that the application registration, redirect URI, endpoints, and client credentials are configured correctly.
6.2 Validate new user provisioning
Test with a user who does not yet exist in Eurekos.
Verify that:
- A new account is created automatically if Auto-create user is enabled
- Required fields such as email, first name, and last name are populated correctly
- Default values are applied where expected
- Related entities such as organizations, tags, or suborganizations are handled correctly
This confirms that first-time provisioning behaves as intended and that the Identity Provider is supplying the required data.
6.3 Validate existing user linking
Test with a user who already exists in Eurekos before SSO is introduced.
Verify that:
- The existing account is recognized and reused
- No duplicate account is created
- Existing progress, enrollments, and permissions remain intact
- The user can transition to SSO without disruption
This is one of the most important rollout scenarios, especially in platforms with an established user base.
6.4 Validate attribute mapping
Review all mapped fields in the resulting user profile.
Verify that:
- Each field receives the expected value from the Identity Provider
- Renamed profile fields still map correctly through their machine names
- Multi-value or structured attributes are interpreted correctly where applicable
- No fields are left blank unexpectedly
If a value is incorrect or missing, the issue is usually either:
- An attribute not being sent by the Identity Provider
- A mismatch between IdP claim name and Eurekos field mapping
6.5 Validate synchronization behavior
Test how user data behaves after the initial login.
If Synchronize user info on login is enabled, verify that:
- Profile data updates when changed in the Identity Provider
- Synchronized fields become read-only in Eurekos
- Eurekos reflects the latest organizational structure on each login
If synchronization is disabled, verify that:
- Initial data is populated correctly
- Fields remain editable locally in Eurekos
- Later changes in the Identity Provider do not overwrite local edits
This step is critical for confirming whether Eurekos or the Identity Provider is acting as the operational source of truth for user data.
6.6 Validate login behavior and visibility
Test the intended user experience on the login page.
Verify that:
- The provider is shown or hidden as expected
- Primary and secondary login methods are presented correctly
- Auto-login behavior works only where intended
- The reserve login page is available if needed for administrative fallback
This is especially important in hybrid or phased rollout models, where internal and external users may have different login paths.
6.7 Validate regular login behavior
If Use regular login is enabled, test how SSO and password login coexist.
Verify that:
- Users can still use SSO successfully
- Existing local users are not disrupted
- Users who need password login understand that they may need to reset their password after transitioning to SSO
- Password recovery and one-time login links behave as expected
This helps avoid confusion during rollout, particularly when introducing SSO into an existing platform.
6.8 Validate user lifecycle control
Test how access behaves when the user is changed in the Identity Provider.
For example:
- Disable or remove the user in the Identity Provider
- Attempt login to Eurekos again
Verify that:
- The user can no longer authenticate
- Access is effectively controlled by the Identity Provider
- No manual deactivation in Eurekos is required to block login
This confirms that the integration supports centralized access governance as intended.
6.9 Validate with multiple test users
Where relevant, test more than one user scenario, for example:
- A brand-new user
- An existing user already in Eurekos
- A user with complete profile attributes
- A user with missing or partial data
- A user in a different organization or department
This gives confidence that the integration works beyond a single ideal test case.
Recommended validation approach
For a reliable rollout:
- Test in a non-production environment first
- Start with a limited pilot group
- Validate both technical connection and real user scenarios
- Confirm behavior with both administrators and IT before wider release
A successful OpenID Connect implementation is not just about whether login works once. It should be validated as a complete identity flow, covering authentication, user creation, attribute mapping, synchronization, and access governance so that the platform behaves predictably from day one.
Validation Checklist
| Area | What to Test | Expected Outcome |
|---|---|---|
| Authentication flow | User logs in via SSO | User is redirected to IdP, authenticates successfully, and returns to Eurekos without errors |
| Redirect URI | Login roundtrip | No redirect mismatch errors; user lands correctly back in Eurekos |
| New user provisioning | First-time login (new user) | User is created automatically with correct profile data and default values applied where needed |
| Existing user linking | Login with existing Eurekos user | Existing account is reused; no duplicate user is created; data and progress remain intact |
| Attribute mapping | Review user profile after login | All mapped fields contain correct values based on IdP attributes; no unexpected empty or incorrect fields |
| Missing data handling | Login with incomplete IdP data | Default values are applied; user is still created successfully |
| Dynamic data creation | Login with new org/tag value | Missing entities (e.g. department, organization) are created automatically if configured |
| Synchronization behavior | Update user data in IdP and log in again | Data updates correctly (if sync enabled) or remains unchanged (if disabled) |
| Read-only fields | Attempt to edit synchronized fields | Fields are read-only when synchronization is enabled |
| Login experience | Login page behavior | Provider is visible/hidden as configured; primary/secondary login methods behave correctly |
| Auto-login | Access login page | User is automatically redirected to IdP (if enabled) |
| Regular login fallback | Use email/password login | Works as expected if enabled (note: SSO users may need password reset) |
| User lifecycle control | Disable user in IdP | User can no longer log in to Eurekos |
| Multiple user scenarios | Test different user types | Behavior is consistent across new users, existing users, and users with varying attribute completeness |
Use this as a final validation step before rollout to ensure that both the technical connection and real-world user scenarios behave as expected.
Standards and Security Considerations
The OpenID Connect integration in Eurekos is based on OpenID Connect (OIDC) 1.0, built on OAuth 2.0 and maintained by the OpenID Foundation. This ensures compatibility with enterprise identity providers such as Microsoft Entra ID, Okta, and OneLogin.
Standards And References
- OpenID Connect Core 1.0
- OAuth 2.0 Authorization Framework (RFC 6749)
- OpenID Connect Discovery
These standards define how authentication, token exchange, and identity data are securely handled.
Security Model In Eurekos
When using OpenID Connect:
- Authentication is handled entirely by the Identity Provider
- Eurekos does not store or validate user passwords
- Identity is verified using secure tokens (ID Tokens and Access Tokens)
- Communication follows standardized, encrypted protocols
As a result, Eurekos inherits the security policies defined in the Identity Provider, including:
- Multi-factor authentication (MFA / 2FA)
- Conditional access policies
- Identity governance controls
Access And User Lifecycle Control
Because authentication is external:
- Access to Eurekos depends entirely on the Identity Provider
- Disabling or removing a user in the Identity Provider immediately prevents login
- No manual deactivation in Eurekos is required
Eurekos becomes part of your organization’s identity and security framework, ensuring consistent access control and reducing administrative overhead.
Common Identity Provider Configurations
While OpenID Connect follows a standard, each Identity Provider has its own terminology and setup flow. The configuration in Eurekos remains the same, but how values are obtained may differ slightly depending on your provider.
Below are common patterns to help align configuration across typical enterprise setups.
Microsoft Entra ID (Azure AD)
In Microsoft Entra ID, OIDC is configured through an App Registration.
- The Client ID corresponds to the Application (client) ID
- The Client Secret is created under Certificates & secrets
- The Authorization and Token endpoints are derived from the tenant’s OpenID configuration document
- User attributes (claims) are configured under Token configuration
A typical setup includes:
- Redirect URI pointing to Eurekos
- Scopes such as openid, profile, email
- Optional claims like department, job title, or manager
💡 In many organizations, Azure AD is also used to enforce MFA and conditional access policies, which automatically apply to Eurekos when using OIDC.
Okta
In Okta, OIDC is configured by creating a Web Application integration.
- The Client ID and Secret are generated automatically
- Endpoints are available via the Okta authorization server metadata URL
- Attributes are configured using claims mapping
Typical considerations:
- Ensure correct authorization server is used (default vs custom)
- Map attributes clearly (e.g. email, given_name, family_name)
- Test using Okta’s built-in preview tools before enabling in Eurekos
OneLogin
In OneLogin, OIDC is configured through a Custom Connector or OIDC app.
- Client credentials are generated during app creation
- Endpoints are defined per application
- User attributes are mapped through parameter mapping
Common setup includes:
- Defining user attributes explicitly (e.g. email, username)
- Ensuring consistent naming between OneLogin and Eurekos
- Validating token and user info endpoints
Key Takeaways Across Providers
Although setup steps differ slightly, the integration always depends on the same core elements:
- A registered OIDC application
- Client credentials (ID + Secret)
- Standard endpoints (authorization, token, user info)
- Properly defined user attributes (claims)
The most important success factor is alignment between the Identity Provider configuration and Eurekos attribute mapping.
FAQ
-
Do users need to be created in Eurekos before using OpenID Connect?
No. If auto-create user is enabled, users are created automatically when they log in via the Identity Provider for the first time. This is known as just-in-time provisioning.
-
What happens if a user already exists in Eurekos before SSO is enabled?
Eurekos matches users based on a unique identifier (typically email). The existing account is reused and linked to the Identity Provider, ensuring no duplicate users are created and all existing data is preserved.
-
Can users still log in with email and password after SSO is enabled?
Yes, if “Use regular login” is enabled. However, users who authenticate via SSO may need to reset their password before using email/password login, as SSO accounts are assigned a system-generated password by default.
-
What happens if a user is removed from the Identity Provider?
If a user is disabled or removed in the Identity Provider, they can no longer log in to Eurekos. Access is fully controlled externally, and no manual deactivation in Eurekos is required.
-
What is the most common cause of OpenID Connect configuration issues?
The most common issue is incorrect attribute mapping. This typically occurs when:
- The Identity Provider does not send the expected attributes
- Attribute names do not match the configured mappings in Eurekos
-
What is the Redirect URI and where do I find it?
The Redirect URI is the URL where users are returned after authentication. It is provided directly in the Eurekos OpenID Connect configuration screen and must be copied exactly into the Identity Provider setup.
-
Can Eurekos handle missing user data from the Identity Provider?
Yes. Administrators can define default values and fallback logic to ensure users can still be created even if some attributes are missing. This prevents login failures and ensures consistent user profiles.
-
What is the difference between synchronization and provisioning?
- Provisioning refers to creating the user account on first login
- Synchronization refers to updating user data on subsequent logins
Synchronization can be enabled or disabled depending on whether the Identity Provider should remain the source of truth.
-
Can multiple identity providers be used at the same time?
Yes. Eurekos supports multiple OpenID Connect providers, allowing different login methods for different user groups (e.g. internal users via SSO and external users via email/password or another provider).
-
When should I use auto-login?
Auto-login is recommended when all users authenticate via a single Identity Provider, such as in internal environments. It creates a seamless experience by automatically redirecting users to SSO without requiring them to choose a login method.